жӮЁеҘҪпјҢзҷ»еҪ•еҗҺжүҚиғҪдёӢи®ўеҚ•е“ҰпјҒ
е°Ҹзј–з»ҷеӨ§е®¶еҲҶдә«дёҖдёӢNacosжҖ§иғҪжөӢиҜ•зҡ„зӨәдҫӢеҲҶжһҗпјҢзӣёдҝЎеӨ§йғЁеҲҶдәәйғҪиҝҳдёҚжҖҺд№ҲдәҶи§ЈпјҢеӣ жӯӨеҲҶдә«иҝҷзҜҮж–Үз« з»ҷеӨ§е®¶еҸӮиҖғдёҖдёӢпјҢеёҢжңӣеӨ§е®¶йҳ…иҜ»е®ҢиҝҷзҜҮж–Үз« еҗҺеӨ§жңү收иҺ·пјҢдёӢйқўи®©жҲ‘们дёҖиө·еҺ»дәҶи§ЈдёҖдёӢеҗ§пјҒ
еҹәзЎҖжһ¶жһ„йғЁйҖүжӢ©ж–°зҡ„жіЁеҶҢдёӯеҝғпјҢжөӢиҜ•з»„йңҖиҰҒй…ҚеҗҲеҜ№дёҡз•ҢжҲҗзҶҹзҡ„жіЁеҶҢдёӯеҝғдә§е“ҒеҒҡеҲҶжһҗе’ҢжҜ”иҫғгҖӮз”ұдәҺжҺҢй—Ёж•ҷиӮІйҮҮз”Ёзҡ„жҳҜжҜ”иҫғзәҜеҮҖзҡ„ Spring Cloud жҠҖжңҜж ҲпјҢжүҖд»ҘжҲ‘们йңҖиҰҒеӣҙз»•е®ғзҡ„жіЁеҶҢдёӯеҝғпјҢд»ҺжөӢиҜ•и§’еәҰпјҢиҝӣиЎҢеҠҹиғҪе’ҢжҖ§иғҪдёҠз ”з©¶гҖӮ
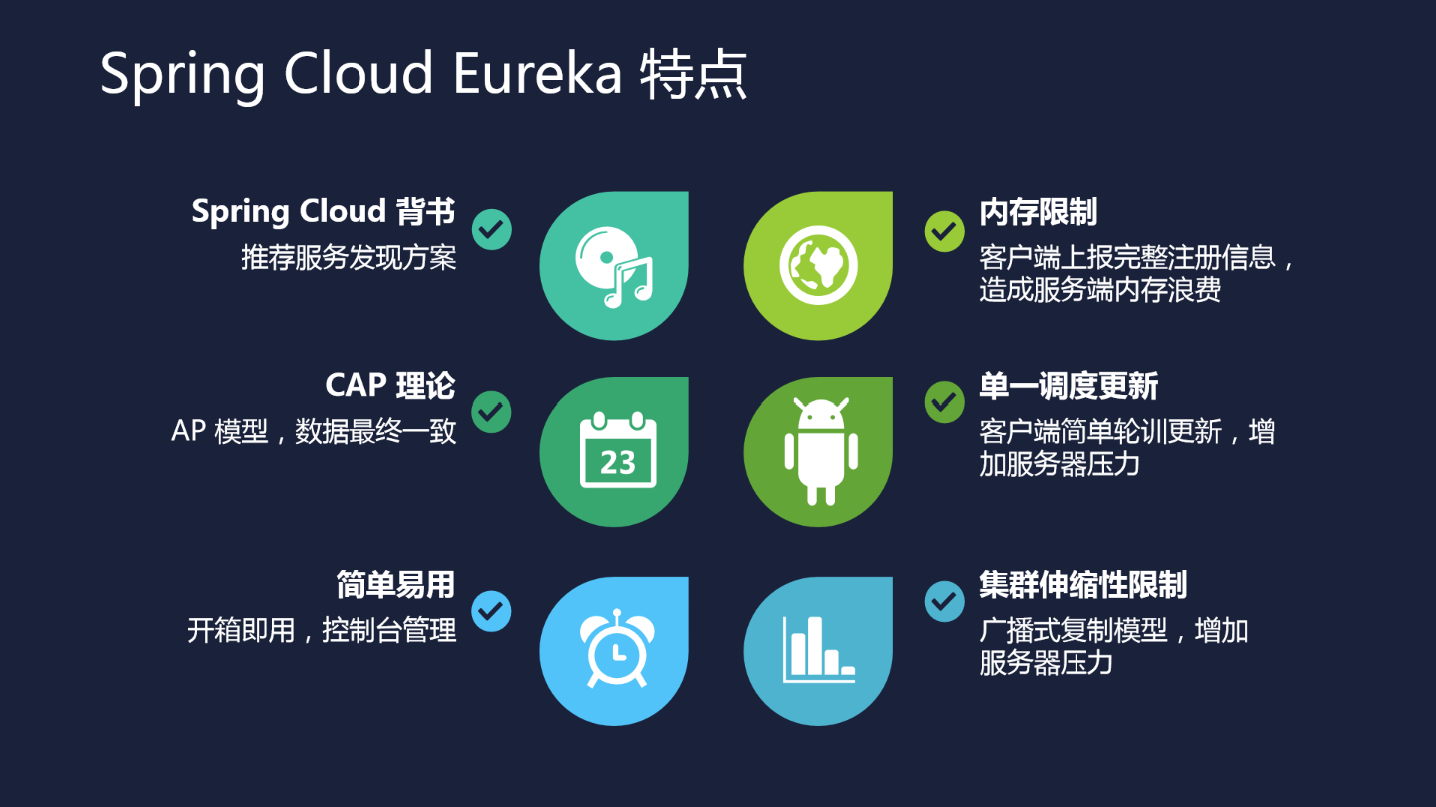
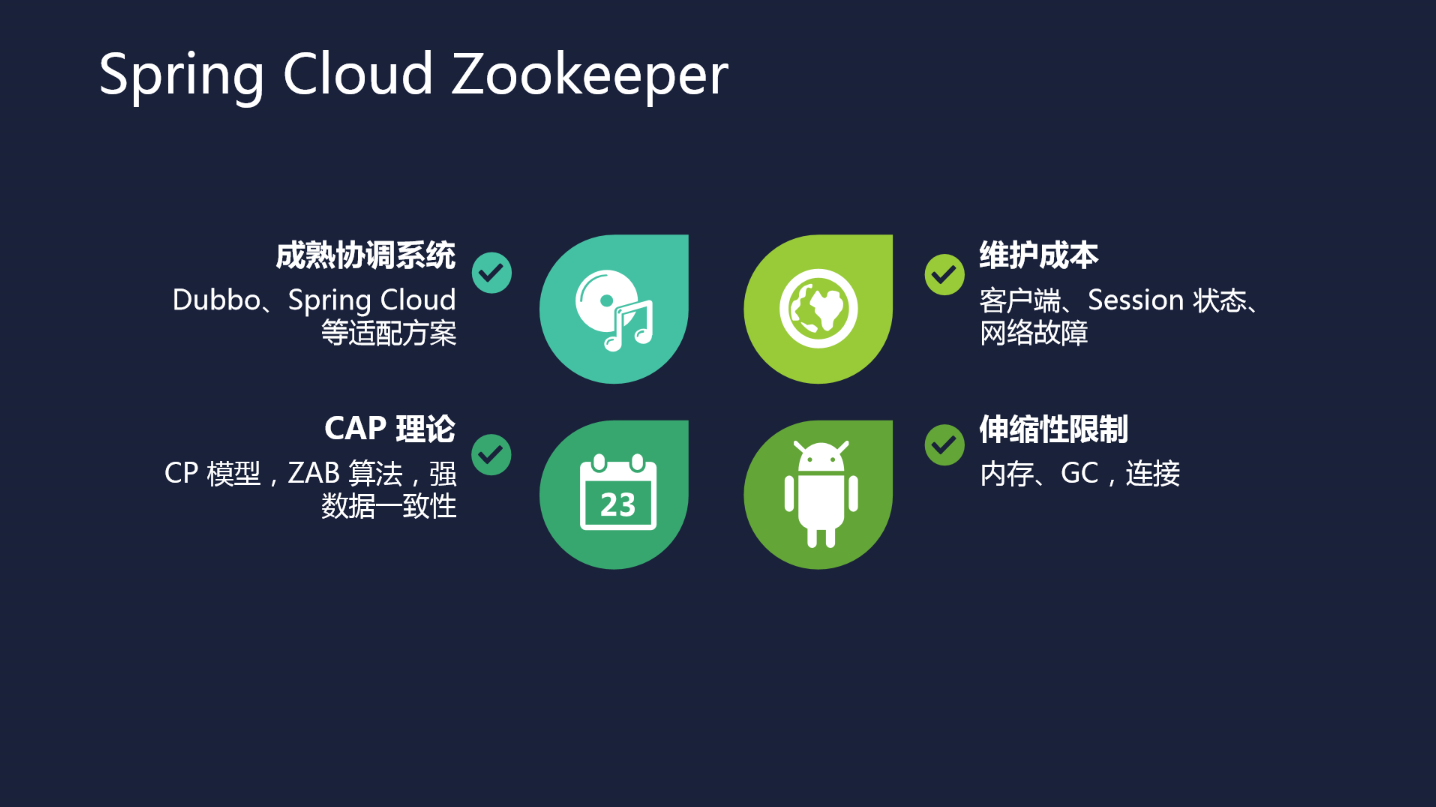
Spring Cloud жҠҖжңҜж Ҳе®ҳж–№ж”ҜжҢҒ Netflix Eureka пјҢHashiCorp Consul пјҢZookeeper дёүдёӘжіЁеҶҢдёӯеҝғпјҢе®ғ们еҸҜд»Ҙзӣёдә’й—ҙе®һзҺ°ж— зјқиҝҒ移пјҢAlibaba Nacos жҳҜж–°еҠ зӣҹ Spring Cloud жҠҖжңҜж Ҳзҡ„ж–°жҲҗе‘ҳгҖӮжөӢиҜ•з»„зҡ„еҗҢеӯҰ们еҜ№дёҠиҝ°еӣӣдёӘжіЁеҶҢдёӯеҝғеҒҡдәҶдёҖдёҖз ”з©¶е’ҢеҲҶжһҗпјҢйүҙдәҺж—¶й—ҙзҙ§иҝ«пјҢйҷӨдәҶ Eureka е’Ң Nacos д№ӢеӨ–пјҢе…¶е®ғдёӨдёӘдёӯй—ҙ件жңӘеҒҡж·ұе…Ҙзҡ„еҠҹиғҪжөӢиҜ•е’ҢжҖ§иғҪжөӢиҜ•гҖӮдёӢйқўжҸҗдҫӣжқҘиҮӘйҳҝйҮҢе·ҙе·ҙ Nacos е®ҳж–№жҹҗж¬Ўдёҡз•Ңе®Ји®Ізҡ„иө„ж–ҷжҲӘеӣҫд»ҘдҫӣеӨ§е®¶еҸӮиҖғ:
Eureka д»Ӣз»Қ
Zookeeper д»Ӣз»Қ
Consul д»Ӣз»Қ

дёҠиҝ°дёүдёӘжіЁеҶҢдёӯеҝғжҜ”иҫғ
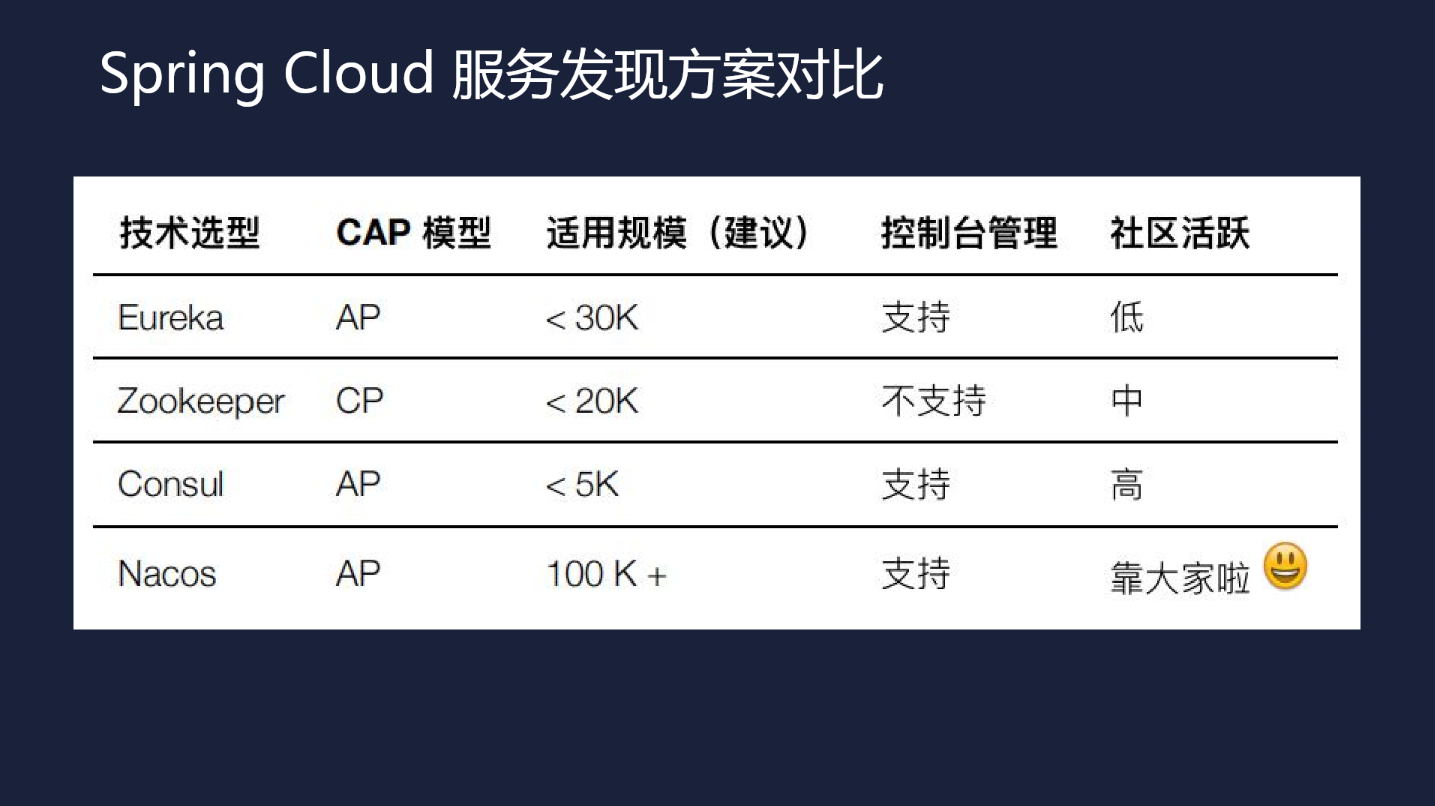
жң¬ж–Үе°Ҷеӣҙз»• Alibaba Nacos зқҖйҮҚй’ҲеҜ№е…¶еҠҹиғҪжөӢиҜ•е’ҢжҖ§иғҪжөӢиҜ•дёӨж–№йқўиҝӣиЎҢеү–жһҗе’Ңд»Ӣз»ҚгҖӮ
ејҖеҸ‘йғЁзҪІдәҶ UAT зҡ„ Nacos пјҢжөӢиҜ•дәІиҮӘеҺӢжөӢгҖӮ
ж ёеҝғи„ҡжң¬
def registry(ip):
    fo = open("service_name.txt", "r")
    str = fo.read()
    service_name_list = str.split(";")
    service_name = service_name_list[random.randint(0,len(service_name_list) - 1)]
    fo.close()
    client = nacos.NacosClient(nacos_host, namespace='')
    print(client.add_naming_instance(service_name,ip,333,"default",1.0,{'preserved.ip.delete.timeout':86400000},True,True))
    while True:
      print(client.send_heartbeat(service_name,ip,333,"default",1.0,"{}"))
time.sleep(5)еҺӢжөӢж•°жҚ®

еҺӢжөӢз»“жһңеӣҫ
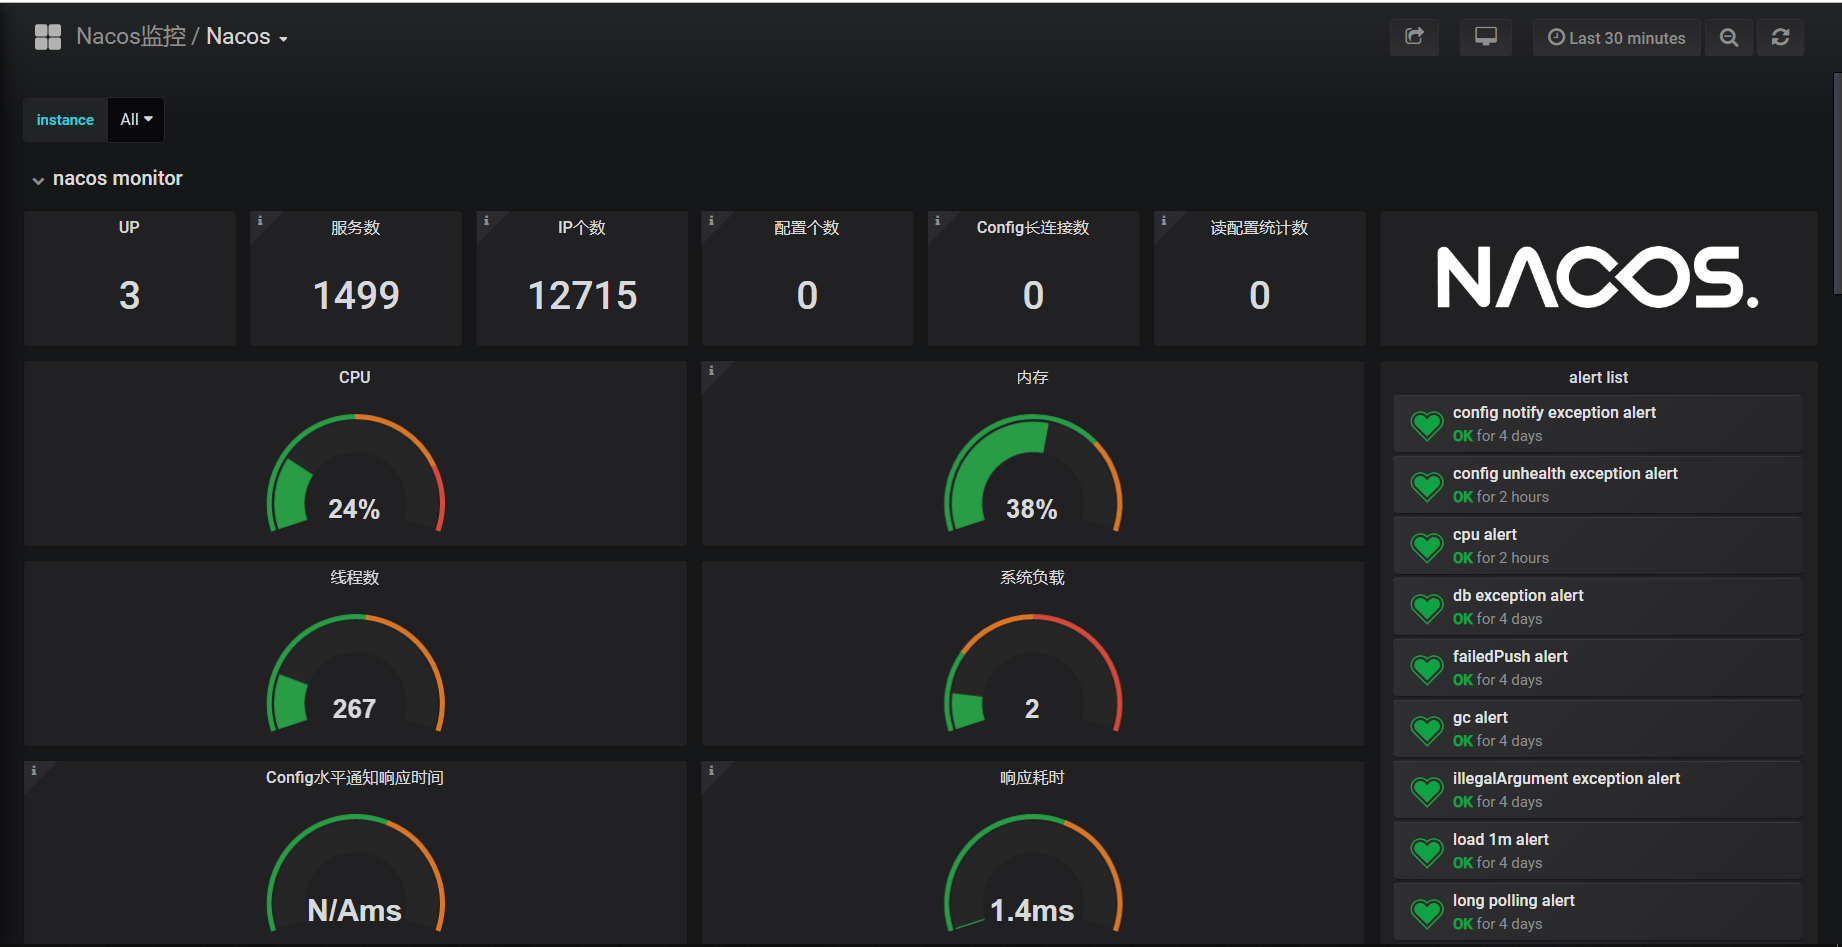
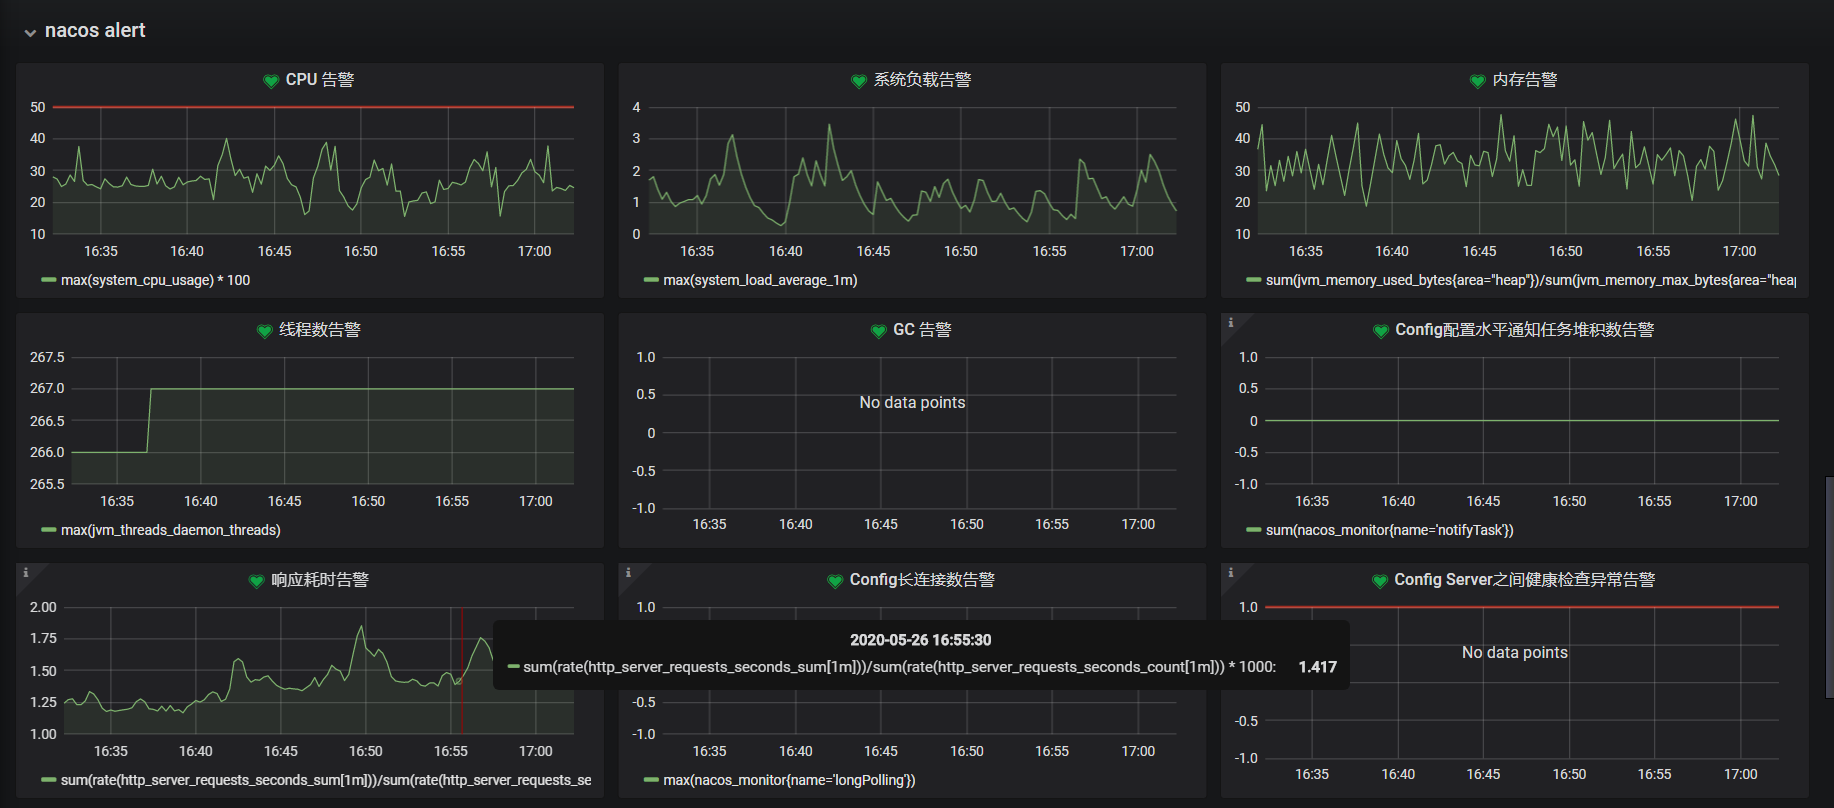
Nacos Server жҳҜ3еҸ° 1C4G йӣҶзҫӨпјҢеҗҢж—¶жүҝеҸ—1499дёӘжңҚеҠЎе’Ң12715дёӘе®һдҫӢжіЁеҶҢпјҢиҖҢдё” CPU е’ҢеҶ…еӯҳй•ҝжңҹдҝқжҢҒеңЁдёҖдёӘеҗҲйҖӮзҡ„иҢғеӣҙеҶ…пјҢжһңзңҹ Nacos жҖ§иғҪжҳҜзӣёеҪ“ OK зҡ„гҖӮ

жӣҙеӨҡжӣҙиҜҰ API иҜ·еҸӮи§Ғ Nacos е®ҳж–№ж–ҮжЎЈ: Open API жҢҮеҚ—
https://nacos.io/zh-cn/docs/open-api.html
дәӨеҸүжіЁеҶҢ
зҪ‘е…іпјҢжңҚеҠЎ A пјҢжңҚеҠЎ B еҗ„10еҸ°е®һдҫӢпјҢзҪ‘е…іжіЁеҶҢ Eureka пјҢ A жіЁеҶҢ Nacos пјҢ B жіЁеҶҢ Eureka пјҢеҗҢжӯҘжӯЈеёёпјҢеҸҜи°ғз”ЁгҖӮ
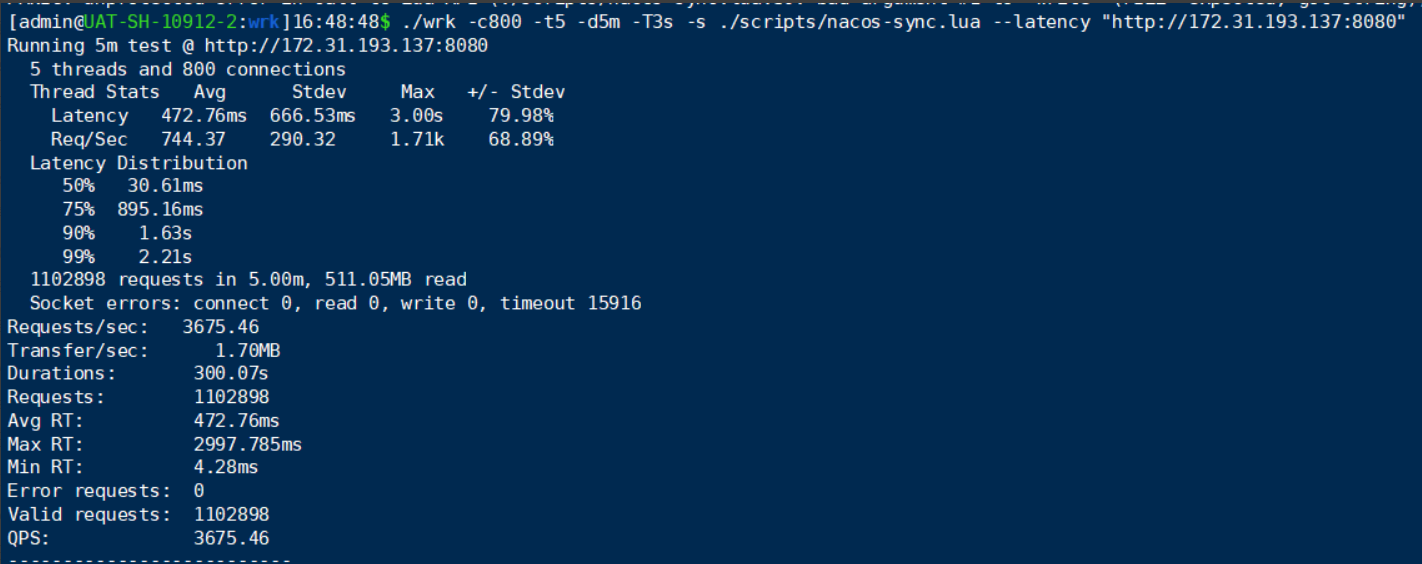
еҺӢеҠӣжөӢиҜ•
иҜ·жұӮеӨ§дәҺ100дёҮж¬ЎпјҢжҹҘзңӢ Sync Server дјҡдёҚдјҡеҸ—еҲ°еҪұе“ҚпјҢз»“жһң ErrorRequest = 0пјҢеҗҢжӯҘжңҚеҠЎж•°е’Ңе®һдҫӢж•°жІЎжңүеҸҳеҢ–гҖӮ
жңүж— жҚҹи°ғз”Ё
зҪ‘е…і Sync Server жҢӮжҺүпјҢзҪ‘е…іжңҚеҠЎ Eureka еҗҢжӯҘ Nacos еӨұиҙҘпјҢдёҚеҪұе“ҚзҪ‘е…і -> A -> B и°ғз”ЁгҖӮ
иҮӘеҠЁеҲӣе»әеҗҢжӯҘ
еҸ‘еёғзі»з»ҹ第дёҖж¬ЎеҸ‘еёғеә”з”ЁеҲ° Eureka / Nacos пјҢдјҡиҮӘеҠЁеҲӣе»ә Eureka -> Nacos зҡ„еҗҢжӯҘд»»еҠЎжҲ– Nacos -> Eureka зҡ„еҗҢжӯҘд»»еҠЎ

еҮҸе°‘ Sync Server
Sync Server 4C8G пјҢеҒңжӯўжңәеҷЁпјҢйҖҗеҸ°йҖ’еҮҸпјҢз»“и®әпјҡе№іеқҮ1еҸ° 4C8G жңәеҷЁжңҖеӨ§еҸҜеҗҢжӯҘ100дёӘжңҚеҠЎгҖӮ
еўһеҠ Sync Server
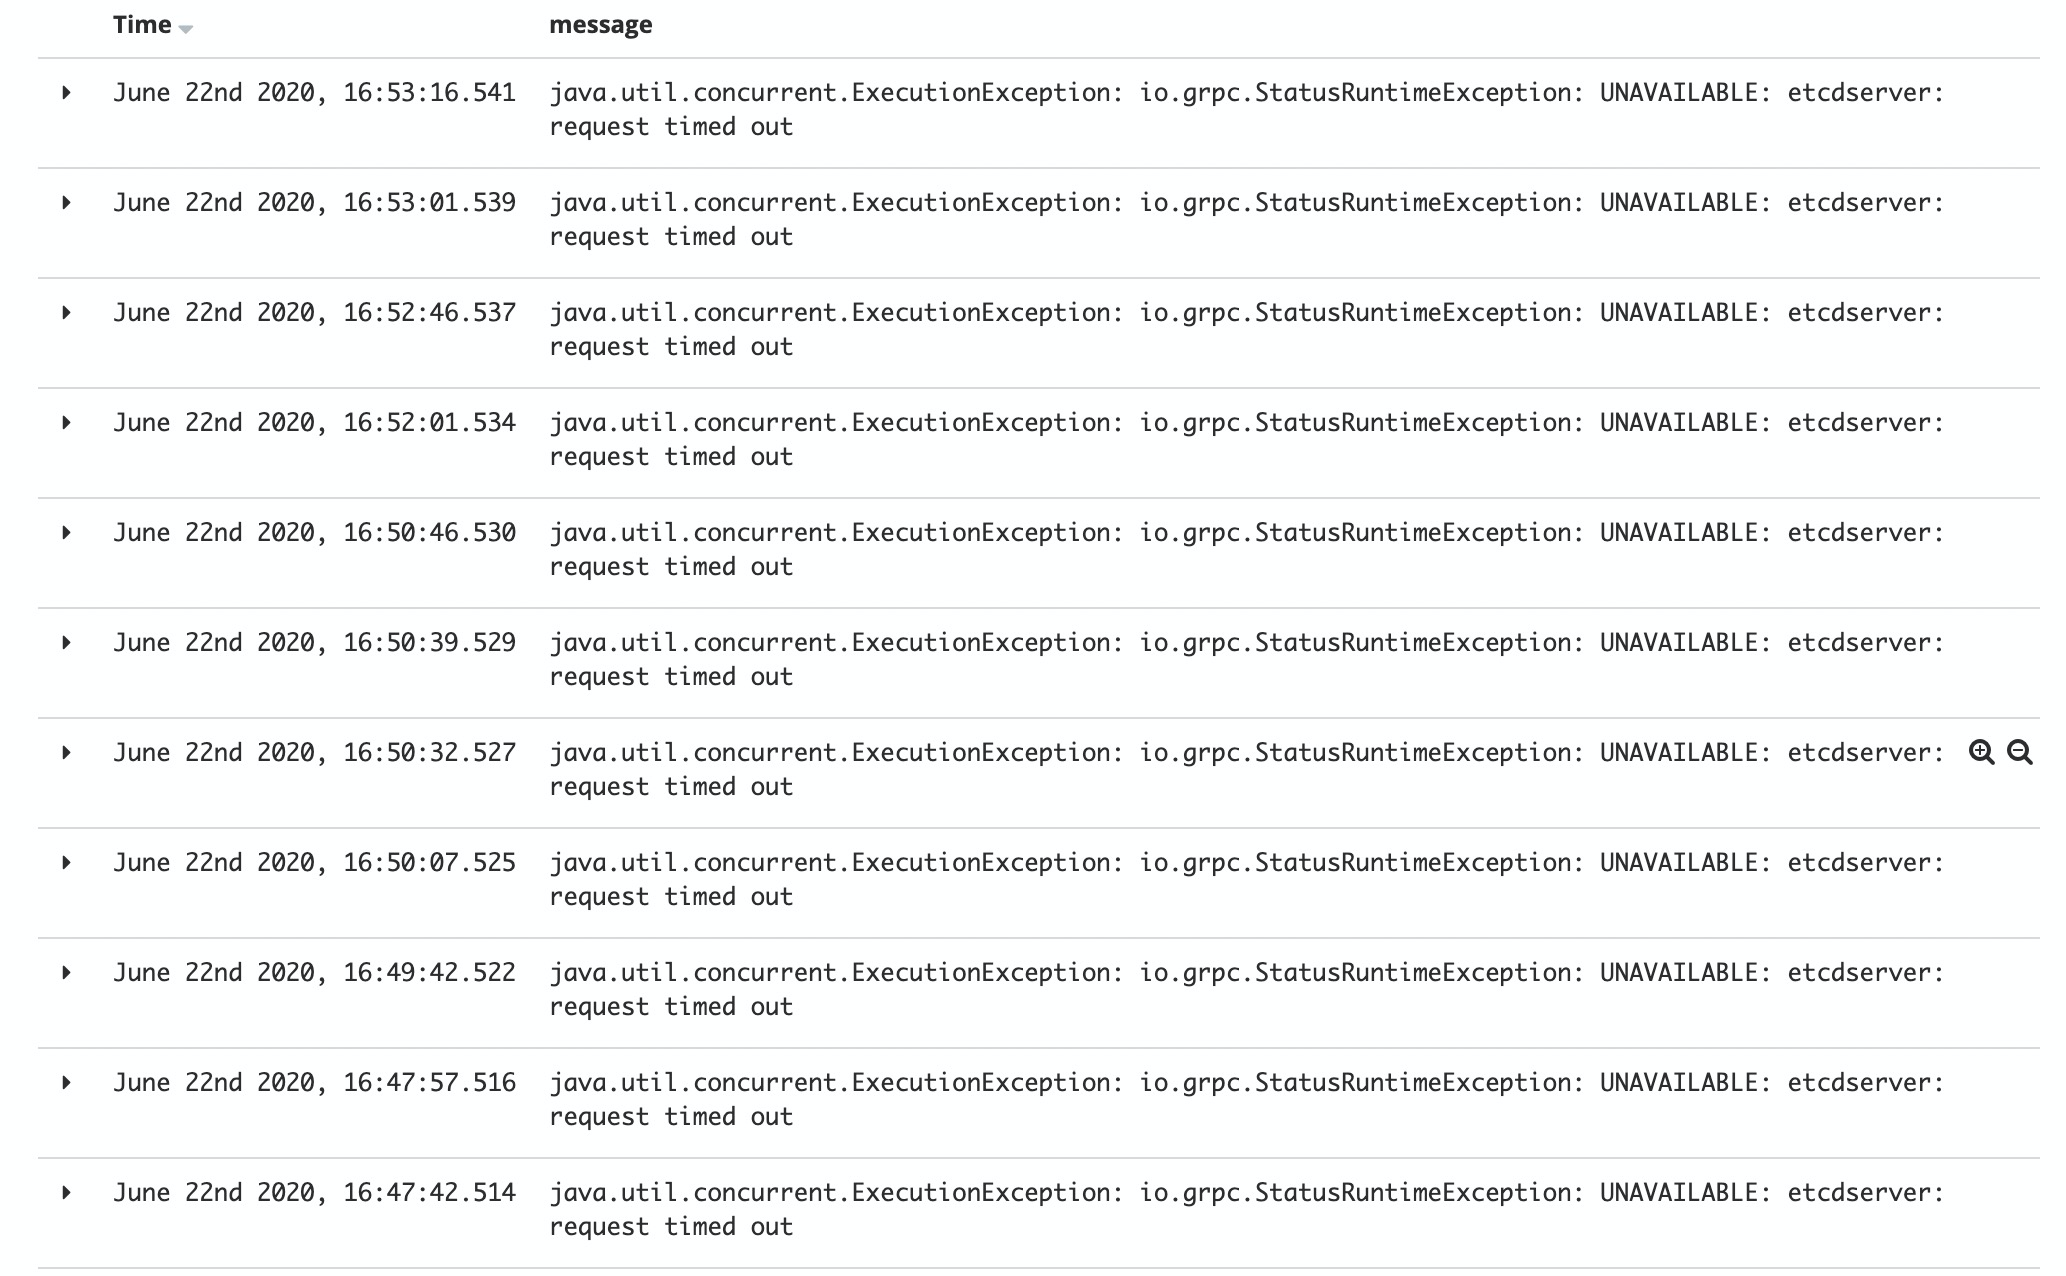
2еҸ° Etcd иҠӮзӮ№пјҢеҒңжңәдёҖеҸ°пјҢEtcd иҜ»еҸ–и¶…ж—¶пјҢз»“и®әпјҡ600дёӘжңҚеҠЎиҮіе°‘2еҸ° Etcd иҠӮзӮ№пјҢиҝҷйҮҢйҮҚзӮ№ејәи°ғпјҢж–°еўһжңҚеҠЎж—¶пјҢ Hash з®—жі•иҷҡжӢҹиҠӮзӮ№ж•°пјҢеҠЎеҝ…е’ҢеҺҹжңүзҡ„дҝқжҢҒдёҖиҮҙпјҢдёҚ然дјҡеҮәзҺ°еҗҢжӯҘеӨұиҙҘпјҢеҪұе“Қи·ЁжіЁеҶҢдёӯеҝғи°ғз”ЁгҖӮ
йҮҚеҗҜ Sync Server
еўһеҠ Sync Server дёӘж•°пјҢйҮҚеҗҜ Sync Server пјҢеҗ„иҠӮзӮ№еҗҢжӯҘж•°йҮҚж–°и®Ўз®—дё”еқҮиЎЎгҖӮ
Nacos Client з•ҢйқўйҮҚзӮ№жөӢиҜ•йӣҶзҫӨз®ЎзҗҶпјҢжңҚеҠЎеҲ—иЎЁе’ҢжқғйҷҗжҺ§еҲ¶гҖӮ
Nacos Server йҮҚеҗҜеҗҺпјҢйӣҶзҫӨз®ЎзҗҶз•ҢйқўжӯЈеёёеұ•зӨә3еҸ°йӣҶзҫӨиҠӮзӮ№ IP гҖӮ
жңҚеҠЎжіЁеҶҢ Nacos Server еҗҺпјҢжңҚеҠЎеҲ—иЎЁж–°еўһжіЁеҶҢдёҠеҺ»зҡ„жңҚеҠЎеҗҚе’Ңе®һдҫӢдёӘж•°пјҢиҖҢдё”еҸҜжҹҘзңӢиҜҰжғ…гҖӮ

жңҚеҠЎдёҠдёӢзәҝж“ҚдҪңпјҢеҒҘеә·зҠ¶жҖҒе’Ңе…ғж•°жҚ®зӯүеұ•зӨәжӯЈеёёгҖӮ
зј–иҫ‘пјҢеҲ йҷӨзӯүж“ҚдҪңеҸӘжңүе…·еӨҮ Admin жқғйҷҗзҡ„дәәе‘ҳжүҚеҸҜж“ҚдҪңгҖӮ
иҮӘеҠЁеҢ–жөӢиҜ•й“ҫи·Ҝ
е…Ёй“ҫи·ҜжөӢиҜ•и·Ҝеҫ„
APIзҪ‘е…і -> жңҚеҠЎAпјҲдёӨдёӘе®һдҫӢпјү -> жңҚеҠЎBпјҲдёӨдёӘе®һдҫӢпјү
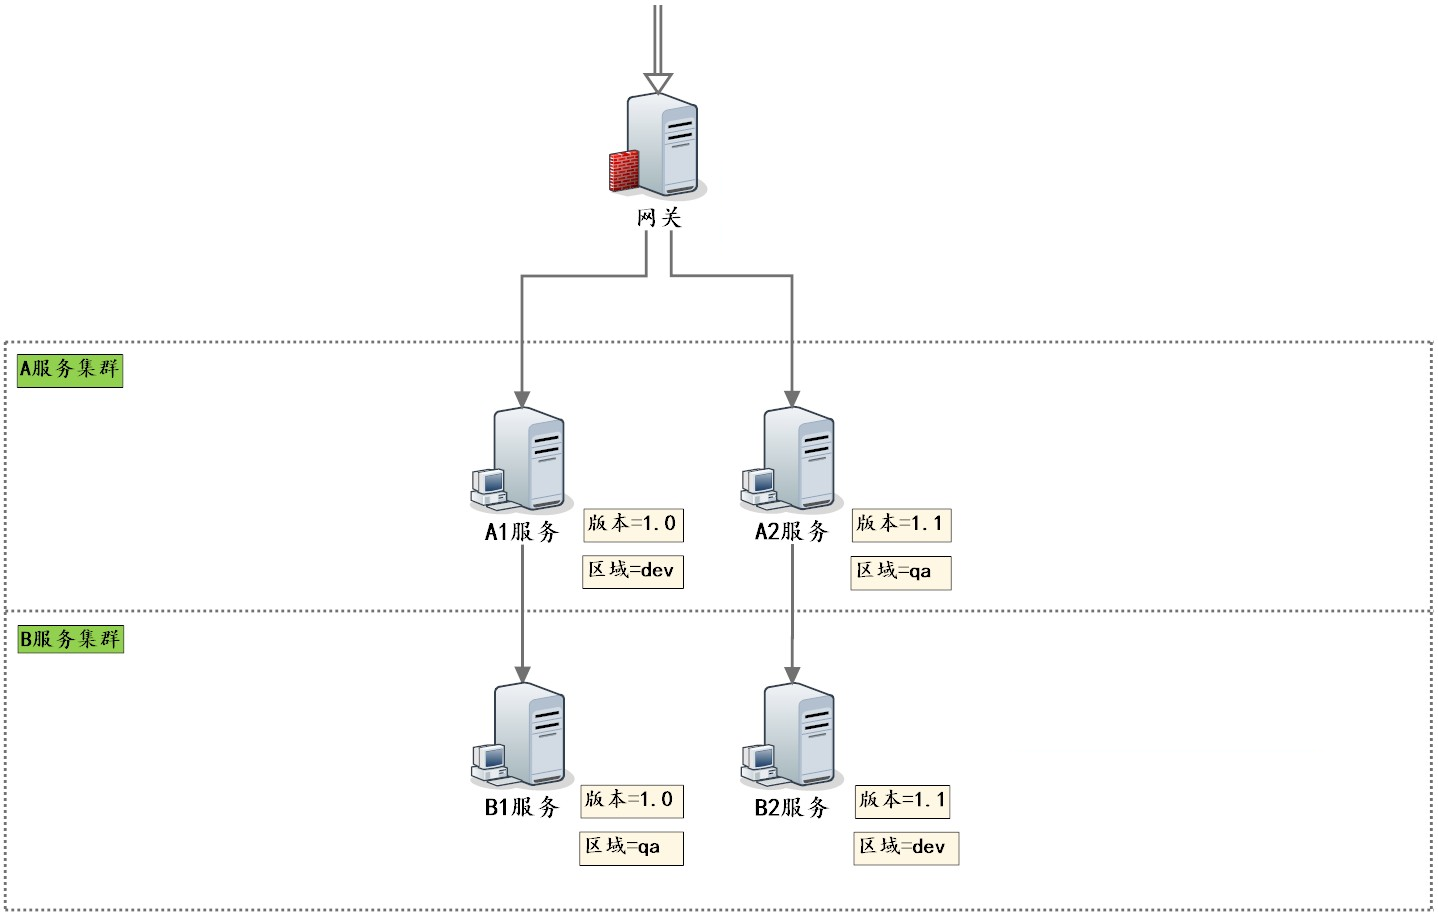
е…Ёй“ҫи·ҜжңҚеҠЎйғЁзҪІ

иҮӘеҠЁеҢ–жөӢиҜ•е…ҘеҸЈ
з»“еҗҲ Spring Boot Junit пјҢ TestApplication.class дёәжөӢиҜ•жЎҶжһ¶еҶ…зҪ®еә”з”ЁеҗҜеҠЁзЁӢеәҸпјҢ MyTestConfiguration з”ЁдәҺеҲқе§ӢеҢ–жүҖжңүжөӢиҜ•з”ЁдҫӢзұ»гҖӮеңЁжөӢиҜ•ж–№жі•дёҠйқўеҠ е…Ҙ JUnit зҡ„ @TestжіЁи§Ј
@RunWith(SpringRunner.class)
@SpringBootTest(classes = { TestApplication.class, MyTestConfiguration.class }, webEnvironment = SpringBootTest.WebEnvironment.RANDOM_PORT)
public class MyTest {
    @Autowired
    private MyTestCases myTestCases;

    private static long startTime;

    @BeforeClass
    public static void beforeTest() {
        startTime = System.currentTimeMillis();
    }

    @AfterClass
    public static void afterTest() {
        LOG.info("* Finished automation test in {} seconds", (System.currentTimeMillis() - startTime) / 1000);
    }

    @Test
    public void testNoGray() throws Exception {
        myTestCases.testNoGray(gatewayTestUrl);
        myTestCases.testNoGray(zuulTestUrl);
    }

    @Test
    public void testVersionStrategyGray() throws Exception {
        myTestCases.testVersionStrategyGray1(gatewayGroup, gatewayServiceId, gatewayTestUrl);
        myTestCases.testVersionStrategyGray1(zuulGroup, zuulServiceId, zuulTestUrl);
    }
}
@Configuration
public class MyTestConfiguration {
@Bean
public MyTestCases myTestCases() {
return new MyTestCases();
}
}еҹәдәҺ Nacos Client зҡ„жҷ®йҖҡи°ғз”ЁиҮӘеҠЁеҢ–жөӢиҜ•
еңЁжөӢиҜ•ж–№жі•дёҠйқўеўһеҠ жіЁи§Ј @DTest пјҢйҖҡиҝҮж–ӯиЁҖ Assert жқҘеҲӨж–ӯжөӢиҜ•з»“жһңгҖӮжіЁи§Ј @DTest еҶ…е®№еҰӮдёӢпјҡ
@Target({ ElementType.METHOD, ElementType.TYPE })
@Retention(RetentionPolicy.RUNTIME)
@Inherited
@Documented
public @interface DTest {

}д»Јз ҒеҰӮдёӢпјҡ
public class MyTestCases {
    @Autowired
    private TestRestTemplate testRestTemplate;

    @DTest
    public void testNoGray(String testUrl) {
        int noRepeatCount = 0;
        List<String> resultList = new ArrayList<String>();
        for (int i = 0; i < 4; i++) {
            String result = testRestTemplate.getForEntity(testUrl, String.class).getBody();

            LOG.info("Result{} : {}", i + 1, result);

            if (!resultList.contains(result)) {
                noRepeatCount++;
            }
            resultList.add(result);
        }

        Assert.assertEquals(noRepeatCount, 4);
    }
}еҹәдәҺ Nacos Client зҡ„зҒ°еәҰи“қз»ҝи°ғз”ЁиҮӘеҠЁеҢ–жөӢиҜ•
еңЁжөӢиҜ•ж–№жі•дёҠйқўеўһеҠ жіЁи§Ј @DTestConfig пјҢйҖҡиҝҮж–ӯиЁҖ Assert жқҘеҲӨж–ӯжөӢиҜ•з»“жһңгҖӮжіЁи§Ј DTestConfig жіЁи§ЈеҶ…е®№еҰӮдёӢпјҡ
@Target({ ElementType.METHOD, ElementType.TYPE })
@Retention(RetentionPolicy.RUNTIME)
@Inherited
@Documented
public @interface DTestConfig {
// з»„еҗҚ
String group();
// жңҚеҠЎеҗҚ
String serviceId();
// з»„еҗҚ-жңҚеҠЎеҗҚз»„еҗҲй”®еҖјзҡ„еүҚзјҖ
String prefix() default StringUtils.EMPTY;
// з»„еҗҚ-жңҚеҠЎеҗҚз»„еҗҲй”®еҖјзҡ„еҗҺзјҖ
String suffix() default StringUtils.EMPTY;
// жү§иЎҢй…ҚзҪ®зҡ„ж–Ү件и·Ҝеҫ„гҖӮжөӢиҜ•з”ЁдҫӢиҝҗиЎҢеүҚпјҢдјҡжҠҠиҜҘж–Ү件йҮҢзҡ„еҶ…е®№жҺЁйҖҒеҲ°иҝңзЁӢй…ҚзҪ®дёӯеҝғжҲ–иҖ…жңҚеҠЎ
String executePath();
// йҮҚзҪ®й…ҚзҪ®зҡ„ж–Ү件и·Ҝеҫ„гҖӮжөӢиҜ•з”ЁдҫӢиҝҗиЎҢеҗҺпјҢдјҡжҠҠиҜҘж–Ү件йҮҢзҡ„еҶ…е®№жҺЁйҖҒеҲ°иҝңзЁӢй…ҚзҪ®дёӯеҝғжҲ–иҖ…жңҚеҠЎгҖӮиҜҘж–Ү件еҶ…е®№жҳҜжңҖеҲқзҡ„й»ҳи®Өй…ҚзҪ®
// еҰӮжһңиҜҘжіЁи§ЈеұһжҖ§дёәз©әпјҢеҲҷзӣҙжҺҘеҲ йҷӨд»Һй…ҚзҪ®дёӯеҝғеҲ йҷӨз»„еҗҚ-жңҚеҠЎеҗҚз»„еҗҲй”®еҖј
String resetPath() default StringUtils.EMPTY;
}д»Јз ҒеҰӮдёӢпјҡ
public class MyTestCases {
    @Autowired
    private TestRestTemplate testRestTemplate;

    @DTestConfig(group = "#group", serviceId = "#serviceId", executePath = "gray-strategy-version.xml", resetPath = "gray-default.xml")
    public void testVersionStrategyGray(String group, String serviceId, String testUrl) {
        for (int i = 0; i < 4; i++) {
            String result = testRestTemplate.getForEntity(testUrl, String.class).getBody();

            LOG.info("Result{} : {}", i + 1, result);

            int index = result.indexOf("[V=1.0]");
            int lastIndex = result.lastIndexOf("[V=1.0]");

            Assert.assertNotEquals(index, -1);
            Assert.assertNotEquals(lastIndex, -1);
            Assert.assertNotEquals(index, lastIndex);
        }
    }
}еҲқе§Ӣй»ҳи®Өж— зҒ°еәҰи“қз»ҝзҡ„й…ҚзҪ®ж–Ү件 gray-default.xml
<?xml version="1.0" encoding="UTF-8"?>
<rule>

</rule>
зҒ°еәҰи“қз»ҝз”ҹж•Ҳзҡ„й…ҚзҪ®ж–Ү件 gray-strategy-version.xml
<?xml version="1.0" encoding="UTF-8"?>
<rule>
    <strategy>
        <version>1.0</version>
    </strategy>
</rule>
еҹәдәҺ Nacos Client зҡ„иҮӘеҠЁеҢ–жөӢиҜ•жҠҘе‘Ҡж ·дҫӢ
---------- Run automation testcase :: testStrategyCustomizationGray() ----------
Header : [a:"1", b:"2"]
Result1 : zuul -> solar-service-a[192.168.0.107:3002][V=1.1][R=qa][G=solar-group] -> solar-service-b[192.168.0.107:4002][V=1.1][R=dev][G=solar-group]
Result2 : zuul -> solar-service-a[192.168.0.107:3002][V=1.1][R=qa][G=solar-group] -> solar-service-b[192.168.0.107:4002][V=1.1][R=dev][G=solar-group]
Result3 : zuul -> solar-service-a[192.168.0.107:3002][V=1.1][R=qa][G=solar-group] -> solar-service-b[192.168.0.107:4002][V=1.1][R=dev][G=solar-group]
Result4 : zuul -> solar-service-a[192.168.0.107:3002][V=1.1][R=qa][G=solar-group] -> solar-service-b[192.168.0.107:4002][V=1.1][R=dev][G=solar-group]
* Passed
---------- Run automation testcase :: testVersionRuleGray() ----------
Result1 : zuul -> solar-service-a[192.168.0.107:3002][V=1.1][R=qa][G=solar-group] -> solar-service-b[192.168.0.107:4002][V=1.1][R=dev][G=solar-group]
Result2 : zuul -> solar-service-a[192.168.0.107:3001][V=1.0][R=dev][G=solar-group] -> solar-service-b[192.168.0.107:4001][V=1.0][R=qa][G=solar-group]
Result3 : zuul -> solar-service-a[192.168.0.107:3002][V=1.1][R=qa][G=solar-group] -> solar-service-b[192.168.0.107:4002][V=1.1][R=dev][G=solar-group]
Result4 : zuul -> solar-service-a[192.168.0.107:3001][V=1.0][R=dev][G=solar-group] -> solar-service-b[192.168.0.107:4001][V=1.0][R=qa][G=solar-group]
* Passed
Nacos дёҚд»…жҖ§иғҪеҘҪпјҢиҖҢдё”з•Ңйқўз®ҖжҙҒпјҢиҝҷж ·зҡ„жіЁеҶҢдёӯеҝғдҪ еҖјеҫ—жӢҘжңүгҖӮ
д»ҘдёҠжҳҜвҖңNacosжҖ§иғҪжөӢиҜ•зҡ„зӨәдҫӢеҲҶжһҗвҖқиҝҷзҜҮж–Үз« зҡ„жүҖжңүеҶ…е®№пјҢж„ҹи°ўеҗ„дҪҚзҡ„йҳ…иҜ»пјҒзӣёдҝЎеӨ§е®¶йғҪжңүдәҶдёҖе®ҡзҡ„дәҶи§ЈпјҢеёҢжңӣеҲҶдә«зҡ„еҶ…е®№еҜ№еӨ§е®¶жңүжүҖеё®еҠ©пјҢеҰӮжһңиҝҳжғіеӯҰд№ жӣҙеӨҡзҹҘиҜҶпјҢж¬ўиҝҺе…іжіЁдәҝйҖҹдә‘иЎҢдёҡиө„и®Ҝйў‘йҒ“пјҒ
е…ҚиҙЈеЈ°жҳҺпјҡжң¬з«ҷеҸ‘еёғзҡ„еҶ…е®№пјҲеӣҫзүҮгҖҒи§Ҷйў‘е’Ңж–Үеӯ—пјүд»ҘеҺҹеҲӣгҖҒиҪ¬иҪҪе’ҢеҲҶдә«дёәдё»пјҢж–Үз« и§ӮзӮ№дёҚд»ЈиЎЁжң¬зҪ‘з«ҷз«ӢеңәпјҢеҰӮжһңж¶үеҸҠдҫөжқғиҜ·иҒ”зі»з«ҷй•ҝйӮ®з®ұпјҡis@yisu.comиҝӣиЎҢдёҫжҠҘпјҢ并жҸҗдҫӣзӣёе…іиҜҒжҚ®пјҢдёҖз»ҸжҹҘе®һпјҢе°Ҷз«ӢеҲ»еҲ йҷӨж¶үе«ҢдҫөжқғеҶ…е®№гҖӮ
жӮЁеҘҪпјҢзҷ»еҪ•еҗҺжүҚиғҪдёӢи®ўеҚ•е“ҰпјҒ