您好,登录后才能下订单哦!
1.安装:yum install -y git
创建目录:mkdir /data/gitroot
进入:cd /data/gitroot
初始化:git init //初始化仓库

写一个测试文件:echo -e “123\naaa\n456\nbbb” > 1.txt //创建一个新文件
添加:git add 1.txt//把1.txt添加到仓库
提交:git commit -m "add new file 1.txt" //add完了必须要commit才算真正把文件提交到git仓库里
再次更改1.txt
查看状态git status //查看当前仓库中的状态,比如是否有改动的文件

git diff 1.txt //可以对比1.txt本次修改了什么内容,相比较仓库里面的版本
版本回退
多更改几次1.txt,然后add,commit
git log//查看所有提交记录
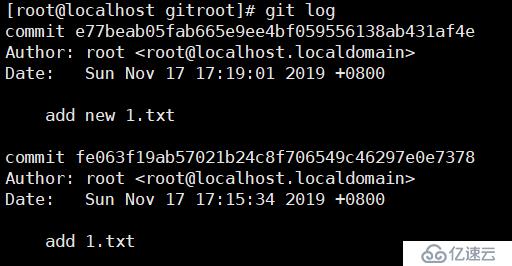
git log --pretty=oneline//一行显示

git reset --hard fe063f19ab//回退版本,其中后面跟的字符串是简写

撤销修改
rm -f 1.txt//不小心删除了1.txt
git checkout -- 1.txt//恢复1.txt

如果1.txt文件修改,add后但没有commit,再想回退到上一次提交的状态,
可以使用git reset HEAD 1.txt,再执行git checkout -- 1.txt
git reflog //查看所有历史版本

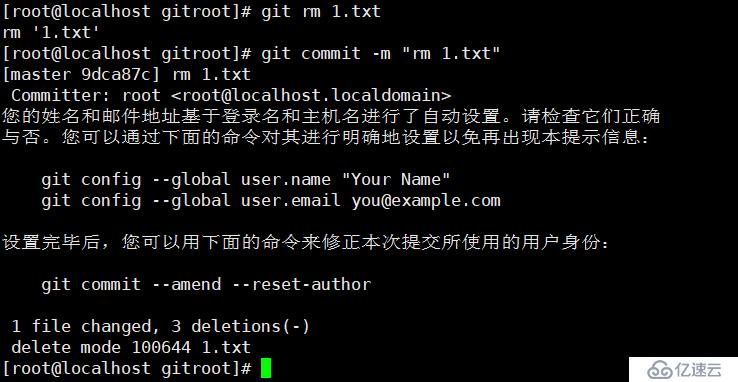
删除文件
echo -e "11111111111\n2222222222" > 2.txt
git rm 2.txt
git commit -m "rm 2.txt"
建立远程仓库
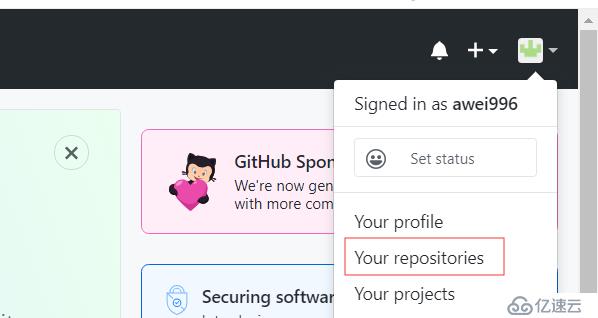
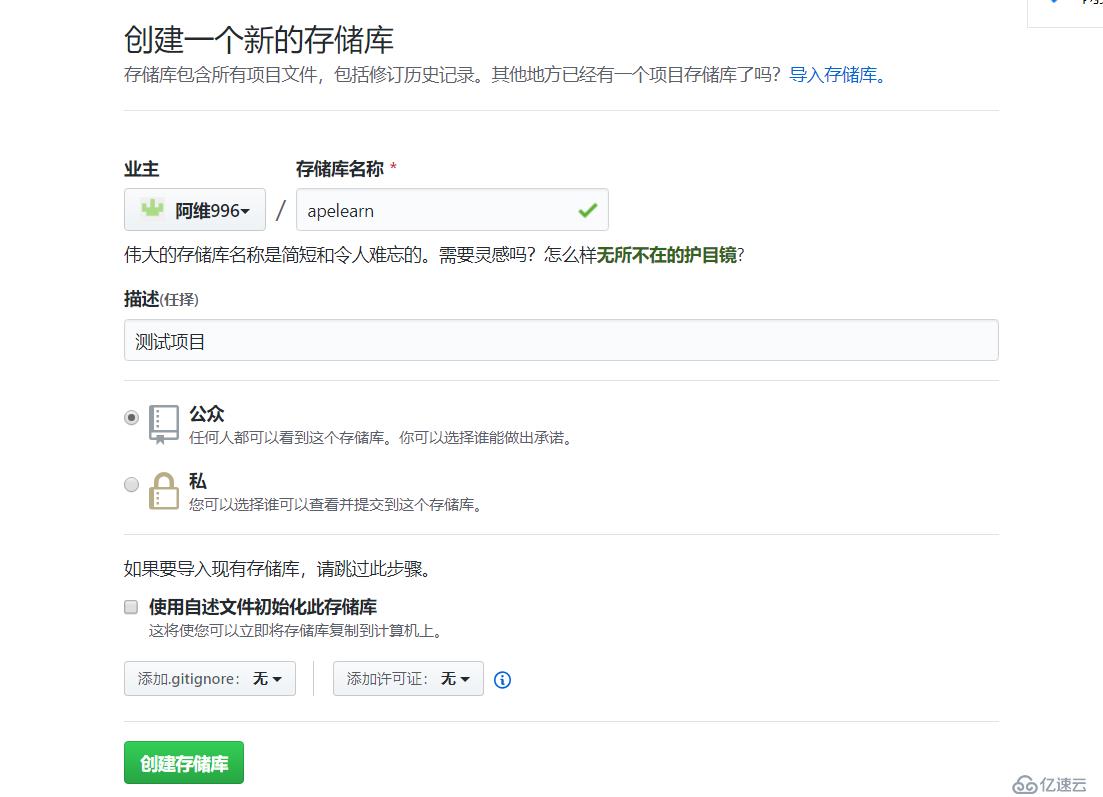
首先到 https://github.com 注册一个账号,创建自己的git,点右上角repositories(新建仓库)再点new
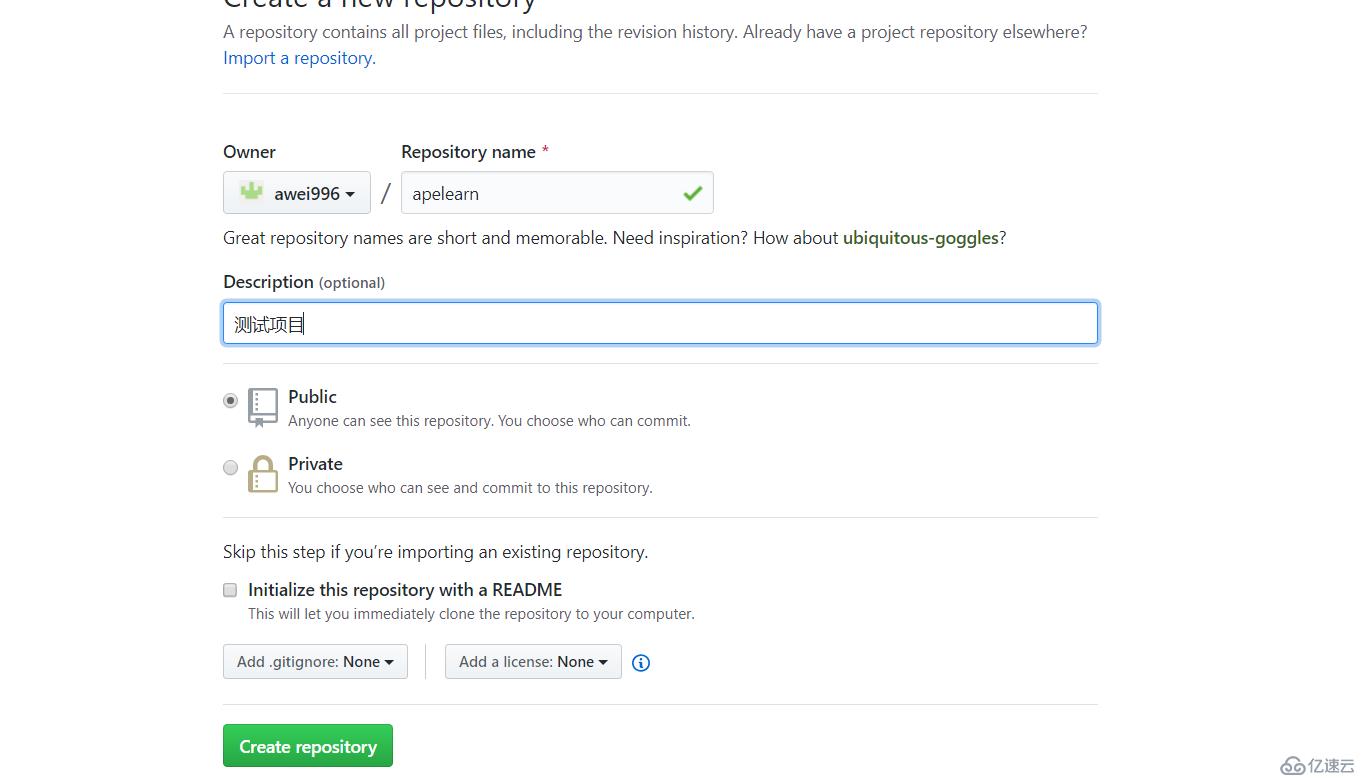
名字自定义,比如叫studygit选择public 点 create repository
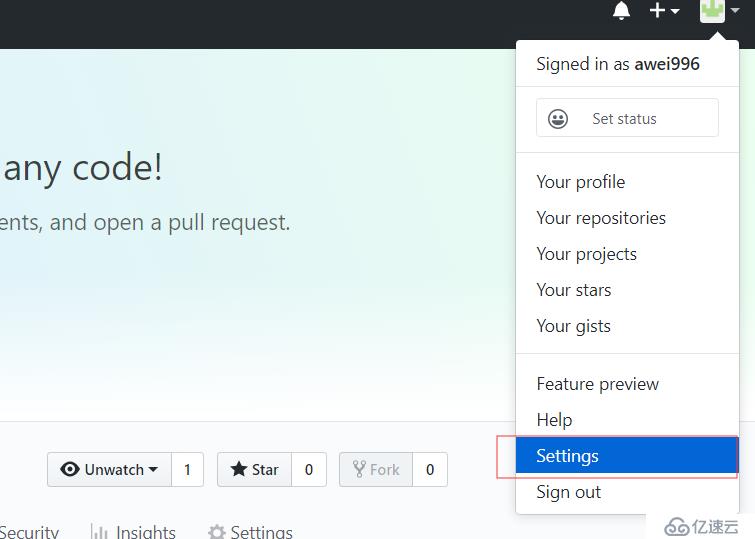
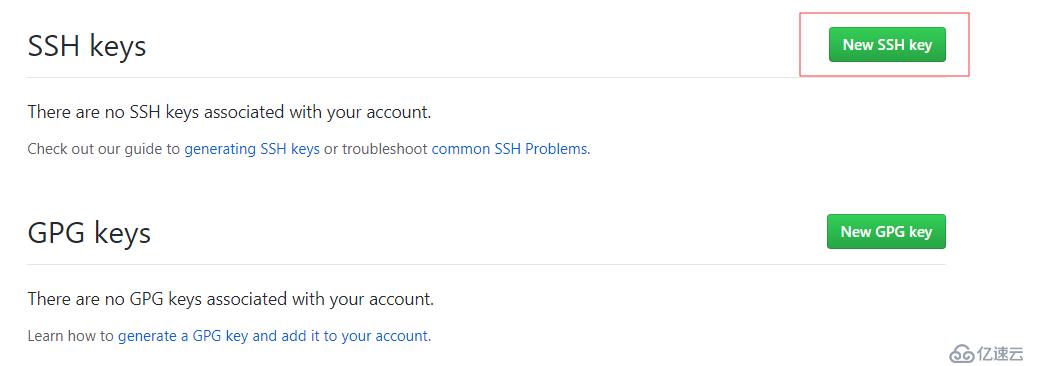
添加key:右上角点自己头像,选择settings,左侧选择SSH and GPG keys

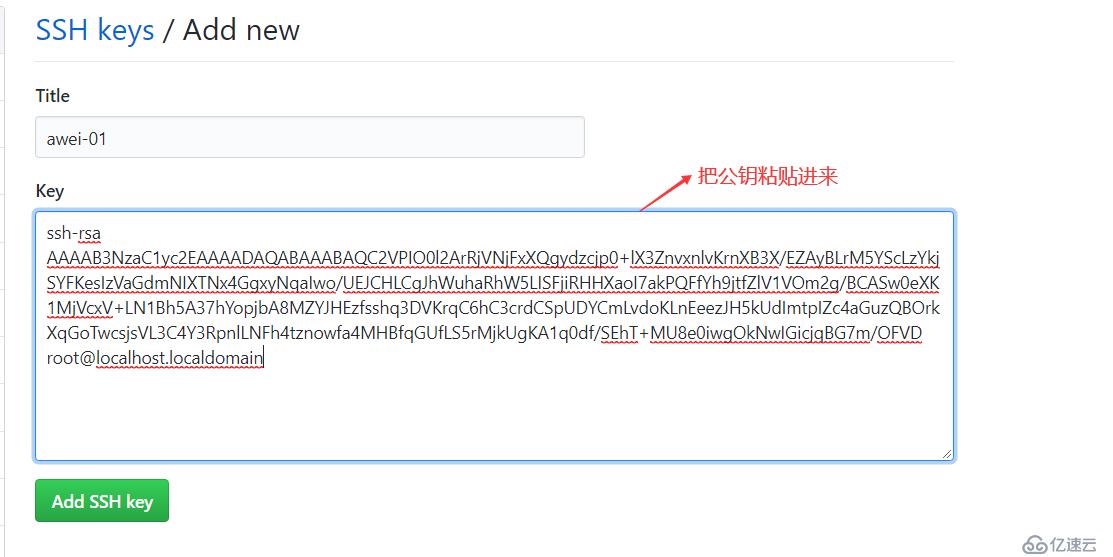
linux生成秘钥:ssh-keygen
左侧点New SSH key,把linux机器上的~/.ssh/id_rsa.pub(公钥)内容粘贴到这里

在服务器/tmp/目录下创建一个apelearn目录:mkdir /tmp/apelearn 进入到目录下 执行官网给的提示命令一步步执行

把本地仓库推送到远程仓库 git remote add origin git@github.com:aminglinux/studygit.git //这一步是在远程创建一个新的仓库studygit,名字尽量和本地的一致
git push -u origin master //然后把本地的studygit仓库推送到远程的studygit
报错:

解决办法:yum update -y nss curl libcurl
成功
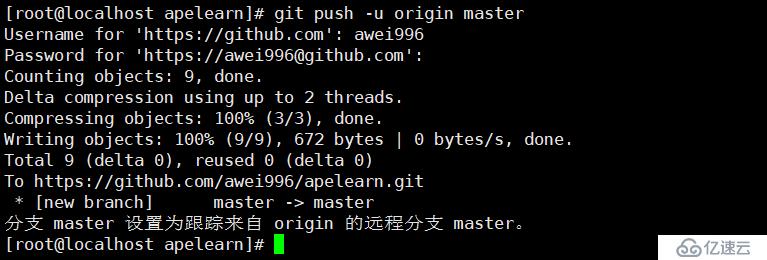
下一次再推送,就可以直接 git push
这时候你可以在服务器上创建一个文件
vim 1.txt ##写点内容进去
git add 1.txt
git commit -m "1.txt"
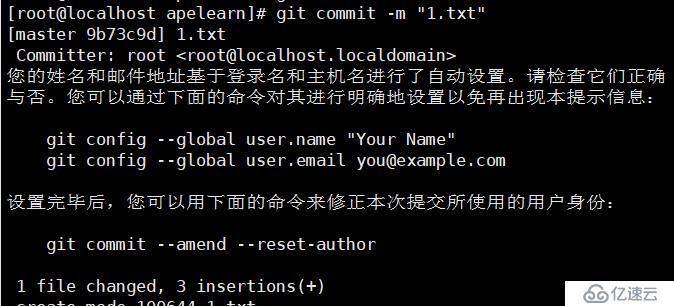
git push ##上传到远程库
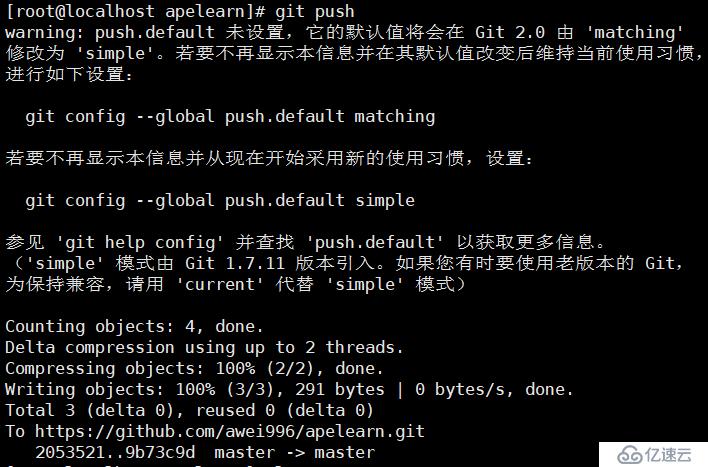
再刷新页面就有了

克隆远程仓库
随便进到一个目录下:cd /home
找到github网站你想克隆的代码

复制链接

拷贝到服务器上:
git clone https://github.com/aminglinux/lanmp.git

它提示,会在当前目录下初始化一个仓库,并创建一个.git的目录,如下
Initialized empty Git repository in /home/lanmp/.
git/完成后,ls可以看到一个lanmp的目录
cd lanmp
vi lanmp.sh 编辑一下文件,然后提交
git add lanmp.sh
git commit -m "sdlfasdf"
然后再推送到远程服务端
git push
如果有变动,用git pull把更新完的拉下来
分支
git branch //查看分支 *号表示当前所在的分支

git branch awei //创建分支

git checkout awei //切换到了aming分支下
再用git branch查看,会看到有两个分支master和aming,当前使用的分支前面会有一个*在aming分支下 ,编辑2.txt,并提交到新分支
echo "askdfjlksadjflk" > 2.txt
git add 2.txt
git commit -m "laksjdflksjdklfj"
切换回master分支
git checkout master //此时cat 2.txt发现并没有更改内容,这说明分支与分支之间是相互隔开的
分支的合并
git checkout master //合并分支之前,先切换到目标分支
git merge aming //把aming分支合并到了master
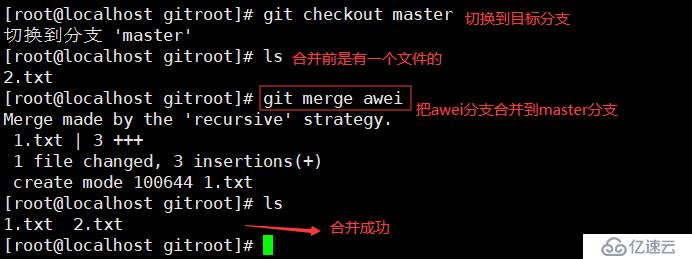
如果master分支和aming分支都对2.txt进行了编辑,当合并时会提示冲突,需要先解决冲突才可以继续合并。
解决冲突的方法是在master分支下,编辑2.txt,改为aming分支里面2.txt的内容。 然后提交2.txt,再合并aming分支。
但是这样有一个问题,万一master分支更改的内容是我们想要的呢? 可以编辑2.txt内容,改为想要的,然后提交。切换到aming分支,然后合并master分支到aming分支即可(倒着合并)。合并分支有一个原则,那就是要把最新的分支合并到旧的分支。也就是说merge后面跟的分支名字一定是最新的分支。
git branch -d aming //删除分支
如果分支没有合并,删除之前会提示,那就不合并,强制删除
git branch -D aming ##强制删除
使用分支的原则
对于分支的应用,建议大家以这样的原则来:
master分支是非常重要的,线上发布代码用这个分支,平时我们开发代码不要在这个分支上。
创建一个dev分支,专门用作开发,只有当发布到线上之前,才会把dev分支合并到master
开发人员应该在dev的基础上再分支成个人分支,个人分支(在自己pc上)里面开发代码,然后合并到dev分支

dev分支合并bob分支的命令是:
git checkout dev //先切换到dev分支,然后
git merge bob
远程分支
本地新建的分支如果不推送到远程,对其他人就是不可见的
查看远程分支:git ls-remote origin,可以看到所有分支

对于git push分支分两种情况
当本地分支和远程分支一致时
git push会把所有本地分支的变更一同推送到远程,如果想只推送一个分支,使用:git push origin branch-name
当本地分支比远程分支多,默认git push 只推送本地和远程一致的分支,想要把多出来的本地分支推送到远程时,使用git push origin branch-name 如果推送失败,先用git pull抓取远程的新提交
git clone的时候默认只把master分支克隆下来,如果想把所有分支都克隆下来,需要手动创建,在本地创建和远程分支对应的分支,
使用git checkout -b branch-name origin/branch-name,本地和远程分支的名称要一致 ##branch-name是你远程分支的名字,远程分支叫什么就写什么
例如:dev分支

标签管理
标签类似于快照功能,可以给版本库打一个标签,记录某个时刻库的状态。也可以随时恢复到该状态。
git checkout master 先切到master分支上
git tag v1.0 给master打一个标签v1.0
git show v1.0 查看标签信息
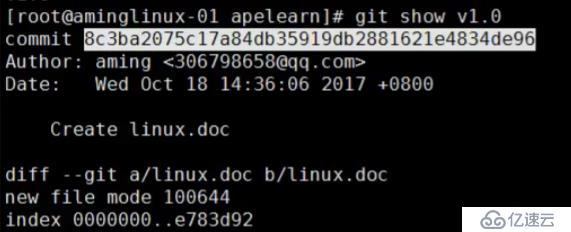
git tag 可以查看所有的标签

tag是针对commit来打标签的,所以可以针对历史的commit来打tag
git log --pretty=oneline --abbrev-commit //先查看历史的commit

git tag v0.9 46d3c1a //针对历史commit打标签

git tag -a v0.8 -m "tag just v1.1 and so on" 5aacaf4 //可以对标签进行描述

git tag -d v0.8 //删除标签
远程标签查看
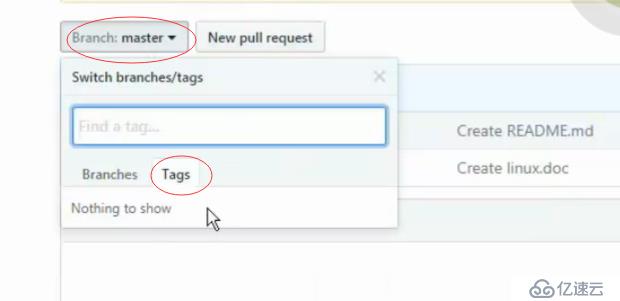
git push origin v1.0 //推送指定标签到远程

推送完再看
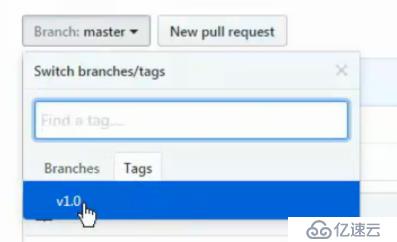
git push --tag origin //推送所有标签
如果本地删除了一个标签,远程也想要删除需要这样操作:
git tag v1.0 -d //删除本地标签
git push origin :refs/tags/v1.0 //删除远程标签
git别名
git commit 这个命令是不是有点长? 用别名可以提高我们的工作效率
别名格式:git config --global alias.别名 初始名
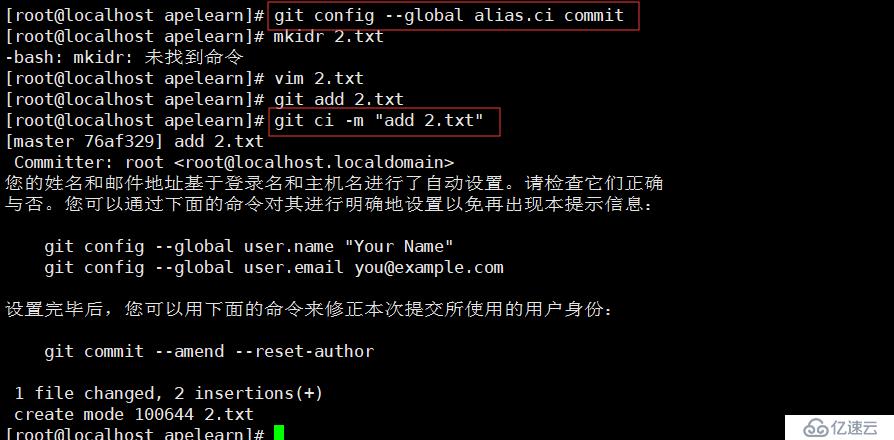
比如吧commit别名称ci:
git config --global alias.ci commit
如图
git config --global alias.co checkout
git config --global alias.br branch

查看git别名使用命令
git config --list |grep alias

另一种方式是直接加到配置文件里:/root/.gitconfig

查询log小技巧:直接在命令行执行
git config --global alias.lg "log --color --graph --pretty=format:'%Cred%h%Creset -%C(yellow)%d%Creset %s %Cgreen(%cr) %C(bold blue)<%an>%Creset' --abbrev-commit"
执行完就可以执行git lg了

取消别名
git config --global --unset alias.br
搭建git服务器
github毕竟是公开的,而私有仓库又得花钱买。所以我们可以想办法搭建一个私有的,只自己公司使用的。Gitlab是个不错的选择。在介绍它之前,先讲述一下命令行的git服务器
找一台服务器,首先要安装git:yum install -y git
添加git用户,并且设置shell为/usr/bin/git-shell,目的是为了不让git用户远程登陆
useradd -s /usr/bin/git-shell git
进到家目录下:cd /home/git
创建authorized_keys文件,并更改属主、属组和权限,用来存客户端机器上的公钥
1.mkdir .ssh
2.touch .ssh/authorized_keys
3.chown -R git.git .ssh
4.chmod 600 .ssh/authorized_keys
以上操作目的是让另一台机器可以通过密钥进行通信
把另一台机器上的公钥放到本机(服务端)配置文件里
/home/git/.ssh/authorized_keys

试验一下,用另一台链接一下:ssh git@192.168.182.133

定好存储git仓库的目录,比如/data/gitroot
mkdir /data/gitroot
cd /data/gitroot
git init --bare sample.git // 创建一个裸仓库
ps:裸仓库没有工作区,因为服务器上的Git仓库纯粹是为了共享,所以不让用户直接登录到服务器上去改工作区,并且服务器上的Git仓库通常都以.git结尾

chown -R git.git sample.git ##设置属主属组
以上操作是在git服务端上做的,平时git服务器是不需要开发人员登录修改代码的,它仅仅是充当着一个服务器的角色,就像github一样,平时操作都是在我们自己的pc上做的
首先要把客户端上的公钥放到git服务器上/home/git/.ssh/authorized_keys文件里
在客户端上(自己pc)克隆远程仓库
git clone git@192.168.182.133:/data/gitroot/sample.git

此时就可以在当前目录下生成一个sample的目录,这个就是我们克隆的远程仓库了。进入到这里面,可以开发一些代码,然后push到远程。
实验:
[root@localhost ~]# cd sample/
[root@localhost sample]# ls
[root@localhost sample]# cp /etc/init.d/mysqld . ##随便拷贝一个文件过来
[root@localhost sample]# ls
mysqld
[root@localhost sample]# git add . ##添加到仓库
[root@localhost sample]# git ci -m "add new file" 提交(ci是我们之前对commit设定的别名)
[master(根提交) 028b4a9] add new file
 Committer: root <root@localhost.localdomain>
您的姓名和邮件地址基于登录名和主机名进行了自动设置。请检查它们正确
与否。您可以通过下面的命令对其进行明确地设置以免再出现本提示信息:

    git config --global user.name "Your Name"
    git config --global user.email you@example.com

设置完毕后,您可以用下面的命令来修正本次提交所使用的用户身份:

    git commit --amend --reset-author

 1 file changed, 380 insertions(+)
 create mode 100755 mysqld
[root@localhost sample]# git push ##推送到远程仓库,这里会报错,报错原因是因为第一次推送他不知道你要推送哪个分支,解决办法指定分支
warning: push.default 未设置,它的默认值将会在 Git 2.0 由 'matching'
修改为 'simple'。若要不再显示本信息并在其默认值改变后维持当前使用习惯,
进行如下设置:

  git config --global push.default matching

若要不再显示本信息并从现在开始采用新的使用习惯,设置:

  git config --global push.default simple

参见 'git help config' 并查找 'push.default' 以获取更多信息。
('simple' 模式由 Git 1.7.11 版本引入。如果您有时要使用老版本的 Git,
为保持兼容,请用 'current' 代替 'simple' 模式)

No refs in common and none specified; doing nothing.
Perhaps you should specify a branch such as 'master'.
fatal: The remote end hung up unexpectedly
error: 无法推送一些引用到 'git@192.168.182.133:/data/gitroot/sample.git'
[root@localhost sample]# git push origin master ##指定分支,推送成功
Counting objects: 3, done.
Delta compression using up to 2 threads.
Compressing objects: 100% (2/2), done.
Writing objects: 100% (3/3), 3.85 KiB | 0 bytes/s, done.
Total 3 (delta 0), reused 0 (delta 0)
To git@192.168.182.133:/data/gitroot/sample.git
 * [new branch]      master -> master
[root@localhost sample]#
[root@localhost tmp]# git clone git@192.168.182.133:/data/gitroot/sample.git ##把服务端的库克隆下来,克隆到tmp下
正克隆到 'sample'...
remote: Counting objects: 3, done.
remote: Compressing objects: 100% (2/2), done.
remote: Total 3 (delta 0), reused 0 (delta 0)
接收对象中: 100% (3/3), done.
[root@localhost tmp]# ls
apelearn  mysql.sock  sample
[root@localhost tmp]# ls sample/
mysqld
[root@localhost tmp]# cd sample/
[root@localhost sample]# ls
mysqld
[root@localhost sample]# mkdir 222.txt 然后在克隆的库里创建一个新文件,随便写点东西
[root@localhost sample]# vim 222.txt
[root@localhost sample]# git add 222.txt
[root@localhost sample]# git commit -m "ch 222.txt"
[master 44076d8] ch 222.txt
 Committer: root <root@localhost.localdomain>
您的姓名和邮件地址基于登录名和主机名进行了自动设置。请检查它们正确
与否。您可以通过下面的命令对其进行明确地设置以免再出现本提示信息:

    git config --global user.name "Your Name"
    git config --global user.email you@example.com

设置完毕后,您可以用下面的命令来修正本次提交所使用的用户身份:

    git commit --amend --reset-author

 1 file changed, 1 insertion(+)
 create mode 100644 222.txt
[root@localhost sample]# git push ##再把它推送到远程服务器
warning: push.default 未设置,它的默认值将会在 Git 2.0 由 'matching'
修改为 'simple'。若要不再显示本信息并在其默认值改变后维持当前使用习惯,
进行如下设置:

  git config --global push.default matching

若要不再显示本信息并从现在开始采用新的使用习惯,设置:

  git config --global push.default simple

参见 'git help config' 并查找 'push.default' 以获取更多信息。
('simple' 模式由 Git 1.7.11 版本引入。如果您有时要使用老版本的 Git,
为保持兼容,请用 'current' 代替 'simple' 模式)

Counting objects: 4, done.
Delta compression using up to 2 threads.
Compressing objects: 100% (2/2), done.
Writing objects: 100% (3/3), 280 bytes | 0 bytes/s, done.
Total 3 (delta 0), reused 0 (delta 0)
To git@192.168.182.133:/data/gitroot/sample.git
   028b4a9..44076d8  master -> master
[root@localhost sample]# pwd
/tmp/sample
[root@localhost sample]# cd /root/sample/ 在进到一开始克隆库的目录
[root@localhost sample]# ls
mysqld
[root@localhost sample]# git pull ##拉取文件
remote: Counting objects: 4, done.
remote: Compressing objects: 100% (2/2), done.
remote: Total 3 (delta 0), reused 0 (delta 0)
Unpacking objects: 100% (3/3), done.
来自 192.168.182.133:/data/gitroot/sample
   028b4a9..44076d8  master     -> origin/master
更新 028b4a9..44076d8
Fast-forward
 222.txt | 1 +
 1 file changed, 1 insertion(+)
 create mode 100644 222.txt
[root@localhost sample]# cat 222.txt 发现是刚刚上传的222.txt文件 这也是一中方式
akakda
[root@localhost sample]# ls
222.txt  mysqld
[root@localhost sample]#
使用gitlab
gitlab官网 https://about.gitlab.com/gitlab-com/
官方安装文档 https://about.gitlab.com/installation/?version=ce#centos-7 (ce/ee)
要求服务器内存不少于2g
vim /etc/yum.repos.d/gitlab.repo//加入如下内容
[gitlab-ce]
name=Gitlab CE Repository
baseurl=https://mirrors.tuna.tsinghua.edu.cn/gitlab-ce/yum/el$releasever/
gpgcheck=0
enabled=1
yum install -y gitlab-ce
编译安装:gitlab-ctl reconfigure
安装成功,之后他会把你的服务自动启动起来

netstat -lnpt //查看监听端口
gitlab-ctl stop/restart/start/status ##关闭/重启/启动/状态
浏览器访问gitlab,输入ip即可
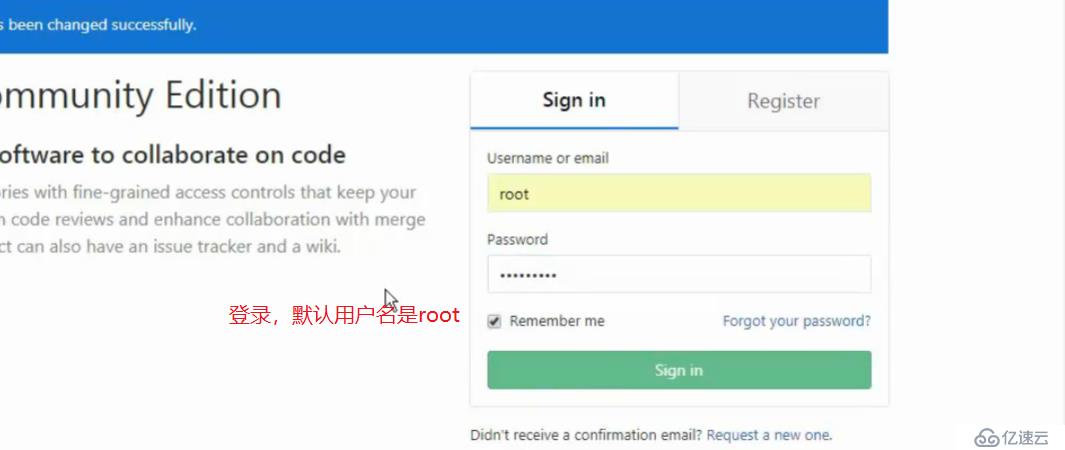
默认管理员root,无密码,它会让我们去定义一个密码

登录
gitlab常用命令 https://www.cnyunwei.cc/archives/1204


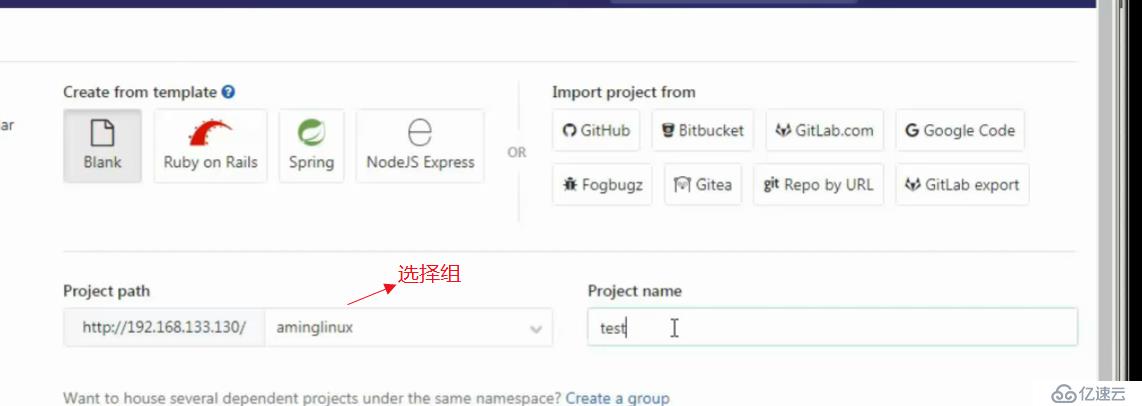
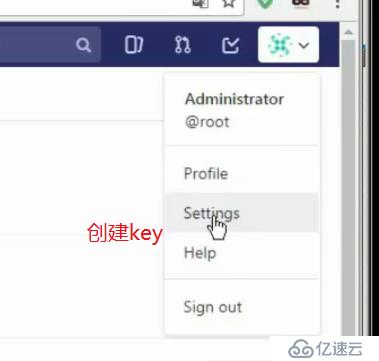
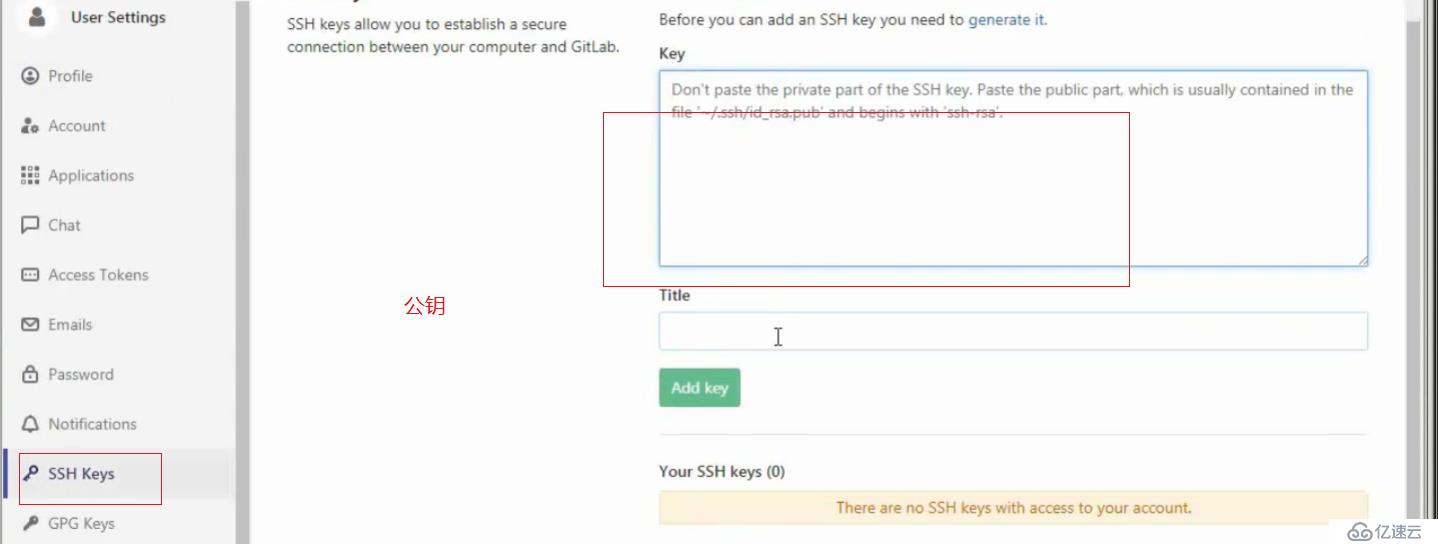
gitlab备份 gitlab-rake gitlab:backup:create

备份目录在/var/opt/gitlab/backups

gitlab 恢复数据
先停服务 gitlab-ctl stop unicorn ; gitlab-ctl stop sidekiq
gitlab-rake gitlab:backup:restore BACKUP=xxxxx (这里是一个编号,即备份文件的前缀)

再启动服务 gitlab-ctl start
免责声明:本站发布的内容(图片、视频和文字)以原创、转载和分享为主,文章观点不代表本网站立场,如果涉及侵权请联系站长邮箱:is@yisu.com进行举报,并提供相关证据,一经查实,将立刻删除涉嫌侵权内容。