您好,登录后才能下订单哦!
密码登录
登录注册
点击 登录注册 即表示同意《亿速云用户服务条款》
本篇文章给大家分享的是有关怎么使用Keras完成CNN模型搭建,小编觉得挺实用的,因此分享给大家学习,希望大家阅读完这篇文章后可以有所收获,话不多说,跟着小编一起来看看吧。
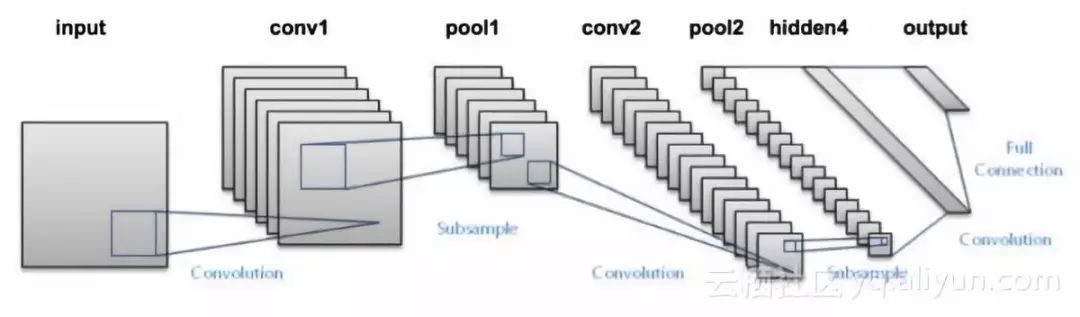
对于图像分类任务而言,卷积神经网络(CNN)是目前最优的网络结构,没有之一。在面部识别、自动驾驶、物体检测等领域,CNN被广泛使用,并都取得了最优性能。对于绝大多数深度学习新手而言,数字手写体识别任务可能是第一个上手的项目,网络上也充斥着各种各样的成熟工具箱的相关代码,新手在利用相关工具箱跑一遍程序后就能立刻得到很好的结果,这时候获得的感受只有一个——深度学习真神奇,却没能真正了解整个算法的具体流程。小编将利用Keras和TensorFlow设计一个简单的二维卷积神经网络(CNN)模型,手把手教你用代码完成MNIST数字识别任务,便于理解深度学习的整个流程。
模型使用的MNIST数据集,该数据集是目前最大的数字手写体数据集(0~9),总共包含60,000张训练图像和10,000张测试图像,每张图像的大小为28x28,灰度图。第一步是加载数据集,可以通过Keras API完成:
#源代码不能直接下载,在这里进行稍微修改,下载数据集后指定路径#下载链接:https://pan.baidu.com/s/1jH6uFFC 密码: dw3dfrom __future__ import print_functionimport kerasimport numpy as np
path='./mnist.npz'  f = np.load(path)
X_train, y_train = f['x_train'], f['y_train']
X_test, y_test = f['x_test'], f['y_test']
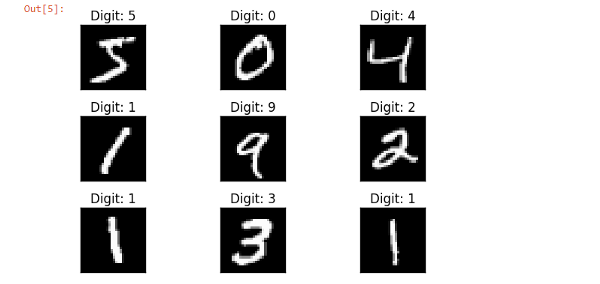
上述代码中,X_train表示训练数据集,总共60,000张28x28大小的手写体图像,y_train表示训练图像对应的标签。同理,X_test表示测试数据集,总共10,000张28x28大小的手写体图像,y_test表示测试图像对应的标签。下面对数据集部分数据进行可视化,以便更好地了解构建的模型深度学习模型的目的。
import matplotlib.pyplot as plt
fig = plt.figure()for i in range(9):
  plt.subplot(3,3,i+1)
  plt.tight_layout()
  plt.imshow(X_train[i], cmap='gray', interpolation='none')
  plt.title("Digit: {}".format(y_train[i]))
  plt.xticks([])
  plt.yticks([])
fig
# let's print the actual data shape before we reshape and normalizeprint("X_train shape", X_train.shape)print("y_train shape", y_train.shape)print("X_test shape", X_test.shape)print("y_test shape", y_test.shape)#input image size 28*28img_rows , img_cols = 28, 28#reshaping#"channels_first" assumes (channels, conv_dim1, conv_dim2, conv_dim3).X_train = X_train.reshape(X_train.shape[0], img_rows, img_cols, 1)
X_test = X_test.reshape(X_test.shape[0], img_rows, img_cols, 1)
input_shape = (img_rows, img_cols, 1)#more reshapingX_train = X_train.astype('float32')
X_test = X_test.astype('float32')
X_train /= 255
X_test /= 255print('X_train shape:', X_train.shape) #X_train shape: (60000, 28, 28, 1)
对图像信息进行必要的处理之后,标签数据y_train和y_test被转换为分类格式(向量形式),即标签‘3’被转换为向量[ 0,0,0,1,0,0,0,0,0,0]用于建模,标签向量非零的位置减一(从0开始)后表示该图像的具体标签,即若图像的标签向量在下标5处不为0,则表示该图像代表数字‘4’。
import keras#set number of categoriesnum_category = 10# convert class vectors to binary class matricesy_train = keras.utils.to_categorical(y_train, num_category)
y_test = keras.utils.to_categorical(y_test, num_category)
在数据准备好提供给模型后,需要定义模型的体系结构并使用必要的优化函数,损失函数和性能指标进行编译。
构建模型遵循的体系结构是经典卷积神经网络,分别含有2个卷积层,之后是连接全连接层和softmax分类器。如果你对每层的作用不熟悉的话,建议学习CS231课程。
在最大池化层和全连接层之后,模型中引入dropout作为正则化来减少过拟合问题。
#导入相关层的结构from __future__ import print_functionimport kerasfrom keras.datasets import mnistfrom keras.models import Sequentialfrom keras.layers import Dense, Dropout, Flatten, Conv2D, MaxPooling2Dfrom keras import backend as kimport matplotlib.pyplot as pltimport numpy as np## model buildingmodel = Sequential()#convolutional layer with rectified linear unit activationmodel.add(Conv2D(32, kernel_size=(3, 3),
                 activation='relu',
                 input_shape=input_shape))#32 convolution filters used each of size 3x3#againmodel.add(Conv2D(64, (3, 3), activation='relu'))#64 convolution filters used each of size 3x3#choose the best features via poolingmodel.add(MaxPooling2D(pool_size=(2, 2)))#randomly turn neurons on and off to improve convergencemodel.add(Dropout(0.25))#flatten since too many dimensions, we only want a classification outputmodel.add(Flatten())#fully connected to get all relevant datamodel.add(Dense(128, activation='relu'))#one more dropout for convergence' sake :) model.add(Dropout(0.5))#output a softmax to squash the matrix into output probabilitiesmodel.add(Dense(num_category, activation='softmax'))
模型搭建好之后,需要进行编译。在本文使用categorical_crossentropy多分类损失函数。由于所有的标签都具有相似的权重,因此将其作为性能指标,并使用AdaDelta梯度下降技术来优化模型参数。
#Adaptive learning rate (adaDelta) is a popular form of gradient descent rivaled only by adam and adagrad#categorical ce since we have multiple classes (10) model.compile(loss=keras.losses.categorical_crossentropy,
              optimizer=keras.optimizers.Adadelta(),
              metrics=['accuracy'])
在定义和编译模型架构之后,需要使用训练数据对模型进行训练,以便能够识别手写数字。即使用X_train和y_train来拟合模型。
batch_size = 128
num_epoch = 10#model trainingmodel_log = model.fit(X_train, y_train,
          batch_size=batch_size,
          epochs=num_epoch,
          verbose=1,
          validation_data=(X_test, y_test))
Epoch表示对所有训练样本进行一个前向传播过程和一个反向传播过程,Batch_Size表示每次前向过程和反向过程时处理的训练样本数,训练输出如下所示:

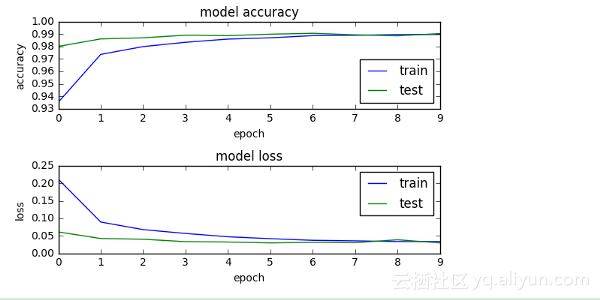
score = model.evaluate(X_test, y_test, verbose=0)print('Test loss:', score[0]) #Test loss: 0.0296396646054print('Test accuracy:', score[1]) #Test accuracy: 0.9904
可以看到,测试准确性高达99%+,这也意味着该模型对于预测训练得很好。对整个过程训练和测试过程进行可视化,即画出训练和测试的准确曲线与损失函数曲线,如下所示。从图中可以看到,随着训练迭代次数的增加,模型在训练和测试数据上的损失和准确性趋于一致,模型最终趋于稳定。
模型训练好后需要保存训练好的参数,以便下次直接调用。模型的体系结构或结构将存储在json文件中,权重将以hdf5文件格式存储。
#Save the model# serialize model to JSONmodel_digit_json = model.to_json()with open("model_digit.json", "w") as json_file:
    json_file.write(model_digit_json)# serialize weights to HDF5model.save_weights("model_digit.h6")
print("Saved model to disk")
因此,保存好的模型可以之后进行重复使用或轻易地迁移到其他应用场景中。
以上就是怎么使用Keras完成CNN模型搭建,小编相信有部分知识点可能是我们日常工作会见到或用到的。希望你能通过这篇文章学到更多知识。更多详情敬请关注亿速云行业资讯频道。
免责声明:本站发布的内容(图片、视频和文字)以原创、转载和分享为主,文章观点不代表本网站立场,如果涉及侵权请联系站长邮箱:is@yisu.com进行举报,并提供相关证据,一经查实,将立刻删除涉嫌侵权内容。