您好,登录后才能下订单哦!
密码登录
登录注册
点击 登录注册 即表示同意《亿速云用户服务条款》
本篇内容主要讲解“Python基于模板怎么实现匹配信用卡数字识别功能”,感兴趣的朋友不妨来看看。本文介绍的方法操作简单快捷,实用性强。下面就让小编来带大家学习“Python基于模板怎么实现匹配信用卡数字识别功能”吧!
Python 3.6 + OpenCV 3.4.1.15
首先,提取出模板中每一个数字的轮廓,再对信用卡图像进行处理,提取其中的数字部分,将该部分数字与模板进行匹配,即可得到结果。
完整代码
# !/usr/bin/env python
# —*— coding: utf-8 —*—
# @Time: 2020/1/11 14:57
# @Author: Martin
# @File: utils.py
# @Software:PyCharm
import cv2


def sort_contours(cnts, method='left-to-right'):
 reverse = False
 i = 0
 if method == 'right-to-left' or method == 'bottom-to-top':
 reverse = True
 if method == 'top-to-bottom' or method == 'bottom-to-top':
 i = 1
 boundingboxes = [cv2.boundingRect(c) for c in cnts]
 (cnts, boundingboxes) = zip(*sorted(zip(cnts, boundingboxes), key=lambda b: b[1][i], reverse=reverse))
 return cnts, boundingboxes


def resize(image, width=None, height=None, inter=cv2.INTER_AREA):
 (h, w) = image.shape[:2]
 if width is None and height is None:
 return image
 if width is None:
 r = height / float(h)
 dim = (int(w * r), height)
 else:
 r = width / float(w)
 dim = (width, int(h * r))
 resized = cv2.resize(image, dim, interpolation=inter)
 return resized
# !/usr/bin/env python
# —*— coding: utf-8 —*—
# @Time: 2020/1/11 14:57
# @Author: Martin
# @File: template_match.py
# @Software:PyCharm
"""
基于模板匹配的信用卡数字识别
"""
import cv2
import utils
import numpy as np

# 指定信用卡类型
FIRST_NUMBER = {
 '3' : 'American Express',
 '4' : 'Visa',
 '5' : 'MasterCard',
 '6' : 'Discover Card'
}


# 绘图显示
def cv_show(name, image):
 cv2.imshow(name, image)
 cv2.waitKey(0)
 cv2.destroyAllWindows()


# 读取模板图像
img = cv2.imread('./images/ocr_a_reference.png')
cv_show('img', img)
# 转化成灰度图
ref = cv2.cvtColor(img, cv2.COLOR_BGR2GRAY)
cv_show('ref', ref)
# 转化成二值图像
ref = cv2.threshold(ref, 10, 255, cv2.THRESH_BINARY_INV)[1]
cv_show('ref', ref)
# 计算轮廓
ref_, refCnts, hierarchy = cv2.findContours(ref.copy(), cv2.RETR_EXTERNAL, cv2.CHAIN_APPROX_SIMPLE)

cv2.drawContours(img, refCnts, -1, (0, 0, 255), 3)
cv_show('img', img)
print(np.array(refCnts).shape)
# 排序,从左到右,从上到下
refCnts = utils.sort_contours(refCnts, method='left-to-right')[0]
digits = {}
# 遍历每一个轮廓
for (i, c) in enumerate(refCnts):
 (x, y , w, h) = cv2.boundingRect(c)
 roi = ref[y:y+h, x:x+w]
 roi = cv2.resize(roi, (57, 88))
 digits[i] = roi
# 初始化卷积核
rectKernel = cv2.getStructuringElement(cv2.MORPH_RECT, (9, 3))
sqKernel = cv2.getStructuringElement(cv2.MORPH_RECT, (5, 5))
# 读取输入图像,预处理
img_path = input("Input the path and image name: ")
image_input = cv2.imread(img_path)
cv_show('image', image_input)
image_input = utils.resize(image_input, width=300)
gray = cv2.cvtColor(image_input, cv2.COLOR_BGR2GRAY)
cv_show('gray', gray)
# 礼帽操作,突出更明亮的区域
tophat = cv2.morphologyEx(gray, cv2.MORPH_TOPHAT, rectKernel)
cv_show('tophat', tophat)

gradX = cv2.Sobel(tophat, ddepth=cv2.CV_32F, dx=1, dy=0, ksize=-1)
gradX = np.absolute(gradX)
(minVal, maxVal) = (np.min(gradX), np.max(gradX))
gradX = (255 * ((gradX - minVal) / (maxVal - minVal)))
gradX = gradX.astype("uint8")

print(np.array(gradX).shape)
cv_show('gradX', gradX)
# 闭操作
gradX = cv2.morphologyEx(gradX, cv2.MORPH_CLOSE, rectKernel)
cv_show('gradX', gradX)
thresh = cv2.threshold(gradX, 0, 255, cv2.THRESH_BINARY | cv2.THRESH_OTSU)[1]
cv_show('thresh', thresh)
thresh = cv2.morphologyEx(thresh, cv2.MORPH_CLOSE, sqKernel)
cv_show('thresh', thresh)
# 计算轮廓
thresh_, threshCnts, hierarchy = cv2.findContours(thresh.copy(), cv2.RETR_EXTERNAL, cv2.CHAIN_APPROX_SIMPLE)
cnts = threshCnts
cur_img = image_input.copy()
cv2.drawContours(cur_img, cnts, -1, (0, 0, 255), 3)
cv_show('img', cur_img)
locs = []
# 遍历轮廓
for (i, c) in enumerate(cnts):
 (x, y, w, h) = cv2.boundingRect(c)
 ar = w / float(h)

 if 2.5 < ar < 4.0 and (40 < w < 55) and (10 < h < 20):
 locs.append((x, y, w, h))
# 将符合的轮廓从左到右排序
locs = sorted(locs, key=lambda ix: ix[0])
output = []
# 遍历每一个轮廓中的数字
for (i, (gX, gY, gW, gH)) in enumerate(locs):
 groupOutput = []

 group = gray[gY - 5:gY + gH + 5, gX - 5: gX + gW + 5]
 cv_show('group', group)
 # 预处理
 group = cv2.threshold(group, 0, 255, cv2.THRESH_OTSU)[1]
 cv_show('group', group)
 # 计算每一组轮廓
 group_, digitCnts, hierarchy = cv2.findContours(group.copy(), cv2.RETR_EXTERNAL, cv2.CHAIN_APPROX_SIMPLE)
 digitCnts = utils.sort_contours(digitCnts, method='left-to-right')[0]
 # 计算每一组的每个数值
 for c in digitCnts:
 (x, y, w, h) = cv2.boundingRect(c)
 roi = group[y: y + h, x: x + w]
 roi = cv2.resize(roi, (57, 88))
 cv_show('roi', roi)
 scores = []
 for (digit, digitROI) in digits.items():
 result = cv2.matchTemplate(roi, digitROI, cv2.TM_CCOEFF)
 (_, score, _, _) = cv2.minMaxLoc(result)
 scores.append(score)
 # 得到最合适的数字
 groupOutput.append(str(np.argmax(scores)))
 cv2.rectangle(image_input, (gX - 5, gY - 5), (gX + gW + 5, gY + gH + 5), (0, 0, 255), 1)
 cv2.putText(image_input, "".join(groupOutput), (gX, gY - 15), cv2.FONT_HERSHEY_SIMPLEX, 0.65, (0, 0, 255), 2)
 # 得到结果
 output.extend(groupOutput)
# 打印结果
print("Credit Card Type: {}".format(FIRST_NUMBER[output[0]]))
print("Credit Card #: {}".format("".join(output)))
cv2.imshow("Image", image_input)
cv2.waitKey(0)
cv2.destroyAllWindows()
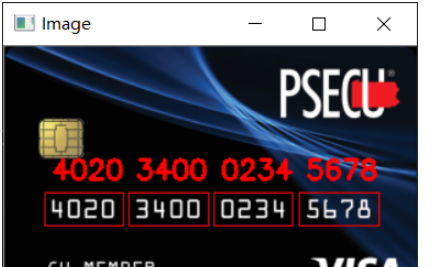
结果展示

Credit Card Type: Visa
Credit Card #: 4020340002345678
到此,相信大家对“Python基于模板怎么实现匹配信用卡数字识别功能”有了更深的了解,不妨来实际操作一番吧!这里是亿速云网站,更多相关内容可以进入相关频道进行查询,关注我们,继续学习!
免责声明:本站发布的内容(图片、视频和文字)以原创、转载和分享为主,文章观点不代表本网站立场,如果涉及侵权请联系站长邮箱:is@yisu.com进行举报,并提供相关证据,一经查实,将立刻删除涉嫌侵权内容。