您好,登录后才能下订单哦!
1、按照BackTrack Cook 5 安装步骤出现问题
报错
在执行 /pentest/misc/openvas/openvas-check-setup.sh时报错
Make sure OpenVAS Scanner is running with an up-to-date NVT
collection and run 'openvasmd –rebuild'
在执行
openvassd 时提示报错
Loading the plugins... 1938 (out of 21019)
** ERROR **: File is empty
aborting...
Aborted
去网上找了一些资料也没有解决办法只能重新安装
2、重新安装步骤
2.1 Configure OBS Repository
apt-get -y install python-software-properties
add-apt-repository "deb http://download.opensuse.org/repositories/security:/OpenVAS:/STABLE:/v4/xUbuntu_10.04/ ./"
apt-key adv --keyserver hkp://keys.gnupg.net --recv-keys BED1E87979EAFD54
apt-get update
2.2 删除openvas
apt-get remove libopenvas2 libopenvasnasl2 openvas-plugins-base openvas-plugins-dfsg openvas-server openvas-client openvas-scanner
2.3 删除以前创建的
rm –rf /usr/local/var/cache/openvas
rm –rf /usr/local/var/lib/openvas
2.4 重新安装
apt-get -y install greenbone-security-assistant gsd openvas-cli openvas-manager openvas-scanner openvas-administrator sqlite3 xsltproc libmicrohttpd10 libopenvas4
2.5 执行 openvas-mkcert 一路回车搞定
2.6 openvas-mkcert-client –n om –i
2.7 执行openvas-nvt-sync 下载插件
2.8 openvassd 加载插件
加载插件需要时间比较长耐心等待。。。

终于完成
2.9openvasmd –rebuild

3.0 openvassad –c 'add_user' –n openvasadmin –r Admin

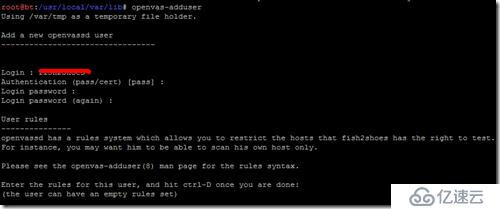
3.1openvas-adduser

3.2
root@bt:/usr/local/var/lib# openvasmd -p 9390 -a 127.0.0.1
root@bt:/usr/local/var/lib# openvasad -a 127.0.0.1 -p 9393
root@bt:/usr/local/var/lib# gsad --http-only --listen=127.0.0.1 -p 9392
3.3
root@bt:/usr/local/var/lib# /pentest/misc/openvas/openvas-check-setup.sh
openvas-check-setup 2.1.5
Test completeness and readiness of OpenVAS-4
(add '--v5' if you want to check for OpenVAS-5)
Please report us any non-detected problems and
help us to improve this check routine:
http://lists.wald.intevation.org/mailman/listinfo/openvas-discuss
Send us the log-file (/tmp/openvas-check-setup.log) to help analyze the problem.
Use the parameter --server to skip checks for client tools
like GSD and OpenVAS-CLI.
Step 1: Checking OpenVAS Scanner ...
OK: OpenVAS Scanner is present in version 3.2.5.
OK: OpenVAS Scanner CA Certificate is present as /usr/local/var/lib/openvas/CA/cacert.pem.
OK: NVT collection in /usr/local/var/lib/openvas/plugins contains 30254 NVTs.
WARNING: Signature checking of NVTs is not enabled in OpenVAS Scanner.
SUGGEST: Enable signature checking (see http://www.openvas.org/trusted-nvts.html).
Step 2: Checking OpenVAS Manager ...
OK: OpenVAS Manager is present in version 2.0.4.
OK: OpenVAS Manager client certificate is present as /usr/local/var/lib/openvas/CA/clientcert.pem.
OK: OpenVAS Manager database found in /usr/local/var/lib/openvas/mgr/tasks.db.
OK: Access rights for the OpenVAS Manager database are correct.
OK: sqlite3 found, extended checks of the OpenVAS Manager installation enabled.
OK: OpenVAS Manager database is at revision 41.
OK: OpenVAS Manager expects database at revision 41.
OK: Database schema is up to date.
OK: OpenVAS Manager database contains information about 30254 NVTs.
OK: xsltproc found.
Step 3: Checking OpenVAS Administrator ...
OK: OpenVAS Administrator is present in version 1.1.2.
OK: At least one user exists.
OK: At least one admin user exists.
Step 4: Checking Greenbone Security Assistant (GSA) ...
OK: Greenbone Security Assistant is present in version 2.0.1.
Step 5: Checking OpenVAS CLI ...
OK: OpenVAS CLI version 1.1.4.SVN.r.
Step 6: Checking Greenbone Security Desktop (GSD) ...
OK: Greenbone Security Desktop is present in Version 1.2.2.
Step 7: Checking if OpenVAS services are up and running ...
OK: netstat found, extended checks of the OpenVAS services enabled.
OK: OpenVAS Scanner is running and listening on all interfaces.
OK: OpenVAS Scanner is listening on port 9391, which is the default port.
WARNING: OpenVAS Manager is running and listening only on the local interface. This means that you will not be able to access the OpenVAS Manager from the outside using GSD or OpenVAS CLI.
SUGGEST: Ensure that OpenVAS Manager listens on all interfaces.
OK: OpenVAS Manager is listening on port 9390, which is the default port.
OK: OpenVAS Administrator is running and listening only on the local interface.
OK: OpenVAS Administrator is listening on port 9393, which is the default port.
WARNING: Greenbone Security Assistant is running and listening only on the local interface. This means that you will not be able to access the Greenbone Security Assistant from the outside using a web browser.
SUGGEST: Ensure that Greenbone Security Assistant listens on all interfaces.
OK: Greenbone Security Assistant is listening on port 9392, which is the default port.
Step 8: Checking nmap installation ...
WARNING: Your version of nmap is not fully supported: 6.01
SUGGEST: You should install nmap 5.51.
Step 9: Checking presence of optional tools ...
OK: pdflatex found.
WARNING: PDF generation failed, most likely due to missing LaTeX packages. The PDF report format will not work.
SUGGEST: Install required LaTeX packages.
OK: ssh-keygen found, LSC credential generation for GNU/Linux targets is likely to work.
WARNING: Could not find rpm binary, LSC credential package generation for RPM and DEB based targets will not work.
SUGGEST: Install rpm.
WARNING: Could not find makensis binary, LSC credential package generation for Microsoft Windows targets will not work.
SUGGEST: Install nsis.
It seems like your OpenVAS-4 installation is OK.
If you think it is not OK, please report your observation
and help us to improve this check routine:
http://lists.wald.intevation.org/mailman/listinfo/openvas-discuss
Please attach the log-file (/tmp/openvas-check-setup.log) to help us analyze the problem.
root@bt:/usr/local/var/lib#
免责声明:本站发布的内容(图片、视频和文字)以原创、转载和分享为主,文章观点不代表本网站立场,如果涉及侵权请联系站长邮箱:is@yisu.com进行举报,并提供相关证据,一经查实,将立刻删除涉嫌侵权内容。