您好,登录后才能下订单哦!
密码登录
登录注册
点击 登录注册 即表示同意《亿速云用户服务条款》
本篇内容主要讲解“怎么用springboot+mybatis+sharding-jdbc做读写分离”,感兴趣的朋友不妨来看看。本文介绍的方法操作简单快捷,实用性强。下面就让小编来带大家学习“怎么用springboot+mybatis+sharding-jdbc做读写分离”吧!
现已更名为: sharding-sphere,官方网址如下
https://shardingsphere.apache.org/document/current/cn/overview/
简单来说,最主要的可以做以下事情:
1.数据库读写分离
2.数据库分库分表
3.分布式事务
在今天的DEMO中, 我们一起来用shard-sphere来做数据库的读写分离
主要需要以下几步:
1.准备主从的数据库,
参考文章:
https://www.javastudy.cloud/articles/2019/11/14/1573693221155.html
2.在springboot工程中,引入相应的mybatis和shard-spere的依赖
3.编写测试类
implementation 'org.mybatis.spring.boot:mybatis-spring-boot-starter:2.1.1'
runtimeOnly 'mysql:mysql-connector-java'
// 这里多了一个shardingsphere的依赖
compile group: 'org.apache.shardingsphere', name: 'sharding-jdbc-spring-boot-starter', version: '4.0.0-RC3'
# 这里我们有一主一从
spring.shardingsphere.datasource.names=master,slave0

# 主库的配置
spring.shardingsphere.datasource.master.type=com.zaxxer.hikari.HikariDataSource
spring.shardingsphere.datasource.master.driver-class-name=com.mysql.cj.jdbc.Driver
spring.shardingsphere.datasource.master.jdbcUrl=jdbc:mysql://localhost:33309/tools
spring.shardingsphere.datasource.master.username=root
spring.shardingsphere.datasource.master.password=javastudy

# 从库的配置
spring.shardingsphere.datasource.slave0.type=com.zaxxer.hikari.HikariDataSource
spring.shardingsphere.datasource.slave0.driver-class-name=com.mysql.cj.jdbc.Driver
spring.shardingsphere.datasource.slave0.jdbcUrl=jdbc:mysql://localhost:33308/tools
spring.shardingsphere.datasource.slave0.username=root
spring.shardingsphere.datasource.slave0.password=javastudy

# sharding-jdbc本身的一些配置
spring.shardingsphere.masterslave.name=ms
spring.shardingsphere.masterslave.master-data-source-name=master
spring.shardingsphere.masterslave.slave-data-source-names=slave0

spring.shardingsphere.props.sql.show=true
这里要注意, 主库和从库配置的第一行, datasource.master.type 这里, 要写HikariDataSource, 这样就可以使用HikariCP了
然后平常hikariCP和Mybatis的配置照常配置就可以了, 但是不在需要spring.datasource.url,spring.datasource.username这些配置了
mybatis的mapper还是按原来的写法写, 然后我们使用autowire进行注入
@Autowired
    private ArticleMapper articleMapper;

    @Test
    public void testDataSource(){

        List<ArticleDO> articleDOS = articleMapper.listArticles(new ArticleQC());
        System.out.println(articleDOS);
    }
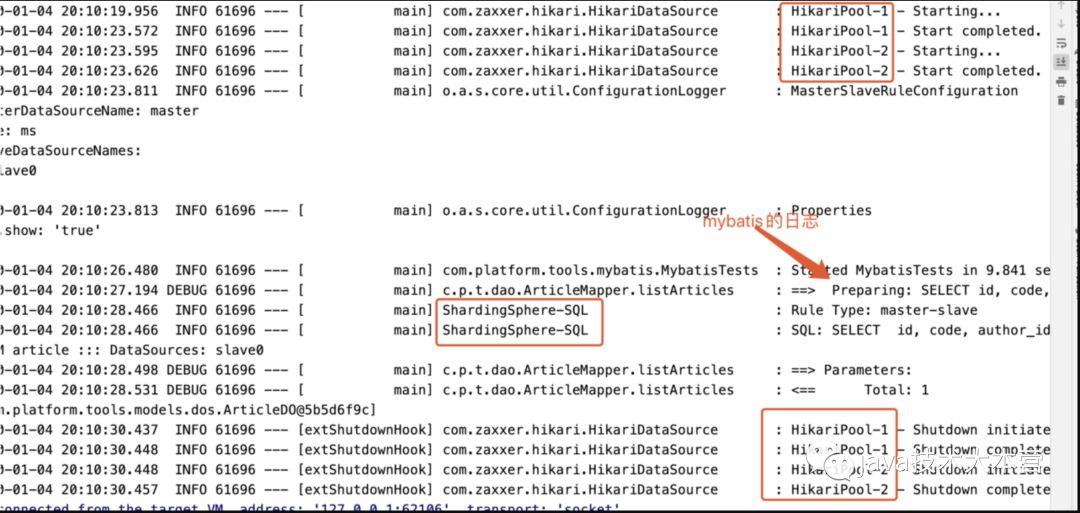
运行单元测试,可通过日志看出使用了hikariCP+sharding-jdbc
到此,相信大家对“怎么用springboot+mybatis+sharding-jdbc做读写分离”有了更深的了解,不妨来实际操作一番吧!这里是亿速云网站,更多相关内容可以进入相关频道进行查询,关注我们,继续学习!
免责声明:本站发布的内容(图片、视频和文字)以原创、转载和分享为主,文章观点不代表本网站立场,如果涉及侵权请联系站长邮箱:is@yisu.com进行举报,并提供相关证据,一经查实,将立刻删除涉嫌侵权内容。