您好,登录后才能下订单哦!
密码登录
登录注册
点击 登录注册 即表示同意《亿速云用户服务条款》
本篇内容介绍了“Android利用zxing生成二维码的详细过程”的有关知识,在实际案例的操作过程中,不少人都会遇到这样的困境,接下来就让小编带领大家学习一下如何处理这些情况吧!希望大家仔细阅读,能够学有所成!
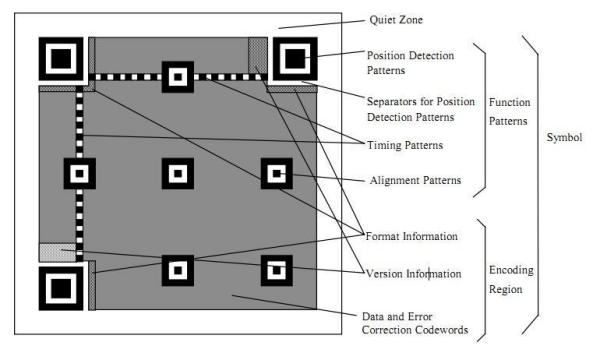
二维码生成原理(即工作原理)
效果图如下:
前提:
源码如下:
总结
二维码官方叫版本Version。Version 1是21 x 21的矩阵,Version 2是 25 x 25的矩阵,Version 3是29的尺寸,每增加一个version,就会增加4的尺寸,公式是:(V-1)*4 + 21(V是版本号) 最高Version 40,(40-1)*4+21 = 177,所以最高是177 x 177 的正方形。
下面是一个二维码的样例:
导入 zxing 的 jar 后开始操作,老规矩最后有源码,作者布局默认相对布局。
第一步:定义二维码的长宽高及图片控件

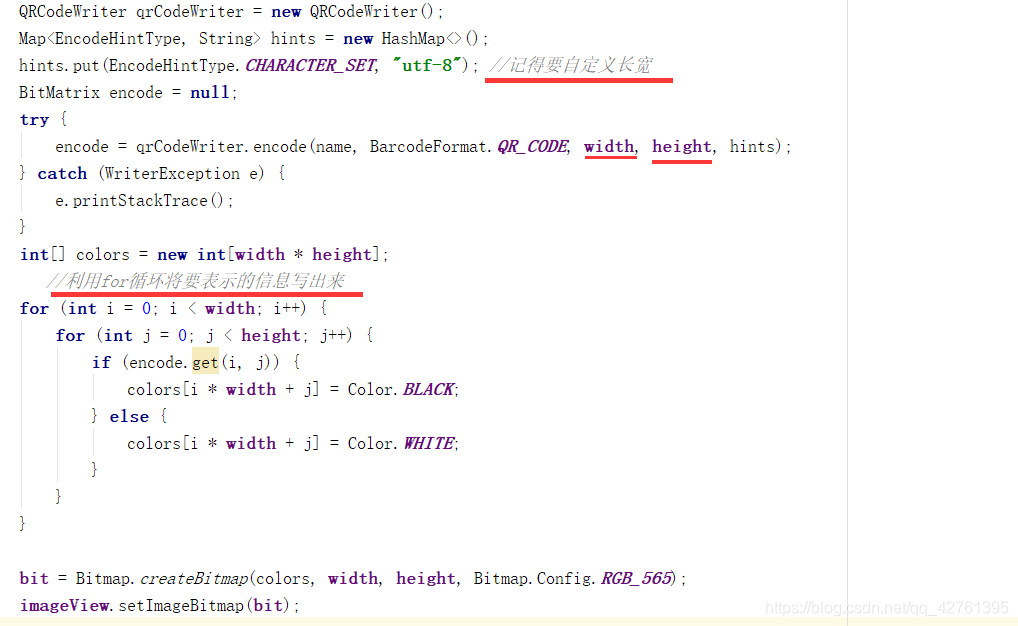
第二步:实例化 QRCodeWriter 后利用 for 循环将二维码画出来,然后用图片控件加载图片。
布局文件:**
  <Button
        android:id="@+id/mybutton"
        android:layout_width="wrap_content"
        android:layout_height="wrap_content"
        android:layout_alignParentTop="true"
        android:layout_centerHorizontal="true"
        android:layout_marginTop="0dp"
        android:text="点击显示二维码"
        android:textSize="20sp" />

    <ImageView
        android:id="@+id/imageView"
        android:layout_width="wrap_content"
        android:layout_height="wrap_content"
        android:layout_alignParentBottom="true"
        android:layout_centerHorizontal="true"
        android:layout_marginBottom="192dp"
        android:src="@drawable/ic_launcher_background" />

    <EditText
        android:id="@+id/myeditText"
        android:layout_width="300dp"
        android:maxLines="1"
        android:layout_height="wrap_content"
        android:layout_below="@+id/mybutton"
        android:layout_centerHorizontal="true"
        android:ems="10"
        android:hint="请输入要加载成二维码的内容" />
java 文件:
public class MainActivity extends Activity implements View.OnClickListener {


    private int width = 300;
    private int height = 300;
    private ImageView imageView;
    private Bitmap bit;
    private Button mybutton;
    private EditText myeditText;


    @Override
    protected void onCreate(Bundle savedInstanceState) {
        super.onCreate(savedInstanceState);
        setContentView(R.layout.activity_main);
        initView();

    }


    private void initView() {
        imageView = (ImageView) findViewById(R.id.imageView);
        mybutton = (Button) findViewById(R.id.mybutton);
        mybutton.setOnClickListener(this);
        myeditText = (EditText) findViewById(R.id.myeditText);
        myeditText.setOnClickListener(this);
    }

    @Override
    public void onClick(View v) {
        switch (v.getId()) {
            case R.id.mybutton:
          String name=myeditText.getText().toString();
          if(name.equals("")){
              myeditText.setError("请输入内容");
          }else{
              zxing(name);
          }

                break;
        }
    }
    private void zxing(String name){
        QRCodeWriter qrCodeWriter = new QRCodeWriter();
        Map<EncodeHintType, String> hints = new HashMap<>();
        hints.put(EncodeHintType.CHARACTER_SET, "utf-8"); //记得要自定义长宽
        BitMatrix encode = null;
        try {
            encode = qrCodeWriter.encode(name, BarcodeFormat.QR_CODE, width, height, hints);
        } catch (WriterException e) {
            e.printStackTrace();
        }
        int[] colors = new int[width * height];
           //利用for循环将要表示的信息写出来
        for (int i = 0; i < width; i++) {
            for (int j = 0; j < height; j++) {
                if (encode.get(i, j)) {
                    colors[i * width + j] = Color.BLACK;
                } else {
                    colors[i * width + j] = Color.WHITE;
                }
            }
        }

        bit = Bitmap.createBitmap(colors, width, height, Bitmap.Config.RGB_565);
        imageView.setImageBitmap(bit);
    }

}
“Android利用zxing生成二维码的详细过程”的内容就介绍到这里了,感谢大家的阅读。如果想了解更多行业相关的知识可以关注亿速云网站,小编将为大家输出更多高质量的实用文章!
免责声明:本站发布的内容(图片、视频和文字)以原创、转载和分享为主,文章观点不代表本网站立场,如果涉及侵权请联系站长邮箱:is@yisu.com进行举报,并提供相关证据,一经查实,将立刻删除涉嫌侵权内容。