您好,登录后才能下订单哦!
密码登录
登录注册
点击 登录注册 即表示同意《亿速云用户服务条款》
这篇文章主要介绍“spring中怎么向一个单例bean中注入非单例bean”,在日常操作中,相信很多人在spring中怎么向一个单例bean中注入非单例bean问题上存在疑惑,小编查阅了各式资料,整理出简单好用的操作方法,希望对大家解答”spring中怎么向一个单例bean中注入非单例bean”的疑惑有所帮助!接下来,请跟着小编一起来学习吧!
前言
错误实例演示
实现ApplicationContextAware接口
lookup method
lookup method签名
看到这个题目相信很多小伙伴都是懵懵的,平时我们的做法大都是下面的操作
@Component
public class People{

@Autowired
private Man man;
}
这里如果Man是单例的,这种写法是没有问题的,但如果Man是原型的,这样是否会存在问题。
这里有一个原型(生命周期为prototype)的类
package com.example.myDemo.component;

import org.springframework.context.annotation.Scope;
import org.springframework.stereotype.Component;

@Component
@Scope(value = "prototype")
public class Man  {

    public void eat() {
        System.out.println("I like beef");
    }
}
有一个单例(生命周期为singleton)的类
package com.example.myDemo.component;

import org.springframework.beans.factory.annotation.Autowired;
import org.springframework.beans.factory.annotation.Lookup;
import org.springframework.stereotype.Component;

@Component
public class Woman {
    //使用依赖注入的方式,注入原型的Man    @Autowired
    private Man man;

    public void eat() {
        System.out.println("man:"+man);
        System.out.println("I like fruits");
    }

}
下面看测试方法,
package com.example.myDemo;

import com.example.myDemo.component.MyFactoryBean;
import com.example.myDemo.component.Woman;
import com.example.myDemo.po.Student;
import org.springframework.boot.SpringApplication;
import org.springframework.boot.autoconfigure.SpringBootApplication;
import org.springframework.boot.autoconfigure.jdbc.DataSourceAutoConfiguration;
import org.springframework.boot.autoconfigure.orm.jpa.HibernateJpaAutoConfiguration;
import org.springframework.context.ApplicationContext;

@SpringBootApplication(exclude={DataSourceAutoConfiguration.class, HibernateJpaAutoConfiguration.class})
public class MyDemoApplication {

    public static void main(String[] args) {
        ApplicationContext ac=SpringApplication.run(MyDemoApplication.class, args);

        Woman woman=(Woman)ac.getBean("woman");
        for(int i=0;i<5;i++){
            woman.eat();
        }


    }

}
看下测试结果,
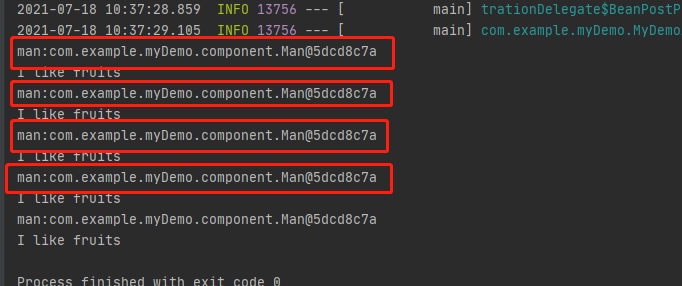
上面的结果显示Woman中的man是单例的,因为5次循环打印打出的结果是同一个对象,发生了什么,
Woman是单例的,Man是原型的,我们使用常规的@Autowired注解注入的却是同一个实例,这里想下为什么Man是一个对象,Woman是单例的,意味着在整个spring容器中只有一个实例,在属性注入的时候肯定也只会注入一次,所以其中Man属性也只能是一个实例,出现上图的结果也就不稀奇了。
现在有这样一个需求要向单例bean中注入原型bean,要怎么实现这样的需求
都知道ApplicationContextAware接口是spring提供的一个扩展点,实现该接口的类可以获得ApplicationContext
Woamn类改成下面的样子
package com.example.myDemo.component;

import org.springframework.beans.BeansException;
import org.springframework.beans.factory.annotation.Autowired;
import org.springframework.beans.factory.annotation.Lookup;
import org.springframework.context.ApplicationContext;
import org.springframework.context.ApplicationContextAware;
import org.springframework.stereotype.Component;

@Component
public class Woman implements ApplicationContextAware {

    private Man man;

    private ApplicationContext ac;

    public void eat() {
        this.man = (Man) ac.getBean("man");
        System.out.println("man:" + man);
        System.out.println("I like fruits");
    }

    @Override
    public void setApplicationContext(ApplicationContext applicationContext) throws BeansException {
        this.ac = applicationContext;
    }
}
Woman实现了ApplicationContextAware接口,注入了ApplicaitonContext对象,然后再eat()方法中通过AppicationContext获得Man的实例,看测试结果,
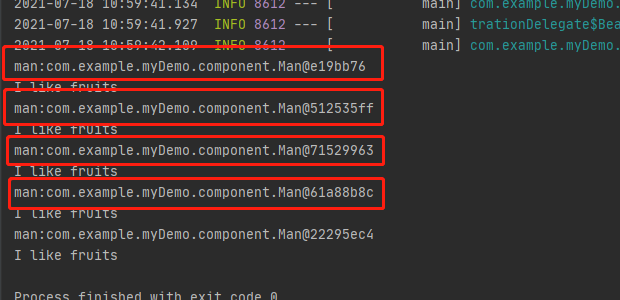
可以看到man属性是多例的也就是符合原型模式的定义。
思考下为什么采用这种方式可以达到注入原型bean的目的
在eat()方法中使用ApplicationContext的getBean方法获取Man,eat()方法每执行一次均会调用一次getBean方法,getbean方法在执行的时候的时候会判断Man的生命周期,如果是原型(prototype)的,那么每调用一次就会重新实例化一个Man,所以会出现上述的结果。
该方法有一个很大的缺点那就是和spring耦合度太高,不符合降低系统的耦合度的要求。
spring也考虑了向一个单例bean中注入原型bean的情况,提供了@Lookup注解,在XML配置方式下是<lookup-method>标签,这里仅使用注解的方式演示,
Woman类修改如下,
package com.example.myDemo.component;

import org.springframework.beans.BeansException;
import org.springframework.beans.factory.annotation.Autowired;
import org.springframework.beans.factory.annotation.Lookup;
import org.springframework.context.ApplicationContext;
import org.springframework.context.ApplicationContextAware;
import org.springframework.stereotype.Component;

@Component
public class Woman  {

    private Man man;

    public void eat() {
        this.man = createMan();
        System.out.println("man:" + man);
        System.out.println("I like fruits");
    }

    @Lookup
    public Man createMan(){
        return null;
    }

}
看下测试结果,
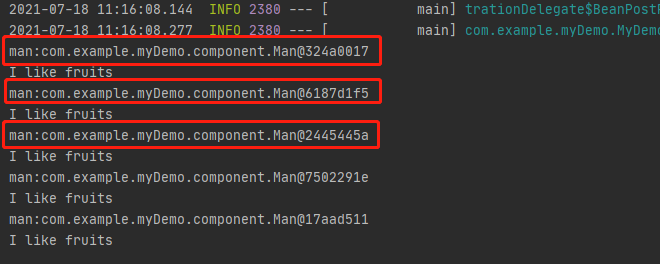
上图显示man是一个多例的,也就是向单例bean中注入了原型bean,其作用的是@Lookup注解。
通过@Lookup注解便完成了注入原型bean的目的,留个思考问题spring是如何做到的?
被@Lookup注解或<lookup-method>配置的方法有如下要求,
public|protected [abstract] return-type methodName(no-argments)
方法可以是public也可以是protected;
方法可以是抽象的也可以是非抽象的;
方法的返回值是要注入的类型,这里是prototype类型的类;
方法没有入参;
方法体可以是空的。具体返回值可以是null或任何类型,对结果没有影响;
到此,关于“spring中怎么向一个单例bean中注入非单例bean”的学习就结束了,希望能够解决大家的疑惑。理论与实践的搭配能更好的帮助大家学习,快去试试吧!若想继续学习更多相关知识,请继续关注亿速云网站,小编会继续努力为大家带来更多实用的文章!
免责声明:本站发布的内容(图片、视频和文字)以原创、转载和分享为主,文章观点不代表本网站立场,如果涉及侵权请联系站长邮箱:is@yisu.com进行举报,并提供相关证据,一经查实,将立刻删除涉嫌侵权内容。