您好,登录后才能下订单哦!
小编给大家分享一下如何利用Android从0到1实现一个流布局控件,希望大家阅读完这篇文章之后都有所收获,下面让我们一起去探讨吧!
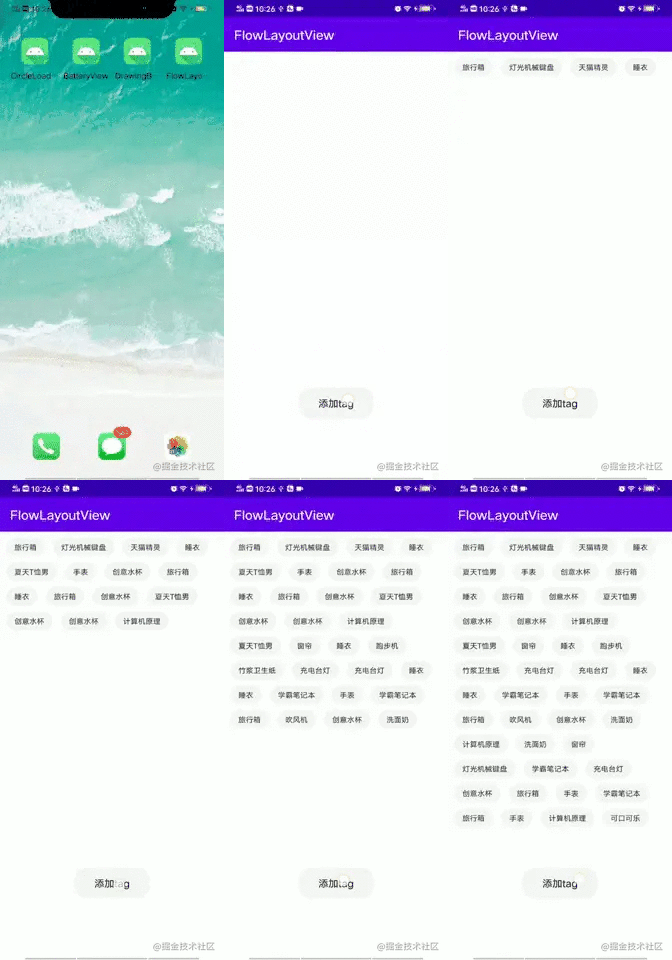
流布局在在项目中还是会时不时地用到的,比如在搜索历史记录,分类,热门词语等可用标签来显示的,都可以设计成流布局的展示方式。这里我从0到1实现了一个搜索历史记录的流布局。

1、创建FlowLayoutView,创建数据源,并添加各个子view。
2、在onMeasure方法中遍历子view,通过简单计算剩余宽度,用集合存储当前行的几个子view,再根据子view的累加高度设置自己的最终尺寸。
3、在onLayout方法中,遍历每一行,遍历该行的子view,依次调动layout设置子view位置。
引入行的概念,每一行存储自己应该放置的子view。判断该行剩余空间和该子view的宽度,来决定能放入该行,还是需要新建下一行来存储。
主要代码:
/**
 * description 流布局viewGroup
 */
public class FlowLayoutView extends ViewGroup {
    private List<Row> rows = new ArrayList<>();
    private int usedWidth;
    /**
     * 当前需要操作的行
     */
    private Row curRow;
    private int verticalPadding = 30;
    private int horizontalPadding = 40;

    public FlowLayoutView(Context context) {
        super(context);
    }

    public FlowLayoutView(Context context, AttributeSet attrs) {
        super(context, attrs);
    }

    @Override
    protected void onMeasure(int widthMeasureSpec, int heightMeasureSpec) {

        restoreLine();  //每次重新布局,属性要初始化,避免onMeasure重复调用混乱问题

        //子view设置宽高为父view大小减去padding值
        int width = MeasureSpec.getSize(widthMeasureSpec);
        int height = MeasureSpec.getSize(heightMeasureSpec);
        int widthMode = MeasureSpec.getMode(widthMeasureSpec);
        int heightMode = MeasureSpec.getMode(heightMeasureSpec);

        //设置每个子view宽高,并且将每个子View归到自己的行
        for (int i = 0; i < getChildCount(); i++) {
            View childView = getChildAt(i);

            //设置子view设置AT_MOST模式,即布局属性为wrap_content
            int childWidthSpec = MeasureSpec.makeMeasureSpec(width, widthMode == MeasureSpec.EXACTLY ? MeasureSpec.AT_MOST : widthMode);
            int childHeightSpec = MeasureSpec.makeMeasureSpec(height, heightMode == MeasureSpec.EXACTLY ? MeasureSpec.AT_MOST : heightMode);
            childView.measure(childWidthSpec, childHeightSpec);

            if (curRow == null) {
                curRow = new Row();
            }

            //根据当前childview宽度和剩余宽度判断是否能放进当前行,放不了就要换行
            if (childView.getMeasuredWidth() + horizontalPadding > width - usedWidth) {
                //先换行,再放入
                nextLine();
            }

            usedWidth += childView.getMeasuredWidth() + horizontalPadding;
            curRow.addView(childView);
        }

        //将最后一个row加入到rows中
        rows.add(curRow);

        //根据子view组成的高度重设自己高度
        int finalHeight = 0;
        for (Row row : rows) {
            finalHeight += row.height + verticalPadding;
        }

        setMeasuredDimension(width, finalHeight);
    }

    @Override
    protected void onLayout(boolean changed, int l, int t, int r, int b) {

        int top = 0;
        //遍历每一行,将每一行子view布局
        for (Row row : rows) {
            row.layout(top);
            top = top + row.height + verticalPadding;
        }
    }

    /**
     * 换行,需要将当前row存储,并且创建新的row,新的行使用空间置0
     */
    private void nextLine() {
        rows.add(curRow);
        curRow = new Row();
        usedWidth = 0;
    }

    /**
     * 每次onmeasure需要重置信息
     */
    private void restoreLine() {
        rows.clear();
        curRow = new Row();
        usedWidth = 0;
    }

    /**
     * 用于记录每一行放置子View的信息
     */
    class Row {
        /**
         * 该行放置的子view
         */
        private List<View> childViews = new ArrayList<>();
        private int height;

        public void addView(View view) {
            childViews.add(view);
            height = view.getMeasuredHeight() > height ? view.getMeasuredHeight() : height;  //高度取最高子view的高度
        }

        public int getSize() {
            return childViews.size();
        }

        /**
         * 将当前childViews进行布局
         * top 当前hang处于的顶部高度
         */
        public void layout(int top) {
            int leftMargin = 0;
            for (int i = 0; i < childViews.size(); i++) {
                View view = childViews.get(i);
                view.layout(leftMargin, top, leftMargin + view.getMeasuredWidth(), top + view.getMeasuredHeight());
                leftMargin = leftMargin + view.getMeasuredWidth() + horizontalPadding;
            }
        }
    }
}
MainActivity代码:
public class MainActivity extends AppCompatActivity {
    private FlowLayoutView flowLayoutView;

    private String[] tagTextArray = new String[]{"天猫精灵", "充电台灯", "睡衣", "手表", "创意水杯", "夏天T恤男", "灯光机械键盘",
            "计算机原理", "学霸笔记本", "可口可乐", "跑步机", "旅行箱", "竹浆卫生纸", "吹风机", "洗面奶", "窗帘"};

    @Override
    protected void onCreate(Bundle savedInstanceState) {
        super.onCreate(savedInstanceState);
        setContentView(R.layout.activity_main);

        init();
    }

    private void init() {
        flowLayoutView = findViewById(R.id.flowlayout);

        TextView tvAddTag = findViewById(R.id.tv_addtag);
        tvAddTag.setOnClickListener(new View.OnClickListener() {
            @Override
            public void onClick(View v) {
                View view = LayoutInflater.from(getApplicationContext()).inflate(R.layout.item_tagview, null);
                TextView tvContent = view.findViewById(R.id.tv_content);
                tvContent.setText(tagTextArray[(int) (Math.random()*tagTextArray.length)]);
                flowLayoutView.addView(view);
            }
        });
    }
}
看完了这篇文章,相信你对“如何利用Android从0到1实现一个流布局控件”有了一定的了解,如果想了解更多相关知识,欢迎关注亿速云行业资讯频道,感谢各位的阅读!
免责声明:本站发布的内容(图片、视频和文字)以原创、转载和分享为主,文章观点不代表本网站立场,如果涉及侵权请联系站长邮箱:is@yisu.com进行举报,并提供相关证据,一经查实,将立刻删除涉嫌侵权内容。