您好,登录后才能下订单哦!
密码登录
登录注册
点击 登录注册 即表示同意《亿速云用户服务条款》
这篇文章将为大家详细讲解有关ASP.NET Core中间件Middleware怎么用,小编觉得挺实用的,因此分享给大家做个参考,希望大家阅读完这篇文章后可以有所收获。
先借用微软官方文档的一张图:
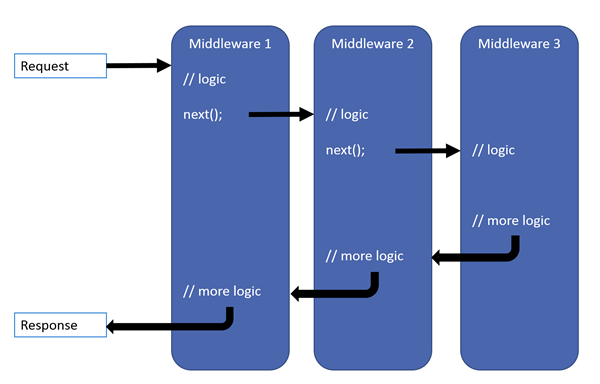
可以看到,中间件实际上是一种配置在HTTP请求管道中,用来处理请求和响应的组件。它可以:
决定是否将请求传递到管道中的下一个中间件
可以在管道中的下一个中间件处理之前和之后进行操作
此外,中间件的注册是有顺序的,书写代码时一定要注意!
该方法为HTTP请求管道添加一个中间件,并标识该中间件为管道终点,称为终端中间件。也就是说,该中间件就是管道的末尾,在该中间件之后注册的中间件将永远都不会被执行。所以,该方法一般只会书写在Configure方法末尾。
public class Startup
{
    public void Configure(IApplicationBuilder app)
    {
        app.Run(async context =>
        {
            await context.Response.WriteAsync("Hello, World!");
        });
    }
}通过该方法快捷的注册一个匿名的中间件
public class Startup
{
    public void Configure(IApplicationBuilder app)
    {
        app.Use(async (context, next) =>
        {
            // 下一个中间件处理之前的操作
            Console.WriteLine("Use Begin");

            await next();

            // 下一个中间件处理完成后的操作
            Console.WriteLine("Use End");
        });
    }
}
注意:
1.如果要将请求发送到管道中的下一个中间件,一定要记得调用next.Invoke / next(),否则会导致管道短路,后续的中间件将不会被执行
2.在中间件中,如果已经开始给客户端发送Response,请千万不要调用next.Invoke / next(),也不要对Response进行任何更改,否则,将抛出异常。
3.可以通过context.Response.HasStarted来判断响应是否已开始。
以下都是错误的代码写法
错误1:
public class Startup
{
    public void Configure(IApplicationBuilder app)
    {
        app.Use(async (context, next) =>
        {
            await context.Response.WriteAsync("Use");
            await next();
        });

        app.Run(context =>
        {
            // 由于上方的中间件已经开始 Response,此处更改 Response Header 会抛出异常
            context.Response.Headers.Add("test", "test");
            return Task.CompletedTask;
        });
    }
}错误2:
public class Startup
{
    public void Configure(IApplicationBuilder app)
    {
        app.Use(async (context, next) =>
        {
            await context.Response.WriteAsync("Use");

            // 即使没有调用 next.Invoke / next(),也不能在 Response 开始后对 Response 进行更改
            context.Response.Headers.Add("test", "test");
        });
    }
}通过该方法针对不同的逻辑条件创建管道分支。需要注意的是:
进入了管道分支后,如果管道分支不存在管道短路或终端中间件,则会再次返回到主管道。
当使用PathString时,路径必须以“/”开头,且允许只有一个'/'字符
支持嵌套,即UseWhen中嵌套UseWhen等
支持同时匹配多个段,如 /get/user
public class Startup
{
    public void Configure(IApplicationBuilder app)
    {
        // /get 或 /get/xxx 都会进入该管道分支
        app.UseWhen(context => context.Request.Path.StartsWithSegments("/get"), app =>
        {
            app.Use(async (context, next) =>
            {
                Console.WriteLine("UseWhen:Use");

                await next();
            });
        });

        app.Use(async (context, next) =>
        {
            Console.WriteLine("Use");

            await next();
        });

        app.Run(async context =>
        {
            Console.WriteLine("Run");

            await context.Response.WriteAsync("Hello World!");
        });
    }
}
当访问 /get 时,输出如下:
UseWhen:Use
Use
Run
如果你发现输出了两遍,别慌,看看是不是浏览器发送了两次请求,分别是 /get 和 /favicon.ico
通过该方法针对不同的请求路径创建管道分支。需要注意的是:
一旦进入了管道分支,则不会再回到主管道。
使用该方法时,会将匹配的路径从HttpRequest.Path 中删除,并将其追加到HttpRequest.PathBase中。
路径必须以“/”开头,且不能只有一个'/'字符
支持嵌套,即Map中嵌套Map、MapWhen(接下来会讲)等
支持同时匹配多个段,如 /post/user
public class Startup
{
    public void Configure(IApplicationBuilder app)
    {
        // 访问 /get 时会进入该管道分支
        // 访问 /get/xxx 时会进入该管道分支
        app.Map("/get", app =>
        {
            app.Use(async (context, next) =>
            {
                Console.WriteLine("Map get: Use");
                Console.WriteLine($"Request Path: {context.Request.Path}");
                Console.WriteLine($"Request PathBase: {context.Request.PathBase}");

                await next();
            });

            app.Run(async context =>
            {
                Console.WriteLine("Map get: Run");

                await context.Response.WriteAsync("Hello World!");
            });

        });

        // 访问 /post/user 时会进入该管道分支
        // 访问 /post/user/xxx 时会进入该管道分支
        app.Map("/post/user", app =>
        {
            // 访问 /post/user/student 时会进入该管道分支
            // 访问 /post/user/student/1 时会进入该管道分支
            app.Map("/student", app =>
            {
                app.Run(async context =>
                {
                    Console.WriteLine("Map /post/user/student: Run");
                    Console.WriteLine($"Request Path: {context.Request.Path}");
                    Console.WriteLine($"Request PathBase: {context.Request.PathBase}");

                    await context.Response.WriteAsync("Hello World!");
                });
            });

            app.Use(async (context, next) =>
            {
                Console.WriteLine("Map post/user: Use");
                Console.WriteLine($"Request Path: {context.Request.Path}");
                Console.WriteLine($"Request PathBase: {context.Request.PathBase}");

                await next();
            });

            app.Run(async context =>
            {
                Console.WriteLine("Map post/user: Run");

                await context.Response.WriteAsync("Hello World!");
            });
        });
    }
}
当你访问 /get/user 时,输出如下:
Map get: Use
Request Path: /user
Request PathBase: /get
Map get: Run
当你访问 /post/user/student/1 时,输出如下:
Map /post/user/student: Run
Request Path: /1
Request PathBase: /post/user/student
其他情况交给你自己去尝试啦!
与Map类似,只不过MapWhen不是基于路径,而是基于逻辑条件创建管道分支。注意事项如下:
一旦进入了管道分支,则不会再回到主管道。
当使用PathString时,路径必须以“/”开头,且允许只有一个'/'字符
HttpRequest.Path和HttpRequest.PathBase不会像Map那样进行特别处理
支持嵌套,即MapWhen中嵌套MapWhen、Map等
支持同时匹配多个段,如 /get/user
public class Startup
{
    public void Configure(IApplicationBuilder app)
    {
        // /get 或 /get/xxx 都会进入该管道分支
        app.MapWhen(context => context.Request.Path.StartsWithSegments("/get"), app =>
        {
            app.MapWhen(context => context.Request.Path.ToString().Contains("user"), app =>
            {
                app.Use(async (context, next) =>
                {
                    Console.WriteLine("MapWhen get user: Use");

                    await next();
                });
            });

            app.Use(async (context, next) =>
            {
                Console.WriteLine("MapWhen get: Use");

                await next();
            });

            app.Run(async context =>
            {
                Console.WriteLine("MapWhen get: Run");

                await context.Response.WriteAsync("Hello World!");
            });
        });
    }
}
当你访问 /get/user 时,输出如下:
MapWhen get user: Use
可以看到,即使该管道分支没有终端中间件,也不会回到主管道。
一下子接触了4个命名相似的、与中间件管道有关的API,不知道你有没有晕倒,没关系,我来帮大家总结一下:
Run用于注册终端中间件,Use用来注册匿名中间件,UseWhen、Map、MapWhen用于创建管道分支。
UseWhen进入管道分支后,如果管道分支中不存在短路或终端中间件,则会返回到主管道。Map和MapWhen进入管道分支后,无论如何,都不会再返回到主管道。
UseWhen和MapWhen基于逻辑条件来创建管道分支,而Map基于请求路径来创建管道分支,且会对HttpRequest.Path和HttpRequest.PathBase进行处理。
上面已经提到过的Run和Use就不再赘述了。
“约定大于配置”,先来个约法三章:
1.拥有公共(public)构造函数,且该构造函数至少包含一个类型为RequestDelegate的参数
2.拥有名为Invoke或InvokeAsync的公共(public)方法,必须包含一个类型为HttpContext的方法参数,且该参数必须位于第一个参数的位置,另外该方法必须返回Task类型。
3.构造函数中的其他参数可以通过依赖注入(DI)填充,也可以通过UseMiddleware传参进行填充。
通过DI填充时,只能接收 Transient 和 Singleton 的DI参数。这是由于中间件是在应用启动时构造的(而不是按请求构造),所以当出现 Scoped 参数时,构造函数内的DI参数生命周期与其他不共享,如果想要共享,则必须将Scoped DI参数添加到Invoke/InvokeAsync来进行使用。
通过UseMiddleware传参时,构造函数内的DI参数和非DI参数顺序没有要求,传入UseMiddleware内的参数顺序也没有要求,但是我建议将非DI参数放到前面,DI参数放到后面。(这一块感觉微软做的好牛皮)
4.Invoke/InvokeAsync的其他参数也能够通过依赖注入(DI)填充,可以接收 Transient、Scoped 和 Singleton 的DI参数。
一个简单的中间件如下:
public class MyMiddleware
{
    // 用于调用管道中的下一个中间件
    private readonly RequestDelegate _next;

    public MyMiddleware(
        RequestDelegate next,
        ITransientService transientService,
        ISingletonService singletonService)
    {
        _next = next;
    }

    public async Task InvokeAsync(
        HttpContext context,
        ITransientService transientService,
        IScopedService scopedService,
        ISingletonService singletonService)
    {
        // 下一个中间件处理之前的操作
        Console.WriteLine("MyMiddleware Begin");

        await _next(context);

        // 下一个中间件处理完成后的操作
        Console.WriteLine("MyMiddleware End");
    }
}然后,你可以通过UseMiddleware方法将其添加到管道中
public class Startup
{
    public void Configure(IApplicationBuilder app)
    {
        app.UseMiddleware<MyMiddleware>();
    }
}不过,一般不推荐直接使用UseMiddleware,而是将其封装到扩展方法中
public static class AppMiddlewareApplicationBuilderExtensions
{
    public static IApplicationBuilder UseMy(this IApplicationBuilder app) => app.UseMiddleware<MyMiddleware>();
}

public class Startup
{
    public void Configure(IApplicationBuilder app)
    {
        app.UseMy();
    }
}优势:
按照请求进行激活。这个就是说,上面基于约定的中间件实例是单例的,但是基于工厂的中间件,可以在依赖注入时设置中间件实例的生命周期。
使中间件强类型化(因为其实现了接口IMiddleware)
该方式的实现基于IMiddlewareFactory和IMiddleware。先来看一下接口定义:
public interface IMiddlewareFactory
{
    IMiddleware? Create(Type middlewareType);

    void Release(IMiddleware middleware);
}

public interface IMiddleware
{
    Task InvokeAsync(HttpContext context, RequestDelegate next);
}你有没有想过当我们调用UseMiddleware时,它是如何工作的呢?事实上,UseMiddleware扩展方法会先检查中间件是否实现了IMiddleware接口。 如果实现了,则使用容器中注册的IMiddlewareFactory实例来解析该IMiddleware的实例(这下你知道为什么称为“基于工厂的中间件”了吧)。如果没实现,那么就使用基于约定的中间件逻辑来激活中间件。
注意,基于工厂的中间件,在应用的服务容器中一般注册为 Scoped 或 Transient 服务。
这样的话,咱们就可以放心的将 Scoped 服务注入到中间件的构造函数中了。
接下来,咱们就来实现一个基于工厂的中间件:
public class YourMiddleware : IMiddleware
{
    public async Task InvokeAsync(HttpContext context, RequestDelegate next)
    {
        // 下一个中间件处理之前的操作
        Console.WriteLine("YourMiddleware Begin");

        await next(context);

        // 下一个中间件处理完成后的操作
        Console.WriteLine("YourMiddleware End");
    }
}

public static class AppMiddlewareApplicationBuilderExtensions
{
    public static IApplicationBuilder UseYour(this IApplicationBuilder app) => app.UseMiddleware<YourMiddleware>();
}然后,在ConfigureServices中添加中间件依赖注入
public class Startup
{
    public void ConfigureServices(IServiceCollection services)
    {
        services.AddTransient<YourMiddleware>();
    }
}最后,在Configure中使用中间件
public class Startup
{
    public void Configure(IApplicationBuilder app)
    {
        app.UseYour();
    }
}微软提供了IMiddlewareFactory的默认实现:
public class MiddlewareFactory : IMiddlewareFactory
{
    // The default middleware factory is just an IServiceProvider proxy.
    // This should be registered as a scoped service so that the middleware instances
    // don't end up being singletons.
    // 默认的中间件工厂仅仅是一个 IServiceProvider 的代理
    // 该工厂应该注册为 Scoped 服务,这样中间件实例就不会成为单例
    private readonly IServiceProvider _serviceProvider;

    public MiddlewareFactory(IServiceProvider serviceProvider)
    {
        _serviceProvider = serviceProvider;
    }

    public IMiddleware? Create(Type middlewareType)
    {
        return _serviceProvider.GetRequiredService(middlewareType) as IMiddleware;
    }

    public void Release(IMiddleware middleware)
    {
        // The container owns the lifetime of the service
        // DI容器来管理服务的生命周期
    }
}可以看到,该工厂使用过DI容器来解析出服务实例的。因此,当使用基于工厂的中间件时,是无法通过UseMiddleware向中间件的构造函数传参的。
基于约定的中间件实例都是 Singleton;而基于工厂的中间件实例可以是 Singleton、Scoped 和 Transient(当然,不建议注册为 Singleton)
基于约定的中间件实例构造函数中可以通过依赖注入传参,也可以用过UseMiddleware传参;而基于工厂的中间件只能通过依赖注入传参
基于约定的中间件实例可以在Invoke/InvokeAsync中添加更多的依赖注入参数;而基于工厂的中间件只能按照IMiddleware的接口定义进行实现。
关于“ASP.NET Core中间件Middleware怎么用”这篇文章就分享到这里了,希望以上内容可以对大家有一定的帮助,使各位可以学到更多知识,如果觉得文章不错,请把它分享出去让更多的人看到。
免责声明:本站发布的内容(图片、视频和文字)以原创、转载和分享为主,文章观点不代表本网站立场,如果涉及侵权请联系站长邮箱:is@yisu.com进行举报,并提供相关证据,一经查实,将立刻删除涉嫌侵权内容。