жӮЁеҘҪпјҢзҷ»еҪ•еҗҺжүҚиғҪдёӢи®ўеҚ•е“ҰпјҒ
еҜҶз Ғзҷ»еҪ•
зҷ»еҪ•жіЁеҶҢ
зӮ№еҮ» зҷ»еҪ•жіЁеҶҢ еҚіиЎЁзӨәеҗҢж„ҸгҖҠдәҝйҖҹдә‘з”ЁжҲ·жңҚеҠЎжқЎж¬ҫгҖӢ
иҝҷзҜҮж–Үз« е°ҶдёәеӨ§е®¶иҜҰз»Ҷи®Іи§Јжңүе…іJavaдёӯSwaggerжҠҖжңҜжҖҺд№Ҳз”ЁпјҢе°Ҹзј–и§үеҫ—жҢәе®һз”Ёзҡ„пјҢеӣ жӯӨеҲҶдә«з»ҷеӨ§е®¶еҒҡдёӘеҸӮиҖғпјҢеёҢжңӣеӨ§е®¶йҳ…иҜ»е®ҢиҝҷзҜҮж–Үз« еҗҺеҸҜд»ҘжңүжүҖ收иҺ·гҖӮ
еңЁеүҚеҗҺз«ҜеҲҶзҰ»ж—¶д»ЈпјҢжҲ‘们йңҖиҰҒе®һж—¶иҮӘеҠЁжӣҙж–°жҺҘеҸЈдҝЎжҒҜпјҢе’ҢжөӢиҜ•жҺҘеҸЈпјҢе®һзҺ°еүҚеҗҺз«ҜеҲҶзҰ»ејҸејҖеҸ‘пјҢswaggerеӣ жӯӨдә§з”ҹ
д»ҘдёӢд»Ҙ3.0.0дҫқиө–дёәдҫӢ
<!--swagger зӣёе…із»„件--> <dependency> <groupId>io.springfox</groupId> <artifactId>springfox-swagger2</artifactId> <version>3.0.0</version> </dependency> <dependency> <groupId>io.springfox</groupId> <artifactId>springfox-swagger-ui</artifactId> <version>3.0.0</version> </dependency> <dependency> <groupId>io.springfox</groupId> <artifactId>springfox-boot-starter</artifactId> <version>3.0.0</version> </dependency>
@RestController
public class HelloController {

    @RequestMapping(value = "/hello")
    public String hello(){
         return "hello";
    }
}
@Configuration
@EnableSwagger2 //ејҖеҗҜswagger2
public class SwaggerConfig {
}然еҗҺи®ҝй—®http://localhost:8080/swagger-ui/index.html
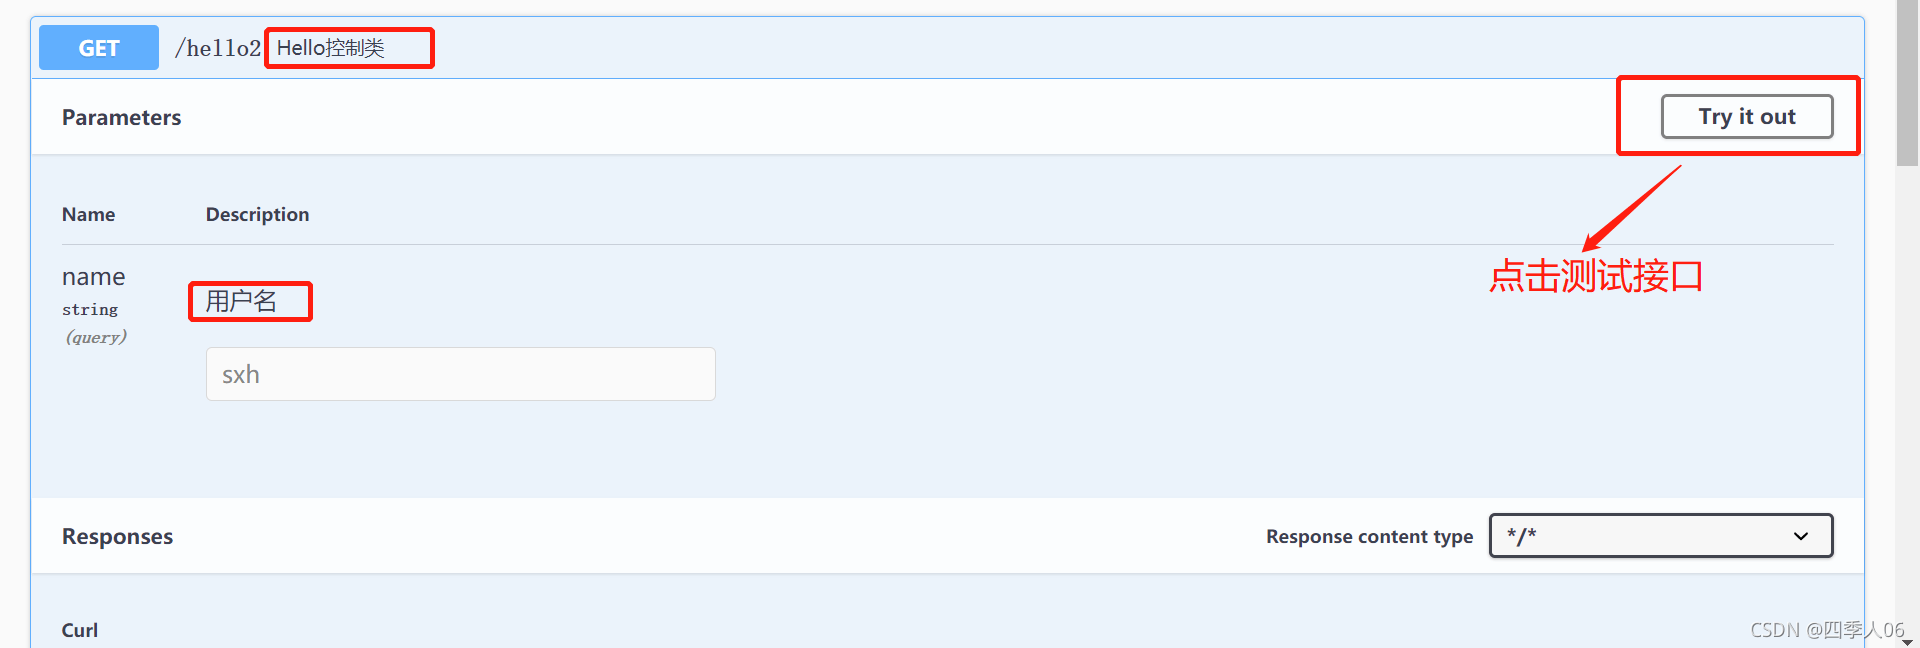
дҪ е°ұиғҪзңӢеҲ°еҰӮдёӢз•ҢйқўпјҢдёәswaggerж–ҮжЎЈ
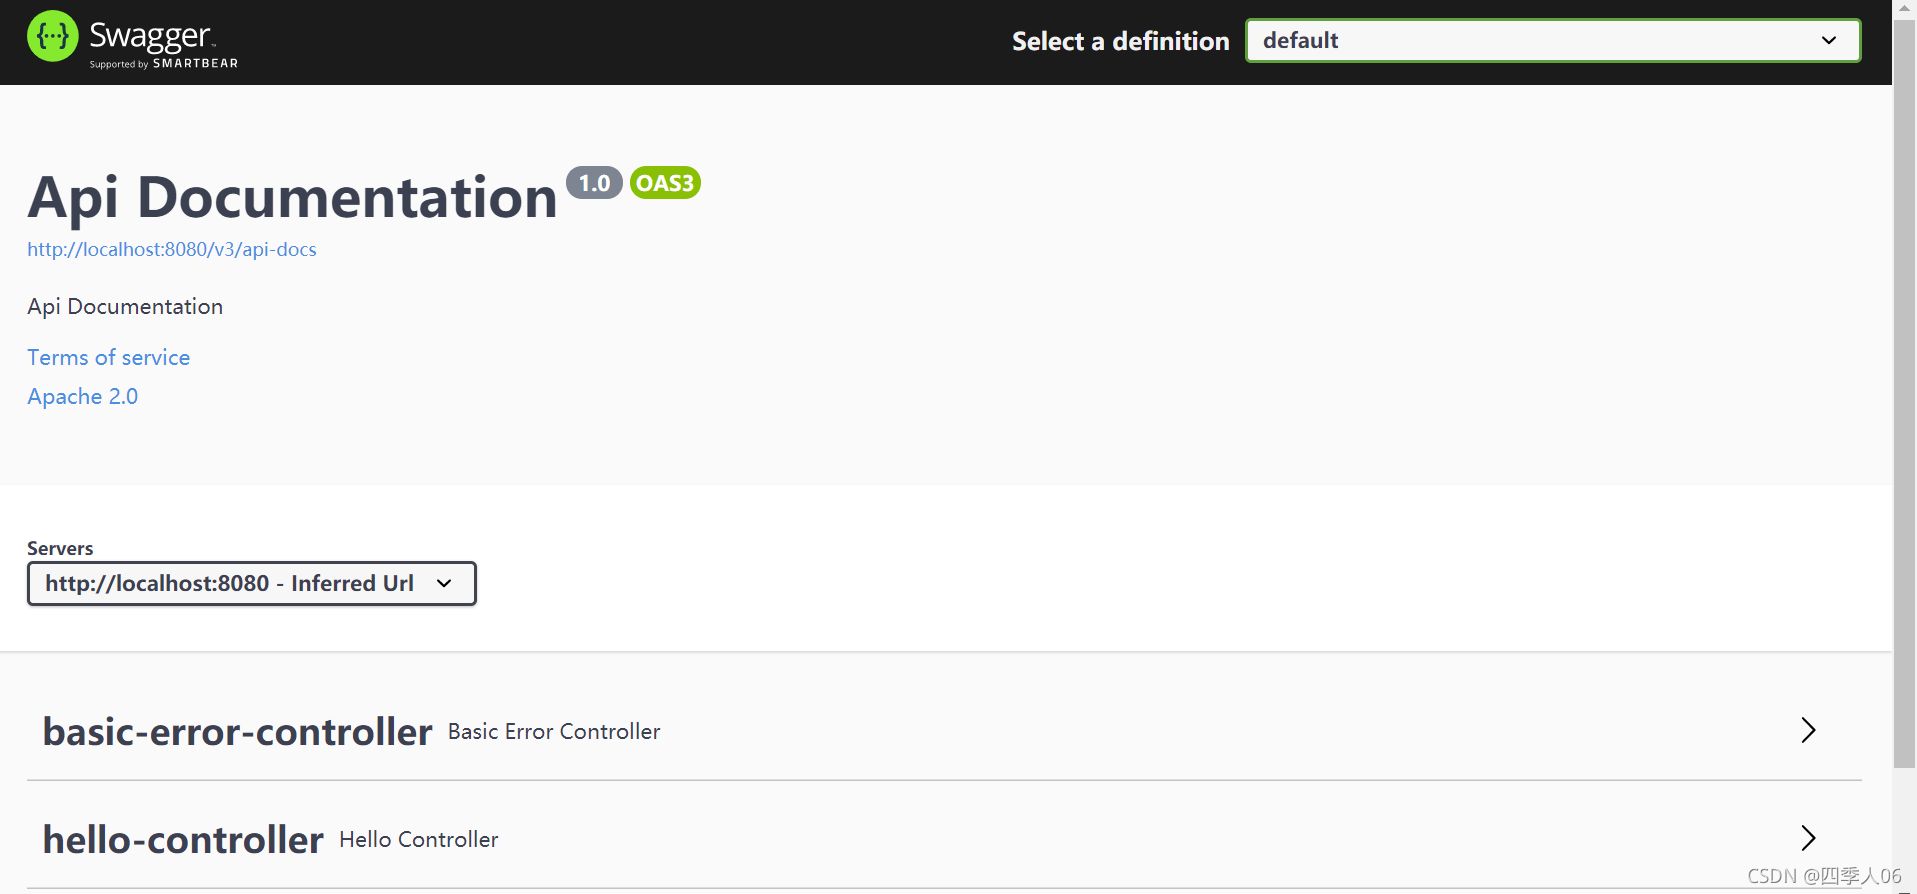
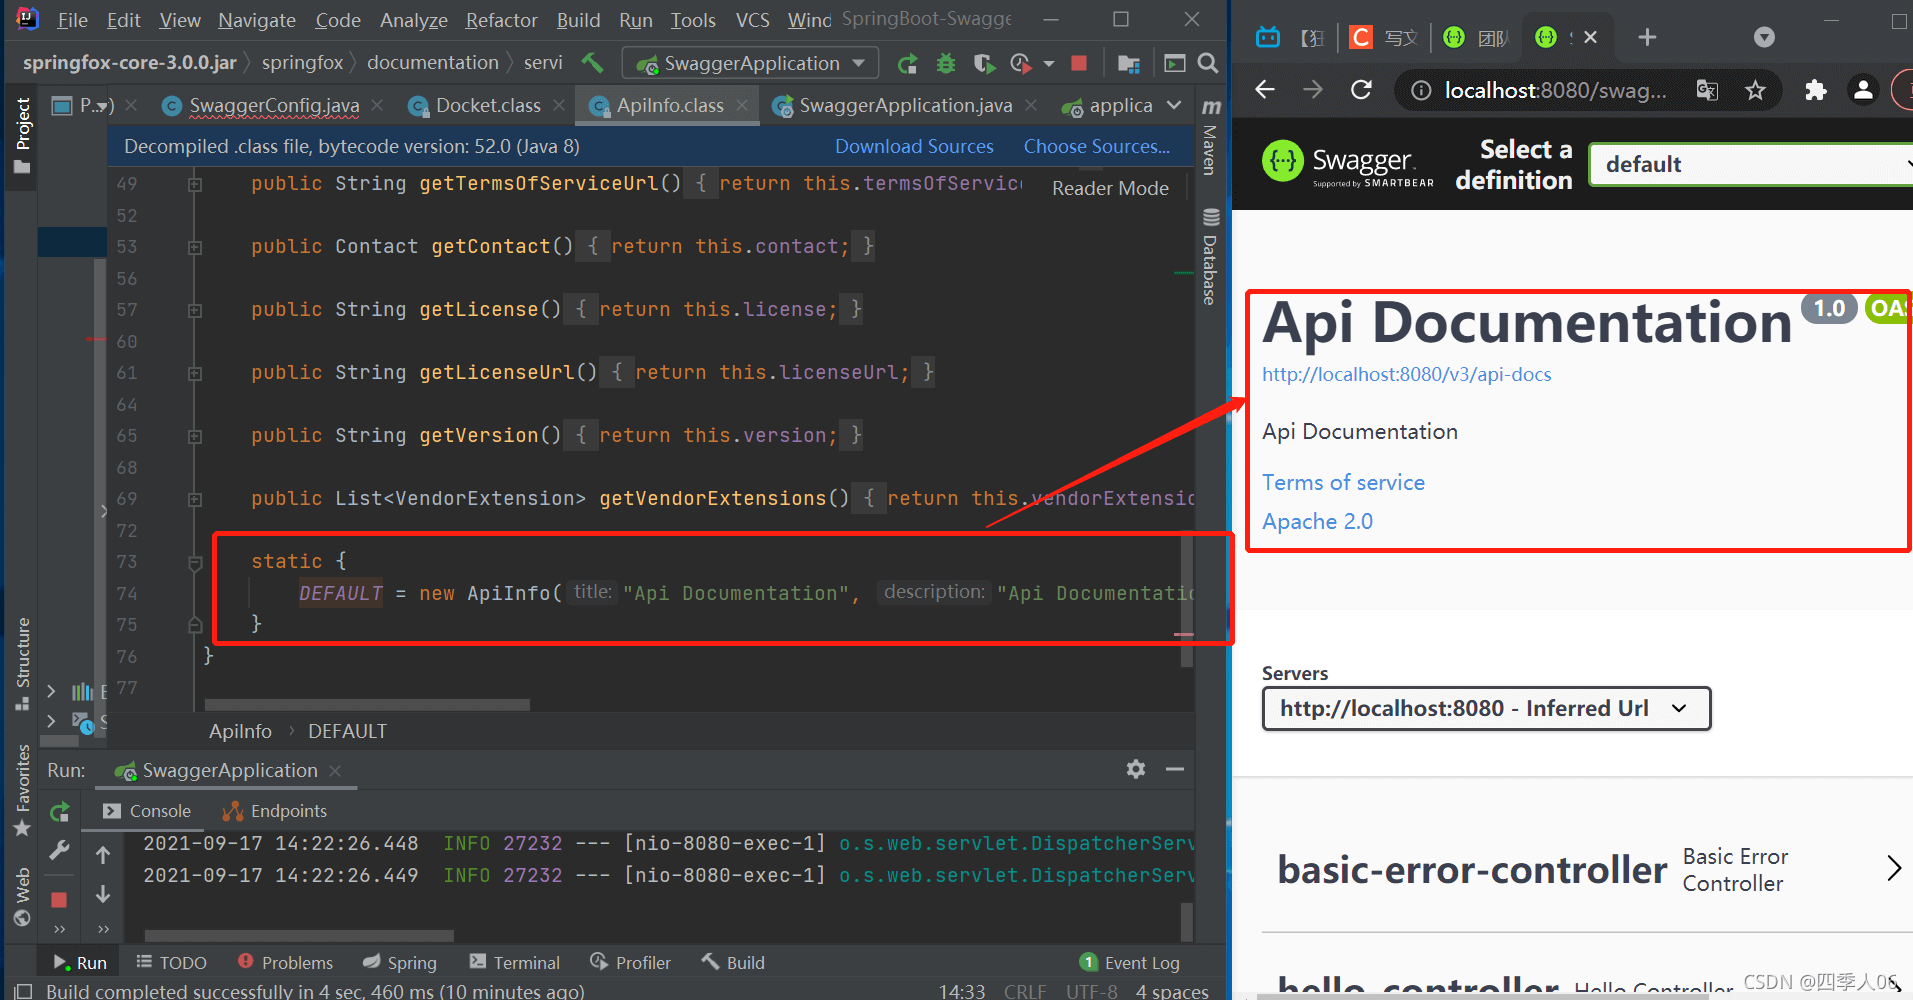
е…ҲжқҘзңӢзңӢеә•еұӮзҡ„д»Јз ҒпјҢдәҶи§ЈдёҖдёӢ

@Configuration
@EnableSwagger2 //ејҖеҗҜswagger2
public class SwaggerConfig {
@Bean
public Docket docket(){
return new Docket(DocumentationType.SWAGGER_2).apiInfo(apiInfo());
}
//й…ҚзҪ®swaggerдҝЎжҒҜapiInfo
private ApiInfo apiInfo(){
//дҪңиҖ…дҝЎжҒҜ
Contact contact = new Contact("е®Ӣе…Ҳж…§", "https://blog.csdn.net/sxh06", "xianhuisong@yeah.net");
return new ApiInfo(
"е®Ӣе…Ҳж…§зҡ„Api Documentation",
"еӯҰд№ swaggerжІЎжңүе°ҪеӨҙ",
"1.0",
"urn:tos",
contact,
"Apache 2.0",
"http://www.apache.org/licenses/LICENSE-2.0",
new ArrayList());
}
}@Configuration
@EnableSwagger2 //ејҖеҗҜswagger2
public class SwaggerConfig {
// @Bean
// public Docket docket1(){
// return new Docket(DocumentationType.SWAGGER_2).groupName("еҲҶз»„дәҢ");
// }
@Bean
public Docket docket(Environment environment){
Profiles profiles=Profiles.of("dev");
//иҺ·еҸ–йЎ№зӣ®зҡ„зҺҜеўғ
boolean flag=environment.acceptsProfiles(profiles);
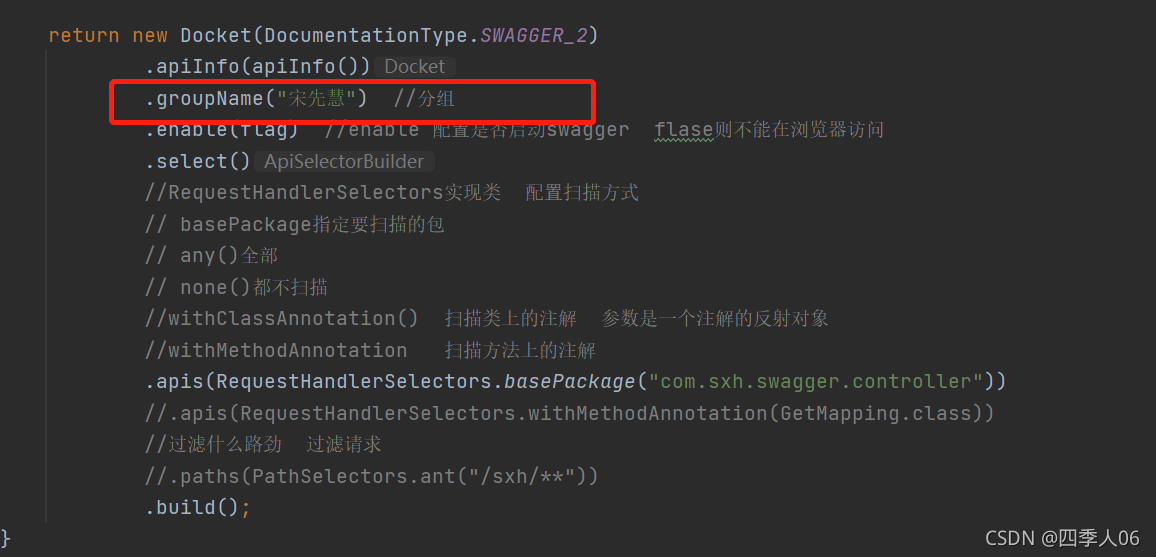
return new Docket(DocumentationType.SWAGGER_2)
.apiInfo(apiInfo())
.groupName("е®Ӣе…Ҳж…§") //еҲҶз»„
.enable(flag) //enable й…ҚзҪ®жҳҜеҗҰеҗҜеҠЁswagger flaseеҲҷдёҚиғҪеңЁжөҸи§ҲеҷЁи®ҝй—®
.select()
//RequestHandlerSelectorsе®һзҺ°зұ» й…ҚзҪ®жү«жҸҸж–№ејҸ
// basePackageжҢҮе®ҡиҰҒжү«жҸҸзҡ„еҢ…
// any()е…ЁйғЁ
// none()йғҪдёҚжү«жҸҸ
//withClassAnnotation() жү«жҸҸзұ»дёҠзҡ„жіЁи§Ј еҸӮж•°жҳҜдёҖдёӘжіЁи§Јзҡ„еҸҚе°„еҜ№иұЎ
//withMethodAnnotation жү«жҸҸж–№жі•дёҠзҡ„жіЁи§Ј
.apis(RequestHandlerSelectors.basePackage("com.sxh.swagger.controller"))
//.apis(RequestHandlerSelectors.withMethodAnnotation(GetMapping.class))
//иҝҮж»Өд»Җд№Ҳи·ҜеҠІ иҝҮж»ӨиҜ·жұӮ
//.paths(PathSelectors.ant("/sxh/**"))
.build();
}
//й…ҚзҪ®swaggerдҝЎжҒҜapiInfo
private ApiInfo apiInfo(){
//дҪңиҖ…дҝЎжҒҜ
Contact contact = new Contact("е®Ӣе…Ҳж…§", "https://blog.csdn.net/sxh06", "xianhuisong@yeah.net");
return new ApiInfo(
"е®Ӣе…Ҳж…§зҡ„Api Documentation",
"еӯҰд№ swaggerжІЎжңүе°ҪеӨҙ",
"1.0",
"urn:tos",
contact,
"Apache 2.0",
"http://www.apache.org/licenses/LICENSE-2.0",
new ArrayList());
}
}еҰӮжһңжҲ‘еҸӘеёҢжңӣеңЁз”ҹжҲҗзҺҜеўғдҪҝз”Ёswagger,еңЁжӯЈејҸзҺҜеўғдёҚдҪҝз”ЁswaggerжҖҺд№Ҳи§ЈеҶіпјҹпјҲenable=false|trueпјү
й…ҚзҪ®еӨҡдёӘDocket е®һдҫӢеҚіеҸҜ
@Bean
public Docket docket1(){
return new Docket(DocumentationType.SWAGGER_2).groupName("еҲҶз»„дёҖ");
}
@Bean
public Docket docket2(){
return new Docket(DocumentationType.SWAGGER_2).groupName("еҲҶз»„дәҢ");
}`
е…ідәҺвҖңJavaдёӯSwaggerжҠҖжңҜжҖҺд№Ҳз”ЁвҖқиҝҷзҜҮж–Үз« е°ұеҲҶдә«еҲ°иҝҷйҮҢдәҶпјҢеёҢжңӣд»ҘдёҠеҶ…е®№еҸҜд»ҘеҜ№еӨ§е®¶жңүдёҖе®ҡзҡ„её®еҠ©пјҢдҪҝеҗ„дҪҚеҸҜд»ҘеӯҰеҲ°жӣҙеӨҡзҹҘиҜҶпјҢеҰӮжһңи§үеҫ—ж–Үз« дёҚй”ҷпјҢиҜ·жҠҠе®ғеҲҶдә«еҮәеҺ»и®©жӣҙеӨҡзҡ„дәәзңӢеҲ°гҖӮ
е…ҚиҙЈеЈ°жҳҺпјҡжң¬з«ҷеҸ‘еёғзҡ„еҶ…е®№пјҲеӣҫзүҮгҖҒи§Ҷйў‘е’Ңж–Үеӯ—пјүд»ҘеҺҹеҲӣгҖҒиҪ¬иҪҪе’ҢеҲҶдә«дёәдё»пјҢж–Үз« и§ӮзӮ№дёҚд»ЈиЎЁжң¬зҪ‘з«ҷз«ӢеңәпјҢеҰӮжһңж¶үеҸҠдҫөжқғиҜ·иҒ”зі»з«ҷй•ҝйӮ®з®ұпјҡis@yisu.comиҝӣиЎҢдёҫжҠҘпјҢ并жҸҗдҫӣзӣёе…іиҜҒжҚ®пјҢдёҖз»ҸжҹҘе®һпјҢе°Ҷз«ӢеҲ»еҲ йҷӨж¶үе«ҢдҫөжқғеҶ…е®№гҖӮ
жӮЁеҘҪпјҢзҷ»еҪ•еҗҺжүҚиғҪдёӢи®ўеҚ•е“ҰпјҒ