жӮЁеҘҪпјҢзҷ»еҪ•еҗҺжүҚиғҪдёӢи®ўеҚ•е“ҰпјҒ
еҜҶз Ғзҷ»еҪ•
зҷ»еҪ•жіЁеҶҢ
зӮ№еҮ» зҷ»еҪ•жіЁеҶҢ еҚіиЎЁзӨәеҗҢж„ҸгҖҠдәҝйҖҹдә‘з”ЁжҲ·жңҚеҠЎжқЎж¬ҫгҖӢ
иҝҷзҜҮж–Үз« дё»иҰҒдёәеӨ§е®¶еұ•зӨәдәҶвҖңAndroidеҰӮдҪ•е®һзҺ°йЎөйқўи·іиҪ¬вҖқпјҢеҶ…е®№з®ҖиҖҢжҳ“жҮӮпјҢжқЎзҗҶжё…жҷ°пјҢеёҢжңӣиғҪеӨҹеё®еҠ©еӨ§е®¶и§ЈеҶіз–‘жғ‘пјҢдёӢйқўи®©е°Ҹзј–еёҰйўҶеӨ§е®¶дёҖиө·з ”究并еӯҰд№ дёҖдёӢвҖңAndroidеҰӮдҪ•е®һзҺ°йЎөйқўи·іиҪ¬вҖқиҝҷзҜҮж–Үз« еҗ§гҖӮ
AppеҠҹиғҪ
еңЁз¬¬дёҖдёӘActivityиҫ“е…Ҙж¶ҲжҒҜ
зӮ№еҮ»з¬¬дёҖдёӘActivityзҡ„еҸ‘йҖҒжҢүй’®
еҸ‘йҖҒж¶ҲжҒҜеҲ°з¬¬дәҢдёӘActivity
第дәҢдёӘActivityжҳҫзӨә收еҲ°зҡ„ж¶ҲжҒҜ
Appз»“жһ„(2дёӘActivity+2дёӘLayout) :
жү“ејҖAppж—¶пјҢеҗҜеҠЁCreateMessageActivty
еҠ иҪҪactivity_create_message.xmlдҪңдёәеёғеұҖ
з”ЁжҲ·зӮ№еҮ»жҢүй’®еҗҜеҠЁReceiveMessageActivty
еҠ иҪҪactivity _receive_message.xmlдҪңдёәеёғеұҖ
activity_create_message.xml
<?xml version="1.0" encoding="utf-8"?>
<androidx.constraintlayout.widget.ConstraintLayout xmlns:android="http://schemas.android.com/apk/res/android"
    xmlns:app="http://schemas.android.com/apk/res-auto"
    xmlns:tools="http://schemas.android.com/tools"
    android:layout_width="match_parent"
    android:layout_height="match_parent"
    tools:context=".CreateMessageActivity">

    <LinearLayout
        android:layout_width="match_parent"
        android:layout_height="match_parent"
        android:orientation="vertical">

        <EditText
            android:id="@+id/input"
            android:layout_width="match_parent"
            android:layout_height="wrap_content"
            android:ems="10"
            android:hint="@string/hint"
            android:inputType="textPersonName"
            android:textSize="30sp"/>

        <Button
            android:id="@+id/button"
            android:layout_width="match_parent"
            android:layout_height="wrap_content"
            android:onClick="onSendMessage"
            android:text="@string/send"
            android:textSize="30sp"
            />

    </LinearLayout>
</androidx.constraintlayout.widget.ConstraintLayout>
activity _receive_message.xml
<?xml version="1.0" encoding="utf-8"?>
<androidx.constraintlayout.widget.ConstraintLayout xmlns:android="http://schemas.android.com/apk/res/android"
    xmlns:app="http://schemas.android.com/apk/res-auto"
    xmlns:tools="http://schemas.android.com/tools"
    android:layout_width="match_parent"
    android:layout_height="match_parent"
    app:layout_constraintRight_toRightOf="parent"
    tools:context=".ReceiveMessageActivity">

    <TextView
        android:id="@+id/output"
        android:layout_width="wrap_content"
        android:layout_height="wrap_content"
        android:text="2nd Activity"
        android:textSize="34sp"
        app:layout_constraintLeft_toLeftOf="parent"
        app:layout_constraintRight_toRightOf="parent"
        app:layout_constraintTop_toTopOf="parent" />
</androidx.constr
string.xml
<resources>
    <string name="app_name">Messager</string>
    <string name="send">Send Message</string>
    <string name="hint">Enter a message</string>
    <string name="choser">Send Message via ...</string>
</resources>
CreateMessageActivtyзұ»пјҡеҸ‘йҖҒж¶ҲжҒҜ
public class CreateMessageActivity extends AppCompatActivity {
//е®ҡд№үеёёйҮҸпјҢдҪңдёәж¶ҲжҒҜзҡ„key
public static final String MESSAGE_KEY="szst.it.ping.messager";
@Override
protected void onCreate(Bundle savedInstanceState) {
super.onCreate(savedInstanceState);
setContentView(R.layout.activity_create_message);
}
public void onSendMessage(View Button){
//иҺ·еҫ—зј–иҫ‘жЎҶеј•з”Ё
EditText editText = findViewById(R.id.input);
//еҸ–еҮәзј–иҫ‘жЎҶж–Үеӯ—
String message = editText.getText().toString();
//IntentжҳҜAndroidдёӯзҡ„дҝЎдҪҝпјҢж–°е»әIntentжү“ејҖпјҢи®ҫзҪ®ж”¶д»¶ActivityдёәReceiveMessageActivity
Intent intent = new Intent(this,ReceiveMessageActivity.class) ;
//еңЁintentдёӯйҷ„еҠ ж¶ҲжҒҜ
intent.putExtra(MESSAGE_KEY,message);
//еҗ‘AndroidеҸ‘еҮәиҜ·жұӮ
startActivity(intent);
}
}ReceiveMessageActivtyзұ»пјҡжҺҘ收ж¶ҲжҒҜ
public class ReceiveMessageActivity extends AppCompatActivity {
@Override
protected void onCreate(Bundle savedInstanceState) {
super.onCreate(savedInstanceState);
setContentView(R.layout.activity_receive_message);
//иҺ·еҫ—intentзҡ„еј•з”Ё
Intent intent = getIntent();
//ж №жҚ®keyеҸ–еҮәvalue
String message = intent.getStringExtra(CreateMessageActivity.MESSAGE_KEY);
//иҺ·еҫ—ж–Үжң¬жЎҶеҶ…е®№пјҢи®ҫзҪ®ж–Үеӯ—
TextView textView = findViewById(R.id.output);
textView.setText(message);
}
}еҗҜеҠЁз•Ңйқў
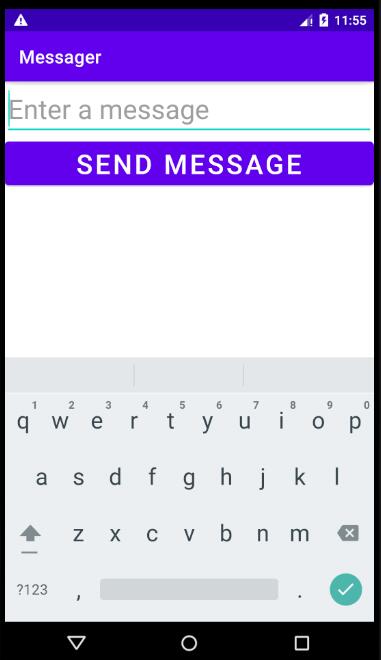
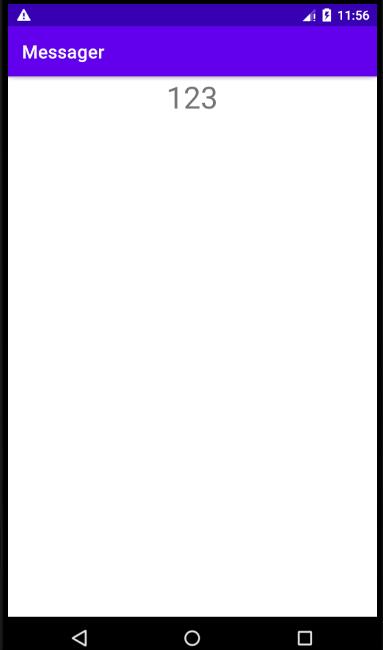
иҫ“е…Ҙж¶ҲжҒҜвҖң123вҖқ并зӮ№еҮ»жҢүй’®еҸ‘йҖҒпјҢжҺҘ收з•ҢйқўеҰӮдёӢ
AppеҠҹиғҪ
еңЁз¬¬дёҖдёӘActivityиҫ“е…Ҙж¶ҲжҒҜ
зӮ№еҮ»з¬¬дёҖдёӘActivityзҡ„еҸ‘йҖҒжҢүй’®
еҸ‘йҖҒж¶ҲжҒҜеҲ°е…¶д»–App
е…¶д»–AppжҳҫзӨә收еҲ°зҡ„ж¶ҲжҒҜ
Appз»“жһ„(1дёӘActivity+1дёӘLayout) :
жү“ејҖAppж—¶пјҢеҗҜеҠЁCreateMessageActivty
еҠ иҪҪactivity_create_message.xmlдҪңдёәеёғеұҖ
з”ЁжҲ·зӮ№еҮ»жҢүй’®еҗҜеҠЁйҖүжӢ©еҗҜеҠЁж»Ўи¶іжқЎд»¶зҡ„App
activity_create_message.xml
еҗҢ1.2дёӯзҡ„activity_create_message.xml
CreateMessageActivtyзұ»пјҡеҸ‘йҖҒж¶ҲжҒҜ
public class CreateMessageActivity extends AppCompatActivity {
@Override
protected void onCreate(Bundle savedInstanceState) {
super.onCreate(savedInstanceState);
setContentView(R.layout.activity_create_message);
}
public void onSendMessage(View Button){
//иҺ·еҫ—зј–иҫ‘жЎҶеј•з”Ё
EditText editText = findViewById(R.id.input);
//еҸ–еҮәзј–иҫ‘жЎҶж–Үеӯ—
String message = editText.getText().toString();
//дҪҝз”Ёnew Intent(Intent.ACTION_SEND)жӣҝжҚўnew Intent(this, ReceiveMessageActivity.class)пјҢдёҚзҹҘйҒ“е…¶е®ғAppдёӯзҡ„зұ»еҗҚ
Intent intent = new Intent(Intent.ACTION_SEND);
//и®ҫзҪ®ж¶ҲжҒҜзұ»еһӢдёәзәҜж–Үжң¬пјҢзі»з»ҹдёҚдјҡеҜ№ж¶ҲжҒҜиҝӣиЎҢеӨ„зҗҶ
intent.setType("text/plain");
//еҗ‘Intentж·»еҠ йҷ„еҠ дҝЎжҒҜ
intent.putExtra(Intent.EXTRA_TEXT,message);
//иҮӘе®ҡд№үйҖүжӢ©еҜ№иҜқжЎҶ
String chooserTitle = getString(R.string.choser);
Intent chosenIntent = Intent.createChooser(intent, chooserTitle);
startActivity(chosenIntent) ;
}
}еҗҜеҠЁз•ҢйқўеҗҢ1.4
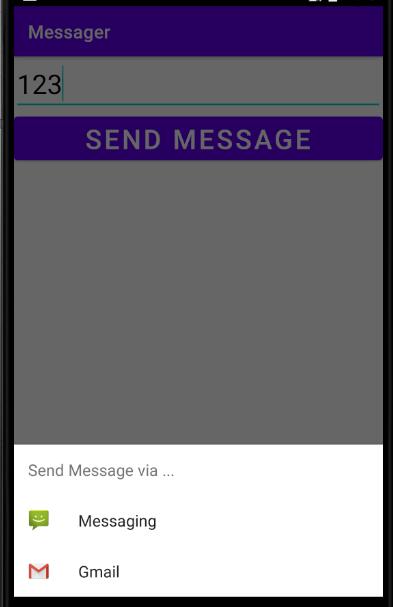
иҫ“е…Ҙж¶ҲжҒҜвҖң123вҖқ并зӮ№еҮ»жҢүй’®еҸ‘йҖҒпјҢйҖүжӢ©иҰҒеҸ‘йҖҒзҡ„appпјҲMessagingпјү
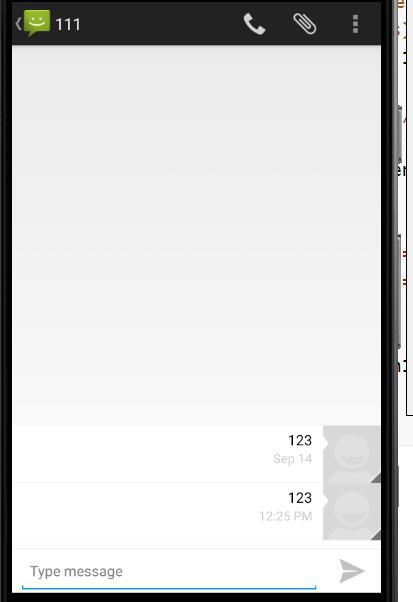
еҸ‘йҖҒйҷ„еҠ ж¶ҲжҒҜеҲ°111

еҸ‘йҖҒжҲҗеҠҹ
д»ҘдёҠжҳҜвҖңAndroidеҰӮдҪ•е®һзҺ°йЎөйқўи·іиҪ¬вҖқиҝҷзҜҮж–Үз« зҡ„жүҖжңүеҶ…е®№пјҢж„ҹи°ўеҗ„дҪҚзҡ„йҳ…иҜ»пјҒзӣёдҝЎеӨ§е®¶йғҪжңүдәҶдёҖе®ҡзҡ„дәҶи§ЈпјҢеёҢжңӣеҲҶдә«зҡ„еҶ…е®№еҜ№еӨ§е®¶жңүжүҖеё®еҠ©пјҢеҰӮжһңиҝҳжғіеӯҰд№ жӣҙеӨҡзҹҘиҜҶпјҢж¬ўиҝҺе…іжіЁдәҝйҖҹдә‘иЎҢдёҡиө„и®Ҝйў‘йҒ“пјҒ
е…ҚиҙЈеЈ°жҳҺпјҡжң¬з«ҷеҸ‘еёғзҡ„еҶ…е®№пјҲеӣҫзүҮгҖҒи§Ҷйў‘е’Ңж–Үеӯ—пјүд»ҘеҺҹеҲӣгҖҒиҪ¬иҪҪе’ҢеҲҶдә«дёәдё»пјҢж–Үз« и§ӮзӮ№дёҚд»ЈиЎЁжң¬зҪ‘з«ҷз«ӢеңәпјҢеҰӮжһңж¶үеҸҠдҫөжқғиҜ·иҒ”зі»з«ҷй•ҝйӮ®з®ұпјҡis@yisu.comиҝӣиЎҢдёҫжҠҘпјҢ并жҸҗдҫӣзӣёе…іиҜҒжҚ®пјҢдёҖз»ҸжҹҘе®һпјҢе°Ҷз«ӢеҲ»еҲ йҷӨж¶үе«ҢдҫөжқғеҶ…е®№гҖӮ
жӮЁеҘҪпјҢзҷ»еҪ•еҗҺжүҚиғҪдёӢи®ўеҚ•е“ҰпјҒ