жӮЁеҘҪпјҢзҷ»еҪ•еҗҺжүҚиғҪдёӢи®ўеҚ•е“ҰпјҒ
еҜҶз Ғзҷ»еҪ•
зҷ»еҪ•жіЁеҶҢ
зӮ№еҮ» зҷ»еҪ•жіЁеҶҢ еҚіиЎЁзӨәеҗҢж„ҸгҖҠдәҝйҖҹдә‘з”ЁжҲ·жңҚеҠЎжқЎж¬ҫгҖӢ
жң¬зҜҮеҶ…е®№д»Ӣз»ҚдәҶвҖңжҖҺд№Ҳе®үиЈ…йғЁзҪІеҸҠз®ЎзҗҶKVMиҷҡжӢҹеҢ–вҖқзҡ„жңүе…ізҹҘиҜҶпјҢеңЁе®һйҷ…жЎҲдҫӢзҡ„ж“ҚдҪңиҝҮзЁӢдёӯпјҢдёҚе°‘дәәйғҪдјҡйҒҮеҲ°иҝҷж ·зҡ„еӣ°еўғпјҢжҺҘдёӢжқҘе°ұи®©е°Ҹзј–еёҰйўҶеӨ§е®¶еӯҰд№ дёҖдёӢеҰӮдҪ•еӨ„зҗҶиҝҷдәӣжғ…еҶөеҗ§пјҒеёҢжңӣеӨ§е®¶д»”з»Ҷйҳ…иҜ»пјҢиғҪеӨҹеӯҰжңүжүҖжҲҗпјҒ
//е…ій—ӯйҳІзҒ«еўҷе’Ңselinux [root@kvm ~]# systemctl disable --now firewalld.service Removed /etc/systemd/system/multi-user.target.wants/firewalld.service. Removed /etc/systemd/system/dbus-org.fedoraproject.FirewallD1.service. [root@kvm ~]# sed -i 's/SELINUX=enforcing/SELINUX=disabled/g' /etc/selinux/config [root@kvm ~]# reboot //дёӢиҪҪepelжәҗе’Ңе·Ҙе…·еҢ… [root@kvm ~]# yum -y install epel-release vim wget net-tools unzip zip gcc gcc-c++ //йӘҢиҜҒCPUжҳҜеҗҰж”ҜжҢҒKVMпјӣеҰӮжһңз»“жһңдёӯжңүvmxпјҲIntelпјүжҲ–svm(AMD)еӯ—ж ·пјҢе°ұиҜҙжҳҺCPUзҡ„ж”ҜжҢҒзҡ„ [root@kvm ~]# egrep -o 'vmx|svm' /proc/cpuinfo //е®үиЈ…kvm [root@kvm ~]# yum -y install qemu-kvm qemu-kvm-tools qemu-img virt-manager libvirt libvirt-python libvirt-client virt-install virt-viewer bridge-utils libguestfs-tools //жЎҘжҺҘзҪ‘еҚЎпјҢз”Ёbr0жқҘжЎҘжҺҘens160зҪ‘еҚЎ [root@kvm ~]# cd /etc/sysconfig/network-scripts/ [root@kvm network-scripts]# cp ifcfg-ens33 ifcfg-br0 [root@kvm network-scripts]# cat ifcfg-br0 TYPE=Bridge DEVICE=br0 NM_CONTROLLED=no BOOTPROTO=static NAME=br0 ONBOOT=yes IPADDR=192.168.237.131 NETMASK=255.255.255.0 GATEWAY=192.168.237.2 DNS1=114.114.114.114 DNS2=8.8.8.8 [root@kvm network-scripts]# cat ifcfg-ens33 TYPE=Ethernet BOOTPROTO=static NAME=ens33 DEVICE=ens33 ONBOOT=yes BRIDGE=br0 NM_CONTROLLED=no //йҮҚеҗҜзҪ‘з»ң [root@kvm ~]# systemctl restart network [root@kvm ~]# ip a 1: lo: <LOOPBACK,UP,LOWER_UP> mtu 65536 qdisc noqueue state UNKNOWN group default qlen 1000 link/loopback 00:00:00:00:00:00 brd 00:00:00:00:00:00 inet 127.0.0.1/8 scope host lo valid_lft forever preferred_lft forever inet6 ::1/128 scope host valid_lft forever preferred_lft forever 2: ens33: <BROADCAST,MULTICAST,UP,LOWER_UP> mtu 1500 qdisc pfifo_fast master br0 state UP group default qlen 1000 link/ether 00:0c:29:7b:10:a5 brd ff:ff:ff:ff:ff:ff inet6 fe80::20c:29ff:fe7b:10a5/64 scope link valid_lft forever preferred_lft forever 3: br0: <BROADCAST,MULTICAST,UP,LOWER_UP> mtu 1500 qdisc noqueue state UP group default qlen 1000 link/ether 00:0c:29:7b:10:a5 brd ff:ff:ff:ff:ff:ff inet 192.168.237.131/24 brd 192.168.237.255 scope global br0 valid_lft forever preferred_lft forever inet6 fe80::20c:29ff:fe7b:10a5/64 scope link valid_lft forever preferred_lft forever 4: virbr0: <NO-CARRIER,BROADCAST,MULTICAST,UP> mtu 1500 qdisc noqueue state DOWN group default qlen 1000 link/ether 52:54:00:1c:33:d6 brd ff:ff:ff:ff:ff:ff inet 192.168.122.1/24 brd 192.168.122.255 scope global virbr0 valid_lft forever preferred_lft forever 5: virbr0-nic: <BROADCAST,MULTICAST> mtu 1500 qdisc pfifo_fast master virbr0 state DOWN group default qlen 1000 link/ether 52:54:00:1c:33:d6 brd ff:ff:ff:ff:ff:ff //еҗҜеҠЁжңҚеҠЎ [root@kvm ~]# systemctl enable --now libvirtd //йӘҢиҜҒе®үиЈ…з»“жһң [root@kvm ~]# lsmod|grep kvm kvm_intel 188740 0 kvm 637289 1 kvm_intel irqbypass 13503 1 kvm //жөӢиҜ• [root@kvm ~]# virsh -c qemu:///system list Id еҗҚз§° зҠ¶жҖҒ ---------------------------------------------------- [root@kvm ~]# virsh --version 4.5.0 [root@kvm ~]# virt-install --version 1.5.0 [root@kvm ~]# ln -s /usr/libexec/qemu-kvm /usr/bin/qemu-kvm [root@kvm ~]# ll /usr/bin/qemu-kvm lrwxrwxrwx 1 root root 21 10жңҲ 20 23:14 /usr/bin/qemu-kvm -> /usr/libexec/qemu-kvm //жҹҘзңӢзҪ‘жЎҘдҝЎжҒҜ [root@kvm ~]# brctl show bridge name bridge id STP enabled interfaces br0 8000.000c297b10a5 no ens33 virbr0 8000.5254001c33d6 yes virbr0-nic
kvm зҡ„ web з®ЎзҗҶз•ҢйқўжҳҜз”ұ webvirtmgr зЁӢеәҸжҸҗдҫӣзҡ„гҖӮ
//е®үиЈ…дҫқиө–еҢ…
[root@kvm ~]# yum -y install git python-pip libvirt-python libxml2-python python-websockify supervisor nginx python-devel
//д»ҺgithubдёҠдёӢиҪҪwebvirtmgrд»Јз Ғ
[root@kvm ~]# cd /usr/local/src/
[root@kvm src]# git clone git://github.com/retspen/webvirtmgr.git
жӯЈе…ӢйҡҶеҲ° 'webvirtmgr'...
remote: Enumerating objects: 5614, done.
remote: Total 5614 (delta 0), reused 0 (delta 0), pack-reused 5614
жҺҘ收еҜ№иұЎдёӯ: 100% (5614/5614), 2.97 MiB | 29.00 KiB/s, done.
еӨ„зҗҶ delta дёӯ: 100% (3606/3606), done.
//е®үиЈ…webvirtmgr
[root@kvm src]# cd webvirtmgr/
[root@kvm webvirtmgr]# pip install -r requirements.txt
Collecting django==1.5.5 (from -r requirements.txt (line 1))
Downloading https://files.pythonhosted.org/packages/38/49/93511c5d3367b6b21fc2995a0e53399721afc15e4cd6eb57be879ae13ad4/Django-1.5.5.tar.gz (8.1MB)
100% |в–Ҳв–Ҳв–Ҳв–Ҳв–Ҳв–Ҳв–Ҳв–Ҳв–Ҳв–Ҳв–Ҳв–Ҳв–Ҳв–Ҳв–Ҳв–Ҳв–Ҳв–Ҳв–Ҳв–Ҳв–Ҳв–Ҳв–Ҳв–Ҳв–Ҳв–Ҳв–Ҳв–Ҳв–Ҳв–Ҳв–Ҳв–Ҳ| 8.1MB 49kB/s
......
//жЈҖжҹҘsqlite3жҳҜеҗҰе®үиЈ…
[root@kvm webvirtmgr]# python
Python 2.7.5 (default, Nov 16 2020, 22:23:17)
[GCC 4.8.5 20150623 (Red Hat 4.8.5-44)] on linux2
Type "help", "copyright", "credits" or "license" for more information.
>>> import sqlite3
>>> exit()
//еҲқе§ӢеҢ–иҙҰеҸ·дҝЎжҒҜ
[root@kvm webvirtmgr]# python manage.py syncdb
WARNING:root:No local_settings file found.
Creating tables ...
Creating table auth_permission
Creating table auth_group_permissions
Creating table auth_group
Creating table auth_user_groups
Creating table auth_user_user_permissions
Creating table auth_user
Creating table django_content_type
Creating table django_session
Creating table django_site
Creating table servers_compute
Creating table instance_instance
Creating table create_flavor
You just installed Django's auth system, which means you don't have any superusers defined.
Would you like to create one now? (yes/no): yes
Username (leave blank to use 'root'): admin
Email address: 123@qq.com
Password:
Password (again):
Superuser created successfully.
Installing custom SQL ...
Installing indexes ...
Installed 6 object(s) from 1 fixture(s)
//жӢ·иҙқwebзҪ‘йЎөиҮіжҢҮе®ҡзӣ®еҪ•
[root@kvm webvirtmgr]# mkdir /var/www
[root@kvm webvirtmgr]# cp -r /usr/local/src/webvirtmgr /var/www/
[root@kvm webvirtmgr]# chown -R nginx.nginx /var/www/webvirtmgr/
//з”ҹжҲҗеҜҶй’Ҙ
[root@kvm ~]# ssh-keygen -t rsa
Generating public/private rsa key pair.
Enter file in which to save the key (/root/.ssh/id_rsa):
Created directory '/root/.ssh'.
Enter passphrase (empty for no passphrase):
Enter same passphrase again:
Your identification has been saved in /root/.ssh/id_rsa.
Your public key has been saved in /root/.ssh/id_rsa.pub.
The key fingerprint is:
SHA256:icyLAYmyxABKsogsIHmJqGjSby0ogFwf1p2zeiPwuxY root@kvm
The key's randomart image is:
+---[RSA 2048]----+
|O+ . . . . |
|/ooo o . + |
|&*+ o . o |
|X+.. = . o |
|= o..* S |
|. . +o.E o |
| . .... = . |
| o |
| ... |
+----[SHA256]-----+
[root@kvm ~]# ssh-copy-id 192.168.237.131
/usr/bin/ssh-copy-id: INFO: Source of key(s) to be installed: "/root/.ssh/id_rsa.pub"
The authenticity of host '192.168.237.131 (192.168.237.131)' can't be established.
ECDSA key fingerprint is SHA256:/AR9dYUN0PN9LOHYWfHeUe5LgyczVMH9mYv9+2GcAbM.
ECDSA key fingerprint is MD5:30:f6:de:5a:7d:c2:08:b5:b7:31:61:4a:4e:dd:32:73.
Are you sure you want to continue connecting (yes/no)? yes
/usr/bin/ssh-copy-id: INFO: attempting to log in with the new key(s), to filter out any that are already installed
/usr/bin/ssh-copy-id: INFO: 1 key(s) remain to be installed -- if you are prompted now it is to install the new keys
root@192.168.237.131's password:
Number of key(s) added: 1
Now try logging into the machine, with: "ssh '192.168.237.131'"
and check to make sure that only the key(s) you wanted were added.
//й…ҚзҪ®з«ҜеҸЈиҪ¬еҸ‘
[root@kvm ~]# ssh 192.168.237.131 -L localhost:8000:localhost:8000 -L localhost:6080:localhost:60
Last login: Wed Oct 20 23:12:00 2021 from 192.168.237.1
[root@kvm ~]# ss -anlt
State Recv-Q Send-Q Local Address:Port Peer Address:Port
LISTEN 0 128 127.0.0.1:6080 *:*
LISTEN 0 128 127.0.0.1:8000 *:*
LISTEN 0 128 *:111 *:*
LISTEN 0 5 192.168.122.1:53 *:*
LISTEN 0 128 *:22 *:*
LISTEN 0 100 127.0.0.1:25 *:*
LISTEN 0 128 [::1]:6080 [::]:*
LISTEN 0 128 [::1]:8000 [::]:*
LISTEN 0 128 [::]:111 [::]:*
LISTEN 0 128 [::]:22 [::]:*
LISTEN 0 100 [::1]:25 [::]:*
//й…ҚзҪ®nginx
[root@kvm ~]# cd /etc/nginx/
[root@kvm nginx]# ls
conf.d fastcgi_params mime.types scgi_params win-utf
default.d fastcgi_params.default mime.types.default scgi_params.default
fastcgi.conf koi-utf nginx.conf uwsgi_params
fastcgi.conf.default koi-win nginx.conf.default uwsgi_params.default
[root@kvm nginx]# cp nginx.conf nginx.conf-bak //еӨҮд»Ҫ
[root@kvm nginx]# cat nginx.conf
user nginx;
worker_processes auto;
error_log /var/log/nginx/error.log;
pid /run/nginx.pid;
include /usr/share/nginx/modules/*.conf;
events {
worker_connections 1024;
}
http {
log_format main '$remote_addr - $remote_user [$time_local] "$request" '
'$status $body_bytes_sent "$http_referer" '
'"$http_user_agent" "$http_x_forwarded_for"';
access_log /var/log/nginx/access.log main;
sendfile on;
tcp_nopush on;
tcp_nodelay on;
keepalive_timeout 65;
types_hash_max_size 2048;
include /etc/nginx/mime.types;
default_type application/octet-stream;
include /etc/nginx/conf.d/*.conf;
server {
listen 80;
server_name localhost;
include /etc/nginx/default.d/*.conf;
location / {
root html;
index index.html index.htm;
}
error_page 404 /404.html;
location = /40x.html {
}
error_page 500 502 503 504 /50x.html;
location = /50x.html {
}
}
}
[root@kvm conf.d]# pwd
/etc/nginx/conf.d
[root@kvm conf.d]# vi webvirtmgr.conf
[root@kvm conf.d]# cat webvirtmgr.conf
server {
listen 80 default_server;
server_name $hostname;
#access_log /var/log/nginx/webvirtmgr_access_log;
location /static/ {
root /var/www/webvirtmgr/webvirtmgr;
expires max;
}
location / {
proxy_pass http://127.0.0.1:8000;
proxy_set_header X-Real-IP $remote_addr;
proxy_set_header X-Forwarded-for $proxy_add_x_forwarded_for;
proxy_set_header Host $host:$server_port;
proxy_set_header X-Forwarded-Proto $remote_addr;
proxy_connect_timeout 600;
proxy_read_timeout 600;
proxy_send_timeout 600;
client_max_body_size 1024M;
}
}
//зЎ®дҝқbindз»‘е®ҡзҡ„жҳҜжң¬жңәзҡ„8000з«ҜеҸЈ
[root@kvm ~]# vim /var/www/webvirtmgr/conf/gunicorn.conf.py
bind = '0.0.0.0:8000' //дҝ®ж”№жӯӨиЎҢ
backlog = 2048
//еҗҜеҠЁnginx
[root@kvm ~]# systemctl enable --now nginx
Created symlink from /etc/systemd/system/multi-user.target.wants/nginx.service to /usr/lib/systemd/system/nginx.service.
[root@kvm ~]# ss -anlt
State Recv-Q Send-Q Local Address:Port Peer Address:Port
LISTEN 0 128 127.0.0.1:6080 *:*
LISTEN 0 128 127.0.0.1:8000 *:*
LISTEN 0 128 *:111 *:*
LISTEN 0 128 *:80 *:*
LISTEN 0 5 192.168.122.1:53 *:*
LISTEN 0 128 *:22 *:*
LISTEN 0 100 127.0.0.1:25 *:*
LISTEN 0 128 [::1]:6080 [::]:*
LISTEN 0 128 [::1]:8000 [::]:*
LISTEN 0 128 [::]:111 [::]:*
LISTEN 0 128 [::]:22 [::]:*
LISTEN 0 100 [::1]:25 [::]:*
//и®ҫзҪ®supervisor
[root@kvm ~]# vim /etc/supervisord.conf
#еңЁжңҖеҗҺж·»еҠ дёӢйқўзҡ„еҶ…е®№
[program:webvirtmgr]
command=/usr/bin/python2 /var/www/webvirtmgr/manage.py run_gunicorn -c /var/www/webvirtmgr/conf/gunicorn.conf.py
directory=/var/www/webvirtmgr
autostart=true
autorestart=true
logfile=/var/log/supervisor/webvirtmgr.log
log_stderr=true
user=nginx
[program:webvirtmgr-console]
command=/usr/bin/python2 /var/www/webvirtmgr/console/webvirtmgr-console
directory=/var/www/webvirtmgr
autostart=true
autorestart=true
stdout_logfile=/var/log/supervisor/webvirtmgr-console.log
redirect_stderr=true
user=nginx
//еҗҜеҠЁsupervisor
[root@kvm ~]# systemctl enable --now supervisord
Created symlink from /etc/systemd/system/multi-user.target.wants/supervisord.service to /usr/lib/systemd/system/supervisord.service.
[root@kvm ~]# systemctl status supervisord
в—Ҹ supervisord.service - Process Monitoring and Control Daemon
Loaded: loaded (/usr/lib/systemd/system/supervisord.service; enabled; vendor preset: disabled)
Active: active (running) since дёү 2021-10-20 23:53:33 CST; 12s ago
Process: 46734 ExecStart=/usr/bin/supervisord -c /etc/supervisord.conf (code=exited, status=0/SUCCESS)
Main PID: 46737 (supervisord)
//й…ҚзҪ®nginxз”ЁжҲ·
[root@kvm ~]# su - nginx -s /bin/bash
-bash-4.2$ ssh-keygen -t rsa
Generating public/private rsa key pair.
Enter file in which to save the key (/var/lib/nginx/.ssh/id_rsa):
Created directory '/var/lib/nginx/.ssh'.
Enter passphrase (empty for no passphrase):
Enter same passphrase again:
Your identification has been saved in /var/lib/nginx/.ssh/id_rsa.
Your public key has been saved in /var/lib/nginx/.ssh/id_rsa.pub.
The key fingerprint is:
SHA256:S46h+CYFvCGW+6z68PXZgbKNLLdPdiPD6LmzPOpYBwI nginx@kvm
The key's randomart image is:
+---[RSA 2048]----+
| |
| |
|E.. |
|oo+ |
|o.o+ . S |
| o.o.+ * . |
|. =.* O * |
| =oX=X * o |
|++**%B= . |
+----[SHA256]-----+
-bash-4.2$ touch ~/.ssh/config && echo -e "StrictHostKeyChecking=no\nUserKnownHostsFile=/dev/null" >> ~/.ssh/config
-bash-4.2$ chmod 0600 ~/.ssh/config
-bash-4.2$ ssh-copy-id root@192.168.237.131
/bin/ssh-copy-id: INFO: Source of key(s) to be installed: "/var/lib/nginx/.ssh/id_rsa.pub"
/bin/ssh-copy-id: INFO: attempting to log in with the new key(s), to filter out any that are already installed
/bin/ssh-copy-id: INFO: 1 key(s) remain to be installed -- if you are prompted now it is to install the new keys
Warning: Permanently added '192.168.237.131' (ECDSA) to the list of known hosts.
root@192.168.237.131's password:
Number of key(s) added: 1
Now try logging into the machine, with: "ssh 'root@192.168.237.131'"
and check to make sure that only the key(s) you wanted were added.
-bash-4.2$ exit
зҷ»еҮә
[root@kvm ~]# vim /etc/polkit-1/localauthority/50-local.d/50-libvirt-remote-access.pkla
[Remote libvirt SSH access]
Identity=unix-user:root
Action=org.libvirt.unix.manage
ResultAny=yes
ResultInactive=yes
ResultActive=yes
[root@kvm ~]# chown -R root.root /etc/polkit-1/localauthority/50-local.d/50-libvirt-remote-access.pkla
[root@kvm ~]# systemctl restart nginx
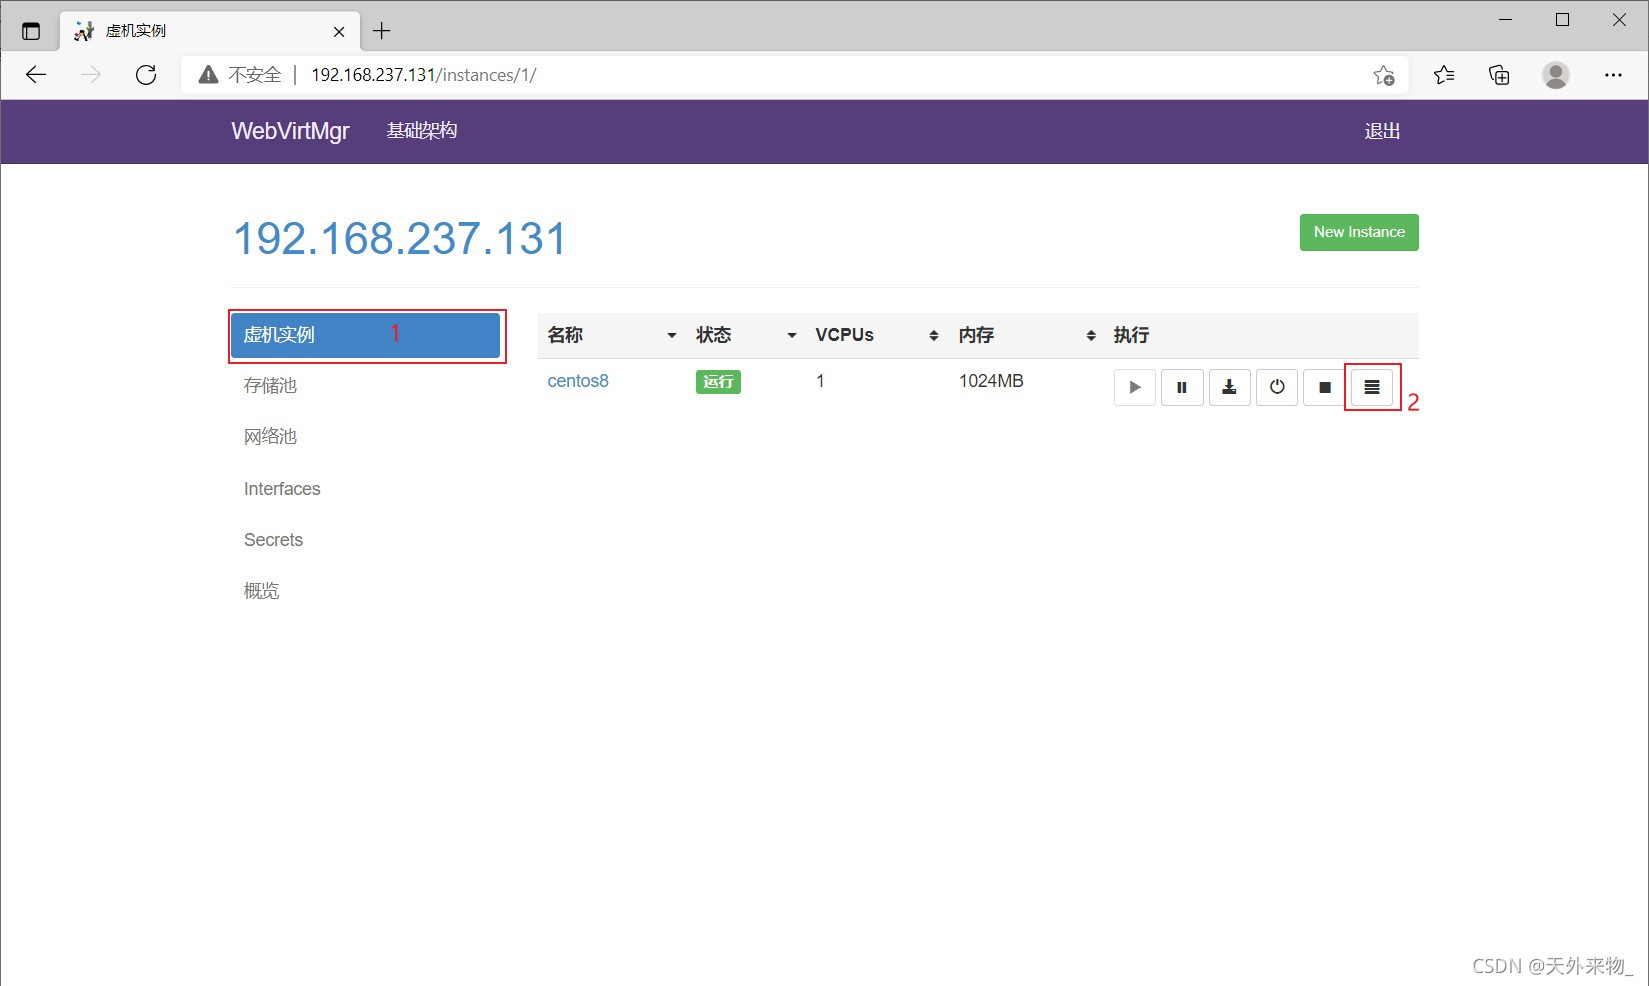
[root@kvm ~]# systemctl restart libvirtdйҖҡиҝҮipең°еқҖеңЁжөҸи§ҲеҷЁдёҠи®ҝй—®kvm

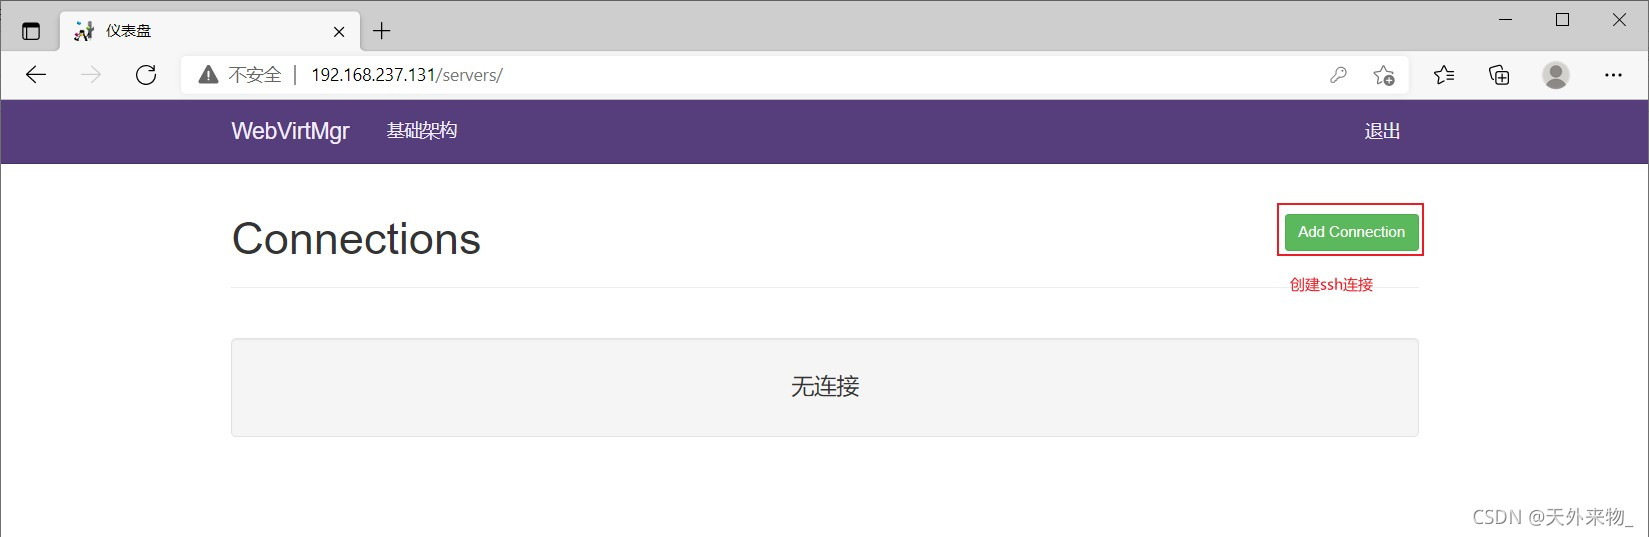
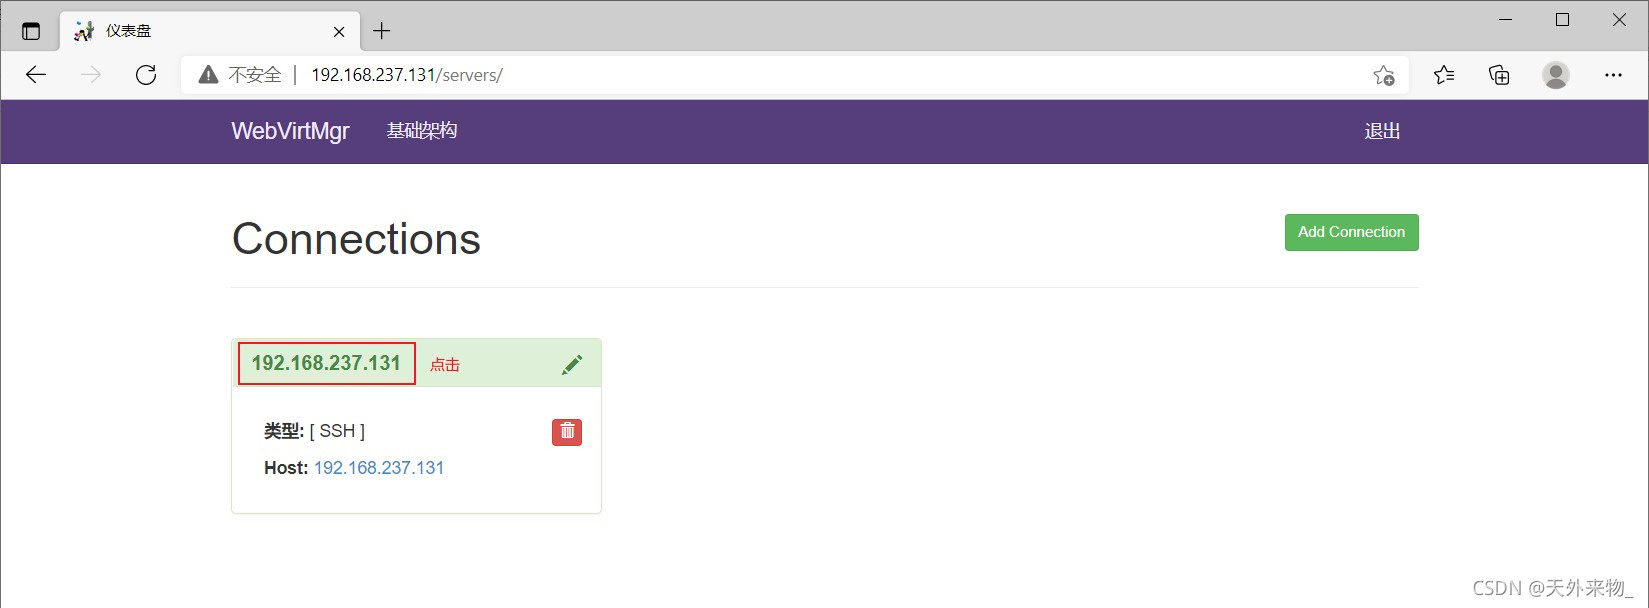
еҲӣе»әSSHиҝһжҺҘпјҡ

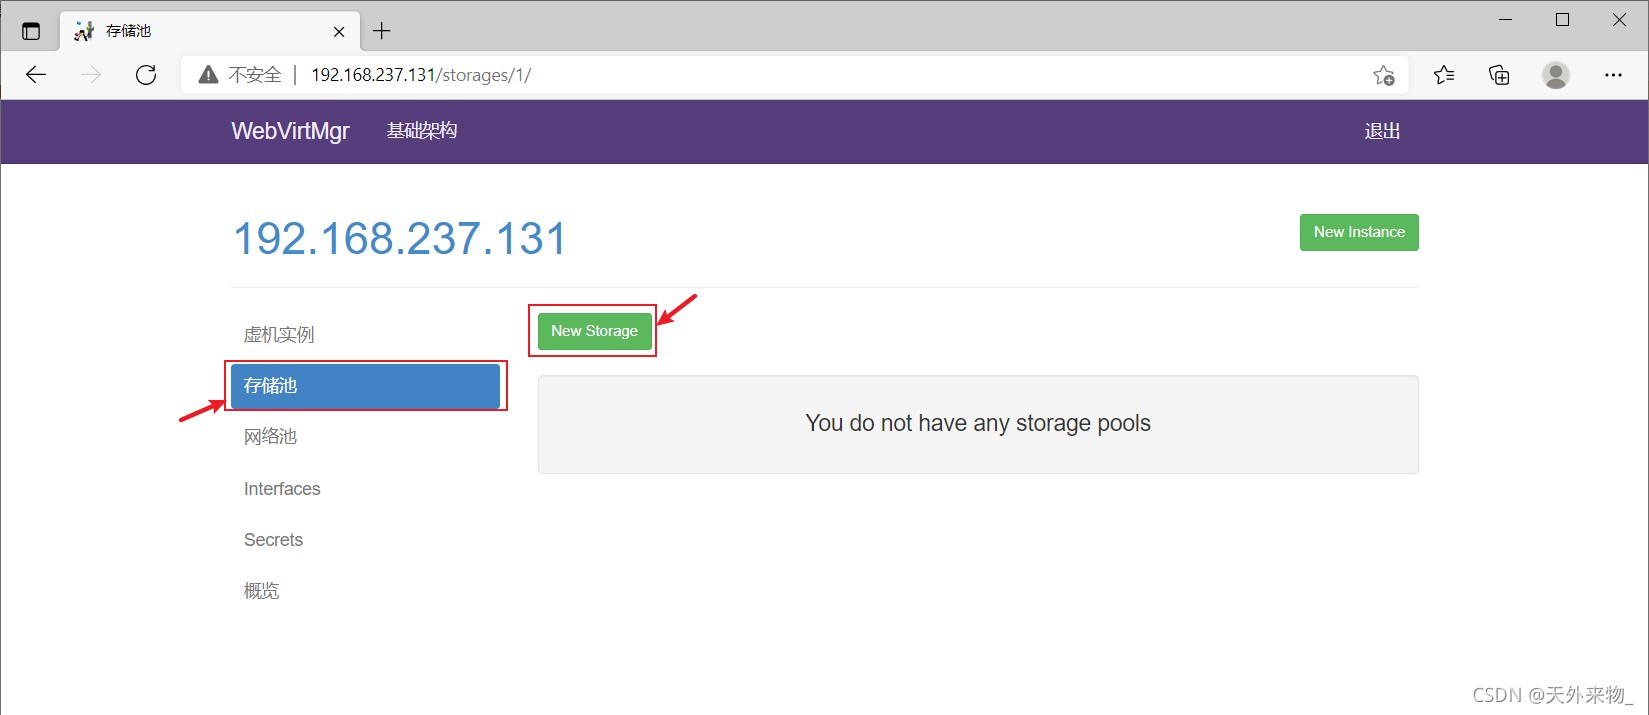
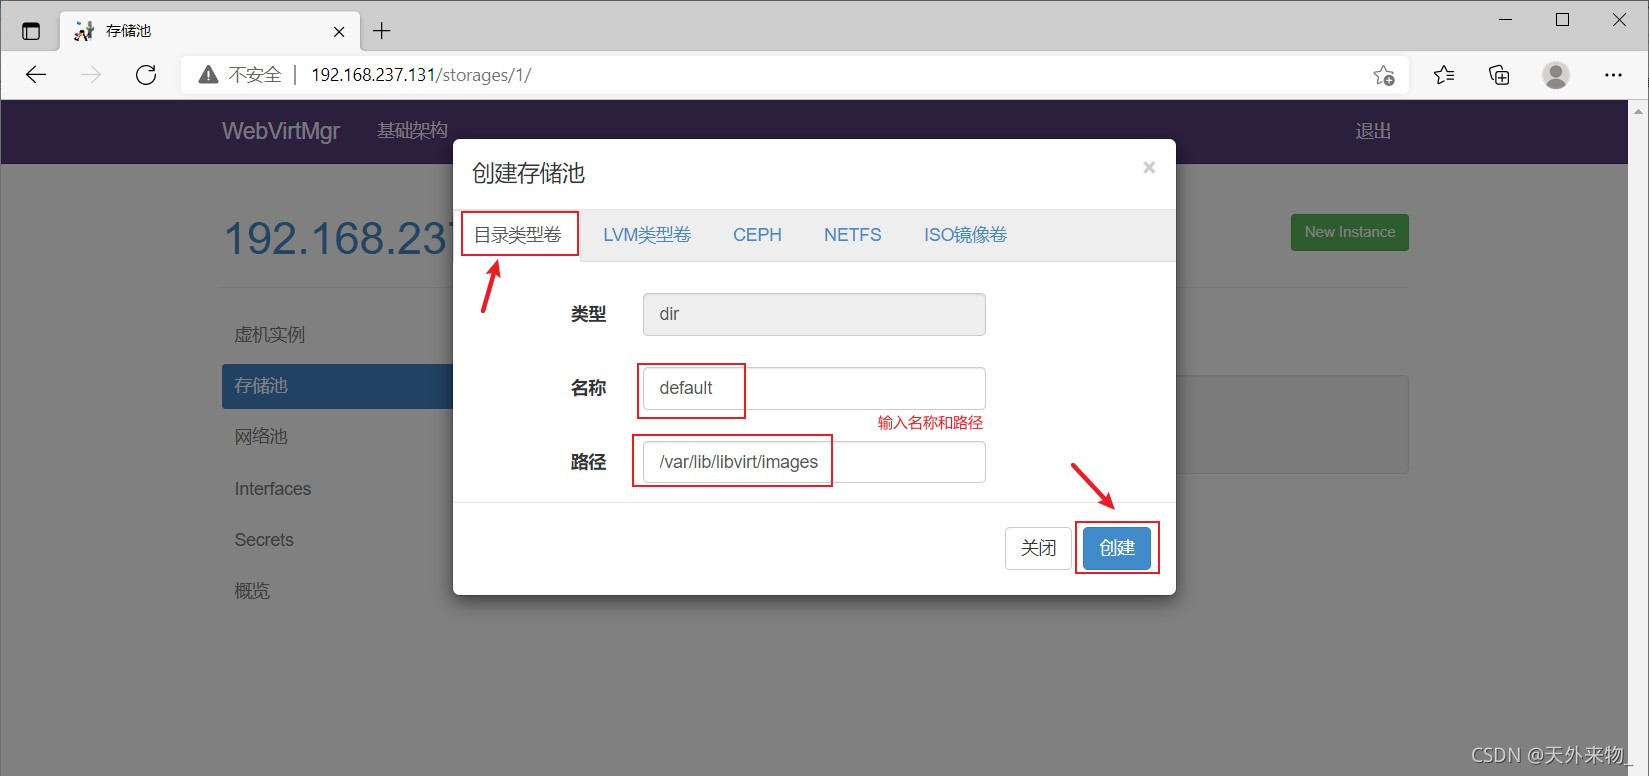
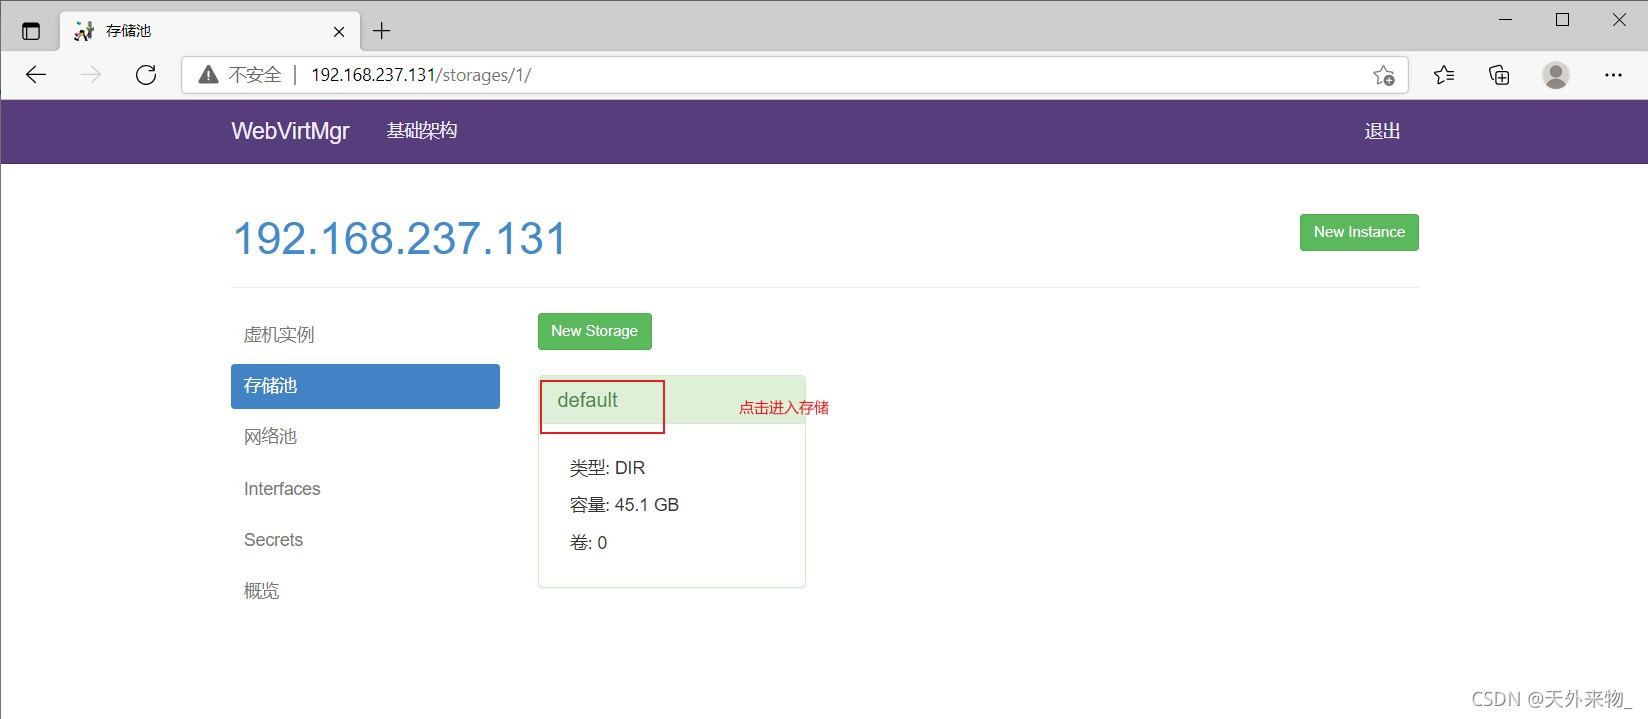
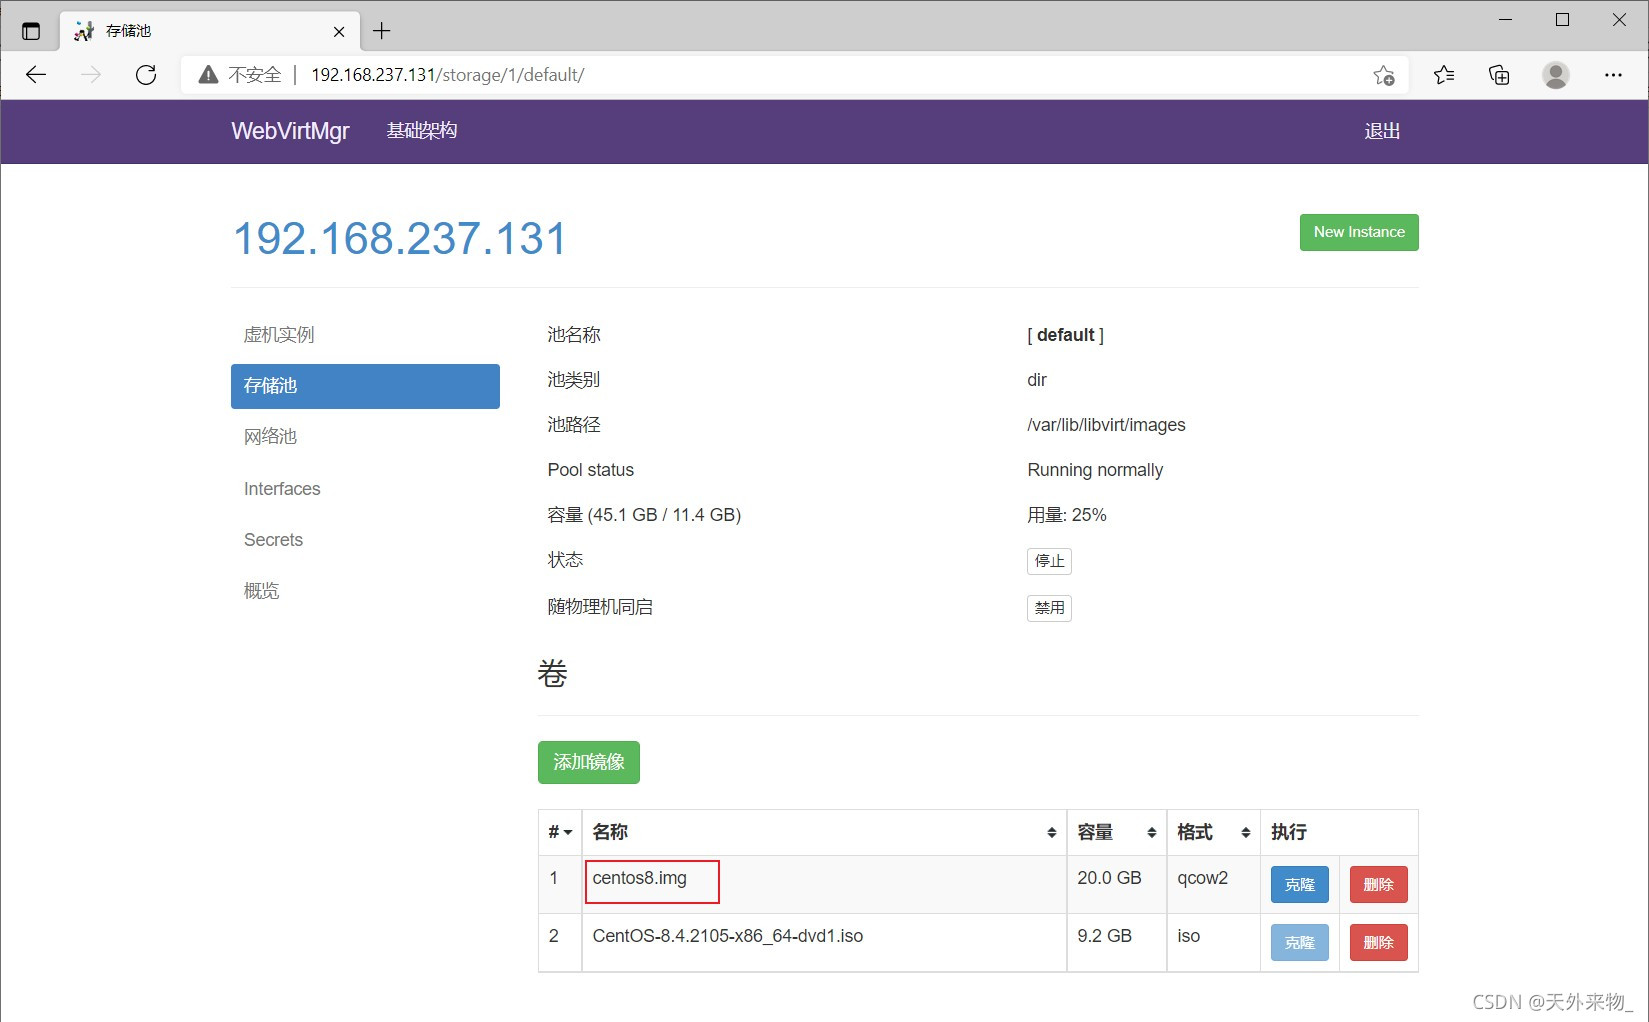
еҲӣе»әеӯҳеӮЁпјҡ
иҝӣе…ҘеӯҳеӮЁпјҡ
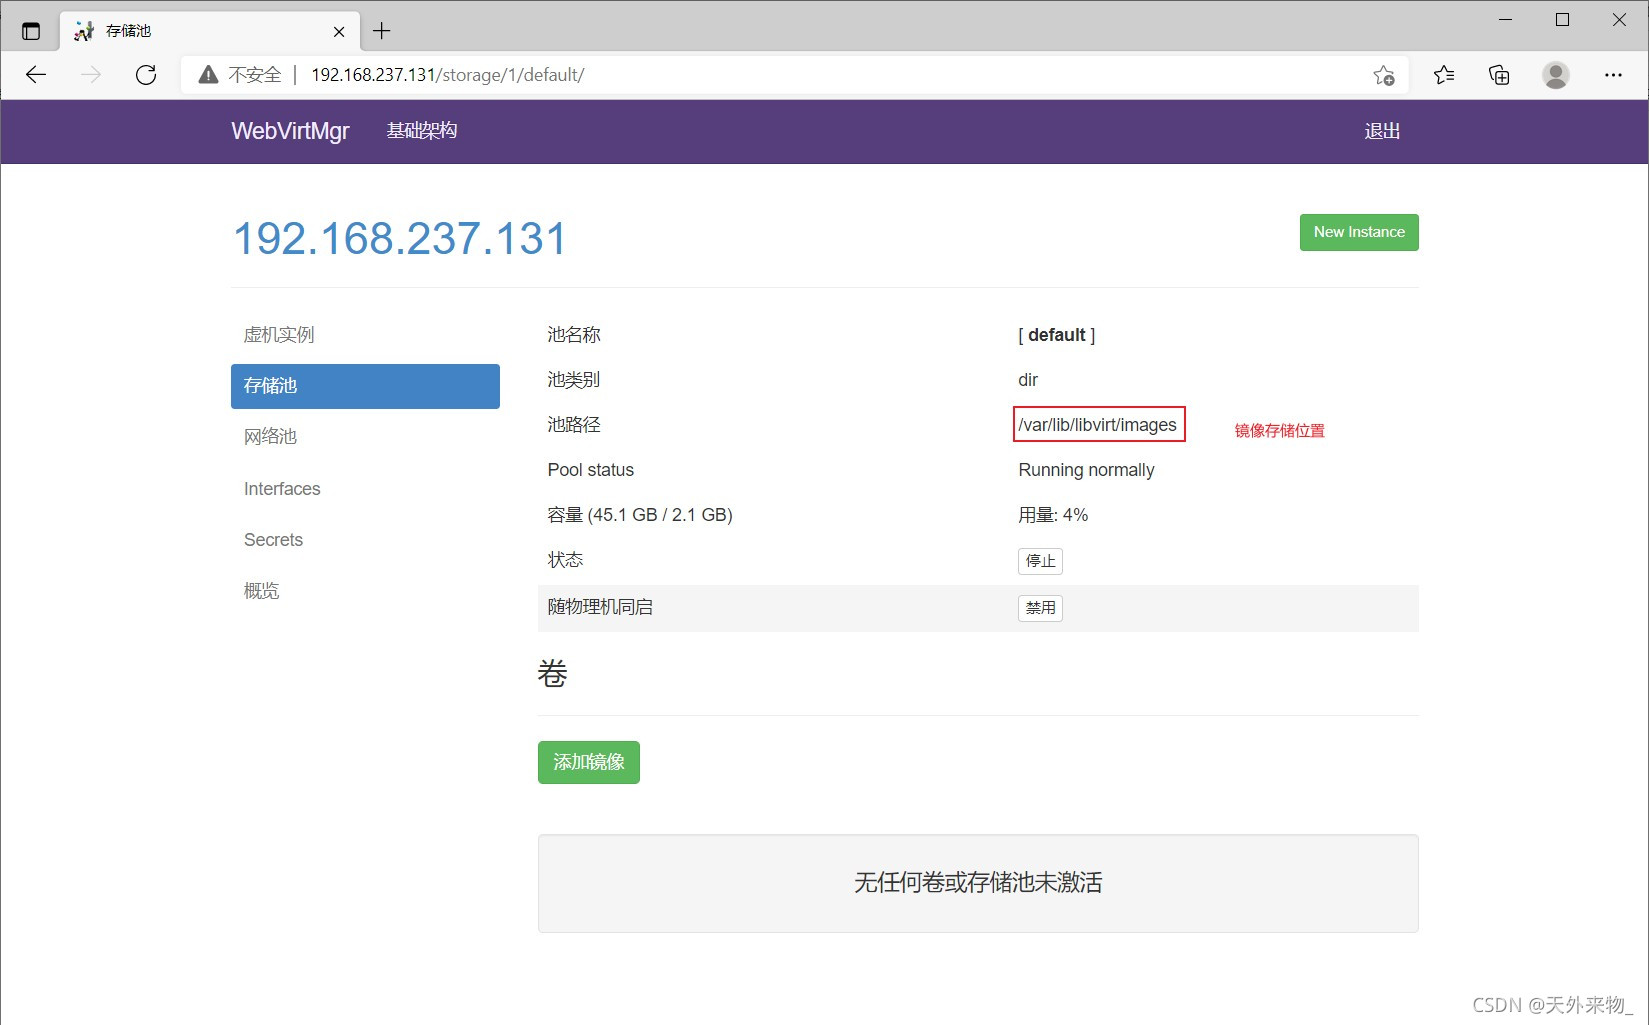
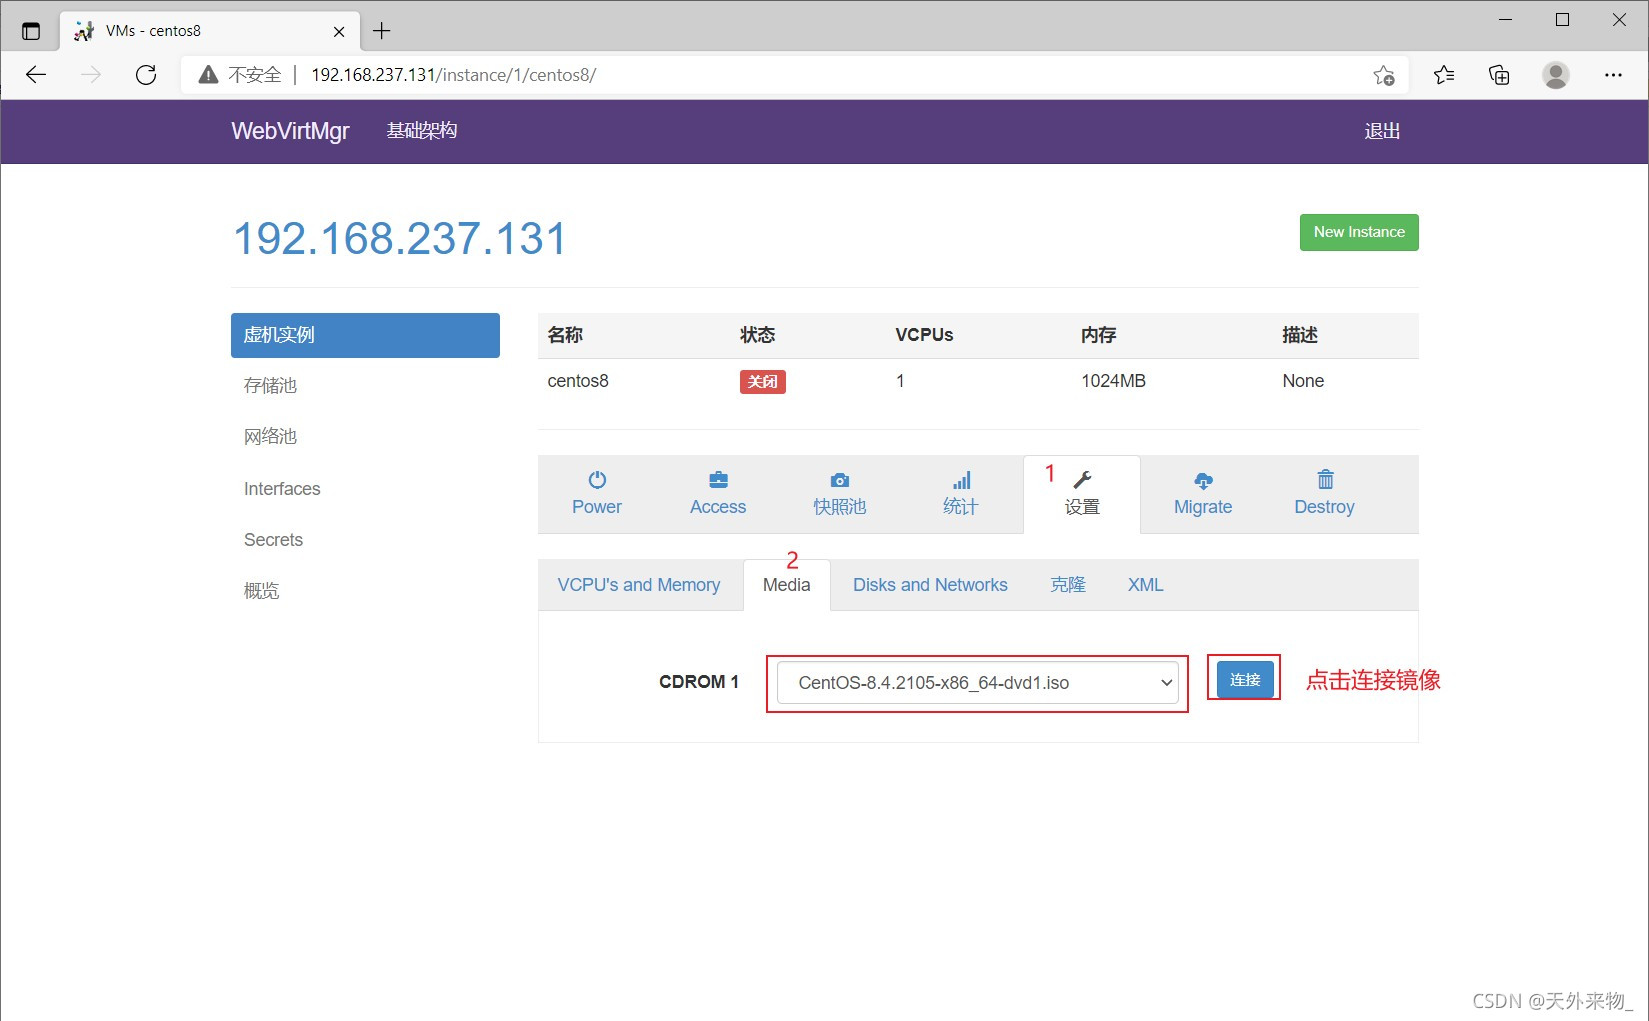
йҖҡиҝҮиҝңзЁӢиҝһжҺҘиҪҜ件дёҠдј ISOй•ңеғҸж–Ү件иҮіеӯҳеӮЁзӣ®еҪ•/var/lib/libvirt/images/
[root@kvm ~]# ls /var/lib/libvirt/images/
CentOS-8.4.2105-x86_64-dvd1.iso
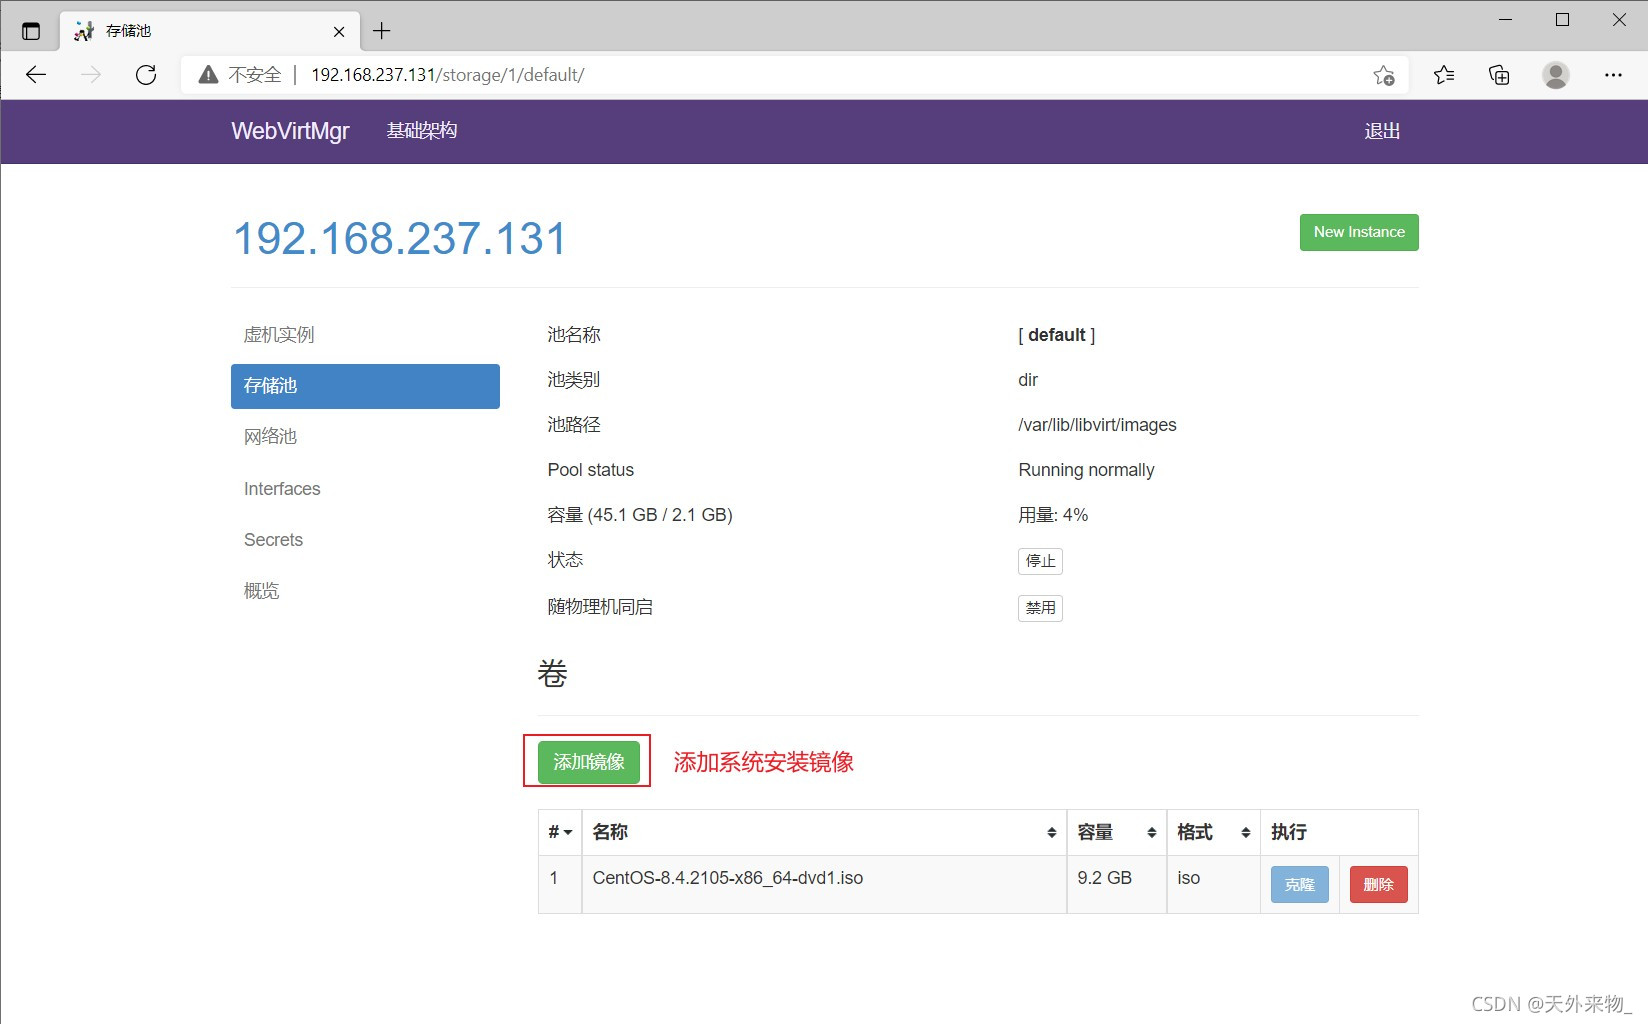
еңЁ web з•ҢйқўжҹҘзңӢISOй•ңеғҸжҳҜеҗҰеӯҳеңЁ

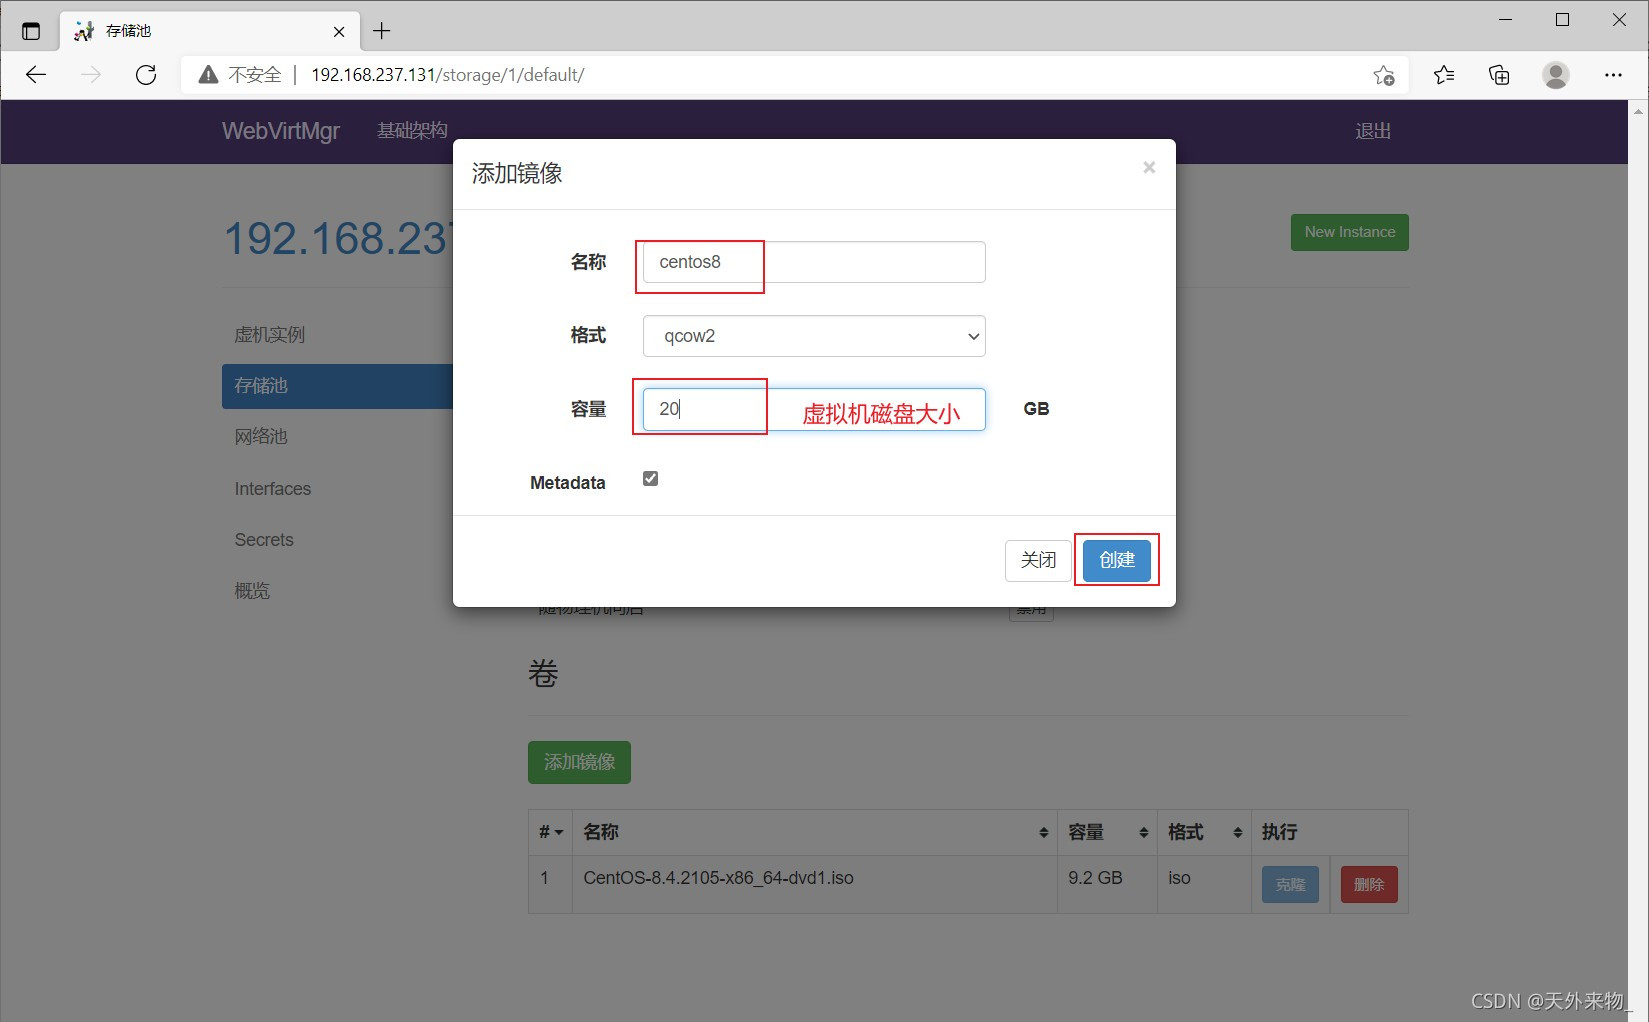
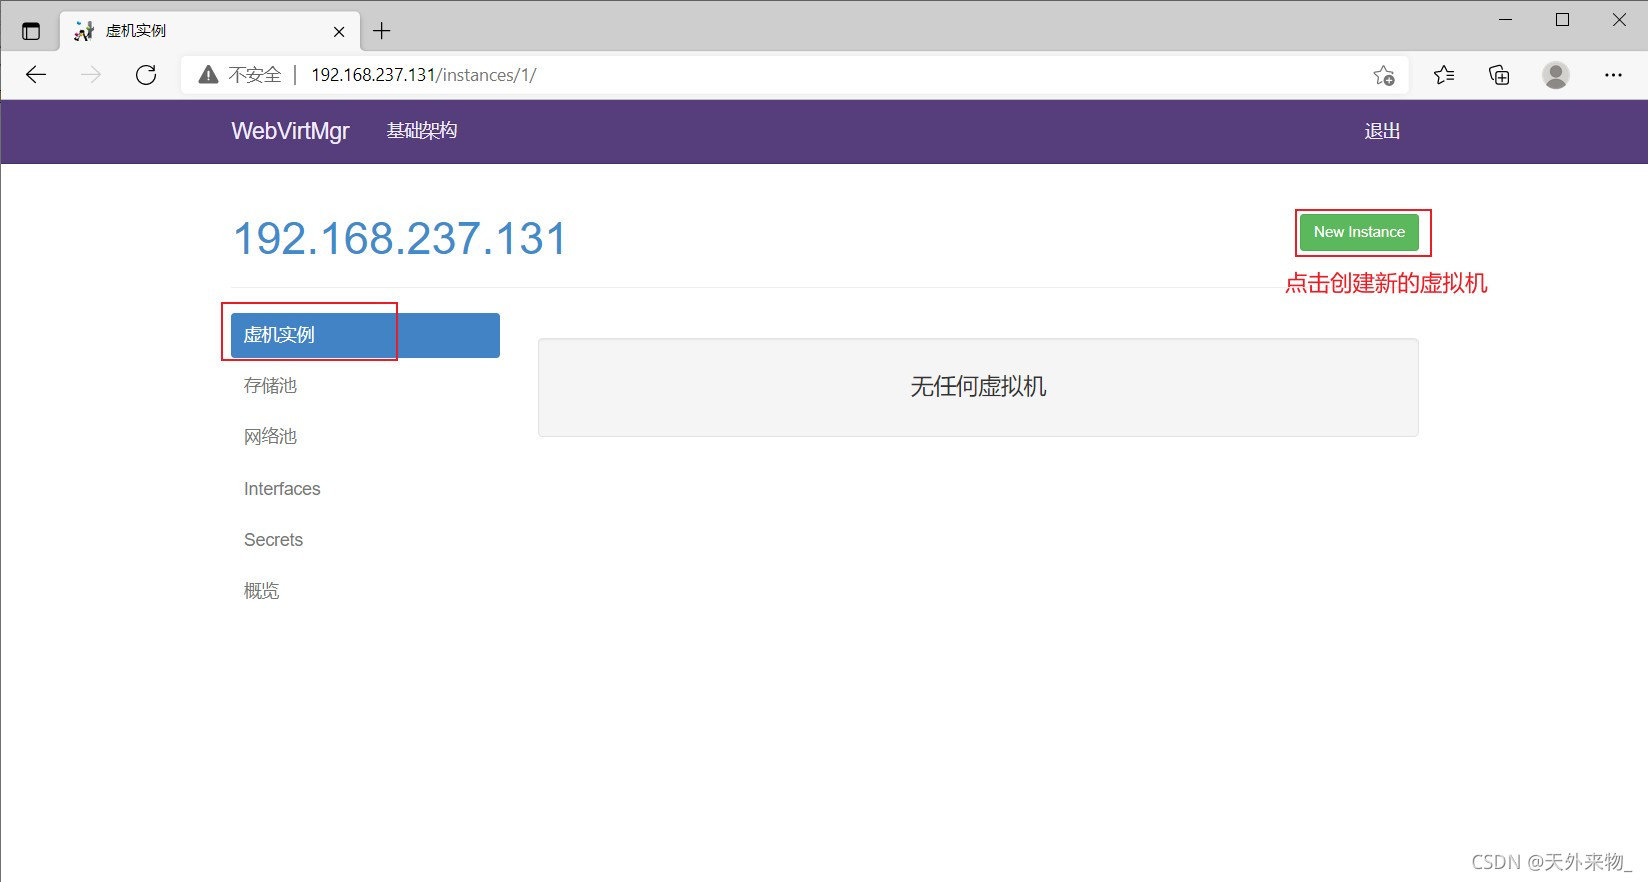
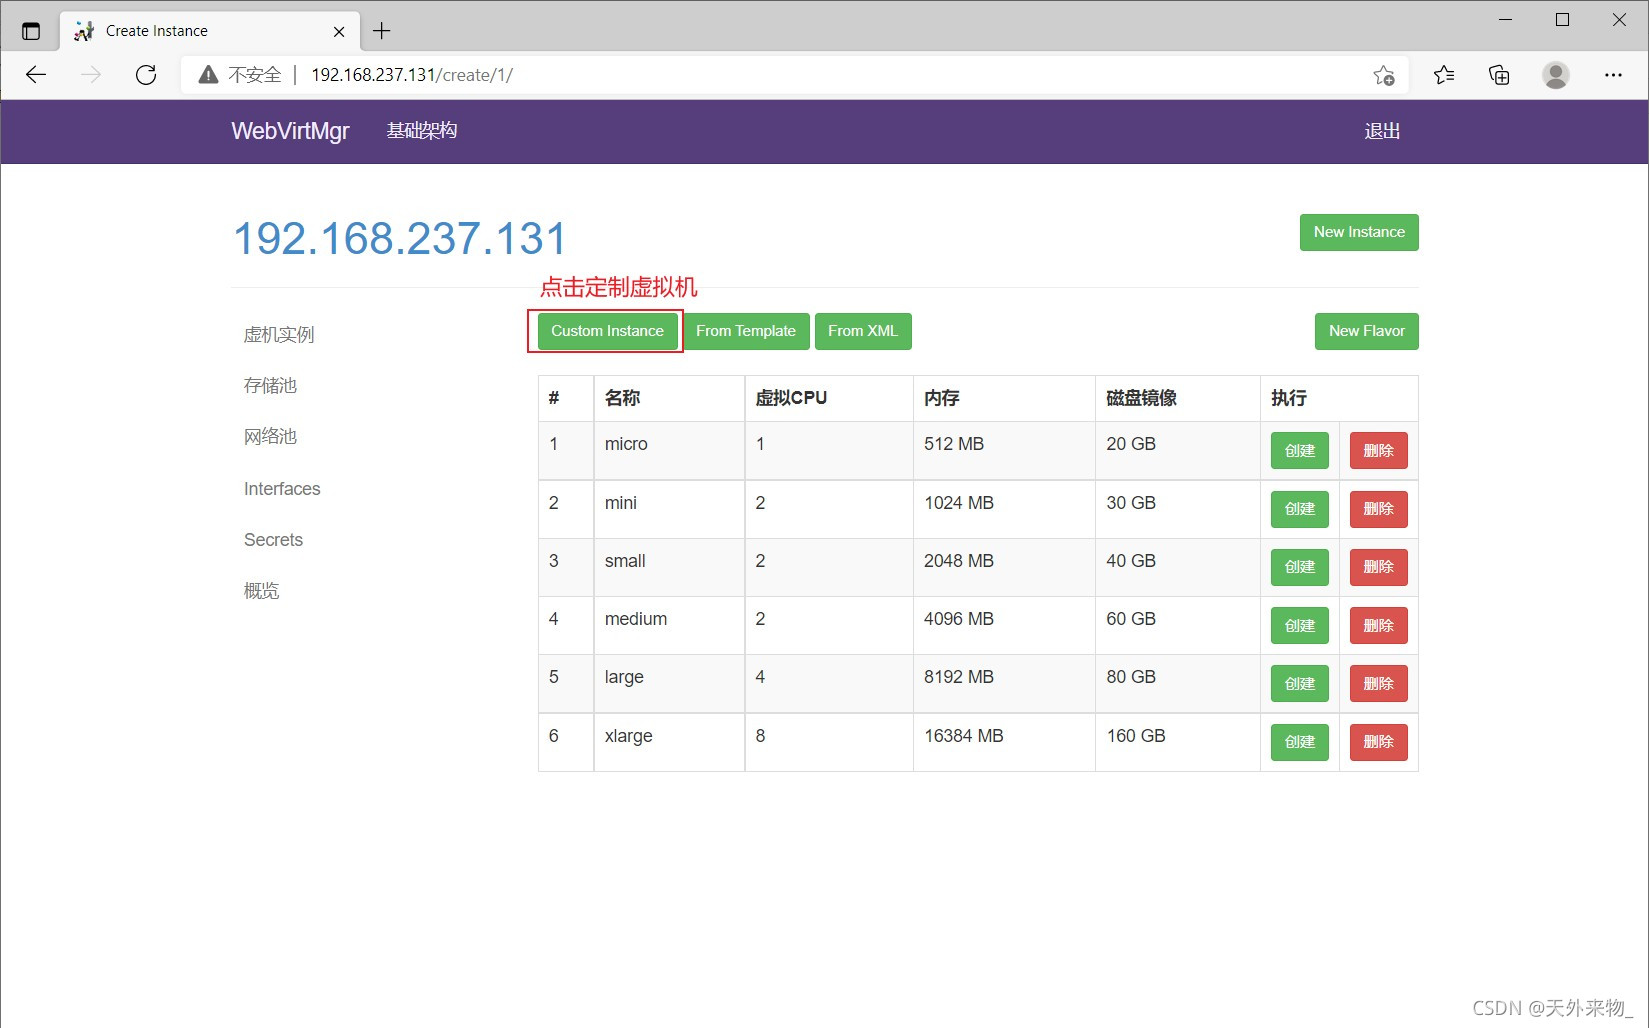
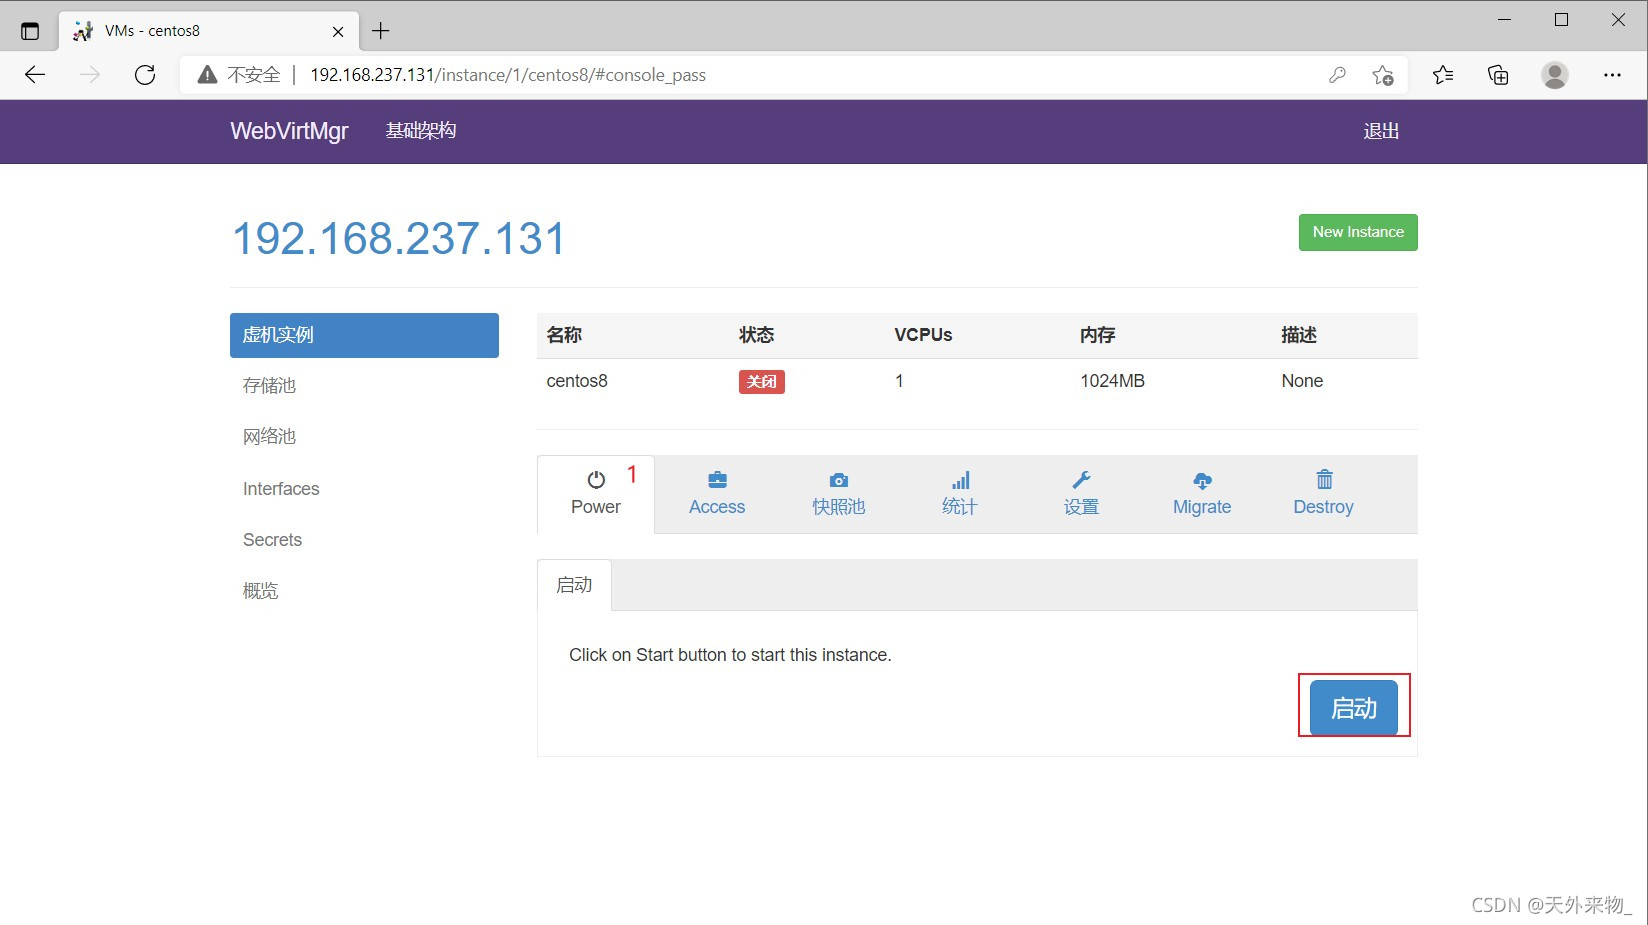
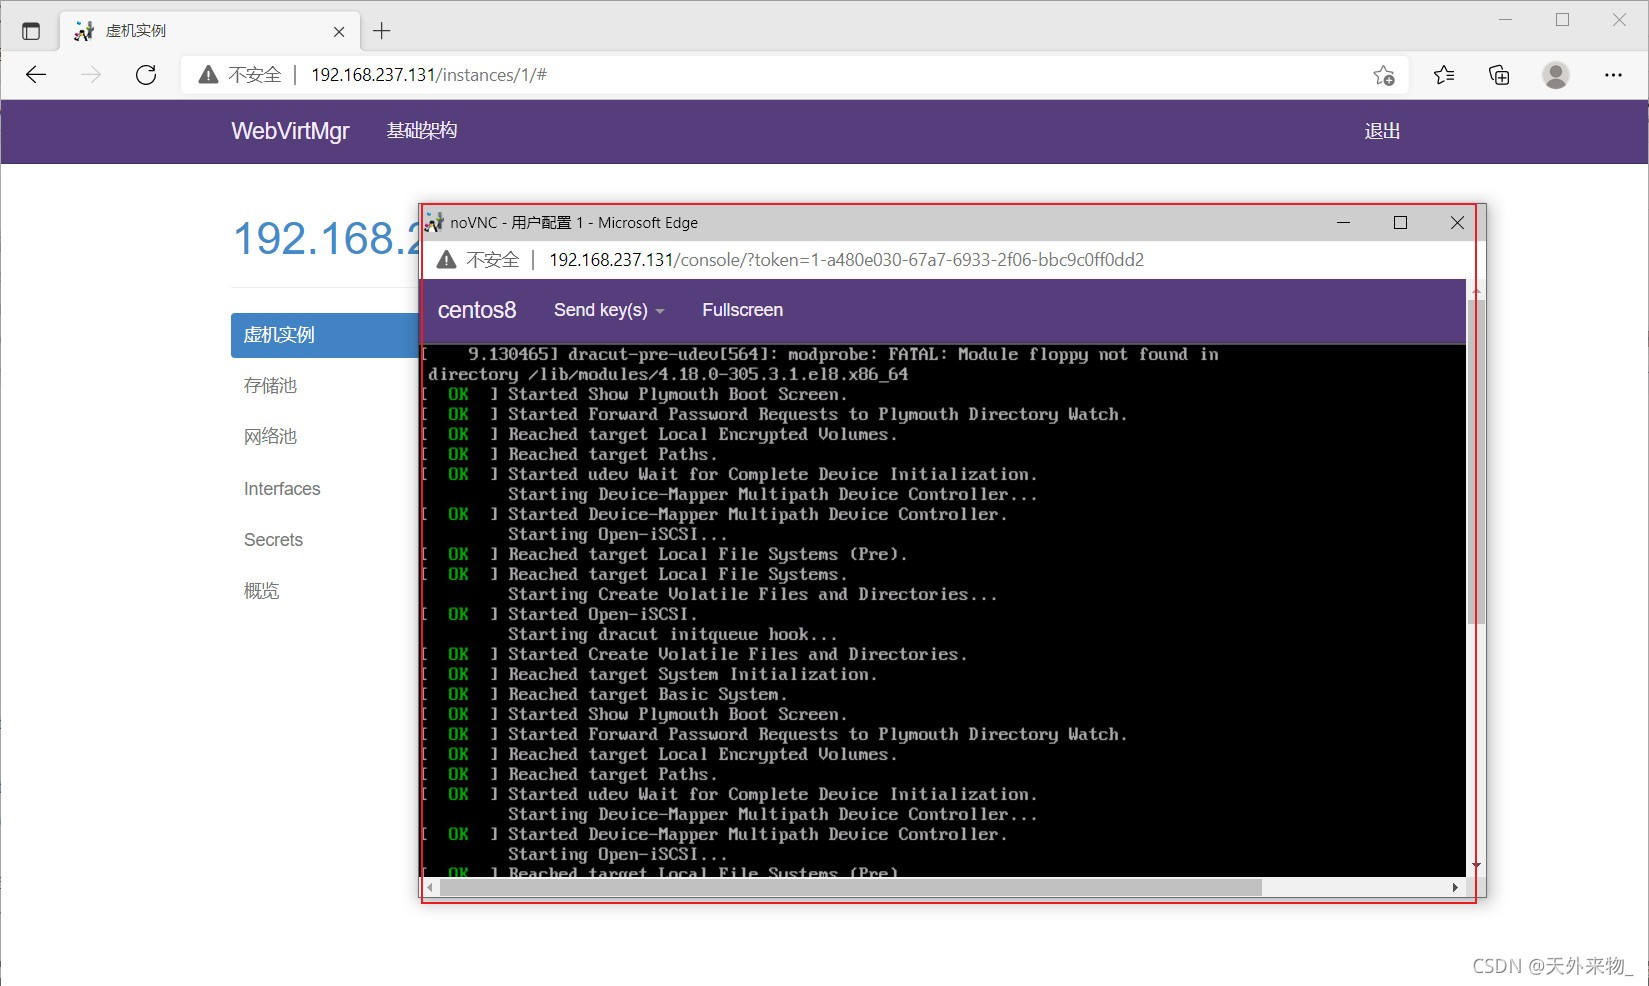
еҲӣе»әзі»з»ҹе®үиЈ…й•ңеғҸ
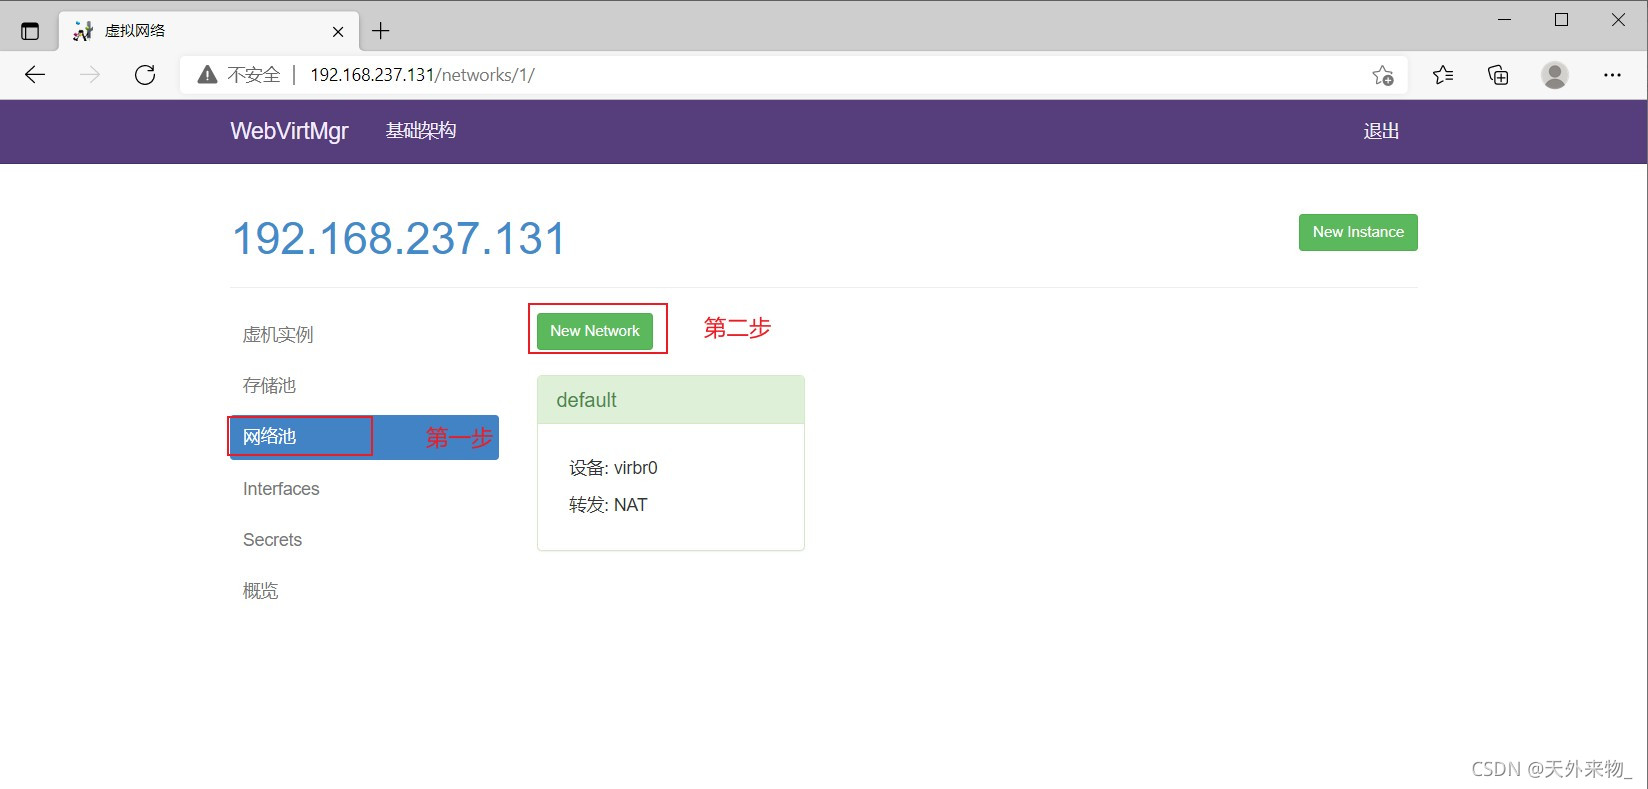
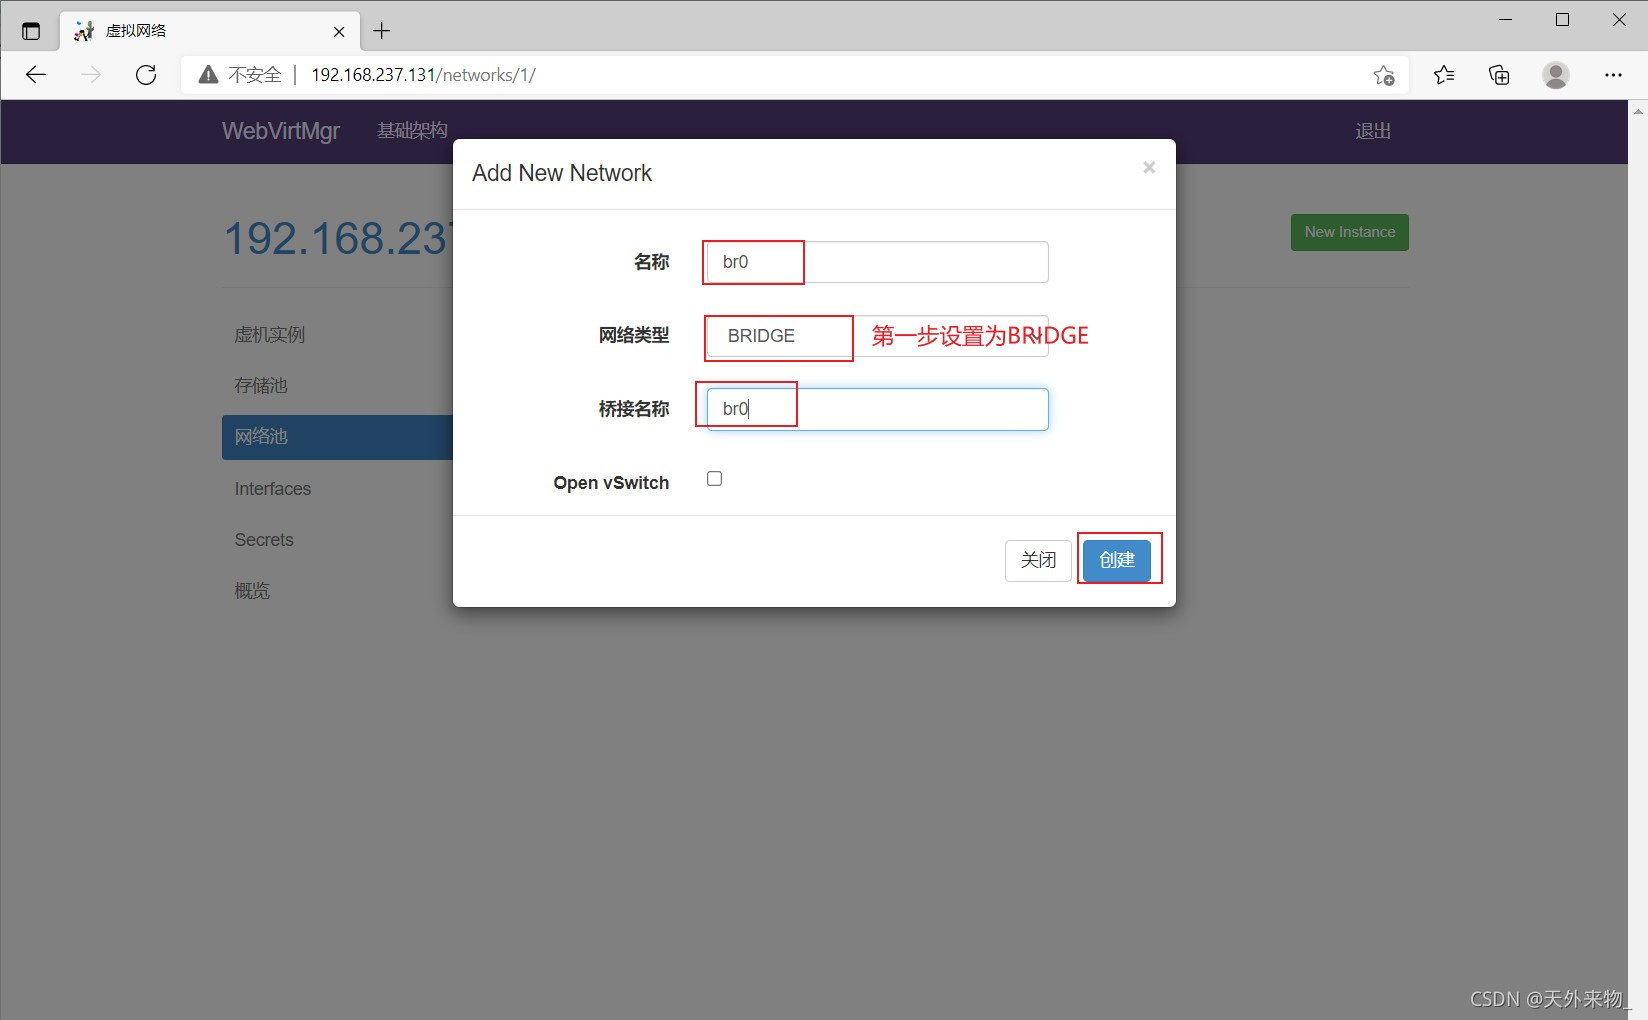
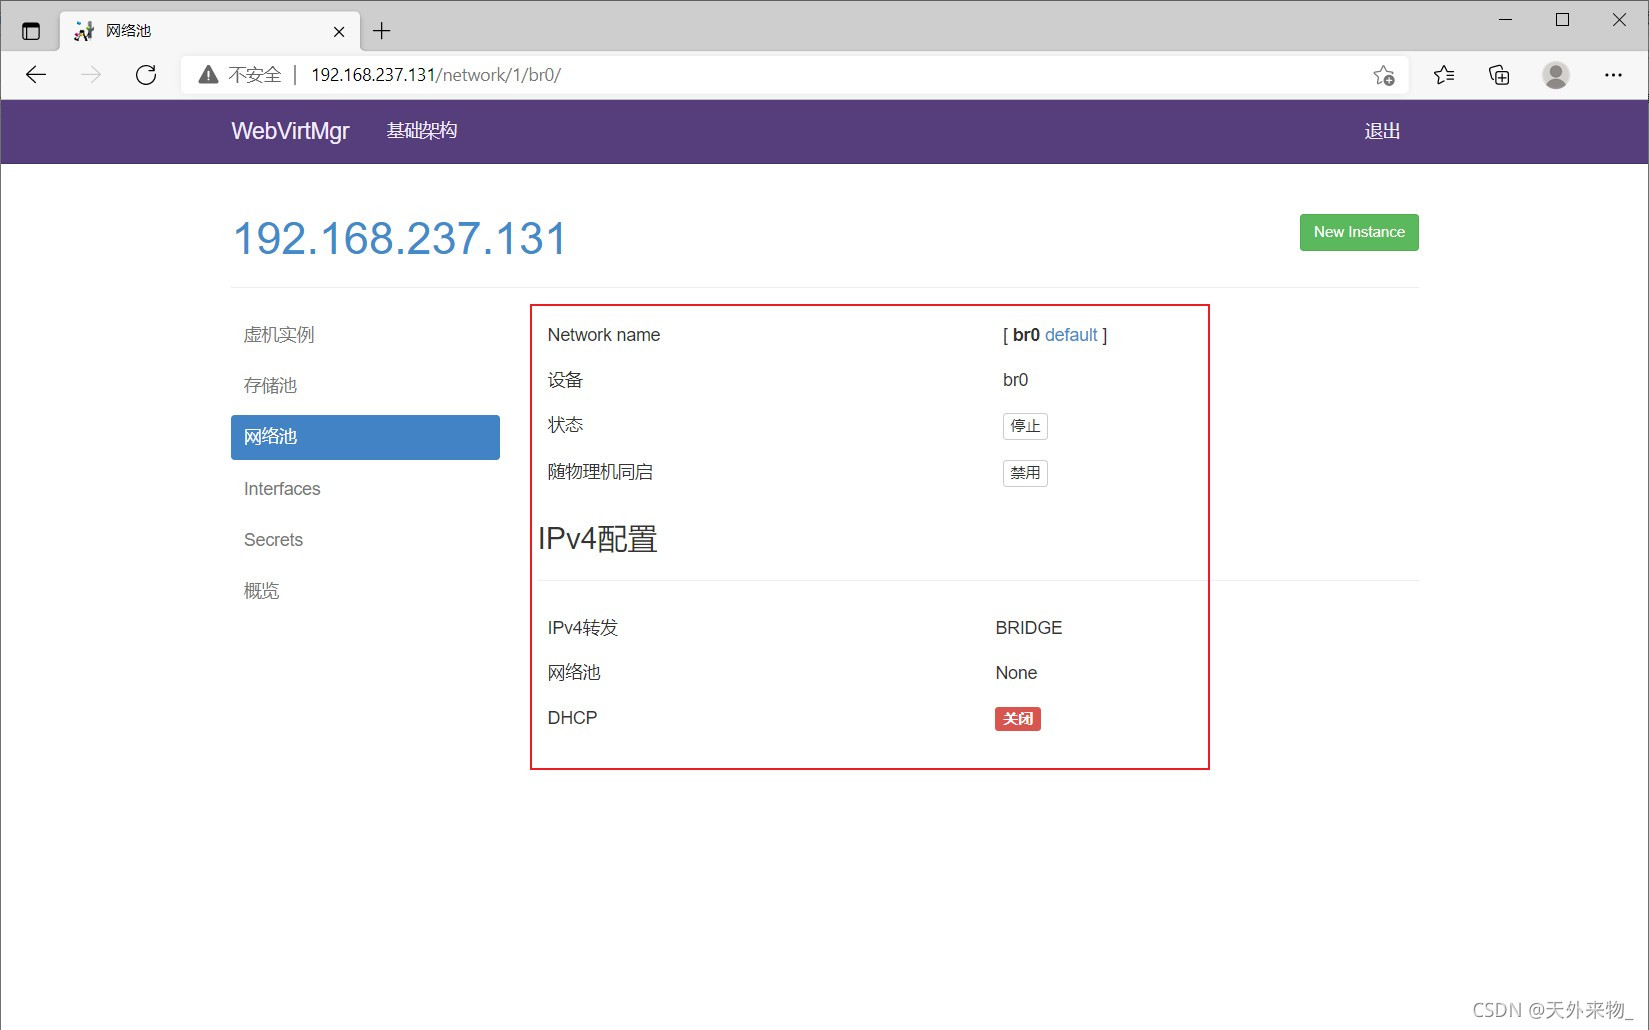
ж·»еҠ жЎҘжҺҘзҪ‘з»ң


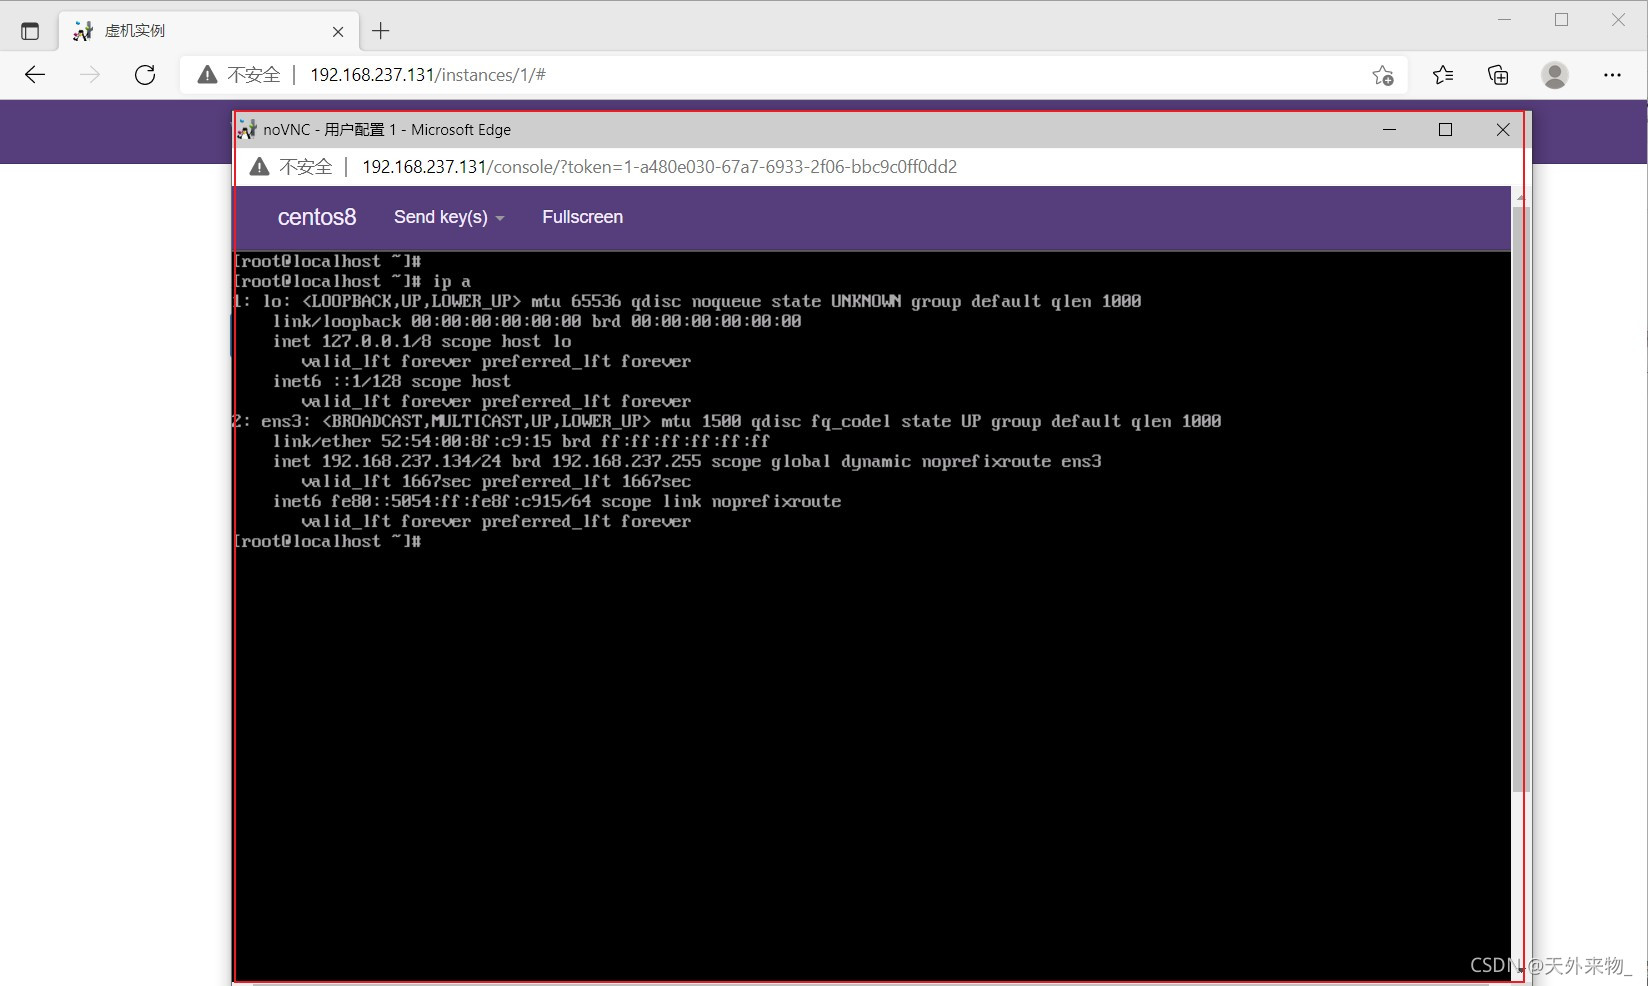
webз•Ңйқўж— жі•и®ҝй—®пјҢе‘Ҫд»ӨиЎҢжҠҘй”ҷпјҲaccept: Too many open filesпјү
еҜ№nginxиҝӣиЎҢй…ҚзҪ® [root@kvm ~]# vim /etc/nginx/nginx.conf user nginx; worker_processes auto; error_log /var/log/nginx/error.log; pid /run/nginx.pid; worker_rlimit_nofile 655350; //ж·»еҠ жӯӨиЎҢ [root@kvm ~]# systemctl restart nginx.service еҜ№зі»з»ҹеҸӮж•°иҝӣиЎҢи®ҫзҪ® [root@kvm ~]# vim /etc/security/limits.conf # End of file //ж·»еҠ дёӢйқўдёӨиЎҢ * soft nofile 655350 * hard nofile 655350 йҮҚеҗҜиҷҡжӢҹжңәпјҢе°ұиғҪжҲҗеҠҹи®ҝй—® [root@kvm ~]# reboot
вҖңжҖҺд№Ҳе®үиЈ…йғЁзҪІеҸҠз®ЎзҗҶKVMиҷҡжӢҹеҢ–вҖқзҡ„еҶ…е®№е°ұд»Ӣз»ҚеҲ°иҝҷйҮҢдәҶпјҢж„ҹи°ўеӨ§е®¶зҡ„йҳ…иҜ»гҖӮеҰӮжһңжғідәҶи§ЈжӣҙеӨҡиЎҢдёҡзӣёе…ізҡ„зҹҘиҜҶеҸҜд»Ҙе…іжіЁдәҝйҖҹдә‘зҪ‘з«ҷпјҢе°Ҹзј–е°ҶдёәеӨ§е®¶иҫ“еҮәжӣҙеӨҡй«ҳиҙЁйҮҸзҡ„е®һз”Ёж–Үз« пјҒ
е…ҚиҙЈеЈ°жҳҺпјҡжң¬з«ҷеҸ‘еёғзҡ„еҶ…е®№пјҲеӣҫзүҮгҖҒи§Ҷйў‘е’Ңж–Үеӯ—пјүд»ҘеҺҹеҲӣгҖҒиҪ¬иҪҪе’ҢеҲҶдә«дёәдё»пјҢж–Үз« и§ӮзӮ№дёҚд»ЈиЎЁжң¬зҪ‘з«ҷз«ӢеңәпјҢеҰӮжһңж¶үеҸҠдҫөжқғиҜ·иҒ”зі»з«ҷй•ҝйӮ®з®ұпјҡis@yisu.comиҝӣиЎҢдёҫжҠҘпјҢ并жҸҗдҫӣзӣёе…іиҜҒжҚ®пјҢдёҖз»ҸжҹҘе®һпјҢе°Ҷз«ӢеҲ»еҲ йҷӨж¶үе«ҢдҫөжқғеҶ…е®№гҖӮ
жӮЁеҘҪпјҢзҷ»еҪ•еҗҺжүҚиғҪдёӢи®ўеҚ•е“ҰпјҒ