您好,登录后才能下订单哦!
这篇文章主要介绍“Spring Schedule Task动态改写Cron配置方式是什么”,在日常操作中,相信很多人在Spring Schedule Task动态改写Cron配置方式是什么问题上存在疑惑,小编查阅了各式资料,整理出简单好用的操作方法,希望对大家解答”Spring Schedule Task动态改写Cron配置方式是什么”的疑惑有所帮助!接下来,请跟着小编一起来学习吧!
使用Spring @Scheduled标签可以很简单地定义Scheduled Task,但是有时我们需要在程序里动态地改写Cron的配置。
什么时候呢?
额,比如:
老板觉得Cron配置太难看了,想直接这样:10:15
两个标签: @EnableScheduling, @Scheduled
@SpringBootApplication
@EnableScheduling
public class SchedulingTasksApplication {
 public static void main(String[] args) {
  SpringApplication.run(SchedulingTasksApplication.class);
 }
}
public class ScheduleTaskSimpleJob {
@Scheduled(cron = "0 15 10 * * ?")
public void scheduleCronTask() {
long now = System.currentTimeMillis() / 1000;
System.out.println(
"schedule tasks using cron jobs - " + now);
}
}Implements SchedulingConfigurer就可以,想怎么改怎么改。
public class ScheduleTaskSimpleJob implements SchedulingConfigurer {
public void scheduleCronTask() {
long now = System.currentTimeMillis() / 1000;
System.out.println(
"schedule tasks using cron jobs - " + now);
}
@Override
public void configureTasks(ScheduledTaskRegistrar taskRegistrar) {
taskRegistrar.addTriggerTask(new Runnable() {
@Override
public void run() {
scheduleCronTask();
}
}, new Trigger() {
@Override
public Date nextExecutionTime(TriggerContext triggerContext) {
//TODO 将时间配置10:15转换为cron
String cron = "0 15 10 * * ?";
CronTrigger trigger = new CronTrigger(cron);
Date nextExecDate = trigger.nextExecutionTime(triggerContext);
return nextExecDate;
}
});
}
}Spring框架自3.0版本起,自带了任务调度功能,好比是一个轻量级的Quartz,而且使用起来也方便、简单,且不需要依赖其他的JAR包。秉承着Spring的一贯风格,Spring任务调度的实现同时支持注解配置和XML配置两种方式。
再来谈谈变态的项目需求:我们正在做一个智能数字电表的数据采集项目,项目最终会在多个工业园上线,每个工业园对电表数据的采集周期可以进行自定义,例如A工业园想每10分钟采集一次数据,B工业园想每15分钟采集一次数据。因为数据采集是个重复的周期性工作,那么就可以考虑使用Spring框架的定时任务功能了。
按正常来讲,修改定时任务的执行周期还不简单,把服务停下来,改下任务的cron参数,再重启服务就搞定了。但有没有一种可能,在不停服务的情况下,就可以动态的修改任务的cron参数呢?完全是有可能的!
如下
<?xml version="1.0" encoding="UTF-8"?>
<beans xmlns="http://www.springframework.org/schema/beans"
 xmlns:xsi="http://www.w3.org/2001/XMLSchema-instance"
 xmlns:task="http://www.springframework.org/schema/task"
 xmlns:context="http://www.springframework.org/schema/context"
 xsi:schemaLocation="
  http://www.springframework.org/schema/beans http://www.springframework.org/schema/beans/spring-beans.xsd
  http://www.springframework.org/schema/task http://www.springframework.org/schema/task/spring-task.xsd
  http://www.springframework.org/schema/context http://www.springframework.org/schema/context/spring-context.xsd ">

 <context:component-scan base-package="com.pes_soft.task.demo" />

 <!-- Spring注解方式配置调度任务 -->
 <task:executor id="executor" pool-size="3"/>
 <task:scheduler id="scheduler" pool-size="3"/>
 <task:annotation-driven executor="executor" scheduler="scheduler"/>
</beans>
注意:配置Spring定时任务时,需要在Spring配置文件的xml头部加入
xmlns:task="http://www.springframework.org/schema/task"和xsi:schemaLocation位置中加入
http://www.springframework.org/schema/task http://www.springframework.org/schema/task/spring-task.xsd
然后是注解式任务逻辑代码SpringStaticCronTask.java
package com.pes_soft.task.demo;
import org.slf4j.Logger;
import org.slf4j.LoggerFactory;
import org.springframework.context.annotation.Lazy;
import org.springframework.scheduling.annotation.Scheduled;
import org.springframework.stereotype.Component;

@Lazy(false)
@Component
public class SpringStaticCronTask {
 private static final Logger logger = LoggerFactory.getLogger(SpringStaticCronTask.class);

 @Scheduled(cron="0/5 * * * * ?")
 public void staticCronTask() {
  logger.debug("staticCronTask is running...");
        }
}
上述任务适用于具有固定任务周期的任务,若要修改任务执行周期,只能走“停服务→修改任务执行周期→重启服务”这条路。
步骤如下:
在定时任务类上增加@EnableScheduling注解,并实现SchedulingConfigurer接口。(值得注意的是:@EnableScheduling对Spring的版本要求比较高,一开始使用的3.2.6版本时一直未成功,后来改成4.2.5版本就可以了)
设置一个静态变量cron,用于存放任务执行周期参数。
另辟一线程,用于模拟实际业务中外部原因修改了任务执行周期。
设置任务触发器,触发任务执行,其中就可以修改任务的执行周期。
完整的SpringDynamicCronTask.java代码如下:
package com.pes_soft.task.demo;
import java.util.Date;
import org.slf4j.Logger;
import org.slf4j.LoggerFactory;
import org.springframework.context.annotation.Lazy;
import org.springframework.scheduling.Trigger;
import org.springframework.scheduling.TriggerContext;
import org.springframework.scheduling.annotation.EnableScheduling;
import org.springframework.scheduling.annotation.SchedulingConfigurer;
import org.springframework.scheduling.config.ScheduledTaskRegistrar;
import org.springframework.scheduling.support.CronTrigger;
import org.springframework.stereotype.Component;

@Lazy(false)
@Component
@EnableScheduling
public class SpringDynamicCronTask implements SchedulingConfigurer {
 private static final Logger logger = LoggerFactory.getLogger(SpringDynamicCronTask.class);
 private static String cron;
 public SpringDynamicCronTask() {
 cron = "0/5 * * * * ?";

  // 开启新线程模拟外部更改了任务执行周期
  new Thread(new Runnable() {
   @Override
   public void run() {
    try {
     Thread.sleep(15 * 1000);
    } catch (InterruptedException e) {
     e.printStackTrace();
    }

    cron = "0/10 * * * * ?";
    System.err.println("cron change to: " + cron);
   }
  }).start();
 }

 @Override
 public void configureTasks(ScheduledTaskRegistrar taskRegistrar) {
  taskRegistrar.addTriggerTask(new Runnable() {
   @Override
   public void run() {
    // 任务逻辑
    logger.debug("dynamicCronTask is running...");
   }
  }, new Trigger() {
   @Override
   public Date nextExecutionTime(TriggerContext triggerContext) {
    // 任务触发,可修改任务的执行周期
    CronTrigger trigger = new CronTrigger(cron);
                Date nextExec = trigger.nextExecutionTime(triggerContext);
                return nextExec;
   }
  });
 }
}
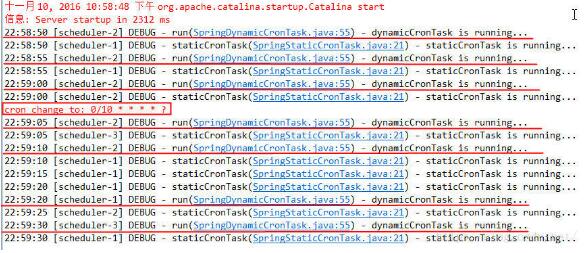
将demo运行起来,查看任务执行情况,可以观察到任务的执行周期由5秒变成了10秒,期间服务并未停止。

到此,关于“Spring Schedule Task动态改写Cron配置方式是什么”的学习就结束了,希望能够解决大家的疑惑。理论与实践的搭配能更好的帮助大家学习,快去试试吧!若想继续学习更多相关知识,请继续关注亿速云网站,小编会继续努力为大家带来更多实用的文章!
免责声明:本站发布的内容(图片、视频和文字)以原创、转载和分享为主,文章观点不代表本网站立场,如果涉及侵权请联系站长邮箱:is@yisu.com进行举报,并提供相关证据,一经查实,将立刻删除涉嫌侵权内容。