您好,登录后才能下订单哦!
密码登录
登录注册
点击 登录注册 即表示同意《亿速云用户服务条款》
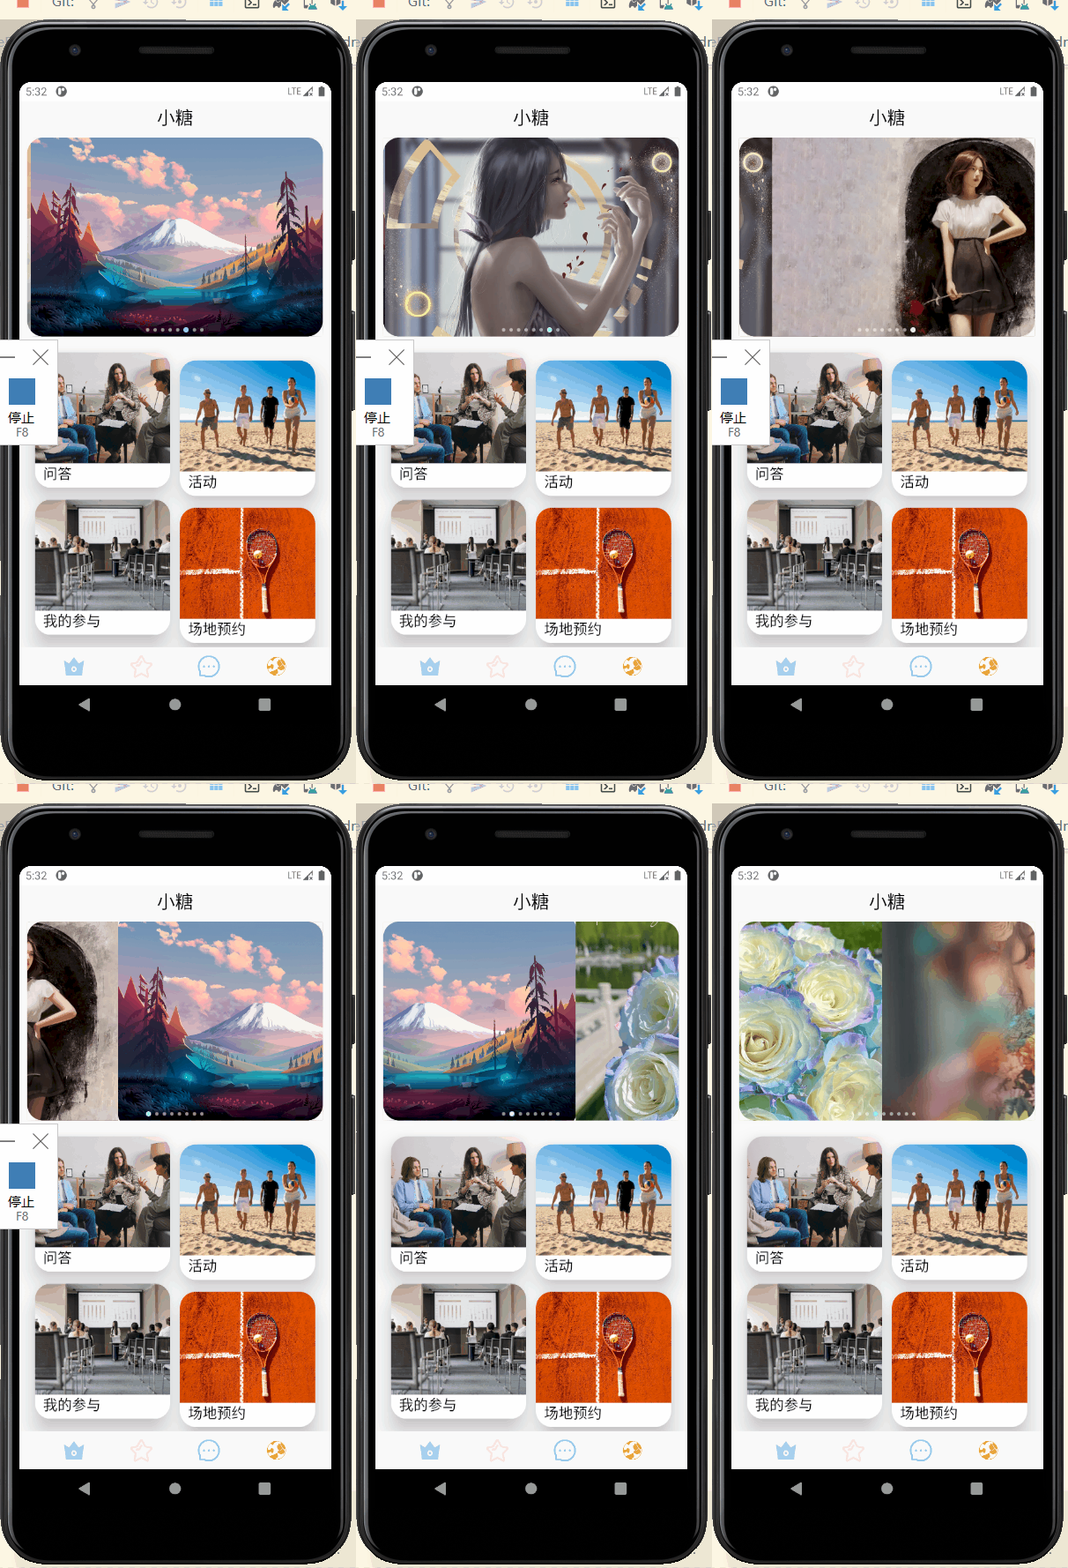
本篇内容主要讲解“怎么使用Android banner”,感兴趣的朋友不妨来看看。本文介绍的方法操作简单快捷,实用性强。下面就让小编来带大家学习“怎么使用Android banner”吧!

implementation 'com.youth.banner:banner:2.1.0'
<!-- if you want to load images from the internet -->
<uses-permission android:name="android.permission.INTERNET" />
<com.youth.banner.Banner
        android:id="@+id/banner"
        android:layout_width="0dp"
        android:layout_height="250dp"
        android:layout_margin="10dp"
        app:banner_radius="20dp"    // 圆角
        android:clickable="true"   //  是否可点击
        app:banner_indicator_selected_color="#95F2EC"
        app:layout_constraintEnd_toEndOf="parent"
        app:layout_constraintHorizontal_bias="0.157"
        app:layout_constraintStart_toStartOf="parent"
        app:layout_constraintTop_toTopOf="parent" />
package com.hnucm.xiaotang;

import android.os.Bundle;

import androidx.fragment.app.Fragment;

import android.util.Log;
import android.view.LayoutInflater;
import android.view.View;
import android.view.ViewGroup;


import com.bumptech.glide.Glide;
import com.bumptech.glide.load.resource.bitmap.RoundedCorners;
import com.bumptech.glide.request.RequestOptions;
import com.youth.banner.Banner;
import com.youth.banner.adapter.BannerImageAdapter;
import com.youth.banner.holder.BannerImageHolder;
import com.youth.banner.indicator.CircleIndicator;
import com.youth.banner.listener.OnBannerListener;

import org.json.JSONArray;
import org.json.JSONException;
import org.xutils.common.Callback;
import org.xutils.http.RequestParams;
import org.xutils.x;

import java.util.ArrayList;
import java.util.List;


public class ShouYeFragment extends Fragment implements OnBannerListener {


    @Override
    public View onCreateView(LayoutInflater inflater, ViewGroup container,
                             Bundle savedInstanceState) {
        View inflate = inflater.inflate(R.layout.fragment_shou_ye, container, false);
        Banner banner =inflate.findViewById(R.id.banner);
        List<String> imgList = new ArrayList<>();

        x.Ext.init(getActivity().getApplication());
        x.Ext.setDebug(BuildConfig.DEBUG);  // 是否输出debug日志, 开启debug会影响性能.
        x.view().inject(getActivity());  //没有用到view注解可以先不用

        imgList.add("https://cdn.jsdelivr.net/gh/Yqifei/Blog-Image@master/20211026/image.6719h9mvs700.png");
        imgList.add("https://cdn.jsdelivr.net/gh/Yqifei/Blog-Image@master/20211031/800-(11).2txrpbqztva0.jpg");
        imgList.add("https://cdn.jsdelivr.net/gh/Yqifei/Blog-Image@master/20211031/800-(5).5s6zwxy19v40.jpg");
        imgList.add("https://cdn.jsdelivr.net/gh/Yqifei/Blog-Image@master/20211031/800-(10).24p8puxcmqbk.jpg");
        imgList.add("https://cdn.jsdelivr.net/gh/Yqifei/Blog-Image@master/20211031/800-(14).pizaxijh634.jpg");

        RequestParams params = new RequestParams("https://www.fastmock.site/mock/08392ee207964eb010bf22b157103494/androidJavaEE/banner");
        x.http().get(params, new Callback.CommonCallback<String>() {
            @Override
            public void onSuccess(String result) {
                try {
                    JSONArray jsonArray = new JSONArray(result);
                    for (int i=0;i<jsonArray.length();i++){
                        imgList.add((String)jsonArray.get(i));
                    }
                    banner.setDatas(imgList);    //  动态更新banner数据
                } catch (JSONException e) {
                    e.printStackTrace();
                }

            }
            @Override
            public void onError(Throwable ex, boolean isOnCallback) {
            }
            @Override
            public void onCancelled(CancelledException cex) {
            }
            @Override
            public void onFinished() {
            }
        });


        banner.setAdapter(new BannerImageAdapter<String>(imgList) {

            @Override
            public void onBindView(BannerImageHolder holder, String data, int position, int size) {
                System.out.println("hello TEST");
                Glide.with(holder.itemView)
                        .load(data)
                        .apply(RequestOptions.bitmapTransform(new RoundedCorners(30)))
                        .into(holder.imageView);
            }

        }).setIndicator(new 				                      CircleIndicator(getContext())).setLoopTime(1000).setOnBannerListener(this);
        //  设置圆形指示点,设置循环时间,设置监听器
        return inflate;
    }

    @Override
    public void OnBannerClick(Object data, int position) {   //  监听每一个图片的点击事件
        Log.i("tag", "你点了第"+position+"张轮播图");
    }
}更多方法以实际使用为准,下面不一定全部列出了
| 方法名 | 返回类型 | 描述 |
|---|---|---|
| getAdapter() | extends BannerAdapter | 获取你设置的BannerAdapter |
| getViewPager2() | ViewPager2 | 获取ViewPager2 |
| getIndicator() | Indicator | 获取你设置的指示器(没有设置直接获取会抛异常哦) |
| getIndicatorConfig() | IndicatorConfig | 获取你设置的指示器配置信息(没有设置直接获取会抛异常哦) |
| getRealCount() | int | 返回banner真实总数 |
| setUserInputEnabled(boolean) | this | 禁止手动滑动Banner;true 允许,false 禁止 |
| setDatas(List) | this | 重新设置banner数据 |
| isAutoLoop(boolean) | this | 是否允许自动轮播 |
| setLoopTime(long) | this | 设置轮播间隔时间(默认3000毫秒) |
| setScrollTime(long) | this | 设置轮播滑动的时间(默认800毫秒) |
| start() | this | 开始轮播(主要配合生命周期使用),或者你手动暂停再次启动 |
| stop() | this | 停止轮播(主要配合生命周期使用),或者你需要手动暂停 |
| setAdapter(T extends BannerAdapter) | this | 设置banner的适配器 |
| setAdapter(T extends BannerAdapter,boolean) | this | 设置banner的适配器,是否支持无限循环 |
| setOrientation(@Orientation) | this | 设置banner轮播方向(垂直or水平) |
| setOnBannerListener(this) | this | 设置点击事件,下标是从0开始 |
| addOnPageChangeListener(this) | this | 添加viewpager2的滑动监听 |
| setPageTransformer(PageTransformer) | this | 设置viewpager的切换效果 |
| addPageTransformer(PageTransformer) | this | 添加viewpager的切换效果(可以设置多个) |
| setIndicator(Indicator) | this | 设置banner轮播指示器(提供有base和接口,可以自定义) |
| setIndicator(Indicator,boolean) | this | 设置指示器(传false代表不将指示器添加到banner上,配合布局文件,可以自我发挥) |
| setIndicatorSelectedColor(@ColorInt) | this | 设置指示器选中颜色 |
| setIndicatorSelectedColorRes(@ColorRes) | this | 设置指示器选中颜色 |
| setIndicatorNormalColor(@ColorInt) | this | 设置指示器默认颜色 |
| setIndicatorNormalColorRes(@ColorRes) | this | 设置指示器默认颜色 |
| setIndicatorGravity(@IndicatorConfig.Direction) | this | 设置指示器位置(左,中,右) |
| setIndicatorSpace(int) | this | 设置指示器之间的间距 |
| setIndicatorMargins(IndicatorConfig.Margins) | this | 设置指示器的Margins |
| setIndicatorWidth(int,int) | this | 设置指示器选中和未选中的宽度,直接影响绘制指示器的大小 |
| setIndicatorNormalWidth(int) | this | 设置指示器未选中的宽度 |
| setIndicatorSelectedWidth(int) | this | 设置指示器选中的宽度 |
| setIndicatorRadius(int) | this | 设置指示器圆角,不要圆角可以设置为0 |
| setIndicatorHeight(int) | this | 设置指示器高度 |
| setBannerRound(float) | this | 设置banner圆角(还有一种setBannerRound2方法,需要5.0以上) |
| setBannerGalleryEffect(int,int,float) | this | 画廊效果 |
| setBannerGalleryMZ(int,float) | this | 魅族效果 |
| setStartPosition(int) | this | 设置开始的位置 (需要在setAdapter或者setDatas之前调用才有效哦) |
| setIndicatorPageChange() | this | 设置指示器改变监听 (一般是为了配合数据操作使用,看情况自己发挥) |
| setCurrentItem() | this | 设置当前位置,和原生使用效果一样 |
| addBannerLifecycleObserver() | this | 给banner添加生命周期观察者,内部自动管理banner的生命周期 |
在banner布局文件中调用,如果你自定义了indicator请做好兼容处理。 下面的属性并不是每个指示器都用得到,所以使用时要注意!
| Attributes | format | describe |
|---|---|---|
| banner_loop_time | integer | 轮播间隔时间,默认3000 |
| banner_auto_loop | boolean | 是否自动轮播,默认true |
| banner_infinite_loop | boolean | 是否支持无限循环(即首尾直接过渡),默认true |
| banner_orientation | enum | 轮播方向:horizontal(默认) or vertical |
| banner_radius | dimension | banner圆角半径,默认0(不绘制圆角) |
| banner_indicator_normal_width | dimension | 指示器默认的宽度,默认5dp (对RoundLinesIndicator无效) |
| banner_indicator_selected_width | dimension | 指示器选中的宽度,默认7dp |
| banner_indicator_normal_color | color | 指示器默认颜色,默认0x88ffffff |
| banner_indicator_selected_color | color | 指示器选中颜色,默认0x88000000 |
| banner_indicator_space | dimension | 指示器之间的间距,默认5dp (对RoundLinesIndicator无效) |
| banner_indicator_gravity | dimension | 指示器位置,默认center |
| banner_indicator_margin | dimension | 指示器的margin,默认5dp,不能和下面的同时使用 |
| banner_indicator_marginLeft | dimension | 指示器左边的margin |
| banner_indicator_marginTop | dimension | 指示器上边的margin |
| banner_indicator_marginRight | dimension | 指示器右边的margin |
| banner_indicator_marginBottom | dimension | 指示器下边的margin |
| banner_indicator_height | dimension | 指示器高度(对CircleIndicator无效) |
| banner_indicator_radius | dimension | 指示器圆角(对CircleIndicator无效) |
| banner_round_top_left | boolean | 设置要绘制的banner圆角方向(如果都不设置默认全部) |
| banner_round_top_right | boolean | 设置要绘制的banner圆角方向(如果都不设置默认全部) |
| banner_round_bottom_left | boolean | 设置要绘制的banner圆角方向(如果都不设置默认全部) |
| banner_round_bottom_right | boolean | 设置要绘制的banner圆角方向(如果都不设置默认全部) |
到此,相信大家对“怎么使用Android banner”有了更深的了解,不妨来实际操作一番吧!这里是亿速云网站,更多相关内容可以进入相关频道进行查询,关注我们,继续学习!
免责声明:本站发布的内容(图片、视频和文字)以原创、转载和分享为主,文章观点不代表本网站立场,如果涉及侵权请联系站长邮箱:is@yisu.com进行举报,并提供相关证据,一经查实,将立刻删除涉嫌侵权内容。