您好,登录后才能下订单哦!
密码登录
登录注册
点击 登录注册 即表示同意《亿速云用户服务条款》
这篇文章主要讲解了“Android AlertDialog实例分析”,文中的讲解内容简单清晰,易于学习与理解,下面请大家跟着小编的思路慢慢深入,一起来研究和学习“Android AlertDialog实例分析”吧!
AlertDialog可以在当前的界面上显示一个对话框,这个对话框是置顶于所有界面元素之上的,能够屏蔽掉其他控件的交互能力,因此AlertDialog一般是用于提示一些非常重要的内容或者警告信息。
首先,我们来了解一下AlertDialog的大体创建顺序。与TextView、Button这些控件稍有不同,AlertDialog并不是初始化(findViewById)之后就直接调用各种方法了。仔细想想AlertDialog的使用场景, 它并不像TextView和Button那些控件似的一般都是固定在界面上,而是在某个时机才会触发出来(比如用户点击了某个按钮或者断网了)。所以AlertDialog并不需要到布局文件中创建,而是在代码中通过构造器(AlertDialog.Builder)来构造标题、图标和按钮等内容的。
1.创建构造器AlertDialog.Builder的对象;
2.通过构造器对象调用setTitle、setMessage、setIcon等方法构造对话框的标题、信息和图标等内容;
3.根据需要调用setPositive/Negative/NeutralButton()方法设置正面按钮、负面按钮和中立按钮;
4.调用构造器对象的create方法创建AlertDialog对象;
5.AlertDialog对象调用show方法,让对话框在界面上显示。
注:AlertDialog.Builder自己也有一个show方法,可以显示对话框,所以上面的第4、第5步可以简化为一步。
下面,我们就来创建几种常用的AlertDialog吧。新建一个工程,在activity_main.xml布局文件上放置五个按钮,点击按钮就会有相应的对话框弹出。
<?xml version="1.0" encoding="utf-8"?>
<LinearLayout xmlns:android="http://schemas.android.com/apk/res/android"
    xmlns:tools="http://schemas.android.com/tools"
    android:layout_width="match_parent"
    android:layout_height="match_parent"
    android:orientation="vertical"
    tools:context="com.fd.alertdialog.MainActivity">

    <Button
        android:id="@+id/btn_normal_dialog"
        android:layout_width="match_parent"
        android:layout_height="wrap_content"
        android:text="普通对话框" />

    <Button
        android:id="@+id/btn_item_dialog"
        android:layout_width="match_parent"
        android:layout_height="wrap_content"
        android:text="普通列表对话框" />

    <Button
        android:id="@+id/btn_single_choice"
        android:layout_width="match_parent"
        android:layout_height="wrap_content"
        android:text="单选对话框" />

    <Button
        android:id="@+id/btn_multi_choice"
        android:layout_width="match_parent"
        android:layout_height="wrap_content"
        android:text="复选对话框" />

    <Button
        android:id="@+id/btn_custom_dialog"
        android:layout_width="match_parent"
        android:layout_height="wrap_content"
        android:text="自定义对话框" />

</LinearLayout>
package com.fd.alertdialog;

import android.content.DialogInterface;
import android.os.Bundle;
import android.support.v7.app.AlertDialog;
import android.support.v7.app.AppCompatActivity;
import android.text.TextUtils;
import android.util.Log;
import android.view.View;
import android.widget.Button;
import android.widget.EditText;
import android.widget.Toast;

import java.util.ArrayList;
import java.util.List;

public class MainActivity extends AppCompatActivity implements View.OnClickListener {
    public static String TAG = MainActivity.class.getSimpleName();
    private int chedkedItem = 0;
    private String name;
    private String pwd;

    @Override
    protected void onCreate(Bundle savedInstanceState) {
        super.onCreate(savedInstanceState);
        setContentView(R.layout.activity_main);

        bindView();
    }

    private void bindView() {
        Button btn_normal_dialog = (Button) findViewById(R.id.btn_normal_dialog);
        Button btn_item_dialog = (Button) findViewById(R.id.btn_item_dialog);
        Button btn_single_choice = (Button) findViewById(R.id.btn_single_choice);
        Button btn_multi_choice = (Button) findViewById(R.id.btn_multi_choice);
        Button btn_custom_dialog = (Button) findViewById(R.id.btn_custom_dialog);
        btn_normal_dialog.setOnClickListener(this);
        btn_item_dialog.setOnClickListener(this);
        btn_single_choice.setOnClickListener(this);
        btn_multi_choice.setOnClickListener(this);
        btn_custom_dialog.setOnClickListener(this);
    }

    @Override
    public void onClick(View v) {
        switch (v.getId()) {
            case R.id.btn_normal_dialog:
                tipDialog();                //提示对话框
                break;
            case R.id.btn_item_dialog:
                itemListDialog();           //列表对话框
                break;
            case R.id.btn_single_choice:
                singleChoiceDialog();       //单选对话框
                break;
            case R.id.btn_multi_choice:
                multiChoiceDialog();        //多选对话框
                break;
            case R.id.btn_custom_dialog:
                customDialog();             //自定义对话框
                break;
            default:
                break;
        }
    }
}
代码比较简单,这里就不做详细讲解了。接下来看一下各个对话框的具体代码。
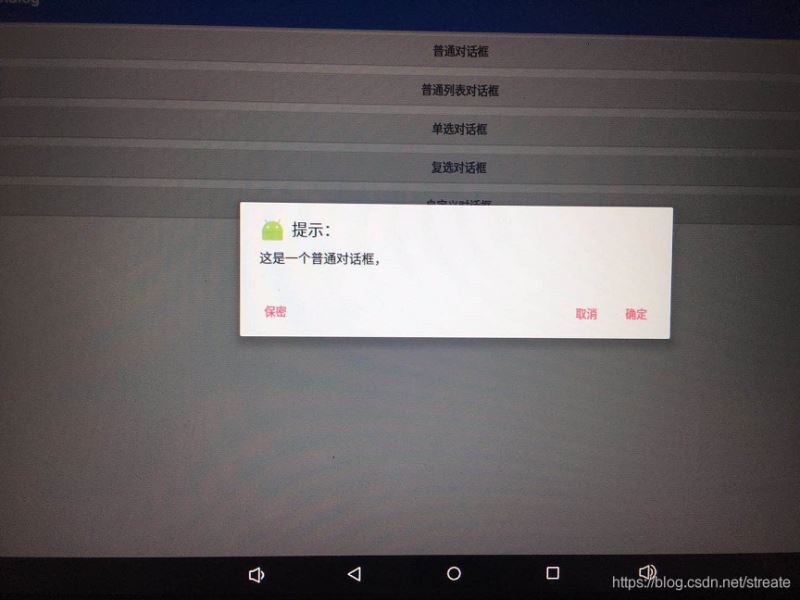
提示对话框应该是最常见的AlertDialog了,其上主要是提示标题,消息主体,底部“取消”、“确定”等按钮。
/**
 * 提示对话框
 */
public void tipDialog() {
    AlertDialog.Builder builder = new AlertDialog.Builder(MainActivity.this);
    builder.setTitle("提示:");
    builder.setMessage("这是一个普通对话框,");
    builder.setIcon(R.mipmap.ic_launcher);
    builder.setCancelable(true);            //点击对话框以外的区域是否让对话框消失

    //设置正面按钮
    builder.setPositiveButton("确定", new DialogInterface.OnClickListener() {
        @Override
        public void onClick(DialogInterface dialog, int which) {
            Toast.makeText(MainActivity.this, "你点击了确定", Toast.LENGTH_SHORT).show();
            dialog.dismiss();
        }
    });
    //设置反面按钮
    builder.setNegativeButton("取消", new DialogInterface.OnClickListener() {
        @Override
        public void onClick(DialogInterface dialog, int which) {
            Toast.makeText(MainActivity.this, "你点击了取消", Toast.LENGTH_SHORT).show();
            dialog.dismiss();
        }
    });
    //设置中立按钮
    builder.setNeutralButton("保密", new DialogInterface.OnClickListener() {
        @Override
        public void onClick(DialogInterface dialog, int which) {
            Toast.makeText(MainActivity.this, "你选择了中立", Toast.LENGTH_SHORT).show();
            dialog.dismiss();
        }
    });


    AlertDialog dialog = builder.create();      //创建AlertDialog对象
    //对话框显示的监听事件
    dialog.setOnShowListener(new DialogInterface.OnShowListener() {
        @Override
        public void onShow(DialogInterface dialog) {
            Log.e(TAG, "对话框显示了");
        }
    });
    //对话框消失的监听事件
    dialog.setOnCancelListener(new DialogInterface.OnCancelListener() {
        @Override
        public void onCancel(DialogInterface dialog) {
            Log.e(TAG, "对话框消失了");
        }
    });
    dialog.show();                              //显示对话框
}
具体介绍一下用到的方法吧:
- setTitle:设置对话框的标题,比如“提示”、“警告”等;
- setMessage:设置对话框要传达的具体信息;
- setIcon: 设置对话框的图标;
- setCancelable: 点击对话框以外的区域是否让对话框消失,默认为true;
- setPositiveButton:设置正面按钮,表示“积极”、“确认”的意思,第一个参数为按钮上显示的文字,下同;
- setNegativeButton:设置反面按钮,表示“消极”、“否认”、“取消”的意思;
- setNeutralButton:设置中立按钮;
- setOnShowListener:对话框显示时触发的事件;
- setOnCancelListener:对话框消失时触发的事件。
当然,这些设置并不是非要不可,而是根据自己需要而定。比如标题、图标这些就可要可不要。
效果如下图所示:
你或许会有这样的疑问:既然底部那些按钮的文字和点击事件的内容都是我们自己来写的,那不是可以把正面按钮的内容和反面按钮的内容互换吗?看看运行后的效果图就会发现,反面按钮是在正面按钮的左边的,所以考虑到用户的操作习惯和代码的语义,我们最好还是按照API来写。
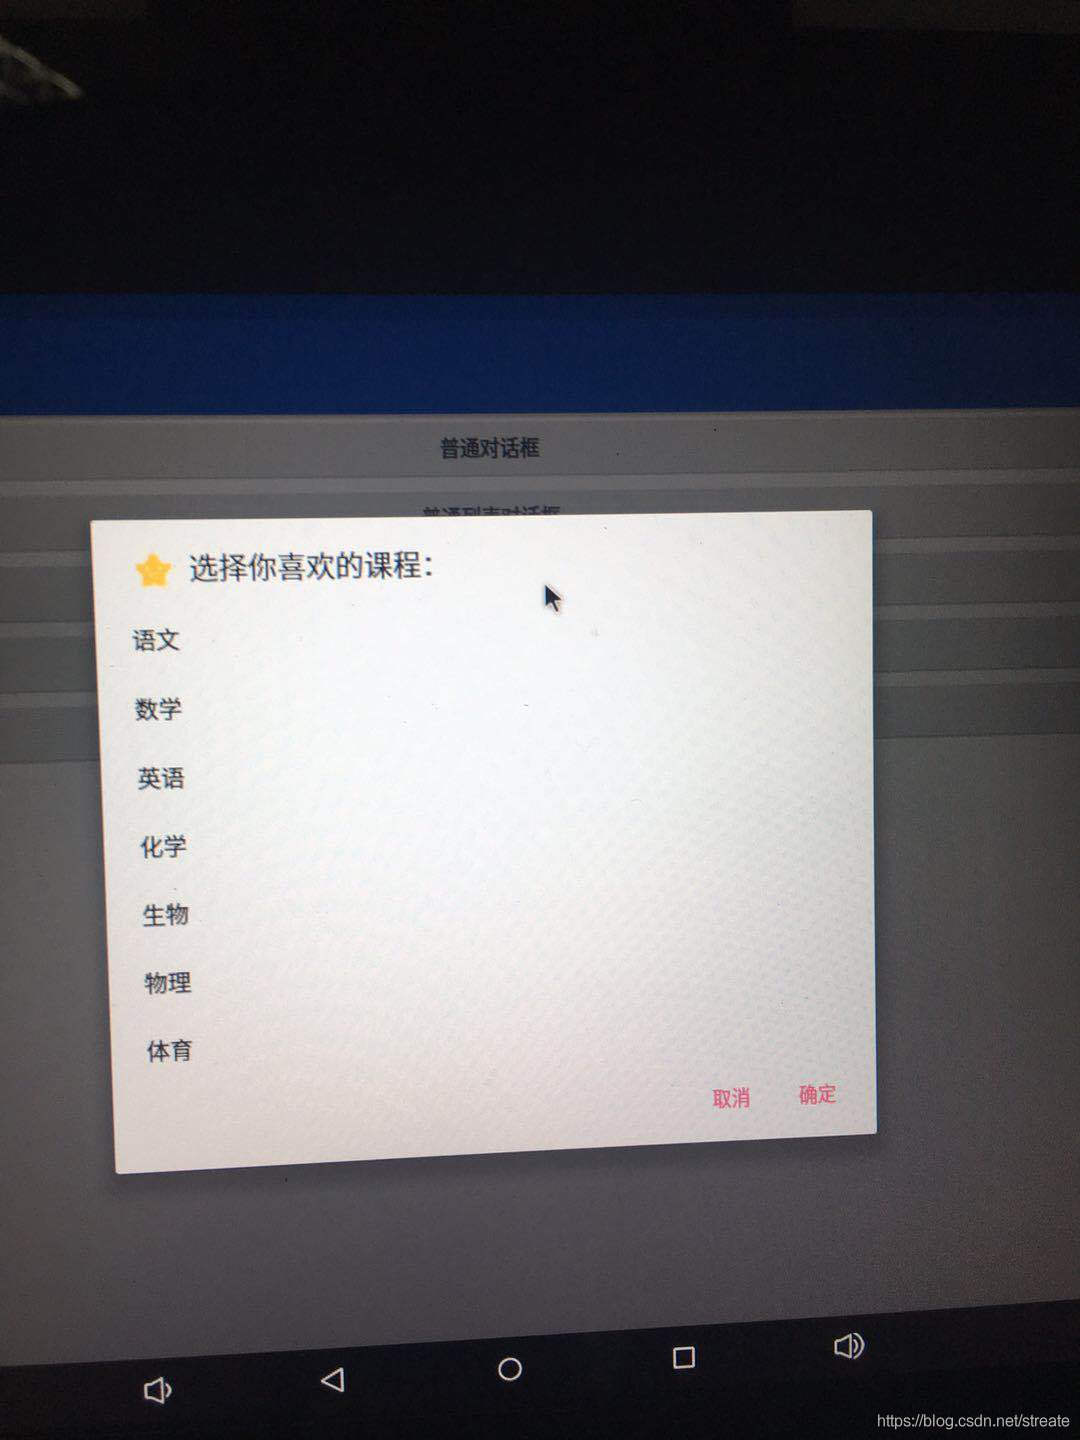
列表对话框的内容就是一列显示内容,需要用到构造器的setItems方法,参数一是列表数据,参数二是点击监听接口,我们要实现这样一个小功能,用户在点击某一项时弹出一个Toast提示选中项的内容。
代码如下所示:
/**
 * 列表对话框
 */
private void itemListDialog() {
    AlertDialog.Builder builder = new AlertDialog.Builder(MainActivity.this);
    builder.setTitle("选择你喜欢的课程:");
    builder.setCancelable(true);
    final String[] lesson = new String[]{"语文", "数学", "英语", "化学", "生物", "物理", "体育"};
    builder.setIcon(R.mipmap.ic_launcher);
    builder.setIcon(R.mipmap.tab_better_pressed)
            .setItems(lesson, new DialogInterface.OnClickListener() {
                @Override
                public void onClick(DialogInterface dialog, int which) {
                    Toast.makeText(getApplicationContext(), "你选择了" + lesson[which], Toast.LENGTH_SHORT).show();
                }
            }).create();
    //设置正面按钮
    builder.setPositiveButton("确定", new DialogInterface.OnClickListener() {
        @Override
        public void onClick(DialogInterface dialog, int which) {
            dialog.dismiss();
        }
    });
    //设置反面按钮
    builder.setNegativeButton("取消", new DialogInterface.OnClickListener() {
        @Override
        public void onClick(DialogInterface dialog, int which) {
            dialog.dismiss();
        }
    });
    AlertDialog dialog = builder.create();     //创建AlertDialog对象
    dialog.show();                              //显示对话框
}
运行后的效果如下所示:
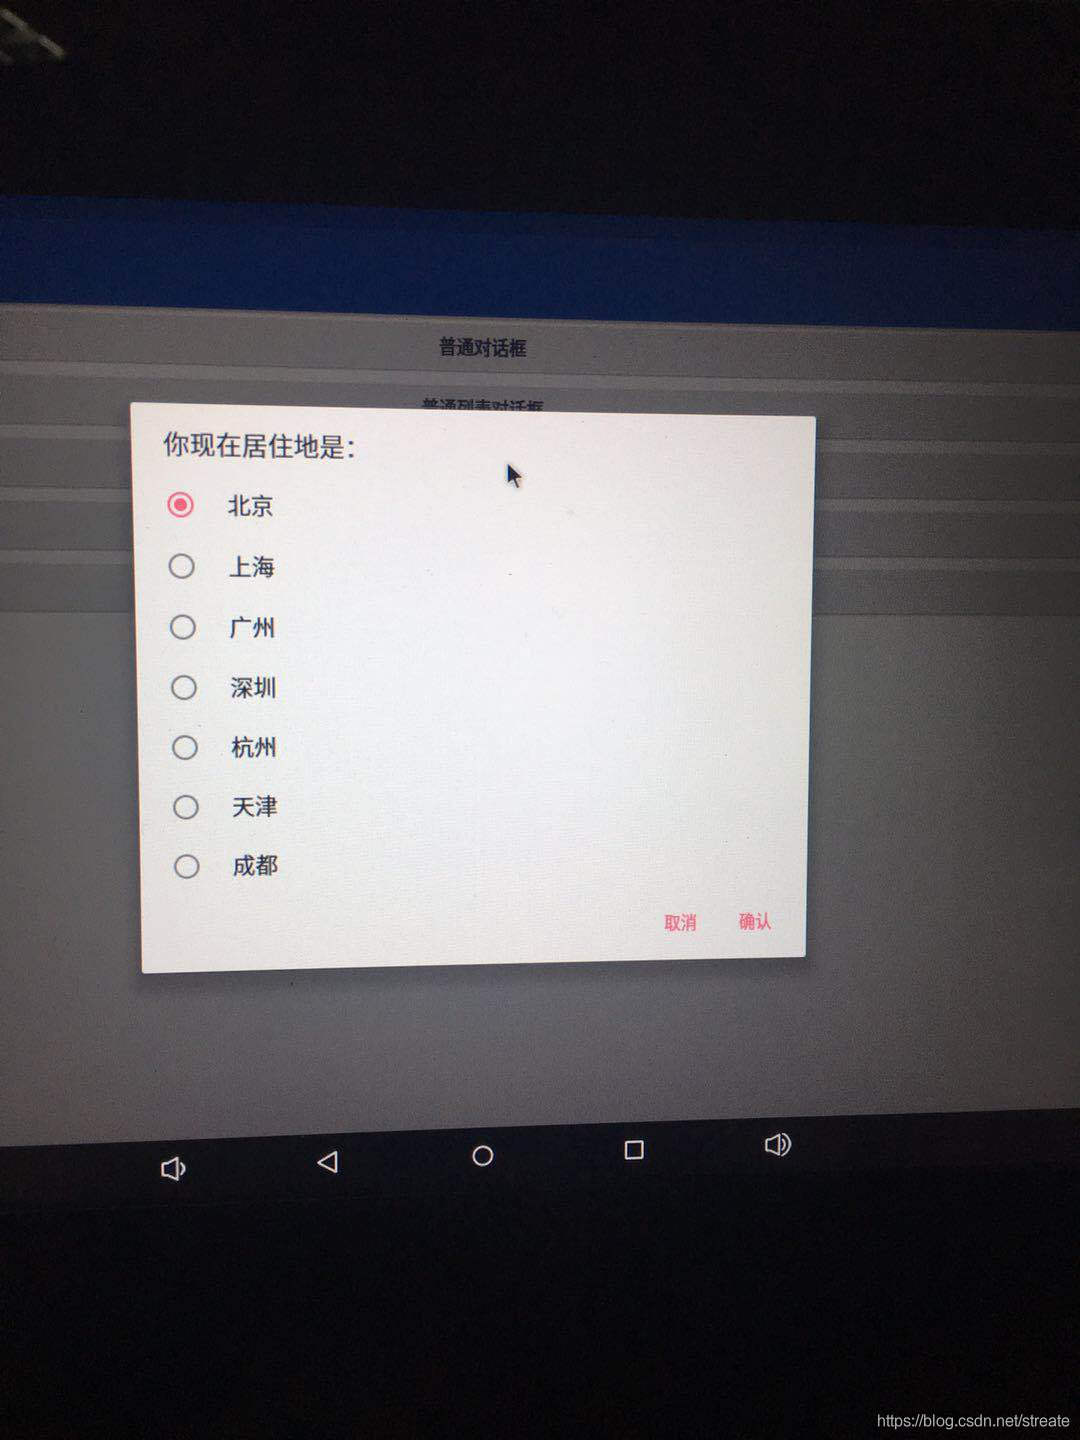
单选对话框的内容就是一个单项选择列表,需要用到setSingleChoiceItems方法,参数一是列表数据,参数二是默认选中的item,参数三则是点击监听接口,我们要实现这样一个小功能,用户在选好某一项之后记下其选择,下次点开对话框时就默认选中该项。
/**
 * 单选对话框
 */
public void singleChoiceDialog() {
    AlertDialog.Builder builder = new AlertDialog.Builder(MainActivity.this);

    builder.setTitle("你现在居住地是:");
    final String[] cities = {"北京", "上海", "广州", "深圳", "杭州", "天津", "成都"};

    builder.setSingleChoiceItems(cities, chedkedItem, new DialogInterface.OnClickListener() {
        @Override
        public void onClick(DialogInterface dialog, int which) {
            Toast.makeText(getApplicationContext(), "你选择了" + cities[which], Toast.LENGTH_SHORT).show();
            chedkedItem = which;
        }
    });
    builder.setPositiveButton("确认", new DialogInterface.OnClickListener() {
        @Override
        public void onClick(DialogInterface dialog, int which) {
            dialog.dismiss();
        }
    });

    builder.setNegativeButton("取消", new DialogInterface.OnClickListener() {
        @Override
        public void onClick(DialogInterface dialog, int which) {
            dialog.dismiss();
        }
    });

    AlertDialog dialog = builder.create();  //创建AlertDialog对象
    dialog.show();                           //显示对话框
}
运行后的效果如下所示:
你可能会把checkedItem的赋值放在确定按钮的点击事件中,这一看似乎没什么问题,但是这样是错误的!仔细阅读谷歌的API文档就知道了,setSingleChoiceItems 方法中实现的onClick方法中which表示的是当前选中的列表中的item下标,而setPositiveButton和setNegativeButton方法那里的which表示的却是按钮的种类,正面按钮中的which值是-1,反面按钮的是-2,与列表的item是没有关系的。
例子中的保存选中item的方法有问题的,当Activity被销毁之后重新创建的话数据就会丢失,要想持久化保存的话要用sharedpreferences或者数据库。
复选对话框是一个可以重复选中的列表,与单选对话框有点像,不过调用的是setMultiChoiceItems方法,而且多了一个布尔值参数isChecked,表示当前点击的item是否被选中。
我们创建一个集合,将点击选中的item添加到集合中,取消勾选的话就从集合中移除,点击确认按钮后就将选中内容显示出来。
/**
 * 复选对话框
 */
public void multiChoiceDialog() {
    AlertDialog.Builder builder = new AlertDialog.Builder(MainActivity.this);
    builder.setTitle("请选择你喜欢的颜色:");
    final String[] colors = {"红色", "橙色", "黄色", "绿色", "蓝色", "靛色", "紫色"};
    final List<String> myColors = new ArrayList<>();

    builder.setMultiChoiceItems(colors, null, new DialogInterface.OnMultiChoiceClickListener() {
        @Override
        public void onClick(DialogInterface dialog, int which, boolean isChecked) {
            if (isChecked) {
                myColors.add(colors[which]);
            } else {
                myColors.remove(colors[which]);
            }
        }
    });

    builder.setPositiveButton("确认", new DialogInterface.OnClickListener() {
        @Override
        public void onClick(DialogInterface dialog, int which) {
            String result = "";
            for (String color : myColors) {
                result += color + "、";
            }
            Toast.makeText(getApplicationContext(), "你选择了: " + result, Toast.LENGTH_SHORT).show();
            dialog.dismiss();
        }
    });

    builder.setNegativeButton("取消", new DialogInterface.OnClickListener() {
        @Override
        public void onClick(DialogInterface dialog, int which) {
            myColors.clear();
            dialog.dismiss();
        }
    });
    AlertDialog dialog = builder.create();      //创建AlertDialog对象
    dialog.show();                               //显示对话框
}
运行后效果图如下所示:

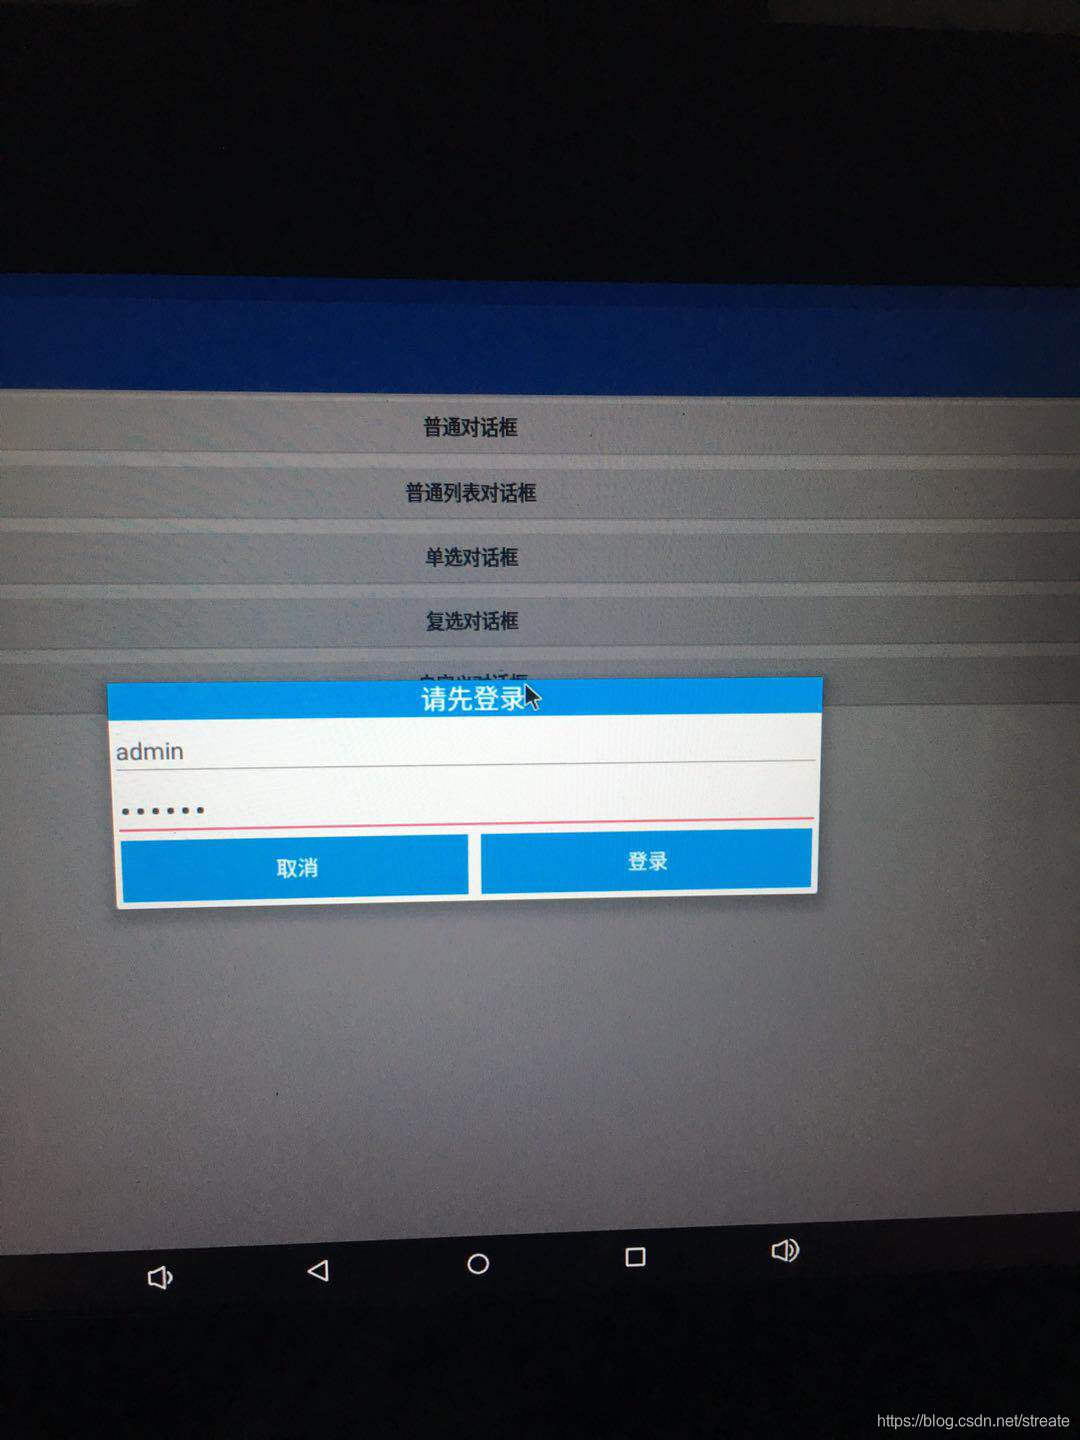
有时候,只显示简单的标题和信息是满足不了我们的要求,比如我们要实现一个登录对话框的话,那就需要在对话框上放置EditText输入框了。AlertDialog早就为我们准备好了setView方法,只要往里面放进我们需要的对话框的View对象就可以了。
<?xml version="1.0" encoding="utf-8"?>
<LinearLayout xmlns:android="http://schemas.android.com/apk/res/android"
    android:layout_width="match_parent"
    android:layout_height="match_parent"
    android:orientation="vertical">

    <TextView
        android:id="@+id/textView"
        android:layout_width="match_parent"
        android:layout_height="wrap_content"
        android:background="#169ee5"
        android:gravity="center"
        android:text="请先登录"
        android:textColor="@android:color/white"
        android:textSize="20sp" />

    <EditText
        android:id="@+id/et_name"
        android:layout_width="match_parent"
        android:layout_height="wrap_content"
        android:hint="请输入你的账户名:"
        android:textSize="18sp" />

    <EditText
        android:id="@+id/et_pwd"
        android:inputType="textPassword"
        android:layout_width="match_parent"
        android:layout_height="wrap_content"
        android:hint="请输入密码:"
        android:textSize="18sp" />

    <LinearLayout
        android:layout_width="match_parent"
        android:layout_height="wrap_content"
        android:layout_marginBottom="5dp"
        android:orientation="horizontal"
        android:paddingLeft="5dp"
        android:paddingRight="5dp">

        <Button
            android:id="@+id/btn_cancel"
            android:layout_width="wrap_content"
            android:layout_height="wrap_content"
            android:layout_marginRight="10dp"
            android:layout_weight="1"
            android:background="#169ee5"
            android:text="取消"
            android:textColor="@android:color/white"
            android:textSize="16sp" />

        <Button
            android:id="@+id/btn_login"
            android:layout_width="wrap_content"
            android:layout_height="wrap_content"
            android:layout_weight="1"
            android:background="#169ee5"
            android:text="登录"
            android:textColor="@android:color/white"
            android:textSize="16sp" />
    </LinearLayout>
</LinearLayout>
setView方法是通过AlertDialog的对象调用的,所以这里的代码顺序会稍有不同:我们要先创建AlertDialog对象和View对象,然后再去初始化对话框中的控件。
/**
 * 自定义登录对话框
 */
public void customDialog() {
    AlertDialog.Builder builder = new AlertDialog.Builder(MainActivity.this);
    final AlertDialog dialog = builder.create();
    View dialogView = View.inflate(MainActivity.this, R.layout.activity_custom, null);
    dialog.setView(dialogView);
    dialog.show();

    final EditText et_name = dialogView.findViewById(R.id.et_name);
    final EditText et_pwd = dialogView.findViewById(R.id.et_pwd);

    final Button btn_login = dialogView.findViewById(R.id.btn_login);
    final Button btn_cancel = dialogView.findViewById(R.id.btn_cancel);

    btn_login.setOnClickListener(new View.OnClickListener() {
        @Override
        public void onClick(View view) {
            name = et_name.getText().toString();
            pwd = et_pwd.getText().toString();
            if (TextUtils.isEmpty(name) || TextUtils.isEmpty(pwd)) {
                Toast.makeText(MainActivity.this, "用户名或密码不能为空!", Toast.LENGTH_SHORT).show();
                return;
            }
            Toast.makeText(MainActivity.this, "用户名:" + name + "\n" + "用户密码:" + pwd, Toast.LENGTH_SHORT).show();
            dialog.dismiss();
        }
    });

    btn_cancel.setOnClickListener(new View.OnClickListener() {
        @Override
        public void onClick(View view) {
            dialog.dismiss();
        }
    });
}
运行后的效果图如下所示:
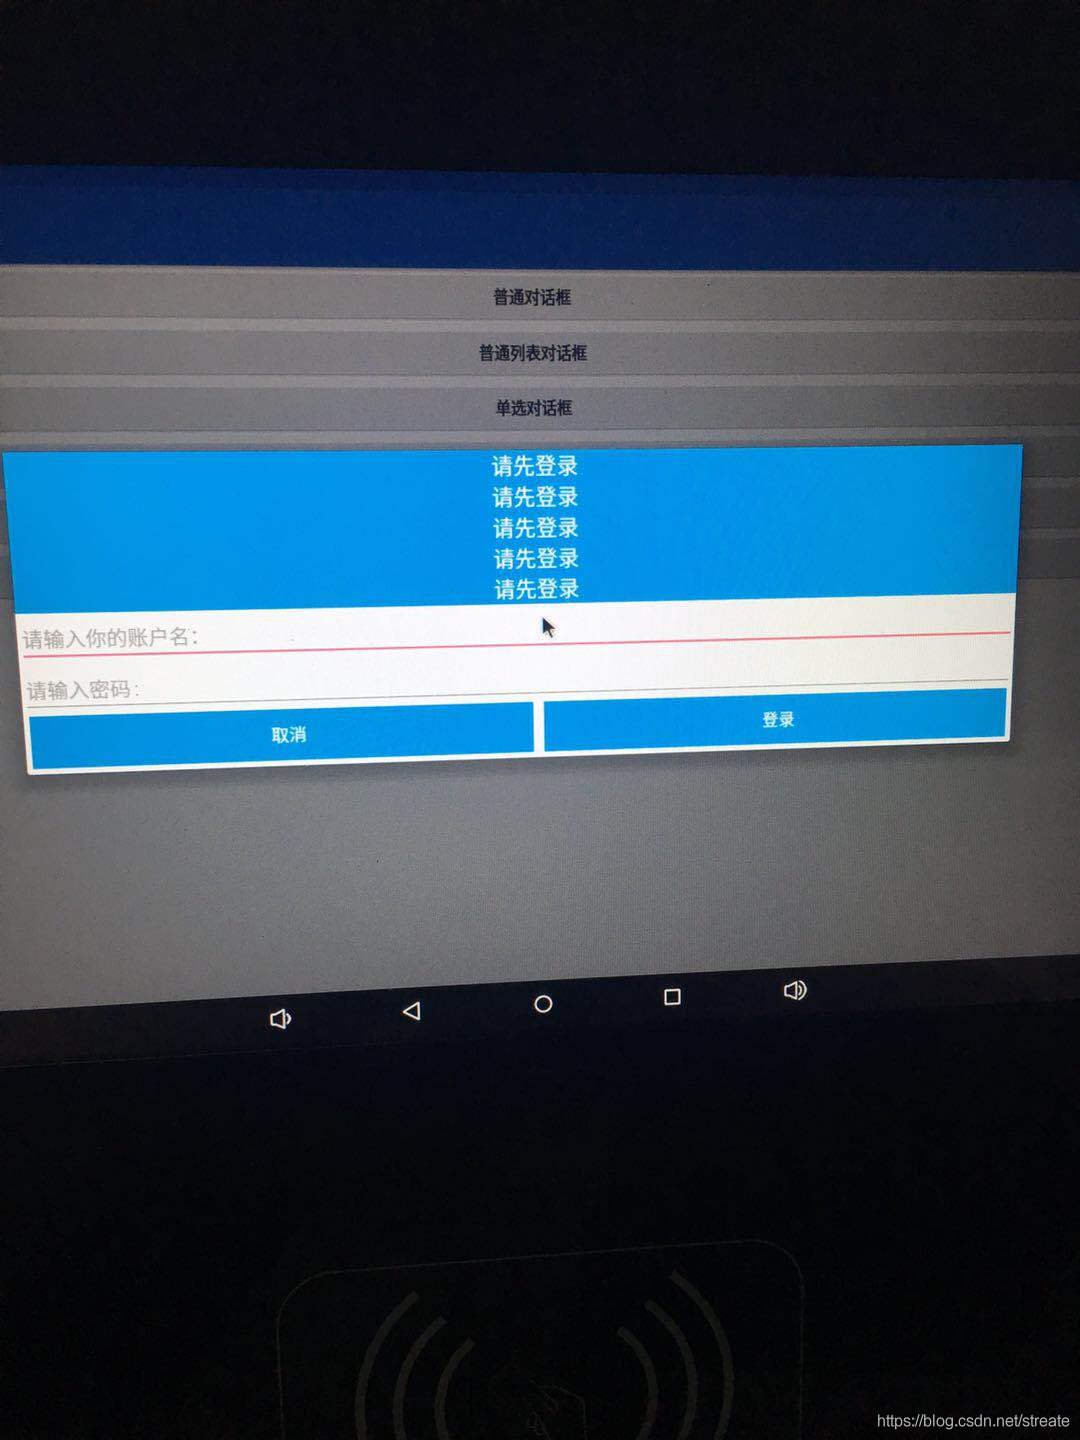
7.1 系统dialog的宽度默认是固定的,即使你自定义布局怎么修改宽度也不起作用,高度可根据布局自动调节。如果想修改弹出窗体大小,可以使用下面这段代码来实现改变对话框的宽高。这段代码必须在dialog.show()方法之后调用才有效。
//此处设置位置窗体大小,
dialog.getWindow().setLayout(width,height);
创建新的布局文件activity_layout.xml
<?xml version="1.0" encoding="utf-8"?>
<LinearLayout xmlns:android="http://schemas.android.com/apk/res/android"
    android:layout_width="match_parent"
    android:layout_height="match_parent"
    android:orientation="vertical">

    <TextView
        android:id="@+id/textView"
        android:layout_width="match_parent"
        android:layout_height="wrap_content"
        android:background="#169ee5"
        android:gravity="center"
        android:text="请先登录"
        android:textColor="@android:color/white"
        android:textSize="20sp" />
    <TextView
        android:id="@+id/textView4"
        android:layout_width="match_parent"
        android:layout_height="wrap_content"
        android:background="#169ee5"
        android:gravity="center"
        android:text="请先登录"
        android:textColor="@android:color/white"
        android:textSize="20sp" />
    <TextView
        android:id="@+id/textView3"
        android:layout_width="match_parent"
        android:layout_height="wrap_content"
        android:background="#169ee5"
        android:gravity="center"
        android:text="请先登录"
        android:textColor="@android:color/white"
        android:textSize="20sp" />
    <TextView
        android:id="@+id/textView2"
        android:layout_width="match_parent"
        android:layout_height="wrap_content"
        android:background="#169ee5"
        android:gravity="center"
        android:text="请先登录"
        android:textColor="@android:color/white"
        android:textSize="20sp" />
    <TextView
        android:id="@+id/textView1"
        android:layout_width="match_parent"
        android:layout_height="wrap_content"
        android:background="#169ee5"
        android:gravity="center"
        android:text="请先登录"
        android:textColor="@android:color/white"
        android:textSize="20sp" />

    <EditText
        android:id="@+id/et_name"
        android:layout_width="match_parent"
        android:layout_height="wrap_content"
        android:hint="请输入你的账户名:"
        android:textSize="18sp" />

    <EditText
        android:id="@+id/et_pwd"
        android:inputType="textPassword"
        android:layout_width="match_parent"
        android:layout_height="wrap_content"
        android:hint="请输入密码:"
        android:textSize="18sp" />

    <LinearLayout
        android:layout_width="match_parent"
        android:layout_height="wrap_content"
        android:layout_marginBottom="5dp"
        android:orientation="horizontal"
        android:paddingLeft="5dp"
        android:paddingRight="5dp">

        <Button
            android:id="@+id/btn_cancel"
            android:layout_width="wrap_content"
            android:layout_height="wrap_content"
            android:layout_marginRight="10dp"
            android:layout_weight="1"
            android:background="#169ee5"
            android:text="取消"
            android:textColor="@android:color/white"
            android:textSize="16sp" />

        <Button
            android:id="@+id/btn_login"
            android:layout_width="wrap_content"
            android:layout_height="wrap_content"
            android:layout_weight="1"
            android:background="#169ee5"
            android:text="登录"
            android:textColor="@android:color/white"
            android:textSize="16sp" />
    </LinearLayout>
</LinearLayout>
代码逻辑和6.2的代码逻辑差不多,只是多了设置对话框宽度的调用 。
/**
 * 修改对话框显示的宽度
 */
public void customDialogDisplay() {
    AlertDialog.Builder builder = new AlertDialog.Builder(MainActivity.this);
    final AlertDialog dialog = builder.create();
    View dialogView = View.inflate(MainActivity.this, R.layout.activity_layout, null);
    dialog.setView(dialogView);
    dialog.show();
    dialog.getWindow().setLayout(ScreenUtils.getScreenWidth(this)/4*3, LinearLayout.LayoutParams.WRAP_CONTENT);

    final EditText et_name = dialogView.findViewById(R.id.et_name);
    final EditText et_pwd = dialogView.findViewById(R.id.et_pwd);

    final Button btn_login = dialogView.findViewById(R.id.btn_login);
    final Button btn_cancel = dialogView.findViewById(R.id.btn_cancel);

    btn_login.setOnClickListener(new View.OnClickListener() {
        @Override
        public void onClick(View view) {
            name = et_name.getText().toString();
            pwd = et_pwd.getText().toString();
            if (TextUtils.isEmpty(name) || TextUtils.isEmpty(pwd)) {
                Toast.makeText(MainActivity.this, "用户名或密码不能为空!", Toast.LENGTH_SHORT).show();
                return;
            }
            Toast.makeText(MainActivity.this, "用户名:" + name + "\n" + "用户密码:" + pwd, Toast.LENGTH_SHORT).show();
            dialog.dismiss();
        }
    });

    btn_cancel.setOnClickListener(new View.OnClickListener() {
        @Override
        public void onClick(View view) {
            dialog.dismiss();
        }
    });

}
ScreenUtils工具类代码
public class ScreenUtils {

    /**
     * 获取屏幕高度(px)
     */
    public static int getScreenHeight(Context context) {
        return context.getResources().getDisplayMetrics().heightPixels;
    }
    /**
     * 获取屏幕宽度(px)
     */
    public static int getScreenWidth(Context context) {
        return context.getResources().getDisplayMetrics().widthPixels;
    }

}
效果图:
7.2 改变Android Dialog弹出后的Activity背景亮度:
在代码中修改.lp.alpha大小,值的大小可根据自己要求设置。
// 设置屏幕背景变暗
private void setScreenBgDarken() {
    WindowManager.LayoutParams lp = getWindow().getAttributes();
    lp.alpha = 0.5f;
    lp.dimAmount = 0.5f;
    getWindow().setAttributes(lp);
}
// 设置屏幕背景变亮
private void setScreenBgLight() {
        WindowManager.LayoutParams lp = getWindow().getAttributes();
    lp.alpha = 1.0f;
    lp.dimAmount = 1.0f;
    getWindow().setAttributes(lp);
}
7.3 如何控制弹窗弹出的位置:
一般都是在屏幕正中间弹出默认,但也可以控制从别的地方弹出,比如从底部弹出,可以这样写
private void popFromBottom(Dialog dialog) {
    Window win = dialog.getWindow();
    win.setGravity(Gravity.BOTTOM);   // 这里控制弹出的位置
    win.getDecorView().setPadding(0, 0, 0, 0);
    WindowManager.LayoutParams lp = win.getAttributes();
    lp.width = WindowManager.LayoutParams.MATCH_PARENT;
    lp.height = WindowManager.LayoutParams.WRAP_CONTENT;
    dialog.getWindow().setBackgroundDrawable(null);
    win.setAttributes(lp);
}
感谢各位的阅读,以上就是“Android AlertDialog实例分析”的内容了,经过本文的学习后,相信大家对Android AlertDialog实例分析这一问题有了更深刻的体会,具体使用情况还需要大家实践验证。这里是亿速云,小编将为大家推送更多相关知识点的文章,欢迎关注!
免责声明:本站发布的内容(图片、视频和文字)以原创、转载和分享为主,文章观点不代表本网站立场,如果涉及侵权请联系站长邮箱:is@yisu.com进行举报,并提供相关证据,一经查实,将立刻删除涉嫌侵权内容。