您好,登录后才能下订单哦!
这篇文章给大家分享的是有关如何使用SpringBoot 配置Oracle和H2双数据源的内容。小编觉得挺实用的,因此分享给大家做个参考,一起跟随小编过来看看吧。
<!-- oracle -->
 <dependency>
     <groupId>com.github.noraui</groupId>
     <artifactId>noraui</artifactId>
     <version>2.4.0</version>
 </dependency>
<!-- h3-->
 <dependency>
     <groupId>com.h3database</groupId>
     <artifactId>h3</artifactId>
     <version>1.4.197</version>
 </dependency>
 <!-- mybatisplus -->
 <dependency>
 	  <groupId>com.baomidou</groupId>
      <artifactId>mybatis-plus-boot-starter</artifactId>
      <version>3.1.1</version>
 </dependency>
spring:
  http:
    encoding:
      charset: UTF-8
      enabled: true
      force: true
  datasource:
    driver-class-name: org.h3.Driver
    schema: classpath:h3/schema-h3.sql
    data: classpath:h3/data-h3.sql
    jdbc-url: jdbc:h3:file:D:/Cache/IdeaWorkSpace/BigData/CustomerModel/src/main/resources/h3/data/h3_data
    username: root
    password: a123456
    initialization-mode: always
    oracle:
     driver-class-name: oracle.jdbc.driver.OracleDriver
     jdbc-url: jdbc:oracle:thin:@xxx:1521:cmis
     username: xxx
     password: xxx
  h3:
    console:
      enabled: true
      path: /h3-console
可以看到配置中配置了两个数据源,主数据源是H2,第二个数据源是Oracle,接下来是通过配置类来注入数据源
配置H2主数据源
package com.caxs.warn.config;
import org.apache.ibatis.session.SqlSessionFactory;
import org.mybatis.spring.SqlSessionFactoryBean;
import org.mybatis.spring.annotation.MapperScan;
import org.springframework.beans.factory.annotation.Qualifier;
import org.springframework.boot.context.properties.ConfigurationProperties;
import org.springframework.boot.jdbc.DataSourceBuilder;
import org.springframework.context.annotation.Bean;
import org.springframework.context.annotation.Configuration;
import org.springframework.jdbc.core.JdbcTemplate;
import org.springframework.jdbc.datasource.DataSourceTransactionManager;
import javax.sql.DataSource;
/**
 * @Author: TheBigBlue
 * @Description:
 * @Date: 2019/9/18
 */
@Configuration
@MapperScan(basePackages = "com.caxs.warn.mapper.h3", sqlSessionFactoryRef = "h3SqlSessionFactory")
public class H2DSConfig {
    @Bean(name = "h3DataSource")
    @ConfigurationProperties(prefix = "spring.datasource")
    public DataSource dataSource() {
        return DataSourceBuilder.create().build();
    }
    @Bean(name = "h3TransactionManager")
    public DataSourceTransactionManager transactionManager() {
        return new DataSourceTransactionManager(this.dataSource());
    }
    @Bean(name = "h3SqlSessionFactory")
    public SqlSessionFactory sqlSessionFactory(@Qualifier("h3DataSource") DataSource dataSource) throws Exception {
        final SqlSessionFactoryBean sessionFactory = new SqlSessionFactoryBean();
        sessionFactory.setDataSource(dataSource);
        sessionFactory.getObject().getConfiguration().setMapUnderscoreToCamelCase(true);
        return sessionFactory.getObject();
    }
    @Bean(name = "h3Template")
    public JdbcTemplate h3Template(@Qualifier("h3DataSource") DataSource dataSource) {
        return new JdbcTemplate(dataSource);
    }
}
配置oracle从数据源
package com.caxs.warn.config;
import org.apache.ibatis.session.SqlSessionFactory;
import org.mybatis.spring.SqlSessionFactoryBean;
import org.mybatis.spring.annotation.MapperScan;
import org.springframework.beans.factory.annotation.Qualifier;
import org.springframework.boot.context.properties.ConfigurationProperties;
import org.springframework.boot.jdbc.DataSourceBuilder;
import org.springframework.context.annotation.Bean;
import org.springframework.context.annotation.Configuration;
import org.springframework.jdbc.core.JdbcTemplate;
import org.springframework.jdbc.datasource.DataSourceTransactionManager;
import javax.sql.DataSource;
/**
 * @Author: TheBigBlue
 * @Description:
 * @Date: 2019/9/18
 */
@Configuration
@MapperScan(basePackages = "com.caxs.warn.mapper.oracle",sqlSessionFactoryRef = "oracleSqlSessionFactory")
public class OracleDSConfig {
    @Bean(name = "oracleDataSource")
    @ConfigurationProperties(prefix = "spring.datasource.oracle")
    public DataSource dataSource() {
        return DataSourceBuilder.create().build();
    }
    @Bean(name = "oracleTransactionManager")
    public DataSourceTransactionManager transactionManager() {
        return new DataSourceTransactionManager(this.dataSource());
    }
    @Bean(name = "oracleSqlSessionFactory")
    public SqlSessionFactory sqlSessionFactory(@Qualifier("oracleDataSource") DataSource dataSource) throws Exception {
        final SqlSessionFactoryBean sessionFactory = new SqlSessionFactoryBean();
        sessionFactory.setDataSource(dataSource);
        sessionFactory.getObject().getConfiguration().setMapUnderscoreToCamelCase(true);
        return sessionFactory.getObject();
    }
    @Bean(name = "oracleTemplate")
    public JdbcTemplate oracleTemplate(@Qualifier("oracleDataSource") DataSource dataSource) {
        return new JdbcTemplate(dataSource);
    }
}Schema “classpath:h3/schema-h3.sql” not found
经过上面的配置就可以使用双数据源了,但是当我们测试时会发现报如下错误:Schema “classpath:h3/schema-h3.sql” not found,这个问题我也是找了好久,因为在配置但数据源的时候没有这个问题的,在配置多数据源才有了这个问题。

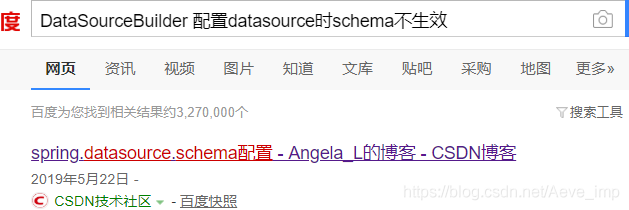
单数据源时,是直接SpringBoot自动配置DataSource的,这个时候是正常的,而当配置多数据源时,我们是通过@Configuration来配置数据源的,怀疑问题出在 DataSourceBuilder 创建数据源这个类上,而单数据源自动装载时不会出现这样的问题。然后百度搜了下这个DataSourceBuilder,看到文章中实例的配置中schema是这样写的:
package com.caxs.warn.service;
import org.slf4j.Logger;
import org.slf4j.LoggerFactory;
import org.springframework.beans.factory.annotation.Autowired;
import org.springframework.beans.factory.annotation.Qualifier;
import org.springframework.beans.factory.annotation.Value;
import org.springframework.boot.ApplicationArguments;
import org.springframework.boot.ApplicationRunner;
import org.springframework.core.io.ClassPathResource;
import org.springframework.jdbc.core.JdbcTemplate;
import org.springframework.stereotype.Component;
import java.io.BufferedReader;
import java.io.IOException;
import java.io.InputStreamReader;
/**
 * @Author: TheBigBlue
 * @Description: 服务启动后,初始化数据库
 * @Date: 2019/9/19
 */
@Component
public class ApplicationRunnerService implements ApplicationRunner {
    private static final Logger LOGGER = LoggerFactory.getLogger(ApplicationRunnerService.class);
    @Autowired
    @Qualifier("h3Template")
    private JdbcTemplate h3Template;
    @Value("${invoke.schema.location}")
    private String schema;
    @Value("${invoke.data.location}")
    private String data;
    /**
     * @Author: TheBigBlue
     * @Description: 项目启动,执行sql文件初始化
     * @Date: 2019/9/19
     * @Param args:
     * @Return:
     **/
    @Override
    public void run(ApplicationArguments args) {
        String schemaContent = this.getFileContent(schema);
        String dataContent = this.getFileContent(data);
        h3Template.execute(schemaContent);
        h3Template.execute(dataContent);
    }
    /**
     * @Author: TheBigBlue
     * @Description: 获取classpath下sql文件内容
     * @Date: 2019/9/19
     * @Param filePath:
     * @Return:
     **/
    private String getFileContent(String filePath) {
        BufferedReader bufferedReader = null;
        String string;
        StringBuilder data = new StringBuilder();
        try {
            ClassPathResource classPathResource = new ClassPathResource(filePath);
            bufferedReader = new BufferedReader(new InputStreamReader(classPathResource.getInputStream()));
            while ((string = bufferedReader.readLine()) != null) {
                data.append(string);
            }
        } catch (IOException e) {
            LOGGER.error("加载ClassPath资源失败", e);
        }finally {
            if(null != bufferedReader){
                try {
                    bufferedReader.close();
                } catch (IOException e) {
                    e.printStackTrace();
                }
            }
        }
        return data.toString();
    }
}
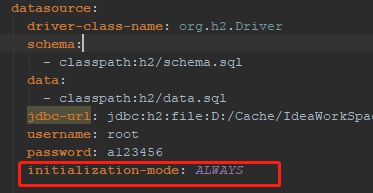
抱着尝试的态度改了下,发现果然没问题了!!原来是在SpringBoot2.0之后schema对应的DataSourceProperties类中schema属性是一个List,所以需要前面加 - (yml中加-映射集合),记录下防止后面再踩坑。


Table “USER” not found; SQL statement:

这个问题也是在只有配置多数据源时才会碰到的问题,就是配置的spring.datasource.schema和spring.datasource.data无效。这个我看了下如果是配置单数据源,springboot自动加载Datasource,是没问题的,但是现在是我们自己维护的datasource: return DataSourceBuilder.create().build();所以感觉还是DataSourceBuilder在加载数据源的时候的问题,但是还是没有找到原因。有网友说必须加initialization-mode: ALWAYS这个配置,但是我配置后也是不能用的。

最后没办法就配置了一个类,在springboot启动后,自己加载文件,读取其中的sql内容,然后用jdbcTemplate去执行了下,模拟了下初始化的操作。。。后面如果有时间再来解决这个问题。
package com.caxs.warn.service;
import org.slf4j.Logger;
import org.slf4j.LoggerFactory;
import org.springframework.beans.factory.annotation.Autowired;
import org.springframework.beans.factory.annotation.Qualifier;
import org.springframework.beans.factory.annotation.Value;
import org.springframework.boot.ApplicationArguments;
import org.springframework.boot.ApplicationRunner;
import org.springframework.core.io.ClassPathResource;
import org.springframework.jdbc.core.JdbcTemplate;
import org.springframework.stereotype.Component;
import java.io.BufferedReader;
import java.io.IOException;
import java.io.InputStreamReader;
/**
 * @Author: TheBigBlue
 * @Description: 服务启动后,初始化数据库
 * @Date: 2019/9/19
 */
@Component
public class ApplicationRunnerService implements ApplicationRunner {
    private static final Logger LOGGER = LoggerFactory.getLogger(ApplicationRunnerService.class);
    @Autowired
    @Qualifier("h3Template")
    private JdbcTemplate h3Template;
    @Value("${invoke.schema.location}")
    private String schema;
    @Value("${invoke.data.location}")
    private String data;
    /**
     * @Author: TheBigBlue
     * @Description: 项目启动,执行sql文件初始化
     * @Date: 2019/9/19
     * @Param args:
     * @Return:
     **/
    @Override
    public void run(ApplicationArguments args) {
        String schemaContent = this.getFileContent(schema);
        String dataContent = this.getFileContent(data);
        h3Template.execute(schemaContent);
        h3Template.execute(dataContent);
    }
    /**
     * @Author: TheBigBlue
     * @Description: 获取classpath下sql文件内容
     * @Date: 2019/9/19
     * @Param filePath:
     * @Return:
     **/
    private String getFileContent(String filePath) {
        BufferedReader bufferedReader = null;
        String string;
        StringBuilder data = new StringBuilder();
        try {
            ClassPathResource classPathResource = new ClassPathResource(filePath);
            bufferedReader = new BufferedReader(new InputStreamReader(classPathResource.getInputStream()));
            while ((string = bufferedReader.readLine()) != null) {
                data.append(string);
            }
        } catch (IOException e) {
            LOGGER.error("加载ClassPath资源失败", e);
        }finally {
            if(null != bufferedReader){
                try {
                    bufferedReader.close();
                } catch (IOException e) {
                    e.printStackTrace();
                }
            }
        }
        return data.toString();
    }
}
感谢各位的阅读!关于“如何使用SpringBoot 配置Oracle和H2双数据源”这篇文章就分享到这里了,希望以上内容可以对大家有一定的帮助,让大家可以学到更多知识,如果觉得文章不错,可以把它分享出去让更多的人看到吧!
免责声明:本站发布的内容(图片、视频和文字)以原创、转载和分享为主,文章观点不代表本网站立场,如果涉及侵权请联系站长邮箱:is@yisu.com进行举报,并提供相关证据,一经查实,将立刻删除涉嫌侵权内容。