您好,登录后才能下订单哦!
密码登录
登录注册
点击 登录注册 即表示同意《亿速云用户服务条款》
本篇内容介绍了“怎么用vue实现注册页效果”的有关知识,在实际案例的操作过程中,不少人都会遇到这样的困境,接下来就让小编带领大家学习一下如何处理这些情况吧!希望大家仔细阅读,能够学有所成!
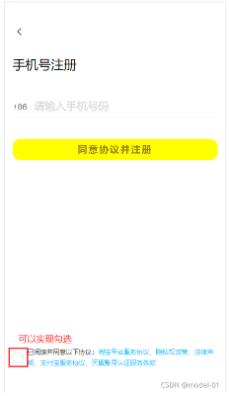
1、实现头部
<template>
  <div class="box">
    <div class="box1">
      <span class="iconfont icon-zuojiantou back" @click="goBack"></span>
    </div>
    <div class="box6">
      <b>手机号注册</b>
    </div>
  </div>
</template>

<script>
export default {
  name: "Top",
  methods: {
    goBack() {
      this.$router.push("/Login");
    },
  },
};
</script>

<style scoped>
.box1 {
  width: 100%;
  height: 0.5rem;
  margin-bottom: 0.19rem;
}

span {
  font-size: 0.18rem;
  line-height: 0.5rem;
  font-size: 0.2rem;
}

.back {
  font-size: 0.25rem;
}

.box6 {
  width: 100%;
  height: 0.66rem;
  margin: auto;
}
b {
  font-size: 0.24rem;
  font-weight: normal;
}
p {
  font-size: 0.13rem;
  color: gray;
  margin-top: 0.11rem;
}
</style>
2、实现注册内容
<template>
  <div class="box">
    <div class="box1">
      <div class="phone-container">
        <span>+86</span>
        <input
          class="userphone"
          type=""
          v-model="usernum"
          placeholder="请输入手机号码"
        />
      </div>
    </div>

    <div class="box2">
      <h4 @click="toSendCode">同意协议并注册</h4>
    </div>
    <div class="box3">
      <van-checkbox v-model="checked">
        已阅读并同意以下协议:<b
          >淘宝平台服务协议、隐私权政策、法律声明、支付宝服务协议、天翼账号认证服务条款</b
        >
      </van-checkbox>
    </div>
  </div>
</template>

<script>
import axios from "axios";
import Vue from "vue";
import { Checkbox, Toast } from "vant";

Vue.use(Checkbox);
Vue.use(Toast);
export default {
  name: "Num",
  data: function () {
    return {
      usernum: "",
      code: "",
      checked: false,
    };
  },
  methods: {
    // 验证手机号
    checkPhone(phone) {
      let reg = /^1[3|4|5|7|8][0-9]{9}$/;
      return reg.test(phone);
    },

    toSendCode() {
      if (this.checked) {
        if (this.checkPhone(this.usernum)) {
          axios({
            url: `/auth/code/?phone=${this.usernum}`,
          }).then((res) => {
            console.log(res);
            if (res.status == 200) {
              localStorage.setItem("userPhone", this.usernum);
              Toast("验证码发送成功");
              this.$router.push("/inputCode");
            }
          });
        } else {
          Toast("请检查您的手机号");
        }
      } else {
        Toast("请先勾选用户协议");
      }
    },
  },
};
</script>

<style scoped>
.box1 {
  width: 100%;
  height: 0.7rem;
}

.box1 b {
  margin-top: 0.25rem;
  font-weight: normal;
}

.phone-container {
  width: 100%;
  padding: 0.1rem 0;
  margin-bottom: 0.4rem;
  position: relative;
}
.phone-container > span {
  position: absolute;
  font-size: 0.16rem;
  color: #666;
  top: 0.21rem;
}
input {
  border: none;
  outline: none;
}

input::-webkit-input-placeholder {
  font-size: 0.2rem;
  color: rgb(216, 214, 214);
}
.userphone {
  display: block;
  width: 100%;
  height: 0.4rem;
  box-sizing: border-box;
  padding: 0 0.3rem;
  padding-left: 0.4rem;
  font-size: 0.2rem;
  border-bottom: 0.01rem solid #eee;
}
.box2 {
  width: 100%;
  height: 0.5rem;
  margin-top: 0.2rem;
}

.box2 h4 {
  width: 100%;
  height: 0.4rem;
  background-color: yellow;
  border-radius: 0.15rem;
  font-size: 0.18rem;
  text-align: center;
  line-height: 0.3rem;
  margin-top: 0.1rem;
  font-weight: 600;
  line-height: 0.4rem;
  letter-spacing: 0.02rem;
  color: rgba(87, 42, 42, 0.623);
}

.box3 {
  width: 100%;
  height: 0.3rem;
  margin-top: 3.4rem;
  font-size: 0.12rem;
}

.box3 b {
  font-weight: normal;
  color: deepskyblue;
}
</style>
“怎么用vue实现注册页效果”的内容就介绍到这里了,感谢大家的阅读。如果想了解更多行业相关的知识可以关注亿速云网站,小编将为大家输出更多高质量的实用文章!
免责声明:本站发布的内容(图片、视频和文字)以原创、转载和分享为主,文章观点不代表本网站立场,如果涉及侵权请联系站长邮箱:is@yisu.com进行举报,并提供相关证据,一经查实,将立刻删除涉嫌侵权内容。