жӮЁеҘҪпјҢзҷ»еҪ•еҗҺжүҚиғҪдёӢи®ўеҚ•е“ҰпјҒ
еҜҶз Ғзҷ»еҪ•
зҷ»еҪ•жіЁеҶҢ
зӮ№еҮ» зҷ»еҪ•жіЁеҶҢ еҚіиЎЁзӨәеҗҢж„ҸгҖҠдәҝйҖҹдә‘з”ЁжҲ·жңҚеҠЎжқЎж¬ҫгҖӢ
иҝҷзҜҮж–Үз« з»ҷеӨ§е®¶еҲҶдә«зҡ„жҳҜжңүе…іSpringAopдёӯеҰӮдҪ•е®һзҺ°@Aspectз»Үе…ҘдёҚз”ҹж•ҲгҖҒдёҚжү§иЎҢеүҚзҪ®еўһејәз»Үе…Ҙ@Beforeзҡ„еҶ…е®№гҖӮе°Ҹзј–и§үеҫ—жҢәе®һз”Ёзҡ„пјҢеӣ жӯӨеҲҶдә«з»ҷеӨ§е®¶еҒҡдёӘеҸӮиҖғпјҢдёҖиө·и·ҹйҡҸе°Ҹзј–иҝҮжқҘзңӢзңӢеҗ§гҖӮ
第дёҖдёӘз”Ёж„ҸжҳҜеҒҡеҗҺз«Ҝзҡ„йҳІиЎЁеҚ•йҮҚеӨҚжҸҗдәӨзҡ„tokenйӘҢиҜҒгҖӮ
第дәҢдёӘз”Ёж„ҸжҳҜеҜ№еҗҺеҸ°JSR303 Validatorзҡ„ж ЎйӘҢз»“жһңеҒҡдёҖдёӘз»ҹдёҖеӨ„зҗҶпјҢдёҚжғіжҠҠеҜ№ж ЎйӘҢз»“жһңзҡ„еӨ„зҗҶеҲҶж•ЈеңЁжҜҸдёӘcontrollerж–№жі•дёӯ
@ResponseBody
@RequestMapping(value = "add", method = RequestMethod.POST)
public ResponseModel add(@Valid User user, BindingResult br, HttpServletResponse response) {
if(br.hasErrors()) {
return ResponseModel.validFail(getErrorsSplitNewLine(br));
}
accountService.addUser(user);
return ResponseModel.success("дҝқеӯҳз”ЁжҲ·жҲҗеҠҹ");
}еҰӮдёҠйқўж–№жі•дёӯпјҢ br.hasErrors() еңЁжҜҸдёӘиЎЁеҚ•жҸҗдәӨж–№жі•дёӯйғҪеӯҳеңЁпјҢжғіеҚ•зӢ¬жҠҪеҮәжқҘдҪҝз”ЁAOPз»ҹдёҖеӨ„зҗҶгҖӮ
жүҖд»ҘеҶҷдёҖдёӘAOPпјҢеҰӮдёӢпјҡ
@Aspect
@Component
public class ParamValidAspect {
@Before("@annotation(com.hebao.tech.adm.framework.annotation.ParamValid)")
public void paramValid(JoinPoint point) {
System.out.println("еҸӮж•°ж ЎйӘҢеҲҮе…Ҙж–№жі•иў«и°ғз”ЁдәҶ.....");
//зңҒз•Ҙ
}
}з”ұдәҺиҝҷзҜҮж–Үз« дё»иҰҒжҳҜи®°еҪ•AOPдёҚз”ҹж•Ҳзҡ„еҺҹеӣ пјҢжүҖд»ҘпјҢиҝҷйҮҢдёҚеҶҷе…·дҪ“е®һзҺ°дәҶгҖӮ
дёҠйқўзҡ„еҶ…е®№е®ҡд№үдёҖдёӘAopз»Үе…ҘпјҢеңЁжңүжіЁи§Ј@ParamValidзҡ„жіЁйҮҠControllerж–№жі•дёҠз»Үе…ҘгҖӮ
import java.lang.annotation.ElementType;
import java.lang.annotation.Retention;
import java.lang.annotation.RetentionPolicy;
import java.lang.annotation.Target;

@Target(ElementType.METHOD)
@Retention(RetentionPolicy.RUNTIME)
public @interface ParamValid {

}иҝҷдёӘParamValidзҡ„еҶ…е®№пјҢд»…д»…жҳҜдёҖдёӘж Үеҝ—жҖ§зҡ„жіЁи§ЈпјҢеЈ°жҳҺдёәж–№жі•еұӮзҡ„жіЁи§ЈпјҢ并且жҳҜиҝҗиЎҢж—¶жіЁи§ЈгҖӮ
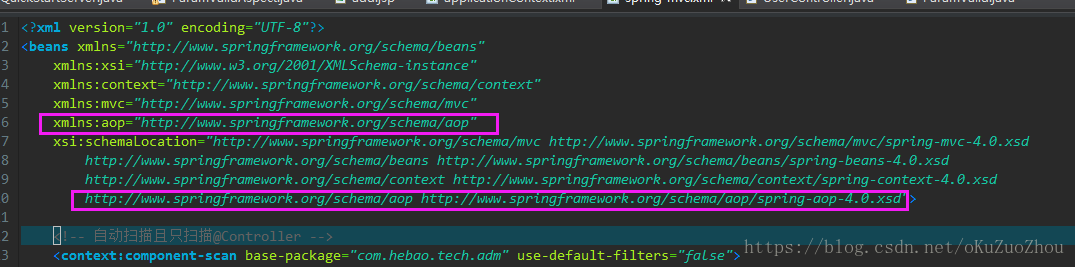
жңҖеҗҺеңЁapplication.xmlдёӯеҠ е…ҘAOPеҠЁжҖҒд»ЈзҗҶи®ҫзҪ®гҖӮ
<!-- иҝҷдёӘй…ҚзҪ®иҰҒй…ҚзҪ®еңЁcomponent-scanд»ҘеҗҺ --> <aop:aspectj-autoproxy proxy-target-class="true" />
еҰӮжһңspringй…ҚзҪ®ж–Ү件没引е…ҘиҝҮaopзҡ„й…ҚзҪ®пјҢиҝҳйңҖиҰҒеңЁеҠ е…ҘxmlеЈ°жҳҺ
еӨ§еҠҹе‘ҠжҲҗпјҢжөӢиҜ•дәҶдёҖдёӢпјҢеҸ‘зҺ°жңүзӮ№жӮІеү§пјҢж №жң¬з»Үе…ҘдёҚз”ҹж•ҲпјҢд№ҹдёҚжҠҘй”ҷпјҢпјҢжҘһжҳҜдёҚжү§иЎҢзӣёе…ізҡ„з»Үе…Ҙд»Јз ҒгҖӮ
жңҖеҗҺеңЁзҪ‘дёҠжҗңдәҶдёҖдёӢпјҢеҸ‘зҺ°SpringдёҺSpringMVCжҳҜ2дёӘдёҚеҗҢзҡ„зҲ¶еӯҗе®№еҷЁпјҢ @AspectеҰӮжһңиў«springе®№еҷЁеҠ иҪҪзҡ„иҜқпјҢиҖҢ@ControllerжіЁи§Јзҡ„иҝҷдәӣзұ»зҡ„е®һдҫӢеҢ–д»ҘеҸҠжіЁе…ҘеҚҙжҳҜз”ұSpringMVCжқҘе®ҢжҲҗгҖӮ @AspectеҰӮжһңиў«springе®№еҷЁеҠ иҪҪзҡ„ж—¶еҖҷпјҢеҸҜиғҪSpring MVCе®№еҷЁиҝҳжңӘеҲқе§ӢеҢ–пјҢ Controllerзұ»иҝҳжңӘеҲқе§ӢеҢ–пјҢжүҖд»Ҙж— жі•жӯЈеёёз»Үе…ҘгҖӮгҖӮ
жүҖд»Ҙи°ғж•ҙеҰӮдёӢпјҡ
@Aspect
public class ParamValidAspect {
@Before("@annotation(com.hebao.tech.adm.framework.annotation.ParamValid)")
public void paramValid(JoinPoint point) {
System.out.println("еҸӮж•°ж ЎйӘҢеҲҮе…Ҙж–№жі•иў«и°ғз”ЁдәҶ.....");
//зңҒз•Ҙ
}
}еҺ»жҺү@ComponentжіЁи§ЈпјҢ然еҗҺжҠҠ aop:aspectj-autoproxy 移е…Ҙspringmvcй…ҚзҪ®ж–Ү件дёӯпјҢ并е®ҡд№үbeanпјҢеҰӮдёӢпјҡ
<!-- иҝҷдёӘй…ҚзҪ®дёҖе®ҡиҰҒй…ҚзҪ®еңЁcomponent-scanд»ҘеҗҺ --> <aop:aspectj-autoproxy proxy-target-class="true" /> <bean id="paramValidAspect" class="com.hebao.tech.adm.framework.spring.aop.ParamValidAspect"/>
иҝҷж ·е°ұеӨ§еҠҹе‘ҠжҲҗдәҶгҖӮ
@Aspect
@Component
public class LogAspect {
    @Before("pointcut()")
    public void before(){
        System.out.println("before");
    }

    @Pointcut("@annotation(com.demo.annotation.Log)")
    public void pointcut(){
    }

    @Around("pointcut()")
    public void around(){
        System.out.println("arount");
    }

    @After("pointcut()")
    public void after(){
        System.out.println("after");
    }
}и°ғз”Ёж–№жі•иҝ”еӣһз»“жһңпјҡ
arount
after
@Aspect
@Component
public class LogAspect {
    @Before("pointcut()")
    public void before(){
        System.out.println("before");
    }

    @Pointcut("@annotation(com.mxy.annotation.Log)")
    public void pointcut(){

    }

    @Around("pointcut()")
    public void around(ProceedingJoinPoint point){
        System.out.println("arount before");

        try {
            point.proceed();
        } catch (Throwable throwable) {
            throwable.printStackTrace();
        }
        System.out.println("arount after");
    }

    @After("pointcut()")
    public void after(){
        System.out.println("after");
    }
}и°ғз”Ёиҝ”еӣһз»“жһңпјҡ
arount before
before
arount after
after
ж„ҹи°ўеҗ„дҪҚзҡ„йҳ…иҜ»пјҒе…ідәҺвҖңSpringAopдёӯеҰӮдҪ•е®һзҺ°@Aspectз»Үе…ҘдёҚз”ҹж•ҲгҖҒдёҚжү§иЎҢеүҚзҪ®еўһејәз»Үе…Ҙ@BeforeвҖқиҝҷзҜҮж–Үз« е°ұеҲҶдә«еҲ°иҝҷйҮҢдәҶпјҢеёҢжңӣд»ҘдёҠеҶ…е®№еҸҜд»ҘеҜ№еӨ§е®¶жңүдёҖе®ҡзҡ„её®еҠ©пјҢи®©еӨ§е®¶еҸҜд»ҘеӯҰеҲ°жӣҙеӨҡзҹҘиҜҶпјҢеҰӮжһңи§үеҫ—ж–Үз« дёҚй”ҷпјҢеҸҜд»ҘжҠҠе®ғеҲҶдә«еҮәеҺ»и®©жӣҙеӨҡзҡ„дәәзңӢеҲ°еҗ§пјҒ
е…ҚиҙЈеЈ°жҳҺпјҡжң¬з«ҷеҸ‘еёғзҡ„еҶ…е®№пјҲеӣҫзүҮгҖҒи§Ҷйў‘е’Ңж–Үеӯ—пјүд»ҘеҺҹеҲӣгҖҒиҪ¬иҪҪе’ҢеҲҶдә«дёәдё»пјҢж–Үз« и§ӮзӮ№дёҚд»ЈиЎЁжң¬зҪ‘з«ҷз«ӢеңәпјҢеҰӮжһңж¶үеҸҠдҫөжқғиҜ·иҒ”зі»з«ҷй•ҝйӮ®з®ұпјҡis@yisu.comиҝӣиЎҢдёҫжҠҘпјҢ并жҸҗдҫӣзӣёе…іиҜҒжҚ®пјҢдёҖз»ҸжҹҘе®һпјҢе°Ҷз«ӢеҲ»еҲ йҷӨж¶үе«ҢдҫөжқғеҶ…е®№гҖӮ
жӮЁеҘҪпјҢзҷ»еҪ•еҗҺжүҚиғҪдёӢи®ўеҚ•е“ҰпјҒ