жӮЁеҘҪпјҢзҷ»еҪ•еҗҺжүҚиғҪдёӢи®ўеҚ•е“ҰпјҒ
еҜҶз Ғзҷ»еҪ•
зҷ»еҪ•жіЁеҶҢ
зӮ№еҮ» зҷ»еҪ•жіЁеҶҢ еҚіиЎЁзӨәеҗҢж„ҸгҖҠдәҝйҖҹдә‘з”ЁжҲ·жңҚеҠЎжқЎж¬ҫгҖӢ
иҝҷзҜҮж–Үз« дё»иҰҒд»Ӣз»ҚвҖңSecurityзҷ»еҪ•и®ӨиҜҒзҡ„жөҒзЁӢжҳҜд»Җд№ҲвҖқзҡ„зӣёе…ізҹҘиҜҶпјҢе°Ҹзј–йҖҡиҝҮе®һйҷ…жЎҲдҫӢеҗ‘еӨ§е®¶еұ•зӨәж“ҚдҪңиҝҮзЁӢпјҢж“ҚдҪңж–№жі•з®ҖеҚ•еҝ«жҚ·пјҢе®һз”ЁжҖ§ејәпјҢеёҢжңӣиҝҷзҜҮвҖңSecurityзҷ»еҪ•и®ӨиҜҒзҡ„жөҒзЁӢжҳҜд»Җд№ҲвҖқж–Үз« иғҪеё®еҠ©еӨ§е®¶и§ЈеҶій—®йўҳгҖӮ
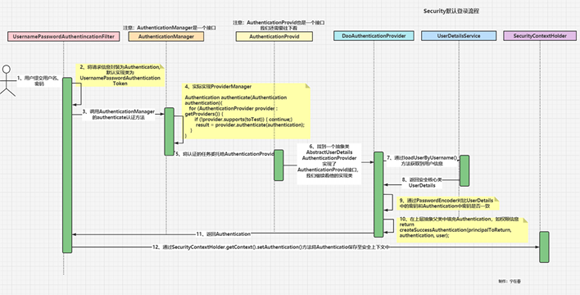
з”ЁжҲ·еҗ‘/loginжҺҘеҸЈдҪҝз”ЁPOSTж–№ејҸжҸҗдәӨз”ЁжҲ·еҗҚгҖҒеҜҶз ҒгҖӮ/loginжҳҜжІЎжҢҮе®ҡж—¶й»ҳи®Өзҡ„жҺҘеҸЈ
иҜ·жұӮйҰ–е…ҲдјҡжқҘеҲ°пјҡ????UsernamePasswordAuthenticationFilter
/**
UsernamePasswordAuthenticationFilterпјҡеӨ„зҗҶиә«д»ҪйӘҢиҜҒиЎЁеҚ•жҸҗдәӨ
д»ҘеҸҠе°ҶиҜ·жұӮдҝЎжҒҜе°ҒиЈ…дёәAuthentication 然еҗҺиҝ”еӣһз»ҷдёҠеұӮзҲ¶зұ»пјҢ
зҲ¶зұ»еҶҚйҖҡиҝҮ SecurityContextHolder.getContext().setAuthentication(authResult); е°ҶйӘҢиҜҒиҝҮзҡ„Authentication дҝқеӯҳиҮіе®үе…ЁдёҠдёӢж–Үдёӯ
*/
public class UsernamePasswordAuthenticationFilter extends AbstractAuthenticationProcessingFilter {
public static final String SPRING_SECURITY_FORM_USERNAME_KEY = "username";
public static final String SPRING_SECURITY_FORM_PASSWORD_KEY = "password";
private static final AntPathRequestMatcher DEFAULT_ANT_PATH_REQUEST_MATCHER = new AntPathRequestMatcher("/login",
"POST");
//еҸҜд»ҘйҖҡиҝҮеҜ№еә”зҡ„setж–№жі•дҝ®ж”№
private String usernameParameter = SPRING_SECURITY_FORM_USERNAME_KEY;
private String passwordParameter = SPRING_SECURITY_FORM_PASSWORD_KEY;
private boolean postOnly = true;
// еҲқе§ӢеҢ–дёҖдёӘз”ЁжҲ·еҜҶз Ғ и®ӨиҜҒиҝҮж»ӨеҷЁ й»ҳи®Өзҡ„зҷ»еҪ•uri жҳҜ /login иҜ·жұӮж–№ејҸжҳҜPOST
public UsernamePasswordAuthenticationFilter() {
super(DEFAULT_ANT_PATH_REQUEST_MATCHER);
}
public UsernamePasswordAuthenticationFilter(AuthenticationManager authenticationManager) {
super(DEFAULT_ANT_PATH_REQUEST_MATCHER, authenticationManager);
}
@Override
public Authentication attemptAuthentication(HttpServletRequest request, HttpServletResponse response)
throws AuthenticationException {
if (this.postOnly && !request.getMethod().equals("POST")) {
throw new AuthenticationServiceException("Authentication method not supported: " + request.getMethod());
}
String username = obtainUsername(request);
username = (username != null) ? username : "";
username = username.trim();
String password = obtainPassword(request);
password = (password != null) ? password : "";
//жҠҠиҙҰеҸ·еҗҚгҖҒеҜҶз Ғе°ҒиЈ…еҲ°дёҖдёӘи®ӨиҜҒTokenеҜ№иұЎдёӯпјҢиҝҷжҳҜдёҖдёӘйҖҡиЎҢиҜҒпјҢдҪҶжҳҜжӯӨж—¶зҡ„зҠ¶жҖҒж—¶дёҚеҸҜдҝЎзҡ„пјҢйҖҡиҝҮи®ӨиҜҒеҗҺжүҚдјҡеҸҳдёәеҸҜдҝЎзҡ„
UsernamePasswordAuthenticationToken authRequest = new UsernamePasswordAuthenticationToken(username, password);
// Allow subclasses to set the "details" property
//и®°еҪ•иҝңзЁӢең°еқҖпјҢеҰӮжһңдјҡиҜқе·Із»ҸеӯҳеңЁпјҲе®ғдёҚдјҡеҲӣе»әпјүпјҢиҝҳе°Ҷи®ҫзҪ®дјҡиҜқ ID
setDetails(request, authRequest);
//дҪҝз”Ё зҲ¶зұ»дёӯзҡ„ AuthenticationManager еҜ№Token иҝӣиЎҢи®ӨиҜҒ
return this.getAuthenticationManager().authenticate(authRequest);
}
/**
obtainUsernameе’ҢobtainPasswordе°ұжҳҜж–№дҫҝд»ҺrequestдёӯиҺ·еҸ–еҲ°usernameе’Ңpassword
е®һйҷ…дёҠеҰӮжһңеңЁеүҚеҗҺз«ҜеҲҶзҰ»зҡ„йЎ№зӣ®дёӯ жҲ‘们еӨ§йғҪз”ЁдёҚдёҠ???? еӣ дёәеүҚз«Ҝдј иҝҮжқҘзҡ„жҳҜJSONж•°жҚ®пјҢжҲ‘们йҖҡеёёжҳҜдҪҝз”ЁJSONе·Ҙе…·зұ»иҝӣиЎҢи§Јжһҗ
*/
@Nullable
protected String obtainPassword(HttpServletRequest request) {
return request.getParameter(this.passwordParameter);
}
@Nullable
protected String obtainUsername(HttpServletRequest request) {
return request.getParameter(this.usernameParameter);
}
/**
жҸҗдҫӣд»Ҙдҫҝеӯҗзұ»еҸҜд»Ҙй…ҚзҪ®ж”ҫе…Ҙиә«д»ҪйӘҢиҜҒиҜ·жұӮзҡ„иҜҰз»ҶдҝЎжҒҜ
*/
protected void setDetails(HttpServletRequest request, UsernamePasswordAuthenticationToken authRequest) {
authRequest.setDetails(this.authenticationDetailsSource.buildDetails(request));
}
/**
...зңҒз•ҘдёҖдәӣдёҚйҮҚиҰҒзҡ„д»Јз Ғ set get
*/
}е°ҶиҺ·еҸ–еҲ°зҡ„ж•°жҚ®еҲ¶дҪңжҲҗдёҖдёӘд»ӨзүҢUsernamePasswordAuthenticationToken authRequest = new UsernamePasswordAuthenticationToken(username, password);
д№ӢеүҚжҲ‘们еңЁеӣҫдёӯи®ІдәҶжҲ‘们е®һйҷ…е°ҒиЈ…зҡ„жҳҜдёҖдёӘAuthenticationеҜ№иұЎпјҢUsernamePasswordAuthenticationTokenжҳҜдёҖдёӘй»ҳи®Өе®һзҺ°зұ»гҖӮ
жҲ‘们з®ҖеҚ•зңӢдёҖдёӢ他们зҡ„з»“жһ„еӣҫпјҡ
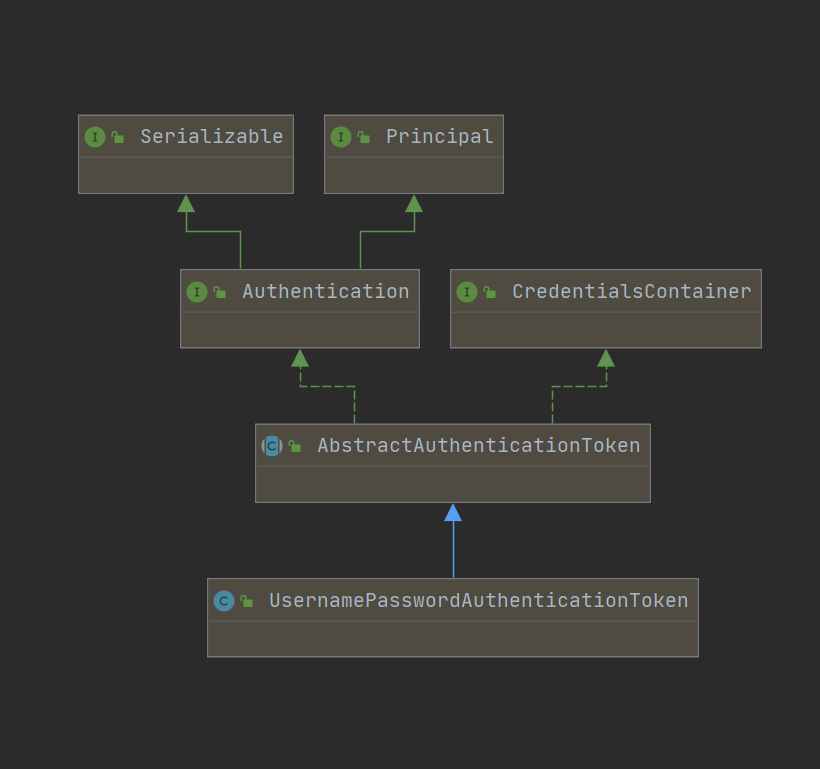
public class UsernamePasswordAuthenticationToken extends AbstractAuthenticationToken {
private static final long serialVersionUID = SpringSecurityCoreVersion.SERIAL_VERSION_UID;
// иҝҷйҮҢе°ұжҳҜз”ЁжҲ·еҗҚе’ҢеҜҶз Ғ иҮӘе®ҡд№үж—¶ ж №жҚ®иҮӘе·ұйңҖжұӮиҝӣиЎҢйҮҚеҶҷ
private final Object principal;
private Object credentials;
/**
//жҠҠиҙҰеҸ·еҗҚгҖҒеҜҶз Ғе°ҒиЈ…еҲ°дёҖдёӘи®ӨиҜҒUsernamePasswordAuthenticationTokenеҜ№иұЎдёӯпјҢиҝҷжҳҜдёҖдёӘйҖҡиЎҢиҜҒпјҢдҪҶжҳҜжӯӨж—¶зҡ„зҠ¶жҖҒж—¶дёҚеҸҜдҝЎзҡ„пјҢ
//жҲ‘们еңЁиҝҷд№ҹеҸҜд»ҘзңӢеҲ° жқғйҷҗжҳҜnullпјҢ setAuthenticated(false);жҳҜиЎЁзӨәжӯӨеҲ»иә«д»ҪжҳҜжңӘйӘҢиҜҒзҡ„ жүҖд»ҘжӯӨж—¶зҠ¶жҖҒжҳҜдёҚеҸҜдҝЎзҡ„
*/
public UsernamePasswordAuthenticationToken(Object principal, Object credentials) {
super(null);
this.principal = principal;
this.credentials = credentials;
setAuthenticated(false);
}
/** иҝҷдёӘж—¶еҖҷжүҚжҳҜеҸҜдҝЎзҡ„зҠ¶жҖҒ */
public UsernamePasswordAuthenticationToken(Object principal, Object credentials,
Collection<? extends GrantedAuthority> authorities) {
super(authorities);
this.principal = principal;
this.credentials = credentials;
super.setAuthenticated(true); // must use super, as we override
}
// ...
}зӣ®еүҚжҳҜеӨ„дәҺжңӘжҺҲжқғзҠ¶жҖҒзҡ„гҖӮжҲ‘们еҗҺйқўиҰҒеҒҡзҡ„е°ұжҳҜеҜ№е®ғиҝӣиЎҢи®ӨиҜҒжҺҲжқғгҖӮ
AuthenticationManagerжҳҜиә«д»Ҫи®ӨиҜҒеҷЁпјҢи®ӨиҜҒзҡ„ж ёеҝғжҺҘеҸЈ
жҲ‘们继з»ӯеҜ№return this.getAuthenticationManager().authenticate(authRequest);иҝӣиЎҢеҲҶжһҗ.
//жҲ‘们еҸҜд»ҘзңӢеҲ° AuthenticationManager е®һйҷ…дёҠе°ұжҳҜдёҖдёӘжҺҘеҸЈпјҢжүҖд»Ҙе®ғ并дёҚеҒҡзңҹжӯЈзҡ„дәӢжғ…пјҢеҸӘжҳҜжҸҗдҫӣдәҶдёҖдёӘж ҮеҮҶпјҢжҲ‘们е°ұ继з»ӯеҺ»зңӢзңӢе®ғзҡ„е®һзҺ°зұ»пјҢзңӢзңӢжҳҜи°Ғеё®е®ғеҒҡдәҶдәӢгҖӮ
public interface AuthenticationManager {
//е°қиҜ•еҜ№дј йҖ’зҡ„AuthenticationеҜ№иұЎиҝӣиЎҢиә«д»ҪAuthentication пјҢеҰӮжһңжҲҗеҠҹеҲҷиҝ”еӣһе®Ңе…ЁеЎ«е……зҡ„AuthenticationеҜ№иұЎпјҲеҢ…жӢ¬жҺҲдәҲзҡ„жқғйҷҗпјүгҖӮ
Authentication authenticate(Authentication authentication) throws AuthenticationException;
}жҲ‘们жүҫеҲ°ProviderManagerе®һзҺ°дәҶAuthenticationManagerгҖӮ(дҪҶжҳҜдҪ дјҡеҸ‘зҺ°е®ғд№ҹдёҚеҒҡдәӢпјҢеҸҲдәӨз»ҷдәҶеҲ«дәәеҒҡ????)
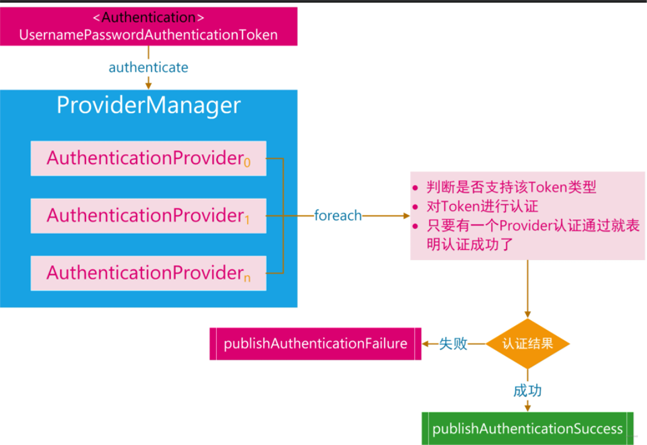
ProviderManager并дёҚжҳҜиҮӘе·ұзӣҙжҺҘеҜ№иҜ·жұӮиҝӣиЎҢйӘҢиҜҒпјҢиҖҢжҳҜе°Ҷ其委жҙҫз»ҷдёҖдёӘ AuthenticationProviderеҲ—иЎЁгҖӮеҲ—иЎЁдёӯзҡ„жҜҸдёҖдёӘ AuthenticationProviderе°Ҷдјҡиў«дҫқж¬ЎжҹҘиҜўжҳҜеҗҰйңҖиҰҒйҖҡиҝҮе…¶иҝӣиЎҢйӘҢиҜҒ,жҜҸдёӘ providerзҡ„йӘҢиҜҒз»“жһңеҸӘжңүдёӨдёӘжғ…еҶөпјҡжҠӣеҮәдёҖдёӘејӮеёёжҲ–иҖ…е®Ңе…ЁеЎ«е……дёҖдёӘ AuthenticationеҜ№иұЎзҡ„жүҖжңүеұһжҖ§гҖӮ
еңЁиҝҷдёӘйҳ…иҜ»дёӯпјҢжҲ‘еҲ йҷӨдәҶи®ёеӨҡжқӮдёғжқӮе…«зҡ„д»Јз ҒпјҢдёҖдәӣеҲӨж–ӯпјҢејӮеёёеӨ„зҗҶпјҢжҲ‘йғҪеҺ»жҺүдәҶпјҢеҸӘй’ҲеҜ№жңҖйҮҚиҰҒзҡ„йӮЈеҮ дёӘзңӢгҖӮ
public class ProviderManager implements AuthenticationManager, MessageSourceAware, InitializingBean {
//зңҒз•ҘдәҶдёҖдәӣд»Јз Ғ
private List<AuthenticationProvider> providers = Collections.emptyList();
/**
* е°қиҜ•еҜ№дј йҖ’зҡ„AuthenticationеҜ№иұЎиҝӣиЎҢиә«д»ҪAuthentication гҖӮAuthenticationProviderзҡ„еҲ—иЎЁе°Ҷиў«иҝһз»ӯе°қиҜ•пјҢ
* зӣҙеҲ°AuthenticationProviderиЎЁжҳҺе®ғиғҪеӨҹйӘҢиҜҒжүҖдј йҖ’зҡ„AuthenticationеҜ№иұЎзҡ„зұ»еһӢгҖӮ 然еҗҺе°Ҷе°қиҜ•дҪҝз”ЁиҜҘAuthenticationProvider гҖӮ
*/
@Override
public Authentication authenticate(Authentication authentication) throws AuthenticationException {
Class<? extends Authentication> toTest = authentication.getClass();
Authentication result = null;
Authentication parentResult = null;
int currentPosition = 0;
int size = this.providers.size();
//жҲ‘们йҒҚеҺҶAuthenticationProvider еҲ—иЎЁдёӯжҜҸдёӘProviderдҫқж¬ЎиҝӣиЎҢи®ӨиҜҒ
// дёҚиҝҮдҪ дјҡеҸ‘зҺ° AuthenticationProvider д№ҹжҳҜдёҖдёӘжҺҘеҸЈпјҢе®ғзҡ„е®һзҺ°зұ»жүҚжҳҜзңҹжӯЈеҒҡдәӢзҡ„дәә ,дёӢж–Үжңү
for (AuthenticationProvider provider : getProviders()) {
if (!provider.supports(toTest)) {
continue;
}
//...
try {
//provider.authenticate()
//еҸӮж•°пјҡиә«д»ҪйӘҢиҜҒ - иә«д»ҪйӘҢиҜҒиҜ·жұӮеҜ№иұЎгҖӮ
//иҝ”еӣһпјҡдёҖдёӘе®Ңе…Ёз»ҸиҝҮиә«д»ҪйӘҢиҜҒзҡ„еҜ№иұЎпјҢеҢ…жӢ¬еҮӯжҚ®гҖӮ еҰӮжһңAuthenticationProviderж— жі•ж”ҜжҢҒеҜ№дј йҖ’зҡ„AuthenticationеҜ№иұЎиҝӣиЎҢиә«д»ҪйӘҢиҜҒпјҢеҲҷеҸҜиғҪиҝ”еӣһnull ,жҲ‘们жҺҘзқҖзңӢе®ғзҡ„е®һзҺ°зұ»жҳҜд»Җд№Ҳж ·еӯҗзҡ„
result = provider.authenticate(authentication);
if (result != null) {
copyDetails(authentication, result);
break;
}
}
catch (AccountStatusException | InternalAuthenticationServiceException ex) {
//....
}
}
// еҰӮжһң AuthenticationProvider еҲ—иЎЁдёӯзҡ„ProviderйғҪи®ӨиҜҒеӨұиҙҘпјҢдё”д№ӢеүҚжңүжһ„йҖ дёҖдёӘ AuthenticationManager е®һзҺ°зұ»пјҢйӮЈд№ҲеҲ©з”ЁAuthenticationManager е®һзҺ°зұ» 继з»ӯи®ӨиҜҒ
if (result == null && this.parent != null) {
// Allow the parent to try.
try {
parentResult = this.parent.authenticate(authentication);
result = parentResult;
}
catch (ProviderNotFoundException ex) {
// ...
}
}
//и®ӨиҜҒжҲҗеҠҹ
if (result != null) {
if (eraseCredentialsAfterAuthentication
&& (result instanceof CredentialsContainer)) {
// Authentication is complete. Remove credentials and other secret data
// from authentication
//жҲҗеҠҹи®ӨиҜҒеҗҺеҲ йҷӨйӘҢиҜҒдҝЎжҒҜ
((CredentialsContainer) result).eraseCredentials();
}
//еҸ‘еёғзҷ»еҪ•жҲҗеҠҹдәӢ件
eventPublisher.publishAuthenticationSuccess(result);
return result;
}
// жІЎжңүи®ӨиҜҒжҲҗеҠҹпјҢжҠӣеҮәејӮеёё
if (lastException == null) {
lastException = new ProviderNotFoundException(messages.getMessage(
"ProviderManager.providerNotFound",
new Object[] { toTest.getName() },
"No AuthenticationProvider found for {0}"));
}
prepareException(lastException, authentication);
throw lastException;
}
}public interface AuthenticationProvider {
/**
и®ӨиҜҒж–№жі•
еҸӮж•°пјҡиә«д»ҪйӘҢиҜҒ - иә«д»ҪйӘҢиҜҒиҜ·жұӮеҜ№иұЎгҖӮ
иҝ”еӣһпјҡдёҖдёӘе®Ңе…Ёз»ҸиҝҮиә«д»ҪйӘҢиҜҒзҡ„еҜ№иұЎпјҢеҢ…жӢ¬еҮӯжҚ®гҖӮ
*/
Authentication authenticate(Authentication authentication) throws AuthenticationException;
/**
иҜҘProviderжҳҜеҗҰж”ҜжҢҒеҜ№еә”зҡ„Authentication
еҰӮжһңжӯӨAuthenticationProviderж”ҜжҢҒжҢҮе®ҡзҡ„AuthenticationеҜ№иұЎпјҢеҲҷиҝ”еӣһtrue гҖӮ
*/
boolean supports(Class<?> authentication);
}жіЁж„Ҹпјҡboolean supports(Class<?> authentication);ж–№ејҸдёҠе®Ңж•ҙJavaDocзҡ„жіЁйҮҠжҳҜпјҡ
еҰӮжһңжңүеӨҡдёӘ
AuthenticationProviderйғҪж”ҜжҢҒеҗҢдёҖдёӘAuthentication еҜ№иұЎпјҢйӮЈд№Ҳ第дёҖдёӘ иғҪеӨҹжҲҗеҠҹйӘҢиҜҒAuthenticationзҡ„ Provder е°ҶеЎ«е……е…¶еұһжҖ§е№¶иҝ”еӣһз»“жһңпјҢд»ҺиҖҢиҰҶзӣ–ж—©жңҹж”ҜжҢҒзҡ„AuthenticationProviderжҠӣеҮәзҡ„д»»дҪ•еҸҜиғҪзҡ„AuthenticationExceptionгҖӮдёҖж—ҰжҲҗеҠҹйӘҢиҜҒеҗҺпјҢе°ҶдёҚдјҡе°қиҜ•еҗҺз»ӯзҡ„AuthenticationProviderгҖӮеҰӮжһңжүҖжңүзҡ„AuthenticationProviderйғҪжІЎжңүжҲҗеҠҹйӘҢиҜҒAuthenticationпјҢйӮЈд№Ҳе°ҶжҠӣеҮәжңҖеҗҺдёҖдёӘProviderжҠӣеҮәзҡ„AuthenticationExceptionгҖӮ(AuthenticationProviderеҸҜд»ҘеңЁSpring Securityй…ҚзҪ®зұ»дёӯй…ҚзҪ®)
жңәиҜ‘дёҚжҳҜеҫҲеҘҪзҗҶи§ЈпјҢжҲ‘们зҝ»иҜ‘жҲҗйҖҡдҝ—жҳ“жҮӮзӮ№пјҡ
еҪ“然жңүж—¶еҖҷжҲ‘们жңүеӨҡдёӘдёҚеҗҢзҡ„
AuthenticationProviderпјҢе®ғ们еҲҶеҲ«ж”ҜжҢҒдёҚеҗҢзҡ„AuthenticationеҜ№иұЎпјҢйӮЈд№ҲеҪ“дёҖдёӘе…·дҪ“зҡ„AuthenticationProvierдј иҝӣе…ҘProviderManagerзҡ„еҶ…йғЁж—¶пјҢе°ұдјҡеңЁAuthenticationProviderеҲ—иЎЁдёӯжҢ‘йҖүе…¶еҜ№еә”ж”ҜжҢҒзҡ„providerеҜ№зӣёеә”зҡ„ AuthenticationеҜ№иұЎиҝӣиЎҢйӘҢиҜҒ
иҝҷдёӘзҹҘиҜҶе’Ңе®һзҺ°еӨҡз§Қзҷ»еҪ•ж–№ејҸзӣёе…іиҒ”пјҢжҲ‘з®ҖеҚ•зҡ„иҜҙдёҖдёӢжҲ‘зҡ„зҗҶи§ЈгҖӮ
жҲ‘们иҝҷйҮҢи®Іи§Јзҡ„жҳҜй»ҳи®Өзҡ„зҷ»еҪ•ж–№ејҸпјҢз”ЁеҲ°зҡ„жҳҜUsernamePasswordAuthenticationFilterе’ҢUsernamePasswordAuthenticationTokenд»ҘеҸҠеҗҺж–Үдёӯзҡ„DaoAuthenticationProviderиҝҷдәӣпјҢжқҘиҝӣиЎҢиә«д»Ҫзҡ„йӘҢиҜҒпјҢдҪҶжҳҜеҰӮжһңжҲ‘们еҗҺжңҹйңҖиҰҒж·»еҠ жүӢжңәзҹӯдҝЎйӘҢиҜҒз Ғзҷ»еҪ•жҲ–иҖ…йӮ®д»¶йӘҢиҜҒз ҒжҲ–иҖ…第дёүж–№зҷ»еҪ•зӯүзӯүгҖӮ
йӮЈд№ҲжҲ‘们д№ҹдјҡйҮҚ新继жүҝAbstractAuthenticationProcessingFilterгҖҒAbstractAuthenticationTokenгҖҒAuthenticationProviderиҝӣиЎҢйҮҚеҶҷпјҢеӣ дёәдёҚеҗҢзҡ„зҷ»еҪ•ж–№ејҸи®ӨиҜҒйҖ»иҫ‘жҳҜдёҚдёҖж ·зҡ„пјҢAuthenticationProviderд№ҹдјҡдёҚдёҖж ·пјҢжҲ‘们дҪҝз”Ёз”ЁжҲ·еҗҚе’ҢеҜҶз Ғзҷ»еҪ•пјҢSecurity жҸҗдҫӣдәҶдёҖдёӘ AuthenticationProviderзҡ„з®ҖеҚ•е®һзҺ° DaoAuthenticationProviderпјҢе®ғдҪҝз”ЁдәҶдёҖдёӘ UserDetailsServiceжқҘжҹҘиҜўз”ЁжҲ·еҗҚгҖҒеҜҶз Ғе’Ң GrantedAuthorityпјҢе®һйҷ…дҪҝз”ЁдёӯжҲ‘们йғҪдјҡе®һзҺ°UserDetailsServiceжҺҘеҸЈ,д»Һж•°жҚ®еә“дёӯжҹҘиҜўзӣёе…із”ЁжҲ·дҝЎжҒҜпјҢAuthenticationProviderзҡ„и®ӨиҜҒж ёеҝғе°ұжҳҜеҠ иҪҪеҜ№еә”зҡ„ UserDetailsжқҘжЈҖжҹҘз”ЁжҲ·иҫ“е…Ҙзҡ„еҜҶз ҒжҳҜеҗҰдёҺе…¶еҢ№й…ҚгҖӮ
жөҒзЁӢеӣҫеӨ§иҮҙеҰӮдёӢпјҡ
AuthenticationProviderе®ғзҡ„е®һзҺ°зұ»гҖҒ继жүҝзұ»еҫҲеӨҡпјҢжҲ‘们зӣҙжҺҘзңӢе’ҢUserзӣёе…ізҡ„пјҢдјҡе…ҲжүҫеҲ°AbstractUserDetailsAuthenticationProviderиҝҷдёӘжҠҪиұЎзұ»гҖӮ
жҲ‘们е…ҲзңӢзңӢиҝҷдёӘжҠҪиұЎзұ»пјҢ然еҗҺеҶҚзңӢе®ғзҡ„е®һзҺ°зұ»пјҢзңӢ他们жҳҜеҰӮдҪ•дёҖжӯҘдёҖжӯҘйҖ’иҝӣзҡ„гҖӮ
/**
дёҖдёӘеҹәжң¬зҡ„AuthenticationProvider пјҢе®ғе…Ғи®ёеӯҗзұ»иҰҶзӣ–е’ҢдҪҝз”ЁUserDetailsеҜ№иұЎгҖӮ иҜҘзұ»ж—ЁеңЁе“Қеә”UsernamePasswordAuthenticationTokenиә«д»ҪйӘҢиҜҒиҜ·жұӮгҖӮ
йӘҢиҜҒжҲҗеҠҹеҗҺпјҢе°ҶеҲӣе»әUsernamePasswordAuthenticationToken并е°Ҷе…¶иҝ”еӣһз»ҷи°ғз”ЁиҖ…гҖӮ д»ӨзүҢе°ҶеҢ…жӢ¬з”ЁжҲ·еҗҚзҡ„StringиЎЁзӨәжҲ–д»Һиә«д»ҪйӘҢиҜҒеӯҳеӮЁеә“иҝ”еӣһзҡ„UserDetailsдҪңдёәе…¶дё»дҪ“гҖӮ
*/
public abstract class AbstractUserDetailsAuthenticationProvider
implements AuthenticationProvider, InitializingBean, MessageSourceAware {
//...зңҒз•ҘдәҶдёҖдәӣд»Јз Ғ
private UserCache userCache = new NullUserCache();
private GrantedAuthoritiesMapper authoritiesMapper = new NullAuthoritiesMapper();
//и®ӨиҜҒж–№жі•
@Override
public Authentication authenticate(Authentication authentication) throws AuthenticationException {
Assert.isInstanceOf(UsernamePasswordAuthenticationToken.class, authentication,
() -> this.messages.getMessage("AbstractUserDetailsAuthenticationProvider.onlySupports",
"Only UsernamePasswordAuthenticationToken is supported"));
//еҲӨж–ӯз”ЁжҲ·еҗҚжҳҜеҗҰдёәз©ә
String username = determineUsername(authentication);
boolean cacheWasUsed = true;
//е…ҲжҹҘзј“еӯҳ
UserDetails user = this.userCache.getUserFromCache(username);
if (user == null) {
cacheWasUsed = false;
try {
user = retrieveUser(username, (UsernamePasswordAuthenticationToken) authentication);
}
catch (UsernameNotFoundException ex) {
this.logger.debug("Failed to find user '" + username + "'");
if (!this.hideUserNotFoundExceptions) {
throw ex;
}
throw new BadCredentialsException(this.messages
.getMessage("AbstractUserDetailsAuthenticationProvider.badCredentials", "Bad credentials"));
}
Assert.notNull(user, "retrieveUser returned null - a violation of the interface contract");
}
try {
//дёҖдәӣжЈҖжҹҘ
this.preAuthenticationChecks.check(user);
additionalAuthenticationChecks(user, (UsernamePasswordAuthenticationToken) authentication);
}
catch (AuthenticationException ex) {
if (!cacheWasUsed) {
throw ex;
}
// There was a problem, so try again after checking
// we're using latest data (i.e. not from the cache)
cacheWasUsed = false;
//retrieveUser жҳҜдёӘжІЎжңүжҠҪиұЎзҡ„ж–№жі• зЁҚеҗҺжҲ‘们зңӢзңӢе®ғзҡ„е®һзҺ°зұ»жҳҜеҰӮдҪ•е®һзҺ°зҡ„
user = retrieveUser(username, (UsernamePasswordAuthenticationToken) authentication);
//дёҖдәӣжЈҖжҹҘдҝЎжҒҜ з”ЁжҲ·жҳҜеҗҰеҸҜз”Ёд»Җд№Ҳзҡ„
this.preAuthenticationChecks.check(user);
additionalAuthenticationChecks(user, (UsernamePasswordAuthenticationToken) authentication);
}
this.postAuthenticationChecks.check(user);
if (!cacheWasUsed) {
this.userCache.putUserInCache(user);
}
Object principalToReturn = user;
if (this.forcePrincipalAsString) {
principalToReturn = user.getUsername();
}
//еҲӣе»әдёҖдёӘжҲҗеҠҹзҡ„AuthenticationеҜ№иұЎгҖӮ
return createSuccessAuthentication(principalToReturn, authentication, user);
}
private String determineUsername(Authentication authentication) {
return (authentication.getPrincipal() == null) ? "NONE_PROVIDED" : authentication.getName();
}
/**
еҲӣе»әдёҖдёӘжҲҗеҠҹзҡ„AuthenticationеҜ№иұЎгҖӮ иҝҷдёӘд№ҹе…Ғи®ёеӯ—зұ»иҝӣиЎҢе®һзҺ°гҖӮ
еҰӮжһңиҰҒз»ҷеҜҶз ҒеҠ еҜҶзҡ„иҜқпјҢдёҖиҲ¬еӯ—зұ»йғҪдјҡйҮҚж–°иҝӣиЎҢе®һзҺ°
*/
protected Authentication createSuccessAuthentication(Object principal, Authentication authentication,
UserDetails user) {
//иә«д»ҪдҝЎжҒҜеңЁиҝҷйҮҢд№ҹеҠ е…ҘиҝӣеҺ»дәҶ
UsernamePasswordAuthenticationToken result = new UsernamePasswordAuthenticationToken(principal,
authentication.getCredentials(), this.authoritiesMapper.mapAuthorities(user.getAuthorities()));
result.setDetails(authentication.getDetails());
this.logger.debug("Authenticated user");
return result;
}
/**
е…Ғи®ёеӯҗзұ»д»Һзү№е®ҡдәҺе®һзҺ°зҡ„дҪҚзҪ®е®һйҷ…жЈҖзҙўUserDetails пјҢеҰӮжһңжҸҗдҫӣзҡ„еҮӯжҚ®дёҚжӯЈзЎ®пјҢеҲҷеҸҜд»ҘйҖүжӢ©з«ӢеҚіжҠӣеҮәAuthenticationException пјҲеҰӮжһңйңҖиҰҒд»Ҙз”ЁжҲ·иә«д»Ҫз»‘е®ҡеҲ°иө„жәҗд»ҘиҺ·еҫ—жҲ–з”ҹжҲҗдёҖдёӘUserDetails пјү
*/
protected abstract UserDetails retrieveUser(String username, UsernamePasswordAuthenticationToken authentication)
throws AuthenticationException;
//...
}DaoAuthenticationProviderпјҡзңҹжӯЈеҒҡдәӢжғ…зҡ„дәә
/**
д»ҺUserDetailsServiceжЈҖзҙўз”ЁжҲ·иҜҰз»ҶдҝЎжҒҜзҡ„AuthenticationProviderе®һзҺ°гҖӮ
*/
public class DaoAuthenticationProvider extends AbstractUserDetailsAuthenticationProvider {
// ...зңҒз•ҘдәҶдёҖдәӣд»Јз Ғ
/** */
@Override
protected final UserDetails retrieveUser(String username, UsernamePasswordAuthenticationToken authentication)
throws AuthenticationException {
prepareTimingAttackProtection();
try {
//UserDetailsServiceз®ҖеҚ•иҜҙе°ұжҳҜеҠ иҪҪеҜ№еә”зҡ„UserDetailsзҡ„жҺҘеҸЈ(дёҖиҲ¬д»Һж•°жҚ®еә“)пјҢиҖҢUserDetailsеҢ…еҗ«дәҶжӣҙиҜҰз»Ҷзҡ„з”ЁжҲ·дҝЎжҒҜ
//йҖҡиҝҮloadUserByUsernameиҺ·еҸ–з”ЁжҲ·дҝЎжҒҜ пјҢиҝ”еӣһдёҖдёӘ UserDetails
UserDetails loadedUser = this.getUserDetailsService().loadUserByUsername(username);
if (loadedUser == null) {
throw new InternalAuthenticationServiceException(
"UserDetailsService returned null, which is an interface contract violation");
}
return loadedUser;
}
catch (UsernameNotFoundException ex) {
mitigateAgainstTimingAttack(authentication);
throw ex;
}
catch (InternalAuthenticationServiceException ex) {
throw ex;
}
catch (Exception ex) {
throw new InternalAuthenticationServiceException(ex.getMessage(), ex);
}
}
// йҮҚж–°зҲ¶зұ»зҡ„ж–№жі•пјҢеҜ№еҜҶз ҒиҝӣиЎҢдёҖдәӣеҠ еҜҶж“ҚдҪң
@Override
protected Authentication createSuccessAuthentication(Object principal, Authentication authentication,
UserDetails user) {
boolean upgradeEncoding = this.userDetailsPasswordService != null
&& this.passwordEncoder.upgradeEncoding(user.getPassword());
if (upgradeEncoding) {
String presentedPassword = authentication.getCredentials().toString();
String newPassword = this.passwordEncoder.encode(presentedPassword);
user = this.userDetailsPasswordService.updatePassword(user, newPassword);
}
return super.createSuccessAuthentication(principal, authentication, user);
}
//...
}UserDetailsServiceз®ҖеҚ•иҜҙе°ұжҳҜе®ҡд№үдәҶдёҖдёӘеҠ иҪҪеҜ№еә”зҡ„UserDetailsзҡ„жҺҘеҸЈпјҢжҲ‘们еңЁдҪҝз”ЁдёӯпјҢеӨ§йғҪж•°йғҪдјҡе®һзҺ°иҝҷдёӘжҺҘеҸЈпјҢд»Һж•°жҚ®еә“дёӯжҹҘиҜўзӣёе…ізҡ„з”ЁжҲ·дҝЎжҒҜгҖӮ
//еҠ иҪҪз”ЁжҲ·зү№е®ҡж•°жҚ®зҡ„ж ёеҝғжҺҘеҸЈгҖӮ
public interface UserDetailsService {
//ж №жҚ®з”ЁжҲ·еҗҚе®ҡдҪҚз”ЁжҲ·
UserDetails loadUserByUsername(String username) throws UsernameNotFoundException;
}UserDetailsд№ҹжҳҜдёҖдёӘжҺҘеҸЈпјҢе®һйҷ…ејҖеҸ‘дёӯпјҢеҗҢж ·еҜ№е®ғд№ҹдјҡиҝӣиЎҢе®һзҺ°пјҢиҝӣиЎҢе®ҡеҲ¶еҢ–зҡ„дҪҝз”ЁгҖӮ
/**
жҸҗдҫӣж ёеҝғз”ЁжҲ·дҝЎжҒҜгҖӮ
еҮәдәҺе®үе…Ёзӣ®зҡ„пјҢSpring Security дёҚзӣҙжҺҘдҪҝз”Ёе®һзҺ°гҖӮ е®ғ们еҸӘжҳҜеӯҳеӮЁз”ЁжҲ·дҝЎжҒҜпјҢ然еҗҺе°ҶиҝҷдәӣдҝЎжҒҜе°ҒиЈ…еҲ°AuthenticationеҜ№иұЎдёӯгҖӮ иҝҷе…Ғи®ёе°Ҷйқһе®үе…Ёзӣёе…ізҡ„з”ЁжҲ·дҝЎжҒҜпјҲдҫӢеҰӮз”өеӯҗйӮ®д»¶ең°еқҖгҖҒз”өиҜқеҸ·з ҒзӯүпјүеӯҳеӮЁеңЁж–№дҫҝзҡ„дҪҚзҪ®гҖӮ
*/
public interface UserDetails extends Serializable {
//иҝ”еӣһжҺҲдәҲз”ЁжҲ·зҡ„жқғйҷҗгҖӮ
Collection<? extends GrantedAuthority> getAuthorities();
String getPassword();
String getUsername();
//жҢҮзӨәз”ЁжҲ·зҡ„еёҗжҲ·жҳҜеҗҰе·ІиҝҮжңҹгҖӮ ж— жі•йӘҢиҜҒиҝҮжңҹеёҗжҲ·
boolean isAccountNonExpired();
//жҢҮзӨәз”ЁжҲ·жҳҜиў«й”Ғе®ҡиҝҳжҳҜжңӘй”Ғе®ҡгҖӮ ж— жі•еҜ№й”Ғе®ҡзҡ„з”ЁжҲ·иҝӣиЎҢиә«д»ҪйӘҢиҜҒгҖӮ
boolean isAccountNonLocked();
//жҢҮзӨәз”ЁжҲ·зҡ„еҮӯжҚ®пјҲеҜҶз ҒпјүжҳҜеҗҰе·ІиҝҮжңҹгҖӮ иҝҮжңҹзҡ„еҮӯжҚ®дјҡйҳ»жӯўиә«д»ҪйӘҢиҜҒгҖӮ
boolean isCredentialsNonExpired();
//жҢҮзӨәз”ЁжҲ·жҳҜеҗҜз”ЁиҝҳжҳҜзҰҒз”ЁгҖӮ ж— жі•еҜ№зҰҒз”Ёзҡ„з”ЁжҲ·иҝӣиЎҢиә«д»ҪйӘҢиҜҒгҖӮ
boolean isEnabled();
}1гҖҒDaoAuthenticationProviderзұ»дёӢUserDetails retrieveUserпјҲпјүж–№жі•дёӯйҖҡиҝҮthis.getUserDetailsService().loadUserByUsername(username);иҺ·еҸ–еҲ°з”ЁжҲ·дҝЎжҒҜеҗҺпјӣ
2гҖҒе°ҶUserDetailsиҝ”еӣһз»ҷзҲ¶зұ»AbstractUserDetailsAuthenticationProviderдёӯзҡ„и°ғз”ЁеӨ„пјҲеҚіAuthentication authenticate(Authentication authentication)ж–№жі•дёӯпјү
3гҖҒAbstractUserDetailsAuthenticationProviderжӢҝеҲ°иҝ”еӣһзҡ„UserDetailsеҗҺпјҢжңҖеҗҺиҝ”еӣһз»ҷи°ғз”ЁиҖ…зҡ„жҳҜreturn createSuccessAuthentication(principalToReturn, authentication, user); иҝҷйҮҢе°ұжҳҜеҲӣе»әдәҶдёҖдёӘеҸҜдҝЎзҡ„ UsernamePasswordAuthenticationToken,еҚіиә«д»ҪеҮӯиҜҒгҖӮ
protected Authentication createSuccessAuthentication(Object principal, Authentication authentication,
                                                     UserDetails user) {
    UsernamePasswordAuthenticationToken result = new UsernamePasswordAuthenticationToken(principal,
                                                                                         authentication.getCredentials(), this.authoritiesMapper.mapAuthorities(user.getAuthorities()));
    result.setDetails(authentication.getDetails());
    this.logger.debug("Authenticated user");
    return result;
}4гҖҒжҲ‘们еҶҚеӣһеҲ°ProviderManagerзҡ„Authentication authenticate(Authentication authentication)ж–№жі•дёӯзҡ„и°ғз”ЁеӨ„пјҢиҝҷдёӘж—¶еҖҷжҲ‘们зҡ„з”ЁжҲ·дҝЎжҒҜе·Із»ҸжҳҜйӘҢиҜҒиҝҮзҡ„пјҢжҲ‘们жҺҘзқҖеҗ‘дёҠеұӮи°ғз”ЁеӨ„иҝ”еӣһгҖӮ
5гҖҒеӣһеҲ°UsernamePasswordAuthenticationFilterдёӯзҡ„return this.getAuthenticationManager().authenticate(authRequest);иҜӯеҸҘдёӯпјҢиҝҷдёӘж—¶еҖҷиҝҳеҫ—继з»ӯеҗ‘дёҠеұӮиҝ”еӣһ
6гҖҒиҝ”еӣһеҲ°AbstractAuthenticationProcessingFilterдёӯпјҢжҲ‘们зӣҙжҺҘжҢүctrl+bзңӢжҳҜи°Ғи°ғз”ЁдәҶе®ғгҖӮ
public abstract class AbstractAuthenticationProcessingFilter extends GenericFilterBean
implements ApplicationEventPublisherAware, MessageSourceAware {
@Override
public void doFilter(ServletRequest request, ServletResponse response, FilterChain chain)
throws IOException, ServletException {
doFilter((HttpServletRequest) request, (HttpServletResponse) response, chain);
}
private void doFilter(HttpServletRequest request, HttpServletResponse response, FilterChain chain)
throws IOException, ServletException {
if (!requiresAuthentication(request, response)) {
chain.doFilter(request, response);
return;
}
try {
// иҝҷйҮҢе°ұжҳҜи°ғз”ЁеӨ„гҖӮ
Authentication authenticationResult = attemptAuthentication(request, response);
if (authenticationResult == null) {
// return immediately as subclass has indicated that it hasn't completed
return;
}
// sessionзӣёе…іпјҢиҝҷйҮҢжҲ‘们дёҚж·ұиҒҠ
//еҸ‘з”ҹж–°зҡ„иә«д»ҪйӘҢиҜҒж—¶жү§иЎҢдёҺ Http дјҡиҜқзӣёе…ізҡ„еҠҹиғҪгҖӮ
this.sessionStrategy.onAuthentication(authenticationResult, request, response);
// Authentication success
if (this.continueChainBeforeSuccessfulAuthentication) {
chain.doFilter(request, response);
}
//зңӢж–№жі•еҗҚжҲ‘们е°ұзҹҘйҒ“ иҝҷжҳҜжҲ‘们йңҖиҰҒзҡ„жӢү
//жҲҗеҠҹйӘҢиҜҒзңҒд»ҪеҗҺи°ғз”Ё
successfulAuthentication(request, response, chain, authenticationResult);
}
catch (InternalAuthenticationServiceException failed) {
this.logger.error("An internal error occurred while trying to authenticate the user.", failed);
//йӘҢиҜҒеӨұиҙҘи°ғз”Ё
unsuccessfulAuthentication(request, response, failed);
}
catch (AuthenticationException ex) {
// Authentication failed
//йӘҢиҜҒеӨұиҙҘи°ғз”Ё
unsuccessfulAuthentication(request, response, ex);
}
}
}//жҲҗеҠҹиә«д»ҪйӘҢиҜҒзҡ„й»ҳи®ӨиЎҢдёәгҖӮ
//1гҖҒеңЁSecurityContextHolderдёҠи®ҫзҪ®жҲҗеҠҹзҡ„AuthenticationеҜ№иұЎ
//2гҖҒйҖҡзҹҘй…ҚзҪ®зҡ„RememberMeServicesзҷ»еҪ•жҲҗеҠҹ
//3гҖҒйҖҡиҝҮй…ҚзҪ®зҡ„ApplicationEventPublisherи§ҰеҸ‘InteractiveAuthenticationSuccessEvent
//4гҖҒе°Ҷйҷ„еҠ иЎҢдёә委жүҳз»ҷAuthenticationSuccessHandler гҖӮ
//еӯҗзұ»еҸҜд»ҘиҰҶзӣ–жӯӨж–№жі•д»ҘеңЁиә«д»ҪйӘҢиҜҒжҲҗеҠҹеҗҺ继з»ӯFilterChain гҖӮ
protected void successfulAuthentication(HttpServletRequest request, HttpServletResponse response, FilterChain chain,
Authentication authResult) throws IOException, ServletException {
//е°ҶйҖҡиҝҮйӘҢиҜҒзҡ„AuthenticationдҝқеӯҳиҮіе®үе…ЁдёҠдёӢж–Ү
SecurityContextHolder.getContext().setAuthentication(authResult);
if (this.logger.isDebugEnabled()) {
this.logger.debug(LogMessage.format("Set SecurityContextHolder to %s", authResult));
}
this.rememberMeServices.loginSuccess(request, response, authResult);
if (this.eventPublisher != null) {
this.eventPublisher.publishEvent(new InteractiveAuthenticationSuccessEvent(authResult, this.getClass()));
}
this.successHandler.onAuthenticationSuccess(request, response, authResult);
}е…¶е®һдёҚз®ЎжҳҜйӘҢиҜҒжҲҗеҠҹи°ғз”ЁжҲ–жҳҜеӨұиҙҘи°ғз”ЁпјҢеӨ§йғҪж•°жҲ‘们еңЁе®һйҷ…дҪҝз”ЁдёӯпјҢйғҪжҳҜйңҖиҰҒйҮҚеҶҷзҡ„пјҢиҝ”еӣһжҲ‘们иҮӘе·ұжғіиҰҒиҝ”еӣһз»ҷеүҚз«Ҝзҡ„ж•°жҚ®гҖӮ
е…ідәҺвҖңSecurityзҷ»еҪ•и®ӨиҜҒзҡ„жөҒзЁӢжҳҜд»Җд№ҲвҖқзҡ„еҶ…е®№е°ұд»Ӣз»ҚеҲ°иҝҷйҮҢдәҶпјҢж„ҹи°ўеӨ§е®¶зҡ„йҳ…иҜ»гҖӮеҰӮжһңжғідәҶи§ЈжӣҙеӨҡиЎҢдёҡзӣёе…ізҡ„зҹҘиҜҶпјҢеҸҜд»Ҙе…іжіЁдәҝйҖҹдә‘иЎҢдёҡиө„и®Ҝйў‘йҒ“пјҢе°Ҹзј–жҜҸеӨ©йғҪдјҡдёәеӨ§е®¶жӣҙж–°дёҚеҗҢзҡ„зҹҘиҜҶзӮ№гҖӮ
е…ҚиҙЈеЈ°жҳҺпјҡжң¬з«ҷеҸ‘еёғзҡ„еҶ…е®№пјҲеӣҫзүҮгҖҒи§Ҷйў‘е’Ңж–Үеӯ—пјүд»ҘеҺҹеҲӣгҖҒиҪ¬иҪҪе’ҢеҲҶдә«дёәдё»пјҢж–Үз« и§ӮзӮ№дёҚд»ЈиЎЁжң¬зҪ‘з«ҷз«ӢеңәпјҢеҰӮжһңж¶үеҸҠдҫөжқғиҜ·иҒ”зі»з«ҷй•ҝйӮ®з®ұпјҡis@yisu.comиҝӣиЎҢдёҫжҠҘпјҢ并жҸҗдҫӣзӣёе…іиҜҒжҚ®пјҢдёҖз»ҸжҹҘе®һпјҢе°Ҷз«ӢеҲ»еҲ йҷӨж¶үе«ҢдҫөжқғеҶ…е®№гҖӮ
жӮЁеҘҪпјҢзҷ»еҪ•еҗҺжүҚиғҪдёӢи®ўеҚ•е“ҰпјҒ