您好,登录后才能下订单哦!

1. 实验要求
PC1属于vlan10 ,PC2属于vlan20,PC3属于vlan30,PC4属于vlan10。
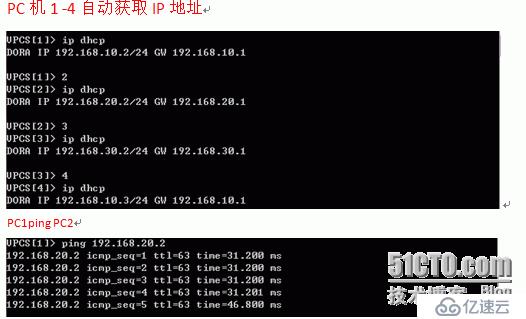
使用dhcp自动获取IP地址。
使用单臂路由技术实现全网互通。
2. 实验步骤
R1:
R1#conf t
Enterconfiguration commands, one per line. End with CNTL/Z.
R1(config)#intfa0/0
R1(config-if)#noshutdown 将接口fa0/0开启
R1(config-if)#intfa0/0.10 进子接口
R1(config-subif)#encapsulationdot1Q 10 改变接口的封装类型,做vlan10的网关
R1(config-subif)#ipadd 192.168.10.1 255.255.255.0 配置IP地址
R1(config-subif)#noshut
R1(config-subif)#intfa0/0.20
R1(config-subif)#encapsulationdot1Q 20
R1(config-subif)#ipadd 192.168.20.1 255.255.255.0
R1(config-subif)#noshut
R1(config-subif)#intfa0/0.30
R1(config-subif)#encapsulationdot1Q 30
R1(config-subif)#ipadd 192.168.30.1 255.255.255.0
R1(config-subif)#noshut
R1(config-subif)#exit
R1(config)#ipdhcp pool v10 建立dhcp地址池
R1(dhcp-config)#network192.168.10.0 /24
R1(dhcp-config)#default-router192.168.10.1
R1(dhcp-config)#dns-server1.1.1.1
R1(dhcp-config)#exit
R1(config)#ipdhcp pool v20 建立dhcp地址池
R1(dhcp-config)#network192.168.20.0 /24
R1(dhcp-config)#default-router192.168.20.1
R1(dhcp-config)#dns-server2.2.2.2
R1(dhcp-config)#exit
R1(config)#ipdhcp pool v30 建立dhcp地址池
R1(dhcp-config)#network192.168.30.0 /24
R1(dhcp-config)#default-router192.168.30.1
R1(dhcp-config)#dns-server3.3.3.3
R1(dhcp-config)#exit
Sw1:
sw1#conft
sw1(config)#no ip routing 关闭路由功能
sw1(config)#vlan 10,20,30 建立vlan10,20,30,
sw1(config-vlan)#int fa1/0
sw1(config-if)#switchport access vlan 10 将接口加入VLAN中
sw1(config-if)#int fa1/1
sw1(config-if)#switchport access vlan 20
sw1(config-if)#int fa1/15
sw1(config-if)#switchport mode trunk 将接口变为中继口
sw1(config-if)#int fa1/4
sw1(config-if)#switchport mode trunk 将接口变为中继口
sw2:
sw2#conft
sw2(config)#no ip routing 关闭路由功能
sw2(config-vlan)#vlan 10,20,30 建立vlan10,20,30
sw2(config-vlan)#int fa1/2
sw2(config-if)#switchport access vlan 30 将接口加入VLAN中
sw2(config-if)#int fa1/3
sw2(config-if)#switchport access vlan 10
sw2(config-if)#int fa1/15
sw2(config-if)#switchport mode trunk 将接口变为中继口
3. 实验验证结果


免责声明:本站发布的内容(图片、视频和文字)以原创、转载和分享为主,文章观点不代表本网站立场,如果涉及侵权请联系站长邮箱:is@yisu.com进行举报,并提供相关证据,一经查实,将立刻删除涉嫌侵权内容。