您好,登录后才能下订单哦!
密码登录
登录注册
点击 登录注册 即表示同意《亿速云用户服务条款》
这篇文章主要介绍“Python怎么实现截图生成符合markdown的链接”,在日常操作中,相信很多人在Python怎么实现截图生成符合markdown的链接问题上存在疑惑,小编查阅了各式资料,整理出简单好用的操作方法,希望对大家解答”Python怎么实现截图生成符合markdown的链接”的疑惑有所帮助!接下来,请跟着小编一起来学习吧!
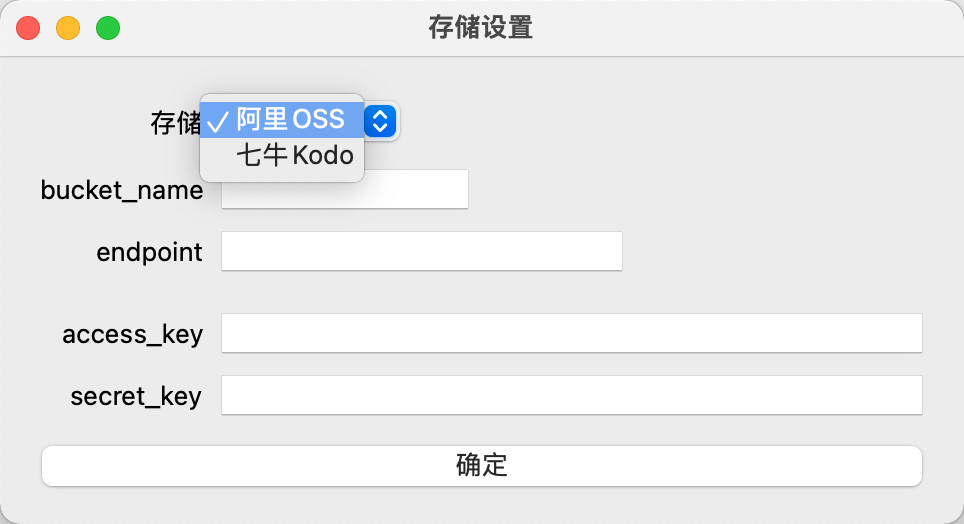
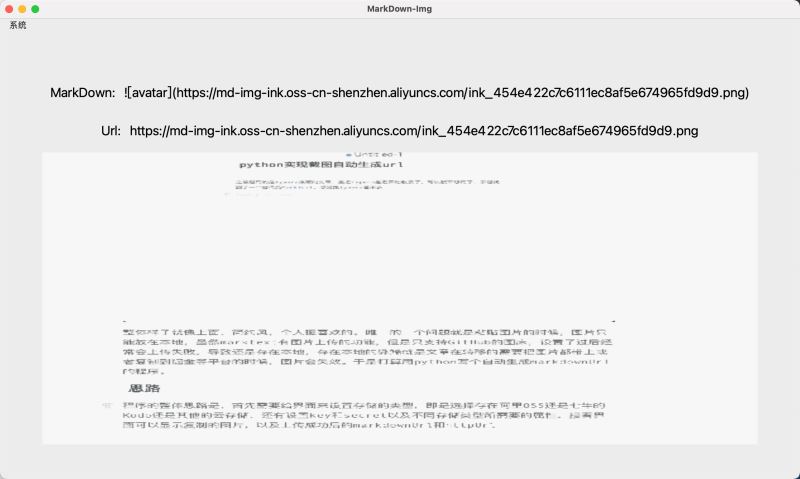
程序的整体思路是,首先需要给界面来设置存储的类型,即是选择存在阿里OSS还是七牛的Kodo还是其他的云存储,还有设置key和secret以及不同存储类型所需要的属性,接着界面可以显示复制的图片,以及上传成功后的markdownUrl和httpUrl,界面大体如下
子界面:
主界面:
程序整体选择用python来实现,因为之前用过QT,所以GUI的框架用的是pyqt5,数据库用的是sqlite3,还有阿里云和七牛的sdk等。
整个界面有一个主窗口和一个子窗口构成,主界面在初始化的同时初始化数据库
class ImgFrame(QMainWindow):
    def __init__(self):
        super().__init__()
        self.http_url = None
        self.markdown_url = None
        self.clipboard = None
        self.img = None
        # 初始化数据库
        self.db = init_db()
        self.init_ui()

    def init_ui(self):
        self.setGeometry(300, 300, 500, 500)
        self.setWindowTitle('MarkDown-Img')
        widget = QWidget()
        setupAction = QAction(QIcon('setup.png'), '设置', self)
        setupAction.setStatusTip('Exit application')
        setupAction.triggered.connect(self.a)
        menubar = QMenuBar(self)
        menubar.setGeometry(QtCore.QRect(0, 0, 251, 23))
        menubar.setObjectName("menubar")
        setup = menubar.addMenu('系统')

        setup.addAction(setupAction)
        menubar.setVisible(True)
        menubar.setNativeMenuBar(False)
        self.setMenuBar(menubar)
        self.img = QLabel()
        layout = QVBoxLayout()
        layout.addWidget(markdown_widget(self))
        layout.addWidget(url_widget(self))
        layout.addWidget(self.img)
        layout.setAlignment(Qt.AlignCenter)

        self.clipboard = QApplication.clipboard()
        self.clipboard.dataChanged.connect(self.paste)

        widget.setLayout(layout)
        self.setCentralWidget(widget)
        self.show()
def init_db():
connect = sqlite3.connect('markdown-img.db')
global conn
#全局变量conn
conn = connect
cursor = connect.cursor()
cursor.execute(sql)
#返回游标
return cursor子窗口的主要作用就是设置云存储所需要的各种字段,然后存储到数据库中
class secondFrame(QWidget):
    def __init__(self, db):
        super().__init__()
        # self.init_ui()
        self.db = db
        self.resize(400, 100)
        self.setWindowTitle('存储设置')

        formlayout = QFormLayout()
        storageLabel = QLabel("存储")
        self.storageBox = QComboBox()
        self.storageBox.addItems(['阿里OSS', '七牛Kodo'])

        self.endpointLabel = QLabel("endpoint")
        self.endpointLineEdit = QLineEdit("")
        self.endpointLineEdit.setStyleSheet("width:200px")

        self.qntLabel = QLabel("七牛域名")
        self.qnLineEdit = QLineEdit("")
        self.qnLineEdit.setStyleSheet("width:200px")

        keyLabel = QLabel("access_key")
        self.keyLineEdit = QLineEdit("")
        self.keyLineEdit.setStyleSheet("width:350px")

        secretLabel = QLabel("secret_key")

        self.secretLineEdit = QLineEdit()
        self.secretLineEdit.setStyleSheet("width:350px")
        self.secretLineEdit.setText('')

        bucketLabel = QLabel("bucket_name")
        self.bucketLineEdit = QLineEdit("")

        confirmButton = QPushButton("确定")

        formlayout.addRow(storageLabel, self.storageBox)
        formlayout.addRow(bucketLabel, self.bucketLineEdit)
        formlayout.addRow(self.endpointLabel, self.endpointLineEdit)
        formlayout.addRow(self.qntLabel, self.qnLineEdit)
        self.qntLabel.setVisible(False)
        self.qnLineEdit.setVisible(False)

        formlayout.addRow(keyLabel, self.keyLineEdit)
        formlayout.addRow(secretLabel, self.secretLineEdit)
        formlayout.addRow(confirmButton)

        self.storageBox.currentIndexChanged[int].connect(self.changeLabel)
        confirmButton.clicked.connect(self.confirm)

        self.setLayout(formlayout)
        self.setVisible(True)
子窗口是通过主窗口的菜单栏的设置菜单触发
    setupAction = QAction(QIcon('setup.png'), '设置', self)
    setupAction.setStatusTip('Exit application')
    setupAction.triggered.connect(self.openSecondFrame)
    def openSecondFrame(self):
        self.frame = secondFrame(self.db)
        self.frame.show()
监听剪贴板的功能通过pyqt中的clipboard来监听剪贴板的实现
    self.clipboard.dataChanged.connect(self.paste)
    def paste(self):
        data = self.clipboard.mimeData()
        if data.hasImage():
            print(data.formats())
            pixmap = self.clipboard.pixmap()
            height = pixmap.height()
            width = pixmap.width()
            if height > 300 and width > 300:
                self.img.setPixmap(shrink_img(pixmap))
            else:
                self.img.setPixmap(pixmap)
            fileName = 'ink_' + ''.join(str(uuid.uuid1()).split('-')) + '.png'
            self.clipboard.pixmap().save(fileName, 'PNG')
            urls = generate_url(self.upload(fileName))
            print(urls)
            self.img.setScaledContents(True)
            self.markdown_url.setText(urls['markdown_url'])
            self.http_url.setText(urls['http_url'])
            pyperclip.copy(urls['markdown_url'])
    def shrink_img(pixmap):
        scale = 0.3
        height = pixmap.height()
        width = pixmap.width()
        shrink_height = int(height * scale)
        shrink_width = int(width * scale)
        size = QSize(shrink_width, shrink_height)
        image = pixmap.toImage()
        return QPixmap.fromImage(image.scaled(size, Qt.IgnoreAspectRatio))
def upload(self, filename):
type, storage = self.get_storage_data()
if type == '阿里OSS':
url = upload2ali(storage, filename)
return url
def get_storage_data(self):
self.db.execute(select_sql)
data = self.db.fetchone()
bucket_name = data[1]
extra = data[2]
key = data[3]
secret = data[4]
if data[0] == '阿里OSS':
bucket = init_ali(bucket_name, extra, key, secret)
return '阿里OSS', {'bucket': bucket, 'bucket_name': bucket_name, 'extra': extra}当图片上传成功后,默认会生成markdown的图片url,然后将这个url设置到剪贴板中,然后在marktext中只需要粘贴就能贴上图床的图片,因为pyqt为了防止死循环,不允许通过剪贴板设置内容,所以我们可以通过pyperclip来设置剪贴板
pyperclip.copy(urls['markdown_url'])
到此,关于“Python怎么实现截图生成符合markdown的链接”的学习就结束了,希望能够解决大家的疑惑。理论与实践的搭配能更好的帮助大家学习,快去试试吧!若想继续学习更多相关知识,请继续关注亿速云网站,小编会继续努力为大家带来更多实用的文章!
免责声明:本站发布的内容(图片、视频和文字)以原创、转载和分享为主,文章观点不代表本网站立场,如果涉及侵权请联系站长邮箱:is@yisu.com进行举报,并提供相关证据,一经查实,将立刻删除涉嫌侵权内容。