жӮЁеҘҪпјҢзҷ»еҪ•еҗҺжүҚиғҪдёӢи®ўеҚ•е“ҰпјҒ
еҜҶз Ғзҷ»еҪ•
зҷ»еҪ•жіЁеҶҢ
зӮ№еҮ» зҷ»еҪ•жіЁеҶҢ еҚіиЎЁзӨәеҗҢж„ҸгҖҠдәҝйҖҹдә‘з”ЁжҲ·жңҚеҠЎжқЎж¬ҫгҖӢ
иҝҷзҜҮж–Үз« з»ҷеӨ§е®¶еҲҶдә«зҡ„жҳҜжңүе…іSpringBootдёҺSpringCacheжҰӮеҝөжҳҜд»Җд№Ҳзҡ„еҶ…е®№гҖӮе°Ҹзј–и§үеҫ—жҢәе®һз”Ёзҡ„пјҢеӣ жӯӨеҲҶдә«з»ҷеӨ§е®¶еҒҡдёӘеҸӮиҖғпјҢдёҖиө·и·ҹйҡҸе°Ҹзј–иҝҮжқҘзңӢзңӢеҗ§гҖӮ
йҰ–е…ҲжҲ‘们зҹҘйҒ“jpa,jdbcиҝҷдәӣдёңиҘҝйғҪжҳҜдёҖдәӣ规иҢғпјҢжҜ”еҰӮjdbcпјҢиҰҒиҰҒиҝһжҺҘеҲ°ж•°жҚ®еә“пјҢйғҪжҳҜйңҖиҰҒз”ЁеҲ°ж•°жҚ®еә“иҝһжҺҘпјҢйў„еӨ„зҗҶпјҢз»“жһңйӣҶиҝҷдёүдёӘеҜ№иұЎпјҢж— и®әжҳҜиҝһжҺҘеҲ°mysqlиҝҳжҳҜoracleйғҪжҳҜйңҖиҰҒз”ЁеҲ°иҝҷдёӘдёүдёӘеҜ№иұЎзҡ„пјҢиҝҷжҳҜдёҖз§Қ规иҢғпјҢиҖҢSpringCacheжҳҜдёҖз§ҚдҪңдёәзј“еӯҳзҡ„规иҢғпјҢе…·дҪ“е®һзҺ°жңүredis,EhCaheзӯү
1.pom.xml
<?xml version="1.0" encoding="UTF-8"?>
<project xmlns="http://maven.apache.org/POM/4.0.0" xmlns:xsi="http://www.w3.org/2001/XMLSchema-instance"
         xsi:schemaLocation="http://maven.apache.org/POM/4.0.0 https://maven.apache.org/xsd/maven-4.0.0.xsd">
    <modelVersion>4.0.0</modelVersion>
    <parent>
        <groupId>org.springframework.boot</groupId>
        <artifactId>spring-boot-starter-parent</artifactId>
        <version>2.6.3</version>
        <relativePath/> <!-- lookup parent from repository -->
    </parent>
    <groupId>com.yl</groupId>
    <artifactId>cache_redis</artifactId>
    <version>0.0.1-SNAPSHOT</version>
    <name>cache_redis</name>
    <description>Demo project for Spring Boot</description>
    <properties>
        <java.version>11</java.version>
    </properties>
    <dependencies>
        <dependency>
            <groupId>org.springframework.boot</groupId>
            <artifactId>spring-boot-starter-cache</artifactId>
        </dependency>
            <artifactId>spring-boot-starter-data-redis</artifactId>
            <artifactId>spring-boot-starter-web</artifactId>

            <artifactId>spring-boot-starter-test</artifactId>
            <scope>test</scope>
    </dependencies>
    <build>
        <plugins>
            <plugin>
                <groupId>org.springframework.boot</groupId>
                <artifactId>spring-boot-maven-plugin</artifactId>
            </plugin>
        </plugins>
    </build>
</project>
2.application.properties
# redisзҡ„й…ҚзҪ® spring.redis.host=192.168.244.135 spring.redis.port=6379 spring.redis.password=root123
3.е®һдҪ“зұ»
package com.yl.cache_redis.domain;
import java.io.Serializable;
public class User implements Serializable {
    private Integer id;
    private String username;
    private String password;
    public Integer getId() {
        return id;
    }
    public void setId(Integer id) {
        this.id = id;
    }
    public String getUsername() {
        return username;
    }
    public void setUsername(String username) {
        this.username = username;
    }
    public String getPassword() {
        return password;
    }
    public void setPassword(String password) {
        this.password = password;
    }
    @Override
    public String toString() {
        return "User{" +
                "id=" + id +
                ", username='" + username + '\'' +
                ", password='" + password + '\'' +
                '}';
    }
}
4.service
package com.yl.cache_redis;
import com.yl.cache_redis.domain.User;
import org.springframework.cache.annotation.Cacheable;
import org.springframework.stereotype.Service;
@Service
public class UserService {
@Cacheable(cacheNames = "u1") //иҝҷдёӘжіЁи§ЈдҪңз”Ёе°ұжҳҜе°Ҷж–№жі•зҡ„иҝ”еӣһеҖјеӯҳеҲ°зј“еӯҳдёӯ
public User getUserById(Integer id) {
System.out.println("getUserById:" + id);
User user = new User();
user.setId(id);
user.setUsername("root");
user.setPassword("root");
return user;
}
}5.дё»зЁӢеәҸпјҢеҠ дёҠејҖеҗҜзј“еӯҳзҡ„жіЁи§Ј
package com.yl.cache_redis;
import org.springframework.boot.SpringApplication;
import org.springframework.boot.autoconfigure.SpringBootApplication;
import org.springframework.cache.annotation.EnableCaching;
@SpringBootApplication
@EnableCaching //ејҖеҗҜзј“еӯҳеҠҹиғҪ
public class CacheRedisApplication {
public static void main(String[] args) {
SpringApplication.run(CacheRedisApplication.class, args);
}
}6.жөӢиҜ•
6.1пјүuserserviceжІЎеҠ @CacheableжіЁи§Јж—¶
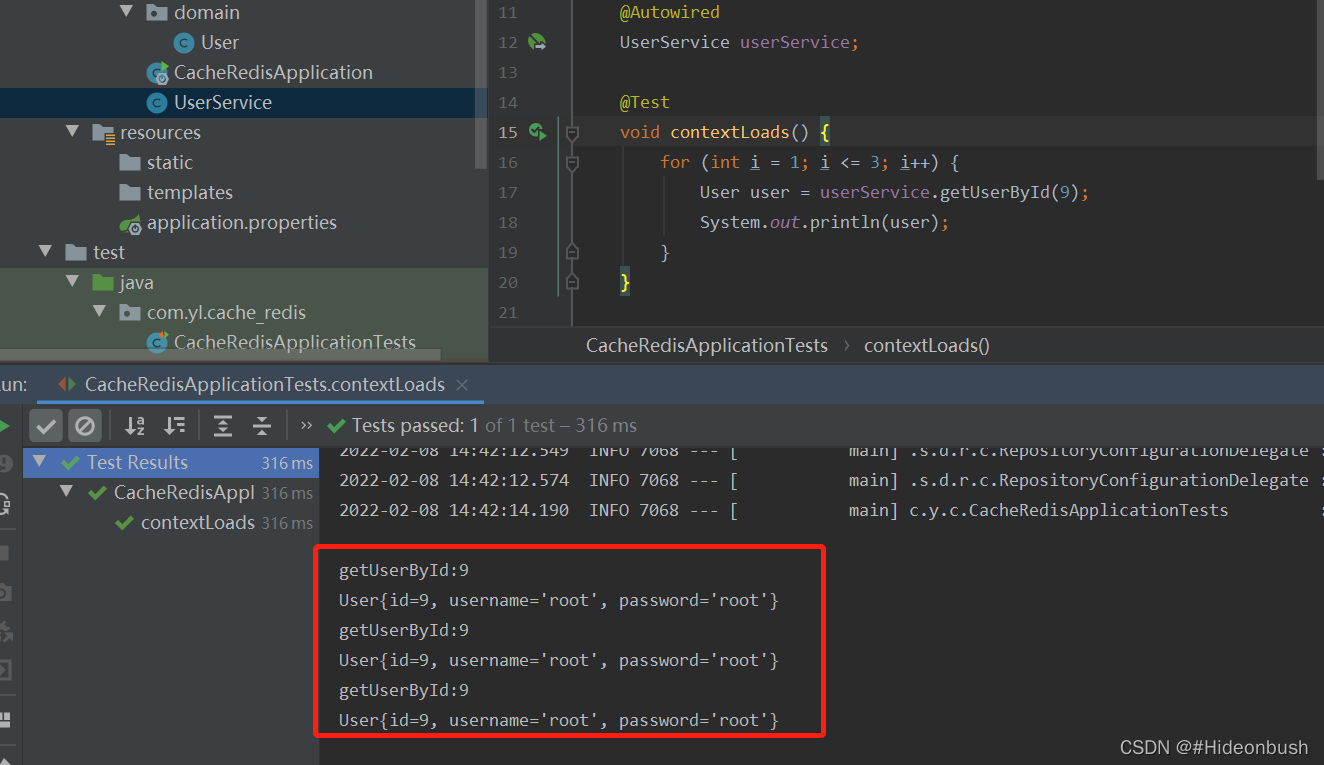
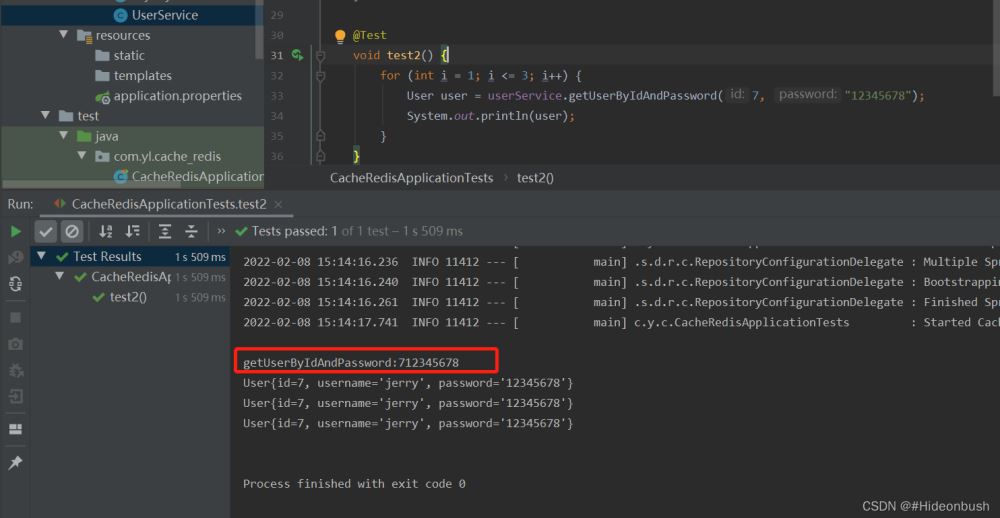
6.2пјүuserserviceеҠ @CacheableжіЁи§ЈеҗҺпјҢеҸ‘зҺ°seviceдёӯзҡ„ж–№жі•еҸӘи°ғз”ЁдәҶдёҖж¬Ў

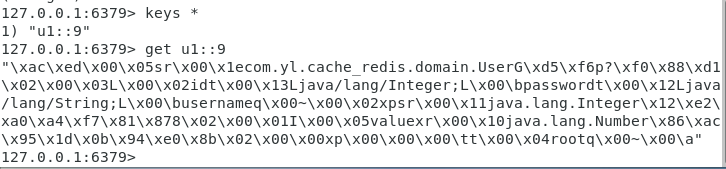
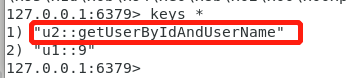
6.3пјүеңЁredisдёӯд№ҹеҸҜд»ҘзңӢеҲ°зј“еӯҳдёӯжңүж•°жҚ®пјҢkeyдёәе®ҡд№үеҘҪзҡ„cacheNames+::+ж–№жі•зҡ„еҸӮж•°
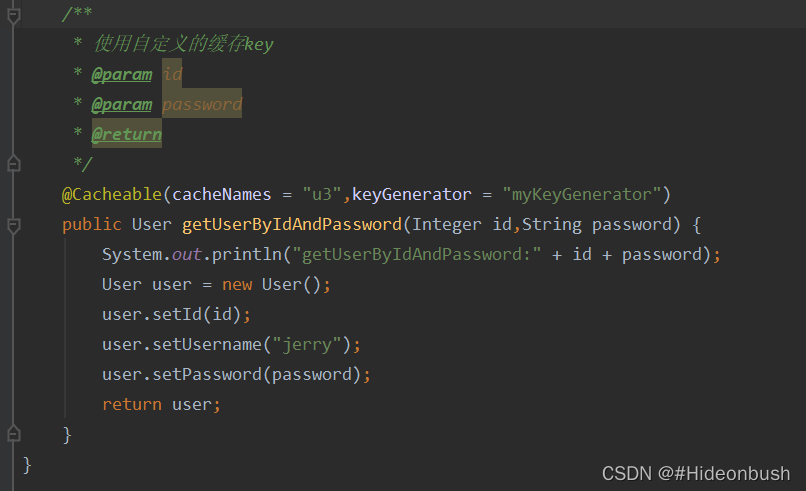
1.SpringCacheй»ҳи®ӨдҪҝз”ЁcacheNamesе’Ңж–№жі•дёӯзҡ„еҸӮж•°з»“еҗҲз»„жҲҗkeyзҡ„пјҢйӮЈд№ҲеҰӮжһңжңүеӨҡдёӘеҸӮж•°е‘ўпјҹе®ғеҸҲжҳҜеҰӮдҪ•з»„жҲҗkeyзҡ„е‘ўпјҹжҲ‘们еҸҜд»ҘжҢҮе®ҡkeyеҗ—пјҹ
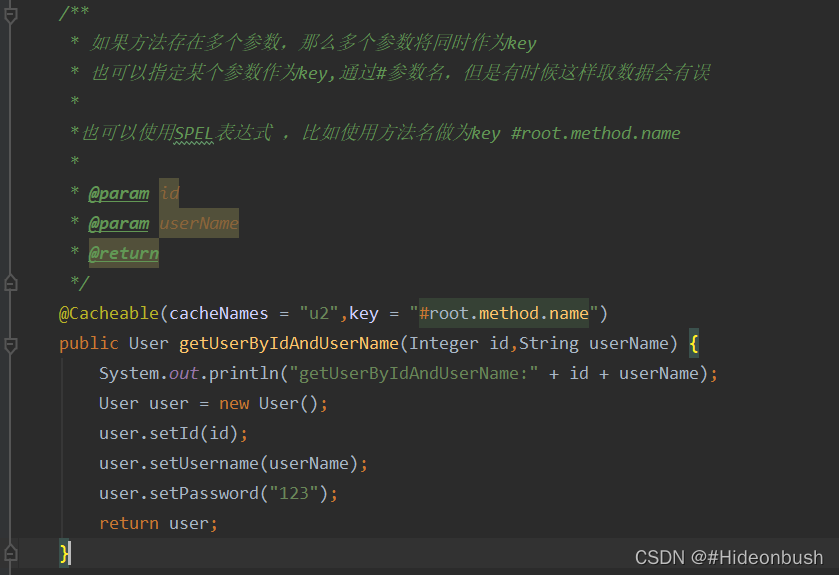
2.еҰӮдҪ•иҮӘе®ҡд№үkeyе‘ўпјҹ
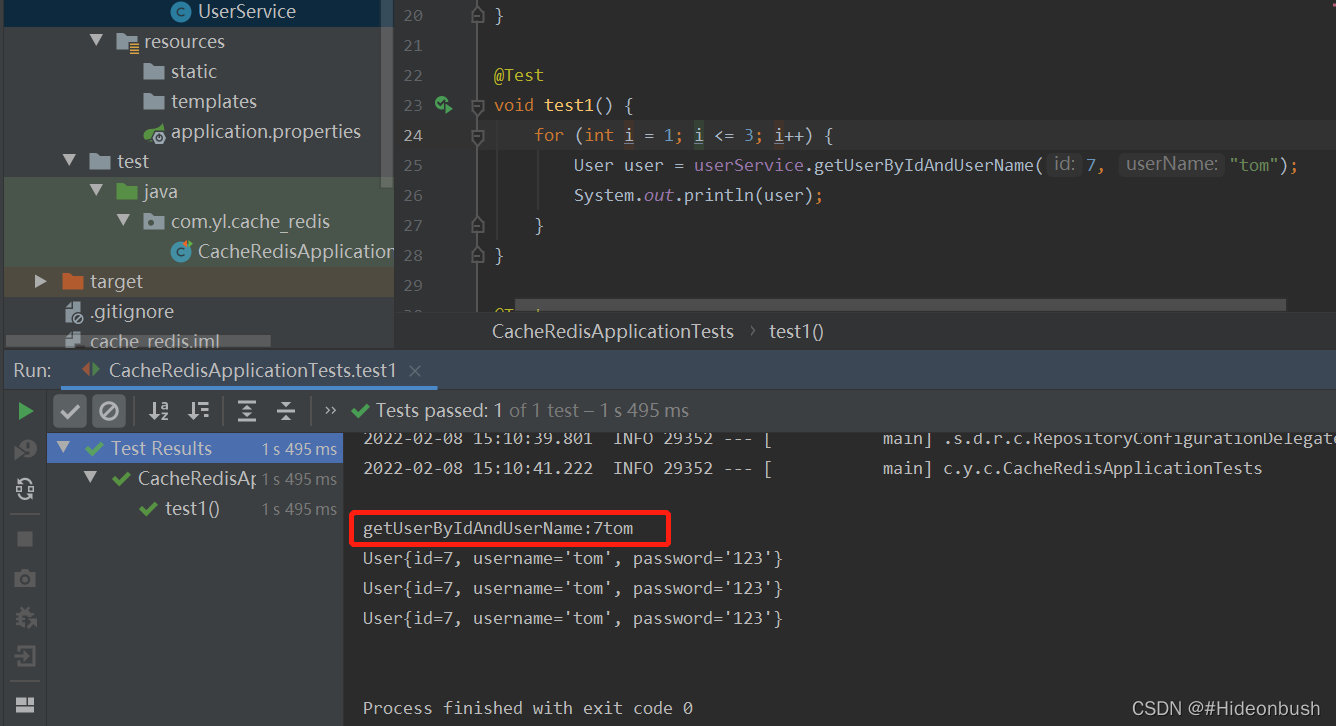
1пјүиҮӘе®ҡд№үkey
package com.yl.cache_redis;

import org.springframework.cache.interceptor.KeyGenerator;
import org.springframework.stereotype.Component;
import java.lang.reflect.Method;
import java.util.Arrays;
@Component
public class MyKeyGenerator implements KeyGenerator {
    @Override
    public Object generate(Object target, Method method, Object... params) {
        return target.toString() + ":" + method.getName() + ":" + Arrays.toString(params);
    }
}2пјүжөӢиҜ•

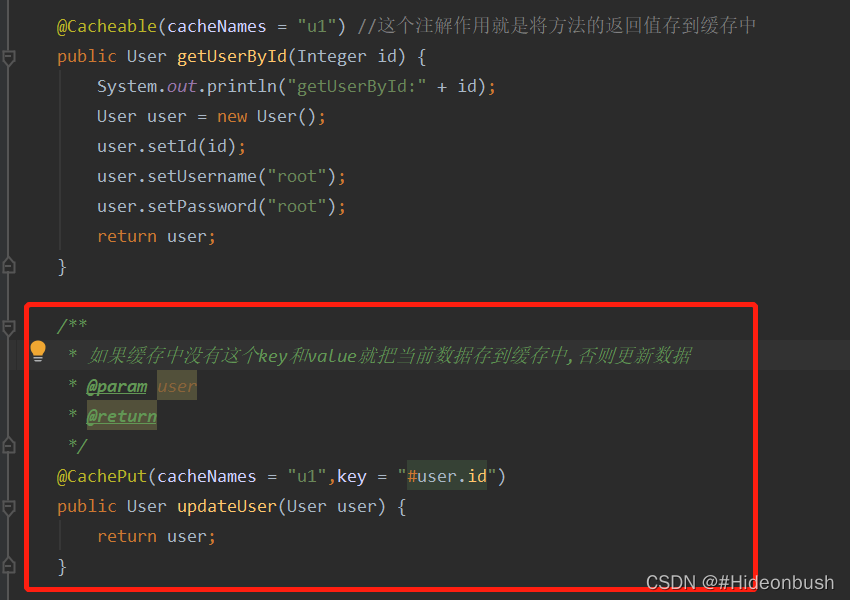
1.дҪҝз”Ё@CachePutжіЁи§ЈжқҘжӣҙж–°пјҢжіЁж„Ҹпјҡ@CachePutдёӯзҡ„keyиҰҒе’Ң@Cacheableдёӯзҡ„keyдёҖж ·пјҢеҗҰеҲҷжӣҙж–°дёҚдәҶпјҒ

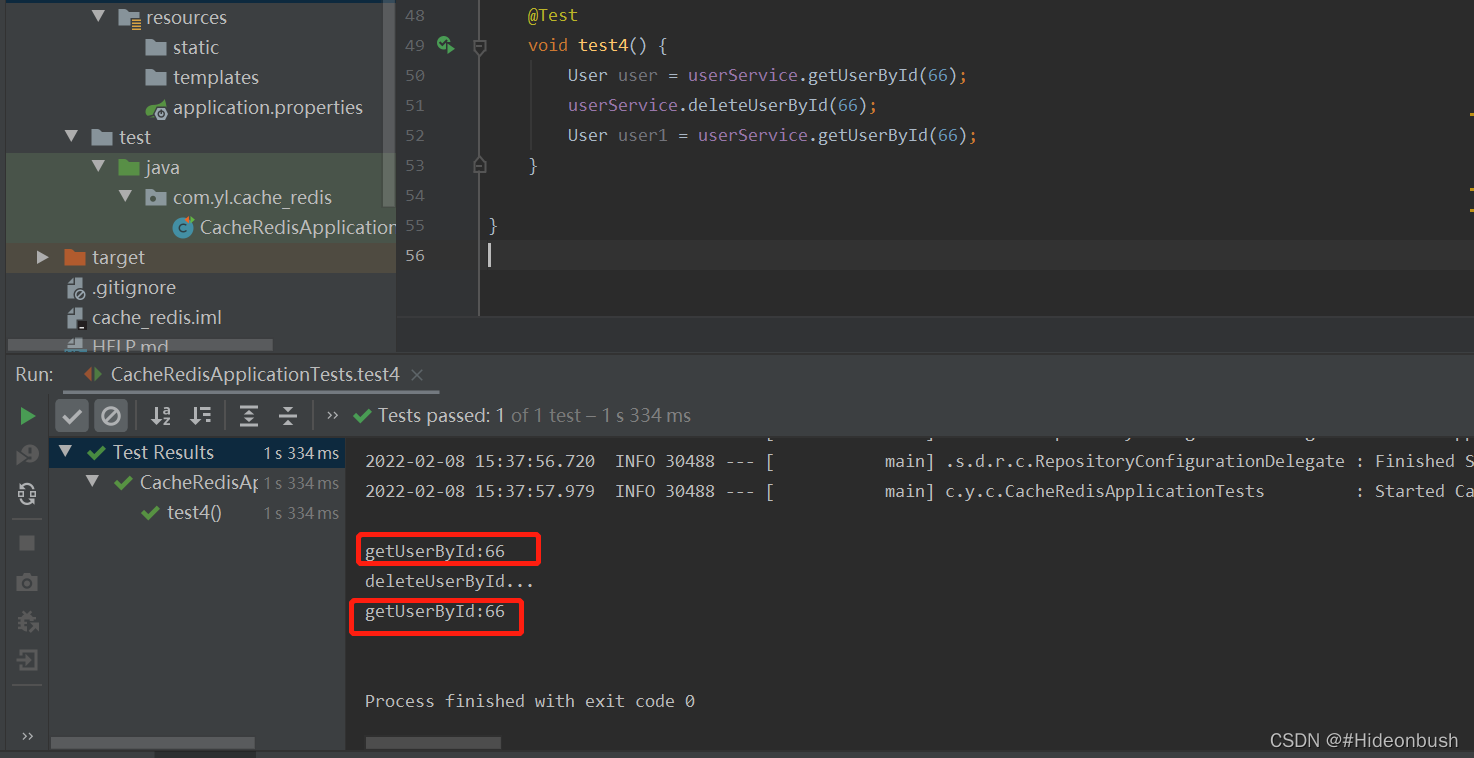
1.дҪҝз”Ё@CacheEvictжіЁи§ЈпјҢдё»иҰҒkeyе’ҢиҰҒ@Cacheableдёӯзҡ„keyдёҖиҮҙ
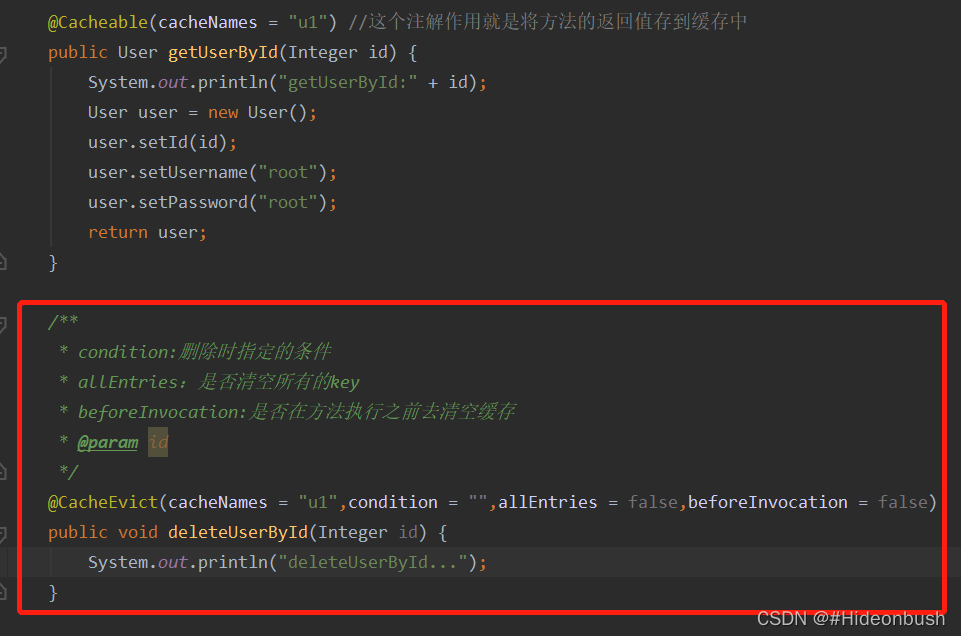
2.жөӢиҜ•
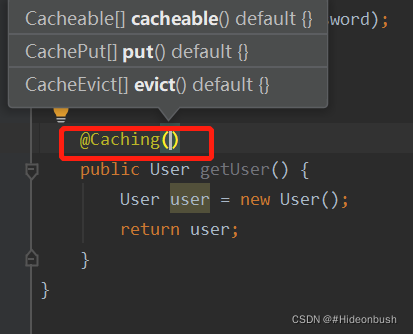
1.@CachingжіЁи§ЈпјҢеҸҜд»Ҙз»„еҗҲеӨҡдёӘжіЁи§Ј
2.@CacheConfigжіЁи§Ј

1.pom.xml
<?xml version="1.0" encoding="UTF-8"?>
<project xmlns="http://maven.apache.org/POM/4.0.0" xmlns:xsi="http://www.w3.org/2001/XMLSchema-instance"
         xsi:schemaLocation="http://maven.apache.org/POM/4.0.0 https://maven.apache.org/xsd/maven-4.0.0.xsd">
    <modelVersion>4.0.0</modelVersion>
    <parent>
        <groupId>org.springframework.boot</groupId>
        <artifactId>spring-boot-starter-parent</artifactId>
        <version>2.6.3</version>
        <relativePath/> <!-- lookup parent from repository -->
    </parent>
    <groupId>com.yl</groupId>
    <artifactId>ehcache</artifactId>
    <version>0.0.1-SNAPSHOT</version>
    <name>ehcache</name>
    <description>Demo project for Spring Boot</description>
    <properties>
        <java.version>11</java.version>
    </properties>
    <dependencies>
        <dependency>
            <groupId>org.springframework.boot</groupId>
            <artifactId>spring-boot-starter-cache</artifactId>
        </dependency>
            <artifactId>spring-boot-starter-web</artifactId>

            <artifactId>spring-boot-starter-test</artifactId>
            <scope>test</scope>
            <groupId>net.sf.ehcache</groupId>
            <artifactId>ehcache</artifactId>
            <version>2.10.6</version>
    </dependencies>
    <build>
        <plugins>
            <plugin>
                <groupId>org.springframework.boot</groupId>
                <artifactId>spring-boot-maven-plugin</artifactId>
            </plugin>
        </plugins>
    </build>
</project>
2.е®һдҪ“зұ»
package com.yl.ehcache.model;
import java.io.Serializable;
public class User implements Serializable {
    private Integer id;
    private String username;
    private String password;
    public Integer getId() {
        return id;
    }
    public void setId(Integer id) {
        this.id = id;
    }
    public String getUsername() {
        return username;
    }
    public void setUsername(String username) {
        this.username = username;
    }
    public String getPassword() {
        return password;
    }
    public void setPassword(String password) {
        this.password = password;
    }
    @Override
    public String toString() {
        return "User{" +
                "id=" + id +
                ", username='" + username + '\'' +
                ", password='" + password + '\'' +
                '}';
    }
}
3.service
package com.yl.ehcache.service;

import com.yl.ehcache.model.User;
import org.springframework.cache.annotation.CacheEvict;
import org.springframework.cache.annotation.Cacheable;
import org.springframework.stereotype.Service;
@Service
public class UserService {
    @Cacheable(cacheNames = "user")
    public User getUserById(Integer id) {
        System.out.println("getUserById()...");
        User user = new User();
        user.setId(id);
        user.setUsername("root");
        user.setPassword("root");
        return user;
    }
    @CacheEvict(cacheNames = "user")
    public void delete(Integer id) {
        System.out.println("delete");
}4.дё»зЁӢеәҸ
package com.yl.ehcache;

import org.springframework.boot.SpringApplication;
import org.springframework.boot.autoconfigure.SpringBootApplication;
import org.springframework.cache.annotation.EnableCaching;
@SpringBootApplication
@EnableCaching
public class EhcacheApplication {
    public static void main(String[] args) {
        SpringApplication.run(EhcacheApplication.class, args);
    }
}
5.ehcache.xml
<ehcache>
    <diskStore path="java.io.tmpdir/shiro-spring-sample"/>
    <defaultCache
            maxElementsInMemory = "1000"
            eternal = "false"
            timeToIdleSeconds = "120"
            timeToLiveSeconds = "120"
            overflowToDisk = "false"
            diskPersistent = "false"
            diskExpiryThreadIntervalSeconds = "120"/>
    <cache name = "user"
           maxElementsInMemory = "1000"
           eternal = "false"
           overflowToDisk = "true"
           diskPersistent = "true"
           diskExpiryThreadIntervalSeconds = "600"/>
</ehcache>
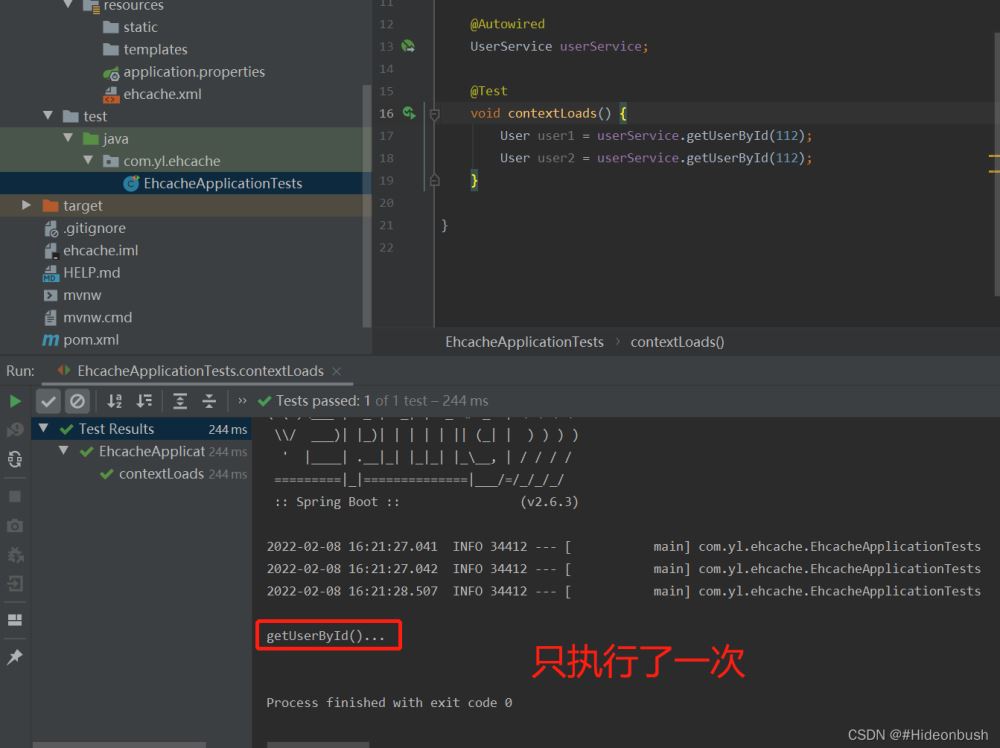
6.жөӢиҜ•
ж„ҹи°ўеҗ„дҪҚзҡ„йҳ…иҜ»пјҒе…ідәҺвҖңSpringBootдёҺSpringCacheжҰӮеҝөжҳҜд»Җд№ҲвҖқиҝҷзҜҮж–Үз« е°ұеҲҶдә«еҲ°иҝҷйҮҢдәҶпјҢеёҢжңӣд»ҘдёҠеҶ…е®№еҸҜд»ҘеҜ№еӨ§е®¶жңүдёҖе®ҡзҡ„её®еҠ©пјҢи®©еӨ§е®¶еҸҜд»ҘеӯҰеҲ°жӣҙеӨҡзҹҘиҜҶпјҢеҰӮжһңи§үеҫ—ж–Үз« дёҚй”ҷпјҢеҸҜд»ҘжҠҠе®ғеҲҶдә«еҮәеҺ»и®©жӣҙеӨҡзҡ„дәәзңӢеҲ°еҗ§пјҒ
е…ҚиҙЈеЈ°жҳҺпјҡжң¬з«ҷеҸ‘еёғзҡ„еҶ…е®№пјҲеӣҫзүҮгҖҒи§Ҷйў‘е’Ңж–Үеӯ—пјүд»ҘеҺҹеҲӣгҖҒиҪ¬иҪҪе’ҢеҲҶдә«дёәдё»пјҢж–Үз« и§ӮзӮ№дёҚд»ЈиЎЁжң¬зҪ‘з«ҷз«ӢеңәпјҢеҰӮжһңж¶үеҸҠдҫөжқғиҜ·иҒ”зі»з«ҷй•ҝйӮ®з®ұпјҡis@yisu.comиҝӣиЎҢдёҫжҠҘпјҢ并жҸҗдҫӣзӣёе…іиҜҒжҚ®пјҢдёҖз»ҸжҹҘе®һпјҢе°Ҷз«ӢеҲ»еҲ йҷӨж¶үе«ҢдҫөжқғеҶ…е®№гҖӮ
жӮЁеҘҪпјҢзҷ»еҪ•еҗҺжүҚиғҪдёӢи®ўеҚ•е“ҰпјҒ