жӮЁеҘҪпјҢзҷ»еҪ•еҗҺжүҚиғҪдёӢи®ўеҚ•е“ҰпјҒ
иҝҷзҜҮж–Үз« е°ҶдёәеӨ§е®¶иҜҰз»Ҷи®Іи§Јжңүе…іpythonжҖҺд№Ҳз”Ёplotlyе®һзҺ°з»ҳеҲ¶еұҖйғЁж”ҫеӨ§еӣҫпјҢе°Ҹзј–и§үеҫ—жҢәе®һз”Ёзҡ„пјҢеӣ жӯӨеҲҶдә«з»ҷеӨ§е®¶еҒҡдёӘеҸӮиҖғпјҢеёҢжңӣеӨ§е®¶йҳ…иҜ»е®ҢиҝҷзҜҮж–Үз« еҗҺеҸҜд»ҘжңүжүҖ收иҺ·гҖӮ

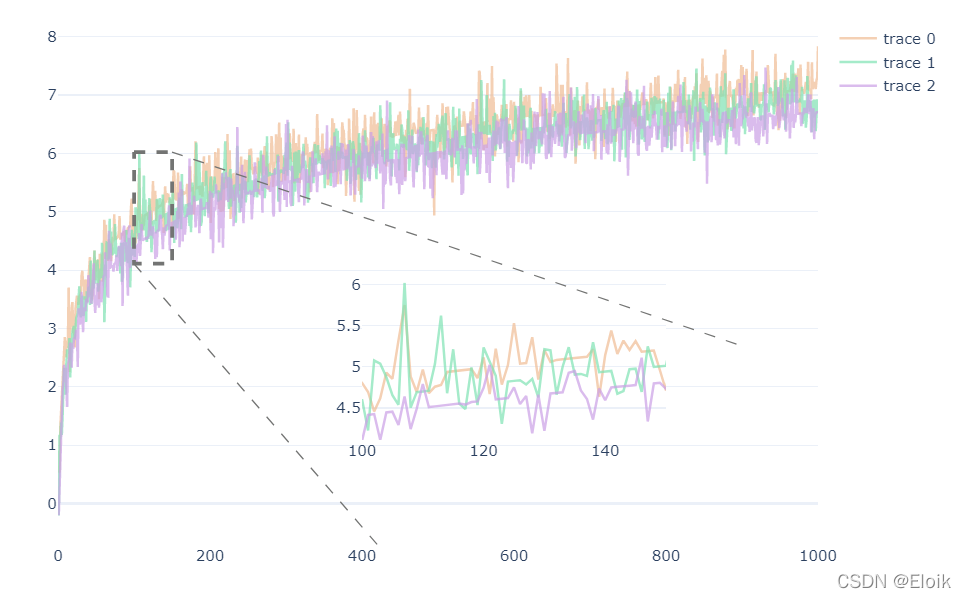
еңЁз»ҳеӣҫеҢәеҹҹжҸ’е…ҘдёҖдёӘеөҢе…ҘеӣҫпјҢеөҢе…ҘеӣҫдёҺеҺҹеӣҫзҡ„з»ҳз”»дҝқжҢҒдёҖиҮҙпјҢйҖҡиҝҮйҷҗеҲ¶еөҢе…Ҙеӣҫзҡ„xиҪҙе’ҢyиҪҙзҡ„жҳҫзӨәиҢғеӣҙпјҢиҫҫеҲ°зј©ж”ҫзҡ„ж•ҲжһңпјҢ并еңЁеҺҹеӣҫдёҠз»ҳз”»дёҖдёӘзҹ©еҪўжЎҶпјҢд»ҘеҮёжҳҫзј©ж”ҫзҡ„еҢәеҹҹпјҢжңҖеҗҺйҖҡиҝҮдёӨжқЎзӣҙзәҝеҮёжҳҫзј©ж”ҫе…ізі»гҖӮ
import plotly.io as pio import plotly.graph_objects as go import pandas as pd import numpy as np # и®ҫзҪ®plotlyй»ҳи®Өдё»йўҳпјҢзҷҪиүІдё»йўҳ pio.templates.default = 'plotly_white'
# xеқҗж Ү x = np.arange(1, 1001) # з”ҹжҲҗyиҪҙж•°жҚ®пјҢ并添еҠ йҡҸжңәжіўеҠЁ y1 = np.log(x) indexs = np.random.randint(0, 1000, 800) for index in indexs: y1[index] += np.random.rand() - 0.5 y1 = y1 + 0.2 y2 = np.log(x) indexs = np.random.randint(0, 1000, 800) for index in indexs: y2[index] += np.random.rand() - 0.5 y3 = np.log(x) indexs = np.random.randint(0, 1000, 800) for index in indexs: y3[index] += np.random.rand() - 0.5 y3 = y3 - 0.2
class LocalZoomPlot:
def __init__(self, x, y, colors, x_range, scale=0.):
"""
:param x: xиҪҙеқҗж ҮпјҢеҲ—иЎЁзұ»еһӢ
:param y: yиҪҙеқҗж ҮпјҢдәҢз»ҙеҲ—иЎЁзұ»еһӢпјҢдҫӢеҰӮ [y1, y2, y3]
:param colors: жҜҸдёӘжӣІзәҝзҡ„йўңиүІпјҢеҝ…йЎ»дёҺ len(y) зӣёзӯү
:param x_range: йңҖиҰҒзј©ж”ҫеҢәеҹҹзҡ„xиҪҙиҢғеӣҙ
:param scale: иҜҰи§Ғ getRangeMinMaxValue еҮҪж•°
"""
self.x = x
self.y = y
self.colors = colors
self.x_range = x_range
self.y_range = self.getRangeMinMaxValue(x_range, scale)
def getRangeMinMaxValue(self, x_range, scale=0.):
"""
иҺ·еҸ–жҢҮе®ҡxиҪҙиҢғеӣҙеҶ…пјҢжүҖжңүyж•°жҚ®зҡ„жңҖеӨ§еҖје’ҢжңҖе°ҸеҖј
:param x_range: жңҹжңӣеұҖйғЁж”ҫеӨ§зҡ„xиҪҙиҢғеӣҙ
:param scale: е°ҶжңҖеӨ§еҖје’ҢжңҖе°ҸеҖјеҗ‘дёӨдҫ§е»¶дјёдёҖе®ҡи·қзҰ»
"""
min_value = np.min([np.min(arr[x_range[0]:x_range[1]]) for arr in self.y])
max_value = np.max([np.max(arr[x_range[0]:x_range[1]]) for arr in self.y])
# жҢүдёҖе®ҡжҜ”дҫӢзј©ж”ҫ
min_value = min_value - (max_value - min_value) * scale
max_value = max_value + (max_value - min_value) * scale
# иҝ”еӣһзј©ж”ҫеҗҺзҡ„з»“жһң
return min_value, max_value
def originPlot(self, fig, **kwargs):
"""
ж №жҚ® y ж•°жҚ®з»ҳеҲ¶еҲқе§ӢжҠҳзәҝеӣҫ
:param fig: go.Figureе®һдҫӢ
"""
fig.add_traces([
go.Scatter(x=self.x, y=arr, opacity=0.7, marker_color=self.colors[i], **kwargs)
for i, arr in enumerate(self.y)
])
return fig
def insetPlot(self, fig, inset_axes):
"""
еңЁеҺҹе§ӢеӣҫеғҸдёҠжҸ’е…ҘеөҢе…Ҙеӣҫ
:param fig: go.FigureеҜ№иұЎе®һдҫӢ
:param inset_axes: еөҢе…Ҙеӣҫзҡ„дҪҚзҪ®е’ҢеӨ§е°Ҹ [е·ҰдёӢи§’зҡ„xиҪҙдҪҚзҪ®, е·ҰдёӢи§’зҡ„yиҪҙдҪҚзҪ®, е®ҪеәҰ, й«ҳеәҰ]
жүҖжңүеқҗж ҮйғҪжҳҜз»қеҜ№еқҗж Ү(0~1д№Ӣй—ҙ)
"""
# дҪҝз”ЁеҲӣе»әеӯҗеӣҫдёӯзҡ„еөҢе…ҘеӣҫеҸӮж•°пјҢеҲӣе»әдёҖдёӘеөҢе…Ҙеӣҫ
fig = fig.set_subplots(insets=[dict(
type='xy',
l=inset_axes[0], b=inset_axes[1],
w=inset_axes[2], h=inset_axes[3],
)])
# еөҢе…ҘеӣҫдёҺеҺҹе§Ӣеӣҫзҡ„з»ҳз”»дёҖиҮҙпјҢйңҖиҰҒжҢҮе®ҡ xaxis е’Ң yaxis еҸӮж•°зЎ®дҝқжҳҜеңЁеөҢе…ҘеӣҫдёҠз»ҳз”»зҡ„
fig = self.originPlot(fig, xaxis='x2', yaxis='y2', showlegend=False)
# е°ҶеөҢе…Ҙеӣҫзҡ„еқҗж ҮиҪҙиҢғеӣҙйҷҗе®ҡеңЁжҢҮе®ҡиҢғеӣҙ
fig.update_layout(
xaxis2=dict(range=self.x_range),
yaxis2=dict(range=self.y_range)
)
return fig
def rectOriginArea(self, fig):
"""
е°Ҷж”ҫеӨ§зҡ„еҢәеҹҹжЎҶиө·жқҘ
:param fig: go.Figureе®һдҫӢ
"""
fig.add_trace(go.Scatter(
# д»Һе·ҰдёҠи§’ејҖе§ӢпјҢйЎәж—¶й’Ҳиҝһзәҝ
x=np.array(self.x_range)[[0, 1, 1, 0, 0]],
y=np.array(self.y_range)[[1, 1, 0, 0, 1]],
mode='lines',
line={'color': '#737473', 'dash': 'dash', 'width': 3},
showlegend=False
))
return fig
def addConnectLine(self, fig, area_point_num, point):
"""
д»Һж”ҫеӨ§еҢәеҹҹжҢҮе®ҡзӮ№иҝһзәҝ
:param fig: go.Figureе®һдҫӢ
:param area_point_num: ж”ҫеӨ§еҢәеҹҹзҡ„й”ҡзӮ№пјҢдҫӢеҰӮпјҡ(0, 0)иЎЁзӨәж”ҫеӨ§еҢәеҹҹзҡ„е·ҰдёӢи§’еқҗж ҮпјҢ(0, 1)иЎЁзӨәе·ҰдёҠи§’еқҗж ҮпјҢ
(1, 0)иЎЁзӨәеҸідёӢи§’еқҗж ҮпјҢ(1, 1)иЎЁзӨәеҸідёҠи§’еқҗж ҮпјҢеҸӘиғҪеҸ–иҝҷеӣӣз§Қжғ…еҶө
:param point: иҰҒиҝӣиЎҢиҝһзәҝзҡ„еҸҰдёҖдёӘзӮ№пјҢйҖҡеёёдҪҚдәҺеөҢе…Ҙеӣҫйҷ„иҝ‘пјҢж №жҚ®зҫҺи§ӮзЁӢеәҰиҮӘиЎҢжҢҮе®ҡ
"""
fig.add_shape(type='line',
x0=self.x_range[area_point_num[0]],
y0=self.y_range[area_point_num[1]],
x1=point[0], y1=point[1],
line={'color': '#737473', 'dash': 'dash', 'width': 1},
)
return figplot = LocalZoomPlot(x, [y1, y2, y3], ['#f0bc94', '#7fe2b3', '#cba0e6'], (100, 150), 0.) fig = go.Figure() fig = plot.originPlot(fig) fig = plot.insetPlot(fig, (0.4, 0.2, 0.4, 0.3)) fig = plot.rectOriginArea(fig) fig = plot.addConnectLine(fig, (0, 0), (420, -0.7)) fig = plot.addConnectLine(fig, (1, 1), (900, 2.7)) # йўқеӨ–еҜ№еӣҫзүҮиҝӣиЎҢи®ҫзҪ® fig.update_layout( width=800, height=600, xaxis=dict( rangemode='tozero', showgrid=False, zeroline=False, ), xaxis2=dict( showgrid=False, zeroline=False ), ) fig.show()
е…ідәҺвҖңpythonжҖҺд№Ҳз”Ёplotlyе®һзҺ°з»ҳеҲ¶еұҖйғЁж”ҫеӨ§еӣҫвҖқиҝҷзҜҮж–Үз« е°ұеҲҶдә«еҲ°иҝҷйҮҢдәҶпјҢеёҢжңӣд»ҘдёҠеҶ…е®№еҸҜд»ҘеҜ№еӨ§е®¶жңүдёҖе®ҡзҡ„её®еҠ©пјҢдҪҝеҗ„дҪҚеҸҜд»ҘеӯҰеҲ°жӣҙеӨҡзҹҘиҜҶпјҢеҰӮжһңи§үеҫ—ж–Үз« дёҚй”ҷпјҢиҜ·жҠҠе®ғеҲҶдә«еҮәеҺ»и®©жӣҙеӨҡзҡ„дәәзңӢеҲ°гҖӮ
е…ҚиҙЈеЈ°жҳҺпјҡжң¬з«ҷеҸ‘еёғзҡ„еҶ…е®№пјҲеӣҫзүҮгҖҒи§Ҷйў‘е’Ңж–Үеӯ—пјүд»ҘеҺҹеҲӣгҖҒиҪ¬иҪҪе’ҢеҲҶдә«дёәдё»пјҢж–Үз« и§ӮзӮ№дёҚд»ЈиЎЁжң¬зҪ‘з«ҷз«ӢеңәпјҢеҰӮжһңж¶үеҸҠдҫөжқғиҜ·иҒ”зі»з«ҷй•ҝйӮ®з®ұпјҡis@yisu.comиҝӣиЎҢдёҫжҠҘпјҢ并жҸҗдҫӣзӣёе…іиҜҒжҚ®пјҢдёҖз»ҸжҹҘе®һпјҢе°Ҷз«ӢеҲ»еҲ йҷӨж¶үе«ҢдҫөжқғеҶ…е®№гҖӮ
жӮЁеҘҪпјҢзҷ»еҪ•еҗҺжүҚиғҪдёӢи®ўеҚ•е“ҰпјҒ