您好,登录后才能下订单哦!
这篇文章给大家分享的是有关Python函数式编程装饰器的示例分析的内容。小编觉得挺实用的,因此分享给大家做个参考,一起跟随小编过来看看吧。
装饰器(decorator)本质是函数闭包(function closure)的语法糖(Syntactic sugar)
函数闭包是函数式语言(函数是一等公民,可作为变量使用)中的术语。函数闭包:一个函数,其参数和返回值都是函数,用于增强函数功能,面向切面编程(AOP)
import time
# 控制台打印100以内的奇数:
def print_odd():
    for i in range(100):
        if i % 2 == 1:
            print(i)
# 函数闭包:用于增强函数func:给函数func增加统计时间的功能:
def count_time_wrapper(func):
    def improved_func():
        start_time = time.time()
        func()
        end_time = time.time()
        print(f"It takes {end_time - start_time} S to find all the odds in range !!!")
    return improved_func
if __name__ == '__main__':
    # 调用count_time_wrapper增强函数
    print_odd = count_time_wrapper(print_odd)
    print_odd()
闭包本质上是一个函数,闭包函数的传入参数和返回值都是函数,闭包函数得到返回值函数是对传入函数增强后的结果。
日志装饰器:
def log_wrapper(func):
    """
    闭包,用于增强函数func: 给func增加日志功能
    """
    def improved_func():
        start_time = time.strftime('%Y-%m-%d %H:%M:%S', time.localtime(time.time()))  # 起始时间
        func()  # 执行函数
        end_time = time.strftime('%Y-%m-%d %H:%M:%S', time.localtime(time.time()))  # 结束时间
        print("Logging: func:{} runs from {} to {}".format(func.__name__, start_time, end_time))
return improved_func通过装饰器进行函数增强,只是一种语法糖,本质上跟上个程序(使用函数闭包)完全一致。

import time
# 函数闭包:用于增强函数func:给函数func增加统计时间的功能:
def count_time_wrapper(func):
    def improved_func():
        start_time = time.time()
        func()
        end_time = time.time()
        print(f"It takes {end_time - start_time} S to find all the odds in range !!!")
    return improved_func
# 控制台打印100以内的奇数:
@count_time_wrapper  # 添加装饰器
def print_odd():
    for i in range(100):
        if i % 2 == 1:
            print(i)
if __name__ == '__main__':
    # 使用  @装饰器(增强函数名) 给当前函数添加装饰器,等价于执行了下面这条语句:
    # print_odd = count_time_wrapper(print_odd)
print_odd()装饰器在第一次调用被装饰函数时进行增强,只增强一次,下次调用仍然是调用增强后的函数,不会重复执行增强!
之前所写的函数闭包,在增强主要功能函数时,没有保留原主要功能函数的参数列表和返回值。
一个保留参数列表和返回值的函数闭包写法:
def general_wrapper(func):
    def improved_func(*args, **kwargs):
        # 增强函数功能:
        ret = func(*args, **kwargs)
        # 增强函数功能:
        return ret
    return improved_func
优化装饰器(参数传递、设置返回值):
import time
# 函数闭包:用于增强函数func:给函数func增加统计时间的功能:
def count_time_wrapper(func):
    # 增强函数:
    def improved_func(*args, **kwargs):
        start_time = time.time()
        result = func(*args, **kwargs)
        end_time = time.time()
        print(f"It takes {end_time - start_time} S to find all the odds in range !!!")
        # 原函数返回值
        return result
    return improved_func
# 计算0-lim奇数之和:
@count_time_wrapper
def count_odds(lim):
    cnt = 0
    for i in range(lim):
        if i % 2 == 1:
            cnt = cnt + i
    return cnt
if __name__ == '__main__':
    result = count_odds(10000000)
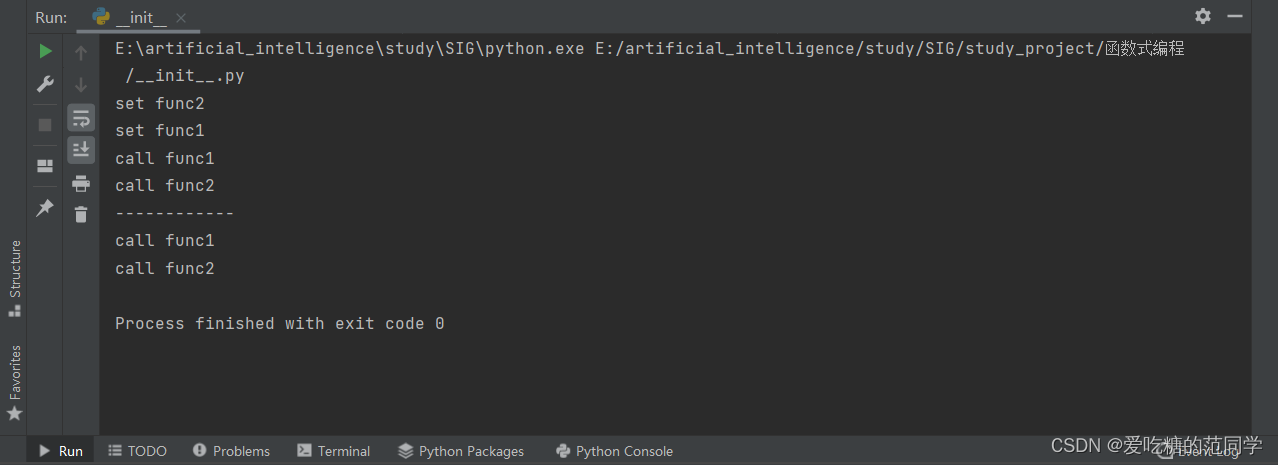
print(f"计算结果为{result}!")# 装饰器1:
def wrapper1(func1):
print("set func1") # 在wrapper1装饰函数时输出
def improved_func1(*args, **kwargs):
print("call func1") # 在wrapper1装饰过的函数被调用时输出
func1(*args, **kwargs)
return None
return improved_func1
# 装饰器2:
def wrapper2(func2):
print("set func2") # 在wrapper2装饰函数时输出
def improved_func2(*args, **kwargs):
print("call func1") # 在wrapper2装饰过的函数被调用时输出
func2(*args, **kwargs)
return None
return improved_func2
@wrapper1
@wrapper2
def original_func():
    pass
if __name__ == '__main__':
original_func()
print("------------")
original_func()
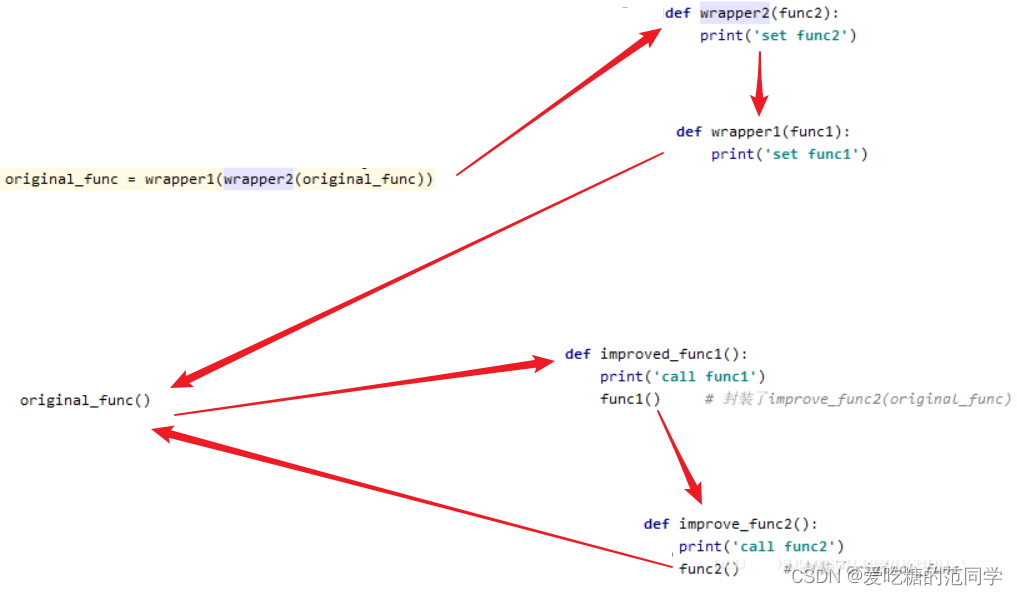
这里得到的执行结果是,wrapper2装饰器先执行,原因是因为:程序从上往下执行,当运行到:
@wrapper1 @wrapper2 def original_func(): pass
这段代码时,使用函数闭包的方式解析为:
original_func = wrapper1(wrapper2(original_func))
所以先进行wrapper2装饰,然后再对被wrapper2装饰完成的增强函数再由wrapper1进行装饰,返回最终的增强函数。

装饰器允许传入参数,一个携带了参数的装饰器将有三层函数,如下所示:
import functools
def log_with_param(text):
    def decorator(func):
        @functools.wraps(func)
        def wrapper(*args, **kwargs):
            print('call %s():' % func.__name__)
            print('args = {}'.format(*args))
            print('log_param = {}'.format(text))
            return func(*args, **kwargs)
        return wrapper
    return decorator
@log_with_param("param!!!")
def test_with_param(p):
    print(test_with_param.__name__)
if __name__ == '__main__':
    test_with_param("test")
将其 @语法 去除,恢复函数调用的形式:
# 传入装饰器的参数,并接收返回的decorator函数
decorator = log_with_param("param!!!")
# 传入test_with_param函数
wrapper = decorator(test_with_param)
# 调用装饰器函数
wrapper("I'm a param")
感谢各位的阅读!关于“Python函数式编程装饰器的示例分析”这篇文章就分享到这里了,希望以上内容可以对大家有一定的帮助,让大家可以学到更多知识,如果觉得文章不错,可以把它分享出去让更多的人看到吧!
免责声明:本站发布的内容(图片、视频和文字)以原创、转载和分享为主,文章观点不代表本网站立场,如果涉及侵权请联系站长邮箱:is@yisu.com进行举报,并提供相关证据,一经查实,将立刻删除涉嫌侵权内容。