您好,登录后才能下订单哦!
密码登录
登录注册
点击 登录注册 即表示同意《亿速云用户服务条款》
这篇文章将为大家详细讲解有关Vue如何实现省市区级联下拉选择框,小编觉得挺实用的,因此分享给大家做个参考,希望大家阅读完这篇文章后可以有所收获。
具体内容如下
以(Vue下拉选择框Select组件二)为基础实现省市区级联下拉选择框组件
(业务需要,固定省份选择为贵州,没有此业务,不传disabled属性即可)
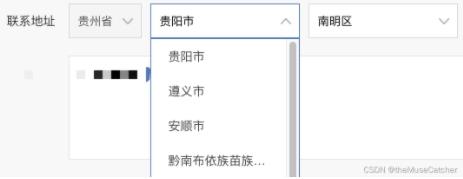
效果图如下:

①创建级联下拉选择Cascader.vue组件
<template>
  <div class="m-cascader-wrap">
    <Select
      class="mr10"
      :
      mode="region"
      :disabled="true"
      :selectData="provinceData"
      :selValue="address.province"
      :width="84"
      placeholder="请选择省"
      @getValue="getProvinceCode" />
    <Select
      class="mr10"
      :
      mode="region"
      :selectData="cityData"
      :selValue="address.city"
      :width="172"
      placeholder="请选择市"
      @getValue="getCityCode" />
    <Select
      mode="region"
      :
      :selectData="areaData"
      :selValue="address.area"
      :width="172"
      placeholder="请选择区"
      @getValue="getAreaCode" />
  </div>
</template>
<script>
import Select from '@/components/Select'
import { dictByType } from '@/api/index'
export default {
  name: 'Cascader',
  components: {
    Select
  },
  props: {
    selectedAddress: { // 省市区初始值
      type: Object,
      default: () => {
        return {}
      }
    },
    zIndex: {
      type: Number,
      default: 1
    }
  },
  data () {
    return {
      provinceData: [
        {
          dictVal: '贵州省',
          dictKey: 'P29'
        }
      ],
      cityData: [],
      areaData: [],
      regionParams: {
        type: '1',
        parentDictKey: ''
      },
      address: {
        province: 'P29',
        city: this.selectedAddress.city || '',
        area: this.selectedAddress.area || ''
      },
      addressName: {
        provinceName: '贵州省',
        cityName: '',
        areaName: ''
      },
      initialCity: true
    }
  },
  created () {
    this.getCity('P29')
    console.log('address:', this.address)
  },
  methods: {
    getCity (key) { // 获取市数据
      this.regionParams.parentDictKey = key
      dictByType(this.regionParams).then(res => {
        console.log('city-res:', res)
        if (res.message.code === 0) {
          if (res.data.dataList) {
            this.cityData = res.data.dataList
            if (this.initialCity && this.address.city) {
              this.initialCity = false
              this.cityData.forEach(item => {
                if (item.dictKey === this.address.city) {
                  this.getArea(item.dictKey)
                }
              })
            }
            console.log('cityData:', this.cityData)
          }
        }
      })
    },
    getArea (key) { // 获取区数据
      this.regionParams.parentDictKey = key
      dictByType(this.regionParams).then(res => {
        console.log('area-res:', res)
        if (res.message.code === 0) {
          if (res.data.dataList) {
            this.areaData = res.data.dataList
            console.log('areaData:', this.areaData)
          }
        }
      })
    },
    getProvinceCode (name, key) {
      console.log('province:', name, key)
    },
    getCityCode (name, key) {
      console.log('city:', name, key)
      this.address.city = key
      this.addressName.cityName = name
      this.$emit('getAddress', {}, {})
      // 获取区下拉列表
      this.getArea(key)
    },
    getAreaCode (name, key) {
      console.log('area:', name, key)
      this.address.area = key
      this.addressName.areaName = name
      this.$emit('getAddress', this.address, this.addressName)
    }
  }
}
</script>
<style lang="less" scoped>
.m-cascader-wrap {
  display: inline-block;
  width: 449px;
  height: 40px;
  line-height: 40px;
}
</style>
②在要使用的页面引入:
<Cascader
  :selectedAddress="register"
  mode="region"
  :zIndex="997"
  @getAddress="getRegisterAddress" />
import Cascader from '@/components/Cascader'
components: {
    Cascader
},
data () {
  return {
    register: {
      province: this.data.registerProvinceCode,
      city: this.data.registerCityCode,
      area: this.data.registerAreaCode
    } || {},
  }
}
methods: {
  getRegisterAddress (address, addressName) {
    console.log('register-address:', address)
    this.register = address
    if (JSON.stringify(addressName) !== '{}') { // 用于提交表单
      this.addParams.registerProvinceName = addressName.provinceName
      this.addParams.registerCityName = addressName.cityName
      this.addParams.registerAreaName = addressName.areaName
    }
    if (JSON.stringify(address) !== '{}') { // 用于校验下拉表单是否未选择
      this.checkFocus('register')
    }
  }
}
关于“Vue如何实现省市区级联下拉选择框”这篇文章就分享到这里了,希望以上内容可以对大家有一定的帮助,使各位可以学到更多知识,如果觉得文章不错,请把它分享出去让更多的人看到。
免责声明:本站发布的内容(图片、视频和文字)以原创、转载和分享为主,文章观点不代表本网站立场,如果涉及侵权请联系站长邮箱:is@yisu.com进行举报,并提供相关证据,一经查实,将立刻删除涉嫌侵权内容。