您好,登录后才能下订单哦!
密码登录
登录注册
点击 登录注册 即表示同意《亿速云用户服务条款》
小编给大家分享一下vue+jsplumb如何实现连线绘图,相信大部分人都还不怎么了解,因此分享这篇文章给大家参考一下,希望大家阅读完这篇文章后大有收获,下面让我们一起去了解一下吧!
具体内容如下
jsPlumb是一个比较强大的绘图组件,它提供了一种方法,主要用于连接网页上的元素。在现代浏览器中,它使用SVG或者Canvas技术,而对于IE8以下(含IE8)的浏览器,则使用VML技术。
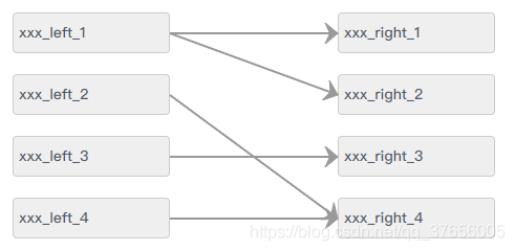
效果图
1.安装
npm install jsplumb --save
2.main.js 引入
import jsPlumb from 'jsplumb'
Vue.prototype.$jsPlumb = jsPlumb.jsPlumb
3.示例代码
<template>
  <div>
    <div id="container">
      <div class="left">
        <ul>
          <li v-for="(item,index) in leftList" :key="'left' + index" :id="item.nodeId" name="source">
            {{item.name}}
          </li>
        </ul>
      </div>

      <div class="right">
        <ul>
          <li v-for="(item,index) in rightList" :key="'right' + index" :id="item.nodeId" name="target">
            {{item.name}}
          </li>
        </ul>
      </div>
    </div>
  </div>
</template>

<script>
  export default {
    name: "linkElementModal",
    data() {
      return {
        jsPlumb: null, // 缓存实例化的jsplumb对象
        leftList:[
          {name: 'xxx_left_1', nodeId: 'left_1'},
          {name: 'xxx_left_2', nodeId: 'left_2'},
          {name: 'xxx_left_3', nodeId: 'left_3'},
          {name: 'xxx_left_4', nodeId: 'left_4'}
        ],
        rightList:[
          {name: 'xxx_right_1', nodeId: 'right_1'},
          {name: 'xxx_right_2', nodeId: 'right_2'},
          {name: 'xxx_right_3', nodeId: 'right_3'},
          {name: 'xxx_right_4', nodeId: 'right_4'}
        ]
      }
    },
    mounted(){
      this.showPlumb();
    },
    methods:{
      showPlumb() {
        this.jsPlumb = this.$jsPlumb.getInstance({
          Container: 'container', // 选择器id
          EndpointStyle: {radius: 0.11, fill: '#999'}, // 端点样式
          PaintStyle: {stroke: '#999', strokeWidth: 2}, // 绘画样式,默认8px线宽  #456
          HoverPaintStyle: {stroke: '#994B0A', strokeWidth: 3 }, // 默认悬停样式  默认为null
          ConnectionOverlays: [ // 此处可以设置所有箭头的样式
            ['Arrow', { // 设置参数可以参考中文文档
              location: 1,
              length: 12,
              paintStyle: {
                stroke: '#999',
                fill: '#999'
              }
            }]
          ],
          Connector: ['Straight'], // 要使用的默认连接器的类型:直线,折线,曲线等
          DrapOptions: {cursor: 'crosshair', zIndex: 2000}
        });

        this.jsPlumb.batch(() => {
          for(let i = 0; i < this.leftList.length; i++){
            this.initLeaf(this.leftList[i].nodeId, 'source');
          }
          for(let j = 0; j < this.rightList.length; j++){
            this.initLeaf(this.rightList[j].nodeId , 'target')
          }
        })

        this.setjsPlumb(true,true);

        //点击连线
        this.jsPlumb.bind('click',  (conn, originalEvent) => {
         console.log(conn, originalEvent)
        })

        //连线时触发
        this.jsPlumb.bind('connection',  (conn, originalEvent) => {
          console.log(conn.sourceId)
          console.log(conn.targetId)
        })

        //右键触发
        this.jsPlumb.bind('contextmenu',  (conn, originalEvent) => {
          console.log(conn, originalEvent)
        })
      },
      //  初始化规则使其可以连线、拖拽
      initLeaf(id, type) {
        const ins = this.jsPlumb;
        const elem = document.getElementById(id);
        if (type === 'source') {
          ins.makeSource(elem, {
            anchor: [1, 0.5, 0, 0], // 左 上 右 下
            allowLoopback: false, //允许回连
            maxConnections: -1 //最大连接数(-1表示不限制)
          })
        } else {
          ins.makeTarget(elem, {
            anchor: [0, 0.5, 0, 0],
            allowLoopback: false,
            maxConnections: -1
          })
        }
      },
      setjsPlumb(sourceFlag, targetFlag){
        const source = document.getElementsByName('source')
        const target = document.getElementsByName('target')

        this.jsPlumb.setSourceEnabled(source, sourceFlag)
        this.jsPlumb.setTargetEnabled(target, targetFlag)
        this.jsPlumb.setDraggable(source, false) // 是否支持拖拽
        this.jsPlumb.setDraggable(target, false) // 是否支持拖拽
      },
    }
  }
</script>

<style>
  #container{
    width: 500px;
    height: 500px;
    padding: 20px;
    position: relative; /*一定加上这句,否则连线位置发生错乱*/
  }

  .left{
    float: left;
    width: 150px;
  }
  .right{
    float: right;
    width: 150px;
  }

  .left li,.right li{
    width: 100%;
    border-radius: 4px;
    border: 1px solid #ccc;
    background: #efefef;
    margin-bottom: 20px;
    padding: 8px 5px;
  }
</style>
以上是“vue+jsplumb如何实现连线绘图”这篇文章的所有内容,感谢各位的阅读!相信大家都有了一定的了解,希望分享的内容对大家有所帮助,如果还想学习更多知识,欢迎关注亿速云行业资讯频道!
免责声明:本站发布的内容(图片、视频和文字)以原创、转载和分享为主,文章观点不代表本网站立场,如果涉及侵权请联系站长邮箱:is@yisu.com进行举报,并提供相关证据,一经查实,将立刻删除涉嫌侵权内容。