您好,登录后才能下订单哦!
密码登录
登录注册
点击 登录注册 即表示同意《亿速云用户服务条款》
6.0设置源码分析:https://blog.csdn.net/zrf1335348191/article/details/51469058?locationNum=8
1. 源码位置:/packages/apps/Settings/
2. Settings.java即是应用的首页
3. |----SettingsActivity.java (和Settings.java就在一个包下,不要全局搜索,否则会搜到多个SettingsActivity这个类)
4. Android6.0源码分析:
1-1:清单文件分析
通过清单文件可以知道设置应用的启动类是Settings.java
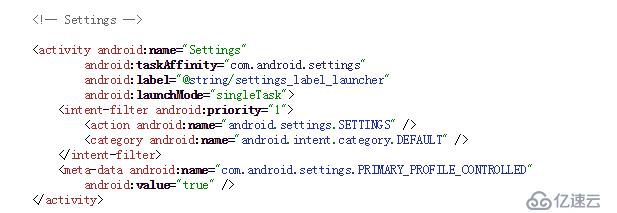
看看清单文件里,可以发现很多的activity都有这样的meta标签定义,这些activity都是Settings.java的内部类,UI都是通过Fragment来实现的。

1-2:Settings.java分析
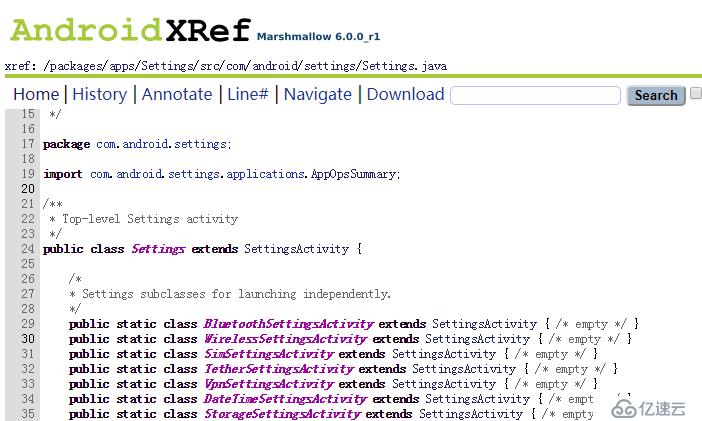
继承自SettingsActivity,其它的都是一些内部类,虽然是空实现,但是都继承了SettingsActivity.
说实话,这么诡异的写法我生平还是第一次见!
1-3:SettingsActivity分析
第一步:看onCreate方法
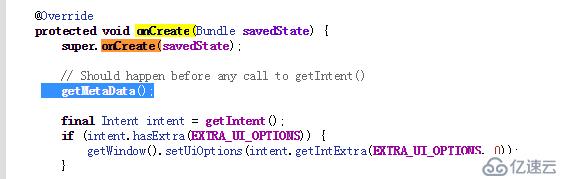
首先调用了一个getMetaData的方法
private void getMetaData() {
try {
ActivityInfo ai = getPackageManager().getActivityInfo(getComponentName(),
PackageManager.GET_META_DATA);
if (ai == null || ai.metaData == null) return;
mFragmentClass = ai.metaData.getString(META_DATA_KEY_FRAGMENT_CLASS);
} catch (NameNotFoundException nnfe) {
// No recovery
Log.d(LOG_TAG, "Cannot get Metadata for: " + getComponentName().toString());
}
}
PackageManager从清单文件里解析当前Activity的信息,并且从META_DATA获取到了对应的Fragment的类名。
private static final String META_DATA_KEY_FRAGMENT_CLASS =212 "com.android.settings.FRAGMENT_CLASS";
这个正与清单文件里的meta的key一样。
1-4:Usb网络共享界面
https://blog.csdn.net/kc58236582/article/details/48313315
项目有个需要,需要判断一下USB网络共享开关是否打开 。但是百度几乎是没有答案的,我就想着研究一下源码,看看设置里的那个页面是怎么去刷新这个UI的。
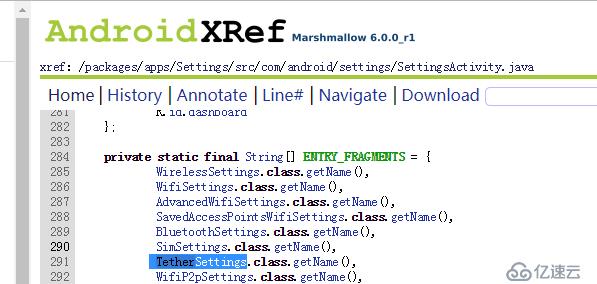
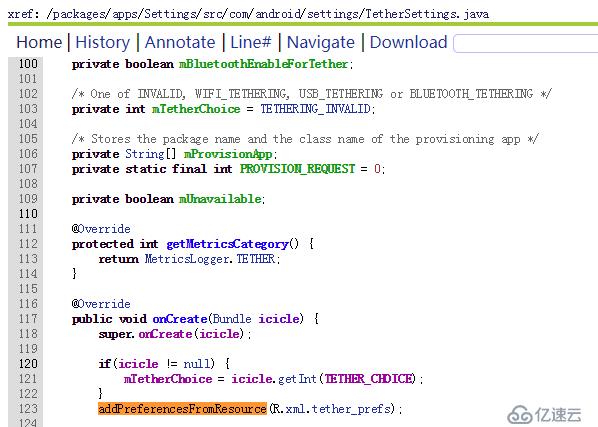
找到网络共享设置页面:TetherSettings.java
TetherSettings
|-----SettingsPreferenceFragment
|---------InstrumentedPreferenceFragment
|--------PreferenceFragment
布局是在PreferenceFragment这个类里实现的,默认使用 布局
布局
<LinearLayout xmlns:android="http://schemas.android.com/apk/res/android"
android:orientation="vertical"
android:layout_height="match_parent"
android:layout_width="match_parent"
android:background="@android:color/transparent"
android:layout_removeBorders="true">
<ListView android:id="@android:id/list"
android:layout_width="match_parent"
android:layout_height="0px"
android:layout_weight="1"
android:paddingTop="0dip"
android:paddingBottom="@dimen/preference_fragment_padding_bottom"
android:scrollbarStyle="@integer/preference_fragment_scrollbarStyle"
android:clipToPadding="false"
android:drawSelectorOnTop="false"
android:cacheColorHint="@android:color/transparent"
android:scrollbarAlwaysDrawVerticalTrack="true" />
<TextView android:id="@android:id/empty"
android:layout_width="match_parent"
android:layout_height="match_parent"
android:padding="@dimen/preference_fragment_padding_side"
android:gravity="center"
android:visibility="gone" />
<RelativeLayout android:id="@+id/button_bar"
android:layout_height="wrap_content"
android:layout_width="match_parent"
android:layout_weight="0"
android:visibility="gone">
<Button android:id="@+id/back_button"
android:layout_width="0dip"
android:layout_height="wrap_content"
android:layout_margin="5dip"
android:layout_alignParentStart="true"
android:text="@string/back_button_label"
/>
<LinearLayout
android:orientation="horizontal"
android:layout_width="wrap_content"
android:layout_height="wrap_content"
android:layout_alignParentEnd="true">
<Button android:id="@+id/skip_button"
android:layout_width="0dip"
android:layout_height="wrap_content"
android:layout_margin="5dip"
android:text="@string/skip_button_label"
android:visibility="gone"
/>
<Button android:id="@+id/next_button"
android:layout_width="0dip"
android:layout_height="wrap_content"
android:layout_margin="5dip"
android:text="@string/next_button_label"
/>
</LinearLayout>
</RelativeLayout>
</LinearLayout>
这些设置里的按钮,是如何更新UI的呢?

可以看到USB网络共享的开关是通过mUsbTether这个对象来控制的。至此,USB网络共享是否开启的代码也就找到了。
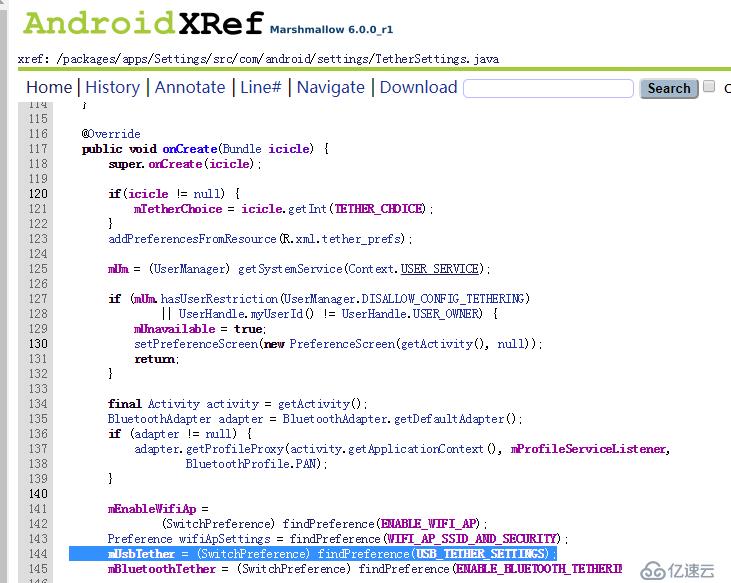
findPreference是父类PreferenceFragment的方法:
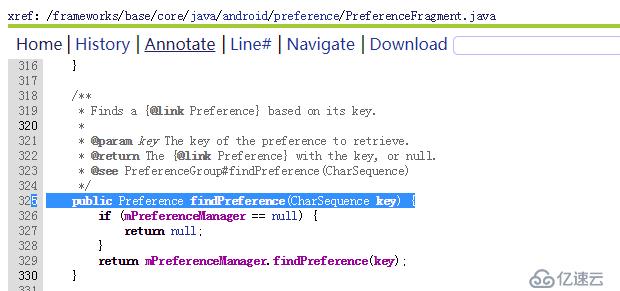
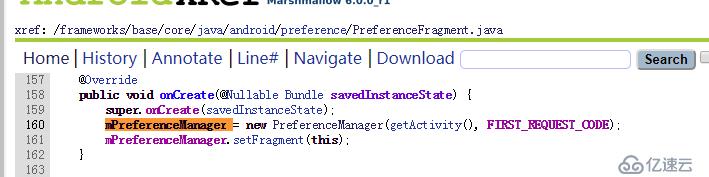
方法引用了PreferenceManager对象,对象在fragment创建时创建:
通过代码可以判断刷新布局的应该这个方法:
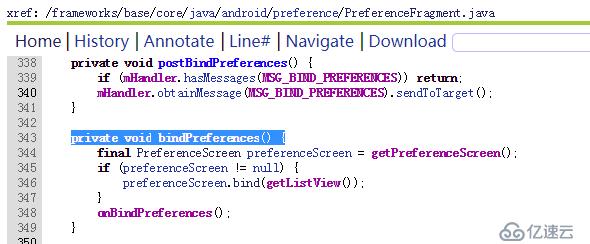
将preferenceScreen这个对象与前面提到的布局里的ListView绑定起来。
这个preferenceScreen对象通过下面的方法赋值:

那么,问题来了,这两个方法什么在哪里被调用的呢?
文件内容如下:
<PreferenceScreen xmlns:android="http://schemas.android.com/apk/res/android">
<SwitchPreference
android:key="usb_tether_settings"
android:title="@string/usb_tethering_button_text"
android:persistent="false" />
<SwitchPreference
android:key="enable_wifi_ap"
android:title="@string/wifi_tether_checkbox_text"
android:persistent="false" />
<Preference
android:key="wifi_ap_ssid_and_security"
android:title="@string/wifi_tether_configure_ap_text"
android:persistent="false" />
<SwitchPreference
android:key="enable_bluetooth_tethering"
android:title="@string/bluetooth_tether_checkbox_text"
android:persistent="false" />
</PreferenceScreen>
到这里就清楚了,settings里的这些开关,并不是单独使用switchButtont等控制堆叠起来的,而是通过解析res/xml下的xml文件,将标签解析(采用XmlPullParser)出现,转化成PreferenceScreen对象,
再将PreferenceBean对象与布局里的ListView绑定起来。
当然,设置里的源码粘贴过来,不能直接使用,很多字段和方法是hide的,需要通过反射来搞定。下面是我测试过的判断usb网络共享是否开启的源码:
package com.refactor.usb_share;
import android.content.BroadcastReceiver;
import android.content.Context;
import android.content.Intent;
import android.content.IntentFilter;
import android.hardware.usb.UsbManager;
import android.net.ConnectivityManager;
import android.util.Log;
import java.lang.reflect.InvocationTargetException;
import java.lang.reflect.Method;
import java.util.ArrayList;
/**
* Created by XinYi on 8/8/10.
* 监听USB网络共享是否开启
*/
public class UsbShareStateMonitor {
private Context context;
private final String TAG = "UsbShareStateMonitor";
private static UsbShareStateMonitor instance = new UsbShareStateMonitor();
private ConnectivityManager cm;
private String[] forReflect = new String[]{};
private boolean mMassStorageActive;
private boolean mUsbConnected;
private String ACTION_TETHER_STATE_CHANGED = "android.net.conn.TETHER_STATE_CHANGED";
/**
* @hide gives a String[] listing all the interfaces configured for
* tethering and currently available for tethering.
*/
private final String EXTRA_AVAILABLE_TETHER = "availableArray";
/**
* @hide gives a String[] listing all the interfaces currently tethered
* (ie, has dhcp support and packets potentially forwarded/NATed)
*/
private final String EXTRA_ACTIVE_TETHER = "activeArray";
/**
* @hide gives a String[] listing all the interfaces we tried to tether and
* failed. Use {@link #getLastTetherError} to find the error code
* for any interfaces listed here.
*/
private final String EXTRA_ERRORED_TETHER = "erroredArray";
/**
* Broadcast Action: External media is no longer being shared via USB mass storage.
* The path to the mount point for the previously shared media is contained in the Intent.mData field.
*
* @hide
*/
private final String ACTION_MEDIA_UNSHARED = "android.intent.action.MEDIA_UNSHARED";
private final String ACTION_USB_STATE =
"android.hardware.usb.action.USB_STATE";
private final String USB_CONNECTED = "connected";
private final int TETHER_ERROR_NO_ERROR = 0;
private String[] mUsbRegexs;
private boolean isUsbShareOpened;
private TetherChangeReceiver mTetherChangeReceiver;
private UsbShareStateMonitor() {
isUsbShareOpened = false;
}
public static UsbShareStateMonitor getInstance() {
return instance;
}
public void regist(Context context) {
this.context = context;
cm = (ConnectivityManager) context.getSystemService(Context.CONNECTIVITY_SERVICE);
mUsbRegexs = getTetherableUsbRegexs();
registTetherChangeReceiver();
}
public void unRegist(){
if(context != null){
context.unregisterReceiver(mTetherChangeReceiver);
mTetherChangeReceiver = null;
}
}
private void registTetherChangeReceiver() {
mTetherChangeReceiver = new TetherChangeReceiver();
IntentFilter filter = new IntentFilter(ACTION_TETHER_STATE_CHANGED);
Intent intent = context.registerReceiver(mTetherChangeReceiver, filter);
filter = new IntentFilter();
filter.addAction(ACTION_USB_STATE);
context.registerReceiver(mTetherChangeReceiver, filter);
filter = new IntentFilter();
filter.addAction(Intent.ACTION_MEDIA_SHARED);
filter.addAction(ACTION_MEDIA_UNSHARED);
filter.addDataScheme("file");
context.registerReceiver(mTetherChangeReceiver, filter);
if (intent != null) mTetherChangeReceiver.onReceive(context, intent);
}
public boolean isUsbShareOpened() {
return isUsbShareOpened;
}
private class TetherChangeReceiver extends BroadcastReceiver {
@Override
public void onReceive(Context content, Intent intent) {
String action = intent.getAction();
if (action.equals(ACTION_TETHER_STATE_CHANGED)) {
// TODO - this should understand the interface types
ArrayList<String> available = intent.getStringArrayListExtra(
EXTRA_AVAILABLE_TETHER);
ArrayList<String> active = intent.getStringArrayListExtra(
EXTRA_ACTIVE_TETHER);
ArrayList<String> errored = intent.getStringArrayListExtra(
EXTRA_ERRORED_TETHER);
updateState(available.toArray(new String[available.size()]),
active.toArray(new String[active.size()]),
errored.toArray(new String[errored.size()]));
} else if (action.equals(Intent.ACTION_MEDIA_SHARED)) {
mMassStorageActive = true;
updateState();
} else if (action.equals(ACTION_MEDIA_UNSHARED)) {
mMassStorageActive = false;
updateState();
} else if (action.equals(ACTION_USB_STATE)) {
mUsbConnected = intent.getBooleanExtra(USB_CONNECTED, false);
updateState();
}
}
}
private void updateState() {
String[] available = getTetherableIfaces();
String[] tethered = getTetheredIfaces();
String[] errored = getTetheringErroredIfaces();
updateState(available, tethered, errored);
}
private void updateState(String[] available, String[] tethered,
String[] errored) {
updateUsbState(available, tethered, errored);
}
private void updateUsbState(String[] available, String[] tethered,
String[] errored) {
mUsbRegexs = getTetherableUsbRegexs();
if(mUsbRegexs == null) {
Log.e(TAG, "mUsbRegexs == null ");
return;
}
boolean usbTethered = false;
for (String s : tethered) {
for (String regex : mUsbRegexs) {
if (s.matches(regex)) usbTethered = true;
}
}
isUsbShareOpened = usbTethered;
}
//hide方法
private String[] getTetherableUsbRegexs() {
return getCmHideMethods("getTetherableUsbRegexs");
}
private String[] getTetherableIfaces() {
return getCmHideMethods("getTetherableIfaces");
}
private String[] getTetheredIfaces() {
return getCmHideMethods("getTetheredIfaces");
}
private String[] getTetheringErroredIfaces() {
return getCmHideMethods("getTetheringErroredIfaces");
}
private String[] getCmHideMethods(String methodName) {
try {
Method method = cm.getClass().getDeclaredMethod(methodName);
method.setAccessible(true);
String[] result = (String[]) method.invoke(cm);
return result;
} catch (NoSuchMethodException e) {
e.printStackTrace();
} catch (IllegalAccessException e) {
e.printStackTrace();
} catch (InvocationTargetException e) {
e.printStackTrace();
}
return null;
}
}
如何获取蓝牙物理MAC
#################################################################################################
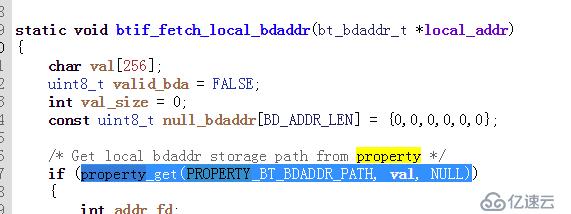
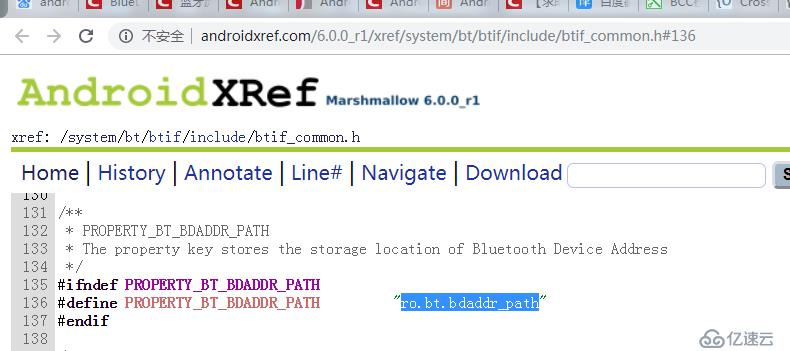
https://blog.csdn.net/kehyuanyu/article/details/49074847 (有关于获取蓝牙物理的影子,顺着果真能找到存储蓝牙物理 mac的文件)
1)
2)
3)
4)
5)
#################################################################################################
设备信息-本机信息:

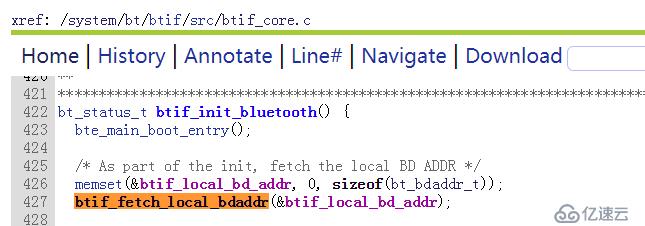
顺着路径找到这个类,找到蓝牙获取的方法。
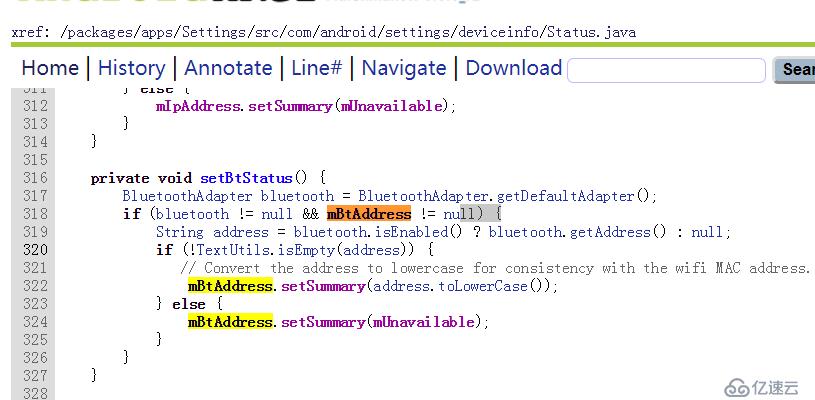
获取蓝牙mac的调用顺序:
BluetoothAdapter-->BluetoothManagerService
很明显上面用到AIDL技术
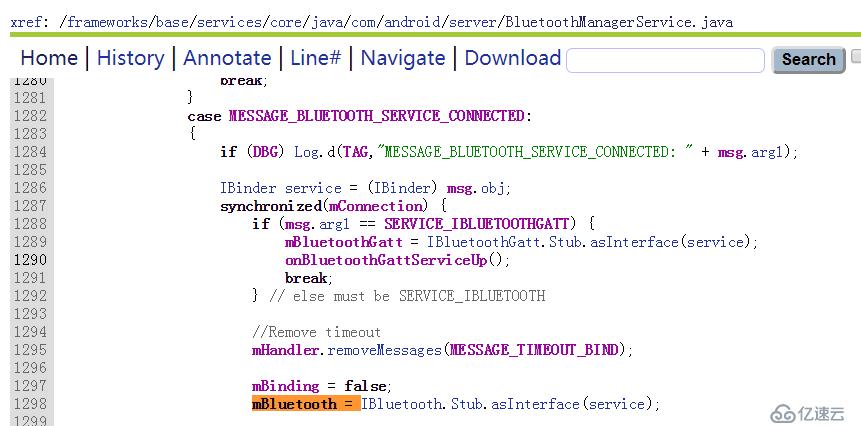
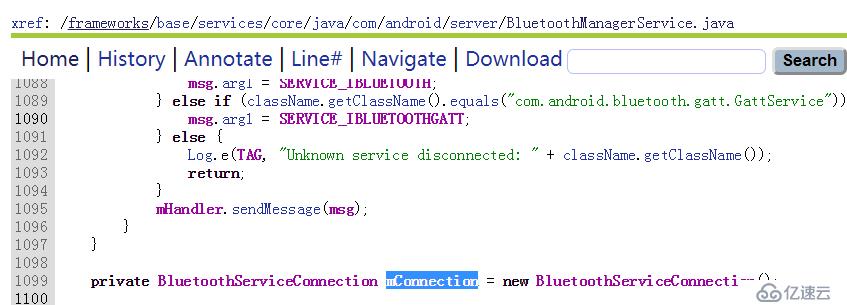
搜索消息关键字 MESSAGE_BLUETOOTH_SERVICE_CONNECTED ,找到消息发送的地方

上面的就是Binder机制了 ,注意注意的代码。(由后面的分析可知arg1应该是AdapterService)
然后根据
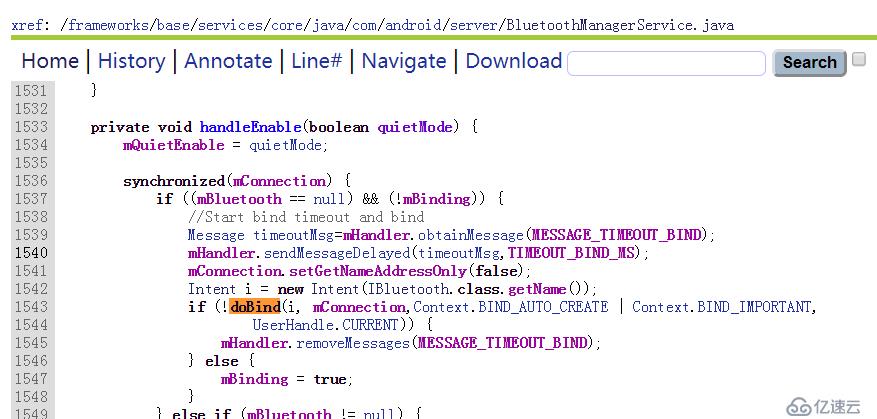
找到bind的地方:
第1处:enable蓝牙的地方,注意intent的参数是IBluetooth
第2处:注意intent的参数是IBluetoothGatt
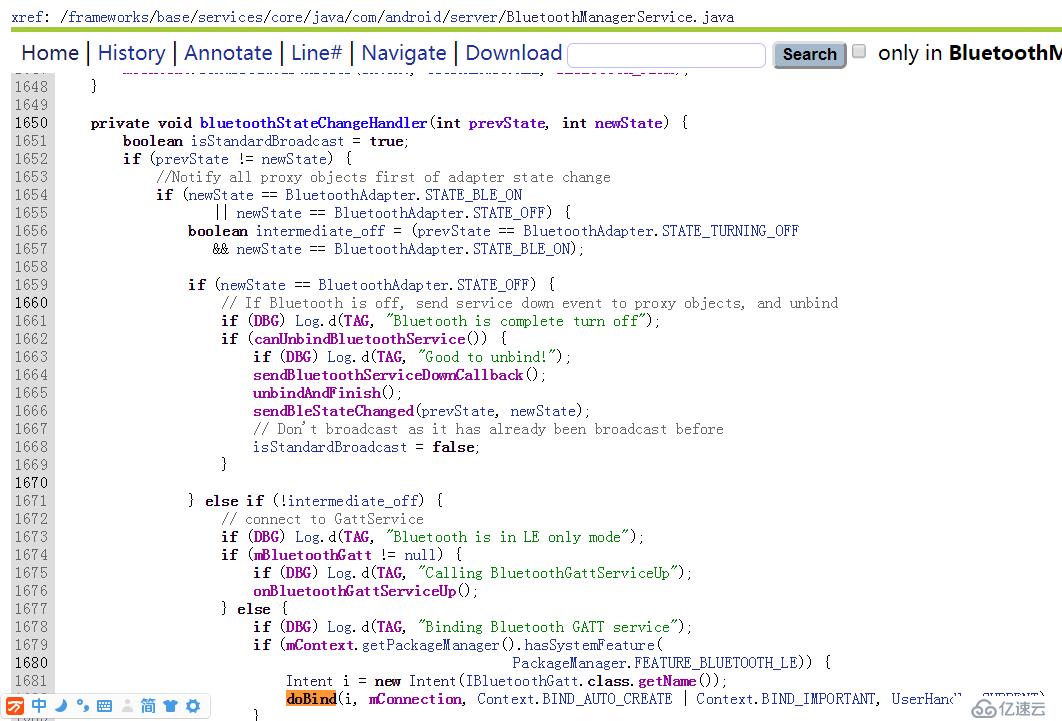
还有一处无关的doBind调用。
注意到这里的intent的构造参数,是IBluetoothGatt。
看doBind方法
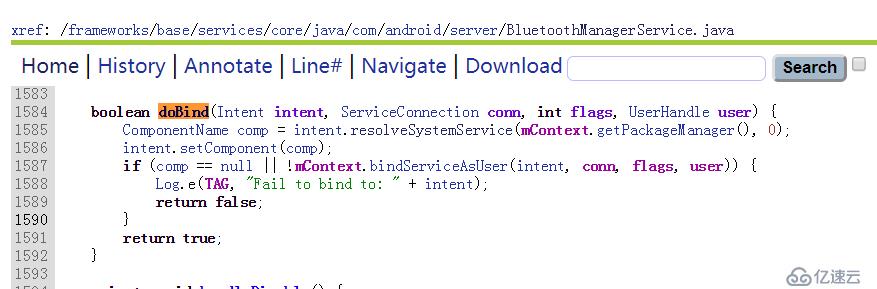
注意解析intent组件的这个方法,最后应该是与GattService或者AdapterService进行了绑定。
那么到底是哪个service呢,后面发现AdapterService才有getAddress()方法,所以绑定的应该是AdapterService。
所以获取蓝牙物理mac的调用顺序又清楚了一步
BluetoothAdapter-->BluetoothManagerService-->AdapterService
看AdapterService,通过它的AdapterServiceBinder与BluetoothManagerService通讯
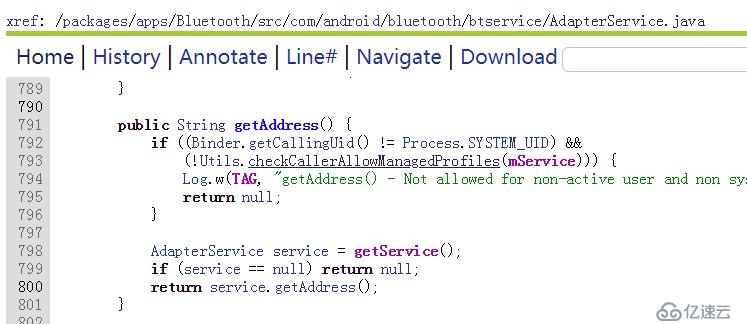
Binder会调用AdapterService的getAddress()方法
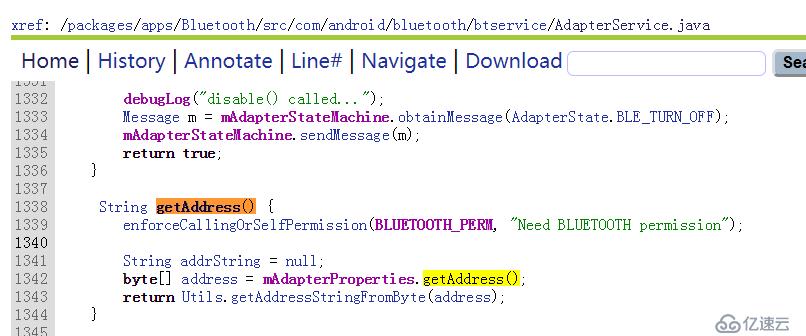

由上面的顺序可知:
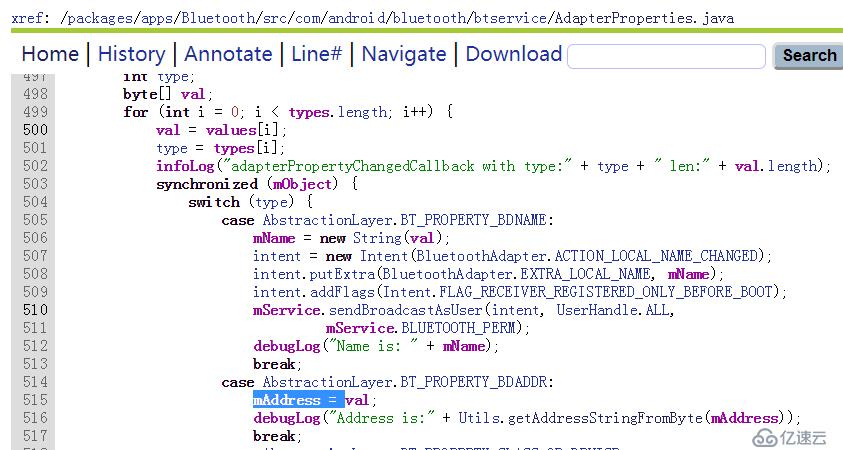
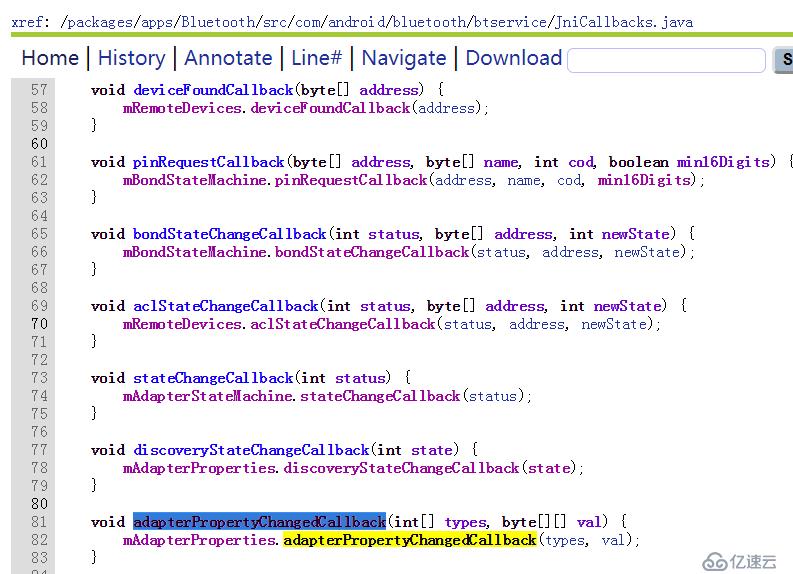
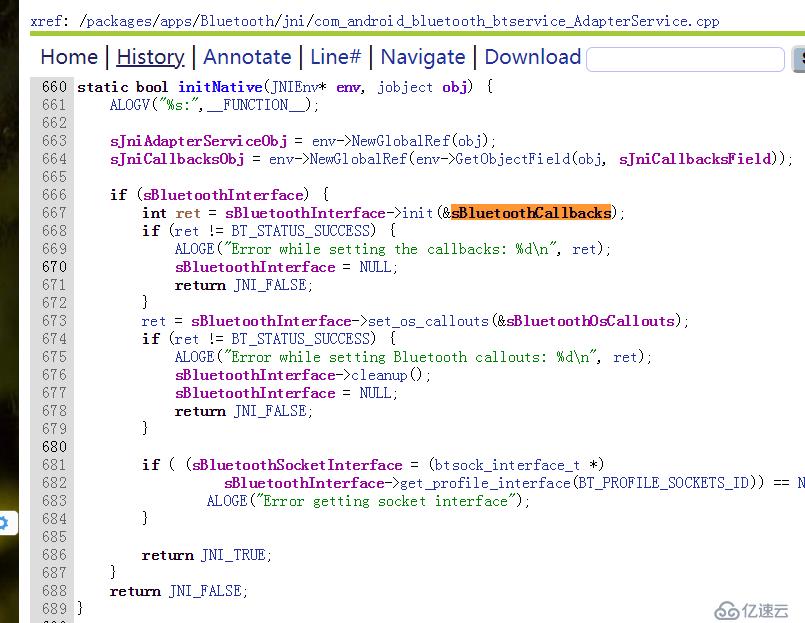
在AdapterService里创建了AdapterProperties,创建JniCallbacks,JniCallbacks封装了AdapterProperties。
注意JniCallbacks这个类,它是与底层cpp交互的桥梁,包括它的adapterPropertyChangedCallback方法。

注意上面的写法,怎么通过jni调用的JniCallbacks这个类的。
static void adapter_properties_callback(bt_status_t status, int num_properties,
                                    bt_property_t *properties) {
       ...

        callbackEnv->CallVoidMethod(sJniCallbacksObj, method_adapterPropertyChangedCallback, types,
                                            props);
        checkAndClearExceptionFromCallback(callbackEnv, __FUNCTION__);
        callbackEnv->DeleteLocalRef(props);
        callbackEnv->DeleteLocalRef(types);
        return;

    }
查询adapter_properties_callback方法的调用 (注意CPP的回调是通过传入方法名进行回调的)

最终是由HAL层回调过来的
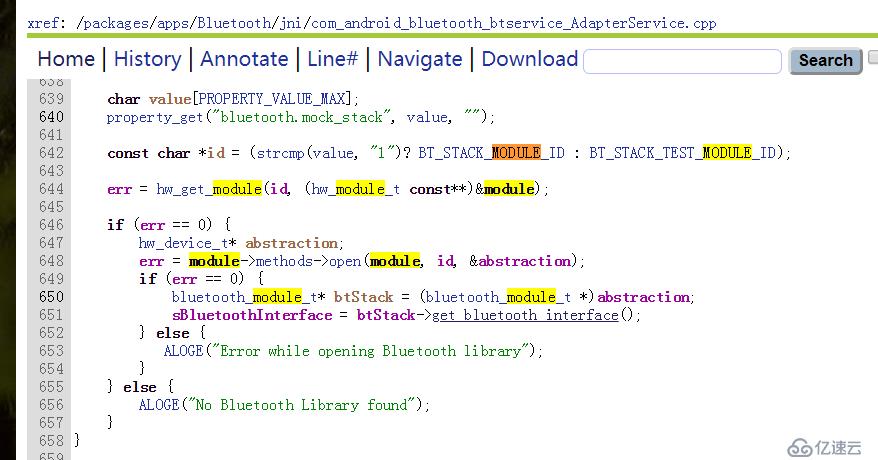
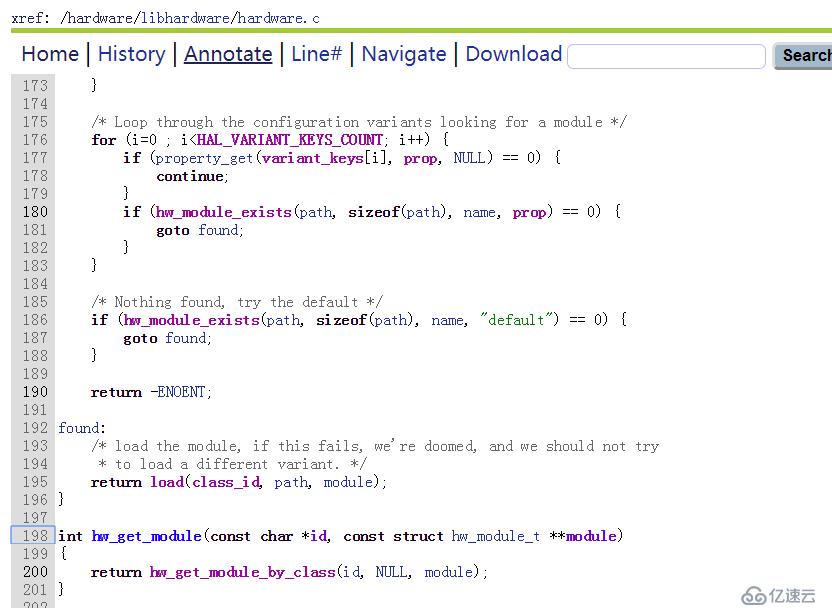
xref: /hardware/libhardware/hardware.c,分析这个类。
获取module:
https://blog.csdn.net/u014135607/article/details/79840130 (参考资料)
https://blog.csdn.net/u011913612/article/details/52576831 (超级详细)
调用HMI
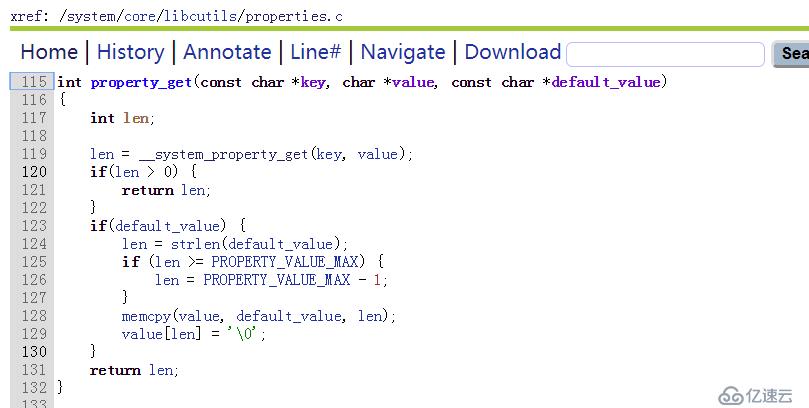
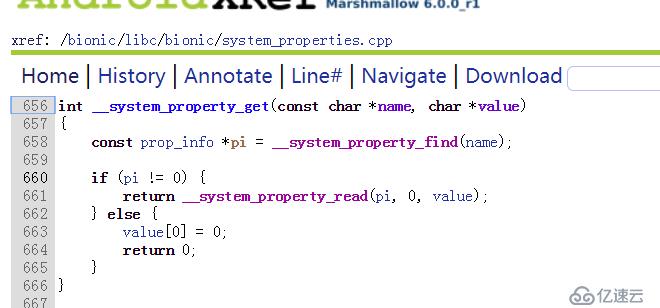
注意dlopen和dlsym这2个方法
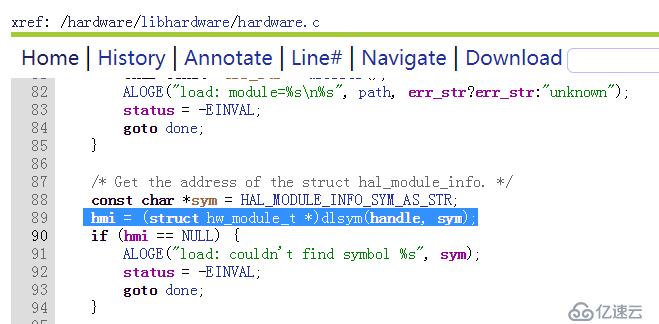
上面这个dlsym方法属于“<dlfcn.h>”这个接口,看它的实现类:
注意这个类在bionic包下
免责声明:本站发布的内容(图片、视频和文字)以原创、转载和分享为主,文章观点不代表本网站立场,如果涉及侵权请联系站长邮箱:is@yisu.com进行举报,并提供相关证据,一经查实,将立刻删除涉嫌侵权内容。