您好,登录后才能下订单哦!
这篇文章主要介绍“Android音视频开发中VideoView怎么使用”,在日常操作中,相信很多人在Android音视频开发中VideoView怎么使用问题上存在疑惑,小编查阅了各式资料,整理出简单好用的操作方法,希望对大家解答”Android音视频开发中VideoView怎么使用”的疑惑有所帮助!接下来,请跟着小编一起来学习吧!
之前介绍过使用MediaPlayer+SurfaceView实现播放视频功能。无意间发现官方封装了VideoView组件来实现简单视频播放功能,内部同样是使用MediaPlayer+SurfaceView的形式控制MediaPlayer对视频文件进行播放。使用场景比较简单,适用于只是播放视频的场景,其提供能力有限不太适合使用在调节视频亮度等其他功能。
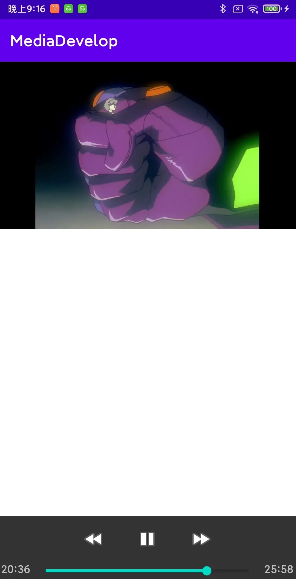
除了播放组件VideoView外还有MediaController组件为视频播放提供播放操作栏功能,可支持视频播放、暂停、快进、快退等功能。另外还提供进度条功能可以拖拽到指定位置进行播放视频。
VideoView封装了MediaPlayer同样也提供了类似于MediaPlayer的api。例如start方法同样是播放视频功能,但调用该方法前最好也是通过设置setOnpreparedListener回调结果来执行,当调用setVideoPath后会主动执行prepareAsync方法。在VideoView内部帮助开发者封装实现了很多功能,其实也能借鉴其内部源码来实现功能更全面功能更完备的自制播放器。
| 常用Api | 说明 |
|---|---|
| setVideoPath | 设置视频资源 |
| start | 播放 |
| pause | 暂停 |
| resume | 重播 |
| seekTo | 指定位置播放 |
| isPlaying | 视频是否播放 |
| getCurrentPosition | 获取当前播放位置 |
| setMediaController | 设置MediaController |
| setOnpreparedListener | 监听视频装载完成事件 |
// 实例化videoView
videoView = new VideoView(this);
Uri uri = Uri.fromFile(new File("sdcard/DCIM","新世纪福音战士24.mp4"));
//加载视频资源
videoView.setVideoURI(uri);
LinearLayout linearLayout = new LinearLayout(this);
linearLayout.addView(videoView);
setContentView(linearLayout);
//设置监听
videoView.setOnPreparedListener(new MediaPlayer.OnPreparedListener() {
    @Override
    public void onPrepared(MediaPlayer mp) {
        //回调成功并播放视频
        videoView.start();
    }
});
//创建操作栏
MediaController mediaController = new MediaController(this);
videoView.setMediaController(mediaController);
mediaController.setMediaPlayer(videoView);
既然封装了VideoView和MediaController两者组件,在使用过程中也发现了许多之前尝试实现的一些功能看看他们又是如何实现的。
MediaController显示时调用show方法内部可以看到一个post(mShowProgress);方法
public void show(int timeout) {
    if (!mShowing && mAnchor != null) {
        setProgress();
        if (mPauseButton != null) {
            mPauseButton.requestFocus();
        }
        disableUnsupportedButtons();
        updateFloatingWindowLayout();
        mWindowManager.addView(mDecor, mDecorLayoutParams);
        mShowing = true;
    }
    updatePausePlay();

    // cause the progress bar to be updated even if mShowing
    // was already true.  This happens, for example, if we're
    // paused with the progress bar showing the user hits play.
    post(mShowProgress);

    if (timeout != 0 && !mAccessibilityManager.isTouchExplorationEnabled()) {
        removeCallbacks(mFadeOut);
        postDelayed(mFadeOut, timeout);
    }
}可以看到mShowProgress是一个Runnable,内部会延迟不停调用自己来更新setProgress()。setProgress()方法就是读取MediaPlayer播放进度从而更新播放信息。
private final Runnable mShowProgress = new Runnable() {
    @Override
    public void run() {
        int pos = setProgress();
        if (!mDragging && mShowing && mPlayer.isPlaying()) {
            postDelayed(mShowProgress, 1000 - (pos % 1000));
        }
    }
};之前自定义实现播放尺寸适配,在VideoView内部直接帮助开发者实现视频播放适配,详细代码可以直接看onMeasure重写。代码大致算法就是通过比较VideoView布局宽高和视频的宽高进行比例比较来重写计算VideoView的宽高。
protected void onMeasure(int widthMeasureSpec, int heightMeasureSpec) {
    //Log.i("@@@@", "onMeasure(" + MeasureSpec.toString(widthMeasureSpec) + ", "
    //        + MeasureSpec.toString(heightMeasureSpec) + ")");

    int width = getDefaultSize(mVideoWidth, widthMeasureSpec);
    int height = getDefaultSize(mVideoHeight, heightMeasureSpec);
    if (mVideoWidth > 0 && mVideoHeight > 0) {

        int widthSpecMode = MeasureSpec.getMode(widthMeasureSpec);
        int widthSpecSize = MeasureSpec.getSize(widthMeasureSpec);
        int heightSpecMode = MeasureSpec.getMode(heightMeasureSpec);
        int heightSpecSize = MeasureSpec.getSize(heightMeasureSpec);

        if (widthSpecMode == MeasureSpec.EXACTLY && heightSpecMode == MeasureSpec.EXACTLY) {
            // the size is fixed
            width = widthSpecSize;
            height = heightSpecSize;

            // for compatibility, we adjust size based on aspect ratio
            if ( mVideoWidth * height  < width * mVideoHeight ) {
                //Log.i("@@@", "image too wide, correcting");
                width = height * mVideoWidth / mVideoHeight;
            } else if ( mVideoWidth * height  > width * mVideoHeight ) {
                //Log.i("@@@", "image too tall, correcting");
                height = width * mVideoHeight / mVideoWidth;
            }
        } else if (widthSpecMode == MeasureSpec.EXACTLY) {
            // only the width is fixed, adjust the height to match aspect ratio if possible
            width = widthSpecSize;
            height = width * mVideoHeight / mVideoWidth;
            if (heightSpecMode == MeasureSpec.AT_MOST && height > heightSpecSize) {
                // couldn't match aspect ratio within the constraints
                height = heightSpecSize;
            }
        } else if (heightSpecMode == MeasureSpec.EXACTLY) {
            // only the height is fixed, adjust the width to match aspect ratio if possible
            height = heightSpecSize;
            width = height * mVideoWidth / mVideoHeight;
            if (widthSpecMode == MeasureSpec.AT_MOST && width > widthSpecSize) {
                // couldn't match aspect ratio within the constraints
                width = widthSpecSize;
            }
        } else {
            // neither the width nor the height are fixed, try to use actual video size
            width = mVideoWidth;
            height = mVideoHeight;
            if (heightSpecMode == MeasureSpec.AT_MOST && height > heightSpecSize) {
                // too tall, decrease both width and height
                height = heightSpecSize;
                width = height * mVideoWidth / mVideoHeight;
            }
            if (widthSpecMode == MeasureSpec.AT_MOST && width > widthSpecSize) {
                // too wide, decrease both width and height
                width = widthSpecSize;
                height = width * mVideoHeight / mVideoWidth;
            }
        }
    } else {
        // no size yet, just adopt the given spec sizes
    }
    setMeasuredDimension(width, height);
}
到此,关于“Android音视频开发中VideoView怎么使用”的学习就结束了,希望能够解决大家的疑惑。理论与实践的搭配能更好的帮助大家学习,快去试试吧!若想继续学习更多相关知识,请继续关注亿速云网站,小编会继续努力为大家带来更多实用的文章!
免责声明:本站发布的内容(图片、视频和文字)以原创、转载和分享为主,文章观点不代表本网站立场,如果涉及侵权请联系站长邮箱:is@yisu.com进行举报,并提供相关证据,一经查实,将立刻删除涉嫌侵权内容。