您好,登录后才能下订单哦!
这篇文章主要介绍“vue项目keepAlive配合vuex动态怎么设置路由缓存”的相关知识,小编通过实际案例向大家展示操作过程,操作方法简单快捷,实用性强,希望这篇“vue项目keepAlive配合vuex动态怎么设置路由缓存”文章能帮助大家解决问题。
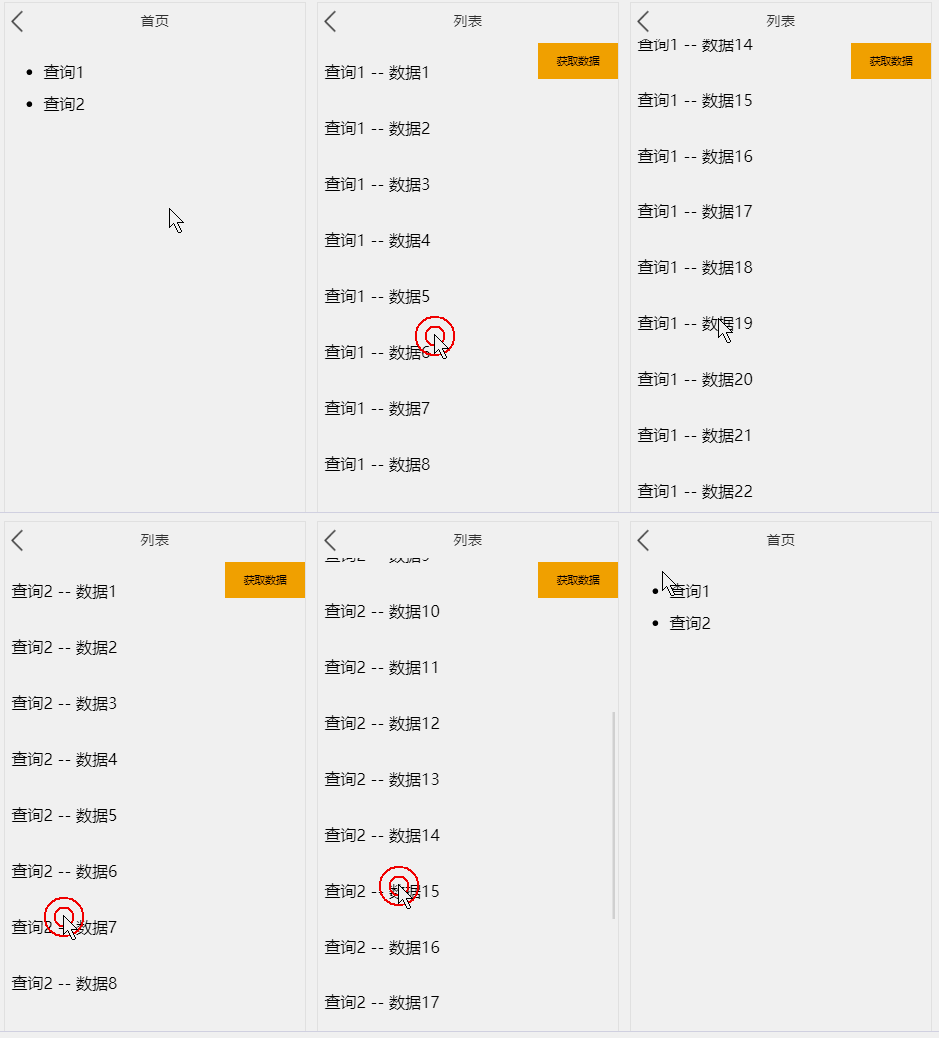
首页 → 列表页→ 详情页(缓存列表页面 ) → 列表页(不重新加载列表页)→ 首页(清除列表页的缓存)

直接使用keepAlive会出现一个问题,当从查询1进入列表页面,这时缓存list组件,然后返回首页,点击查询2,会发现list的数据是查询1的,因为这里直接调用了上一次的缓存因此,在返回首页后需清除list的缓存,下次进入list将重新初始化。
利用keepAlive进行路由缓存,keepAlive的include 和 exclude 属性允许组件有条件地缓存。
配合vuex维护一个缓存数组即可,不多BB,直接上代码
利用include属性进行选择性缓存
<template>
  <div >
    <keep-alive :include="$store.state.common.cachedRouteNames">
      <router-view />
    </keep-alive>
  </div>
</template>
<script>
export default {
  name: 'App'
};
</script>配置路由keepAlive状态
import Vue from 'vue';
// import Vue from 'vue/dist/vue.esm.js'
import App from '../src/App.vue';
import router from '../src/router/index';
// import "../src/assets/style/reset.css";
import 'lib-flexible';
import utils from './utils/utils';
import store from './store/index';
// 配置路由keepAlive状态
utils.setRouterBeforeEach(router);
// runtime模式
new Vue({
  router,
  store,
  render: h => h(App)
}).$mount('#app');vuex管理缓存数组,编写添加和删除缓存路由方法
const UPDATE_CACHEDROUTENAMES = 'update_cachedroutenames';
const state = {
  activatedReloadData: true, // 页面activated时是否需要重新加载
  // 缓存的路由列表
  cachedRouteNames: []
};
const mutations = {
  [UPDATE_CACHEDROUTENAMES](st, { action, route }) {
    const methods = {
      add: () => {
        st.cachedRouteNames.push(route);
      },
      delete: () => {
        st.cachedRouteNames.splice(st.cachedRouteNames.findIndex(e => e === route), 1);
      }
    };
    methods[action]();
  }
};
export default {
  namespaced: true,
  state,
  mutations
};配置路由keepAlive状态
import store from '../store/index';
const { cachedRouteNames } = store.state.common;
const changeRoutes = (route, type) => {
  const routeName = route.components.default.name;
  if (routeName && type === 'add' ? !cachedRouteNames.includes(routeName) : cachedRouteNames.includes(routeName)) {
    store.commit('common/update_cachedroutenames', {
      action: type,
      route: routeName
    });
  }
};
// 定义添加缓存组件name函数,设置的时组件的name
const addRoutes = (route) => {
  changeRoutes(route, 'add');
};
// 定义删除缓存组件name函数,设置的是组件的name
const deleteRoutes = (route) => {
  changeRoutes(route, 'delete');
};
// 配置路由keepAlive状态
const setRouterBeforeEach = (router) => {
  router.beforeEach((to, from, next) => {
    // 对该组件是否读取缓存进行处理
    to.matched.forEach((item) => {
      const routes = item.meta.cachedRouteNames;
      if (item.meta.keepAlive && (!routes || (routes && (!from.name || routes.includes(from.name))))) {
        addRoutes(item);
      } else {
        deleteRoutes(item);
      }
    });
    next();
  });
  // 全局混入。在该组件被解析之后,若是属于需要缓存的组件,先将其添加到缓存配置中,进行缓存
  Vue.mixin({
    beforeRouteEnter(to, from, next) {
      next(() => {
        to.matched.forEach((item) => {
          if (to.meta.keepAlive) {
            addRoutes(item);
          }
        });
      });
    },
  });
};
export default {
  setRouterBeforeEach
};import Vue from 'vue';
import Vuex from 'vuex';
import actions from './actions';
import mutations from './mutations';
import state from './state';
import getters from './getters';
import app from './modules/app';
import common from './modules/common';
Vue.use(Vuex);
const store = new Vuex.Store({
modules: { app, common },
state,
mutations,
actions,
getters
});
export default store;keepAlive:设置缓存
cachedRouteNames:设置缓存条件
// An highlighted block
import Vue from 'vue';
import VueRouter from 'vue-router';
Vue.use(VueRouter);
const Home = resolve => require(['../routers/Home.vue'], resolve);
const List = resolve => require(['../routers/list.vue'], resolve);
const Detail = resolve => require(['../routers/detail.vue'], resolve);
const router = new VueRouter({
  routes: [
    {
      name: 'Home',
      path: '/home',
      component: Home
    },
    {
      name: 'List',
      path: '/list',
      component: List,
      meta: {
        keepAlive: true,
        // 缓存条件:从List --> Detail 则缓存List
        cachedRouteNames: ['Detail']
      }
    },
    {
      name: 'Detail',
      path: '/detail',
      component: Detail
    }
  ]
});
export default router;export default {
name: 'Home',
components: {
HeaderBar
},
data() {
return {
list: [
'查询1',
'查询2'
]
};
},
created() {
// this.getData();
// console.log(111111);
},
};
</script>关于“vue项目keepAlive配合vuex动态怎么设置路由缓存”的内容就介绍到这里了,感谢大家的阅读。如果想了解更多行业相关的知识,可以关注亿速云行业资讯频道,小编每天都会为大家更新不同的知识点。
免责声明:本站发布的内容(图片、视频和文字)以原创、转载和分享为主,文章观点不代表本网站立场,如果涉及侵权请联系站长邮箱:is@yisu.com进行举报,并提供相关证据,一经查实,将立刻删除涉嫌侵权内容。