您好,登录后才能下订单哦!
密码登录
登录注册
点击 登录注册 即表示同意《亿速云用户服务条款》

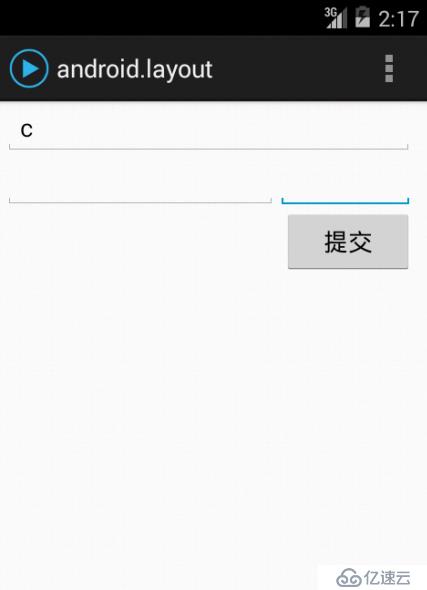
要实现这种效果,
LinearLayout的嵌套实现 2.使用RelativeLayout
<?xml version="1.0" encoding="utf-8"?>
<LinearLayout xmlns:android="http://schemas.android.com/apk/res/android"
    android:layout_width="match_parent"
    android:layout_height="match_parent"
    android:orientation="vertical"
    android:paddingLeft="10dp"
     android:paddingRight="10dp"
     >


     <EditText
        android:id="@+id/EditText1"
        android:layout_width="match_parent"
        android:layout_height="wrap_content"
        android:hint="@string/reminder"
    	/>


     <LinearLayout
         android:layout_width="match_parent"
         android:layout_height="wrap_content"
         android:orientation="horizontal"
         >
          <EditText
        android:id="@+id/dates"
        android:layout_width="0dp"
        android:layout_height="wrap_content"
		android:layout_weight="1"

        />

     <EditText
        android:id="@+id/times"
        android:layout_width="100dp"
        android:layout_height="wrap_content"


        />

     </LinearLayout>


     <Button
         android:id="@+id/button1"
         android:layout_width="96dp"
         android:layout_height="wrap_content"
         android:layout_gravity="right"
         android:text="提交"
         />

</LinearLayout>
<?xml version="1.0" encoding="utf-8"?>
<RelativeLayout xmlns:android="http://schemas.android.com/apk/res/android"
    android:layout_width="match_parent"
    android:layout_height="match_parent"
    android:paddingLeft="10dp"
    android:paddingRight="10dp"
    >
    <EditText
        android:id="@+id/EditText1"
        android:layout_width="fill_parent"
        android:layout_height="wrap_content"
        android:hint="@string/reminder"
    	/>
    <EditText
        android:id="@+id/dates"
        android:layout_width="wrap_content"
        android:layout_height="wrap_content"
		android:layout_below="@id/EditText1"
		android:layout_alignParentLeft="true"
		android:layout_toLeftOf="@+id/times"

        />

     <EditText
        android:id="@+id/times"
        android:layout_width="100dp"
        android:layout_height="wrap_content"
		android:layout_below="@+id/EditText1"
		android:layout_alignParentRight="true"

        />

     <Button
         android:id="@+id/button1"
         android:layout_width="96dp"
         android:layout_height="wrap_content"
         android:layout_below="@id/times"
         android:layout_alignParentRight="true"
         android:text="提交"
         />


</RelativeLayout>
<!--  	android:layout_alignParentLeft="true"    和父控件左对齐
android:layout_toLeftOf="@+id/times" 在指定组件左边
android:layout_below="@id/EditText1"   在指定组件下边
 -->
免责声明:本站发布的内容(图片、视频和文字)以原创、转载和分享为主,文章观点不代表本网站立场,如果涉及侵权请联系站长邮箱:is@yisu.com进行举报,并提供相关证据,一经查实,将立刻删除涉嫌侵权内容。