жӮЁеҘҪпјҢзҷ»еҪ•еҗҺжүҚиғҪдёӢи®ўеҚ•е“ҰпјҒ
Battery Historian
battery historianжҳҜдёҖж¬ҫз”ЁдәҺжЈҖжөӢдёҺз”өжұ жңүе…ізҡ„дҝЎжҒҜе’ҢдәӢ件зҡ„е·Ҙе…·пјҢиҝҗиЎҢеңЁAndroid 5.0 Lollipop (API level 21)еҸҠе…¶д№ӢеҗҺгҖӮе®ғдјҡз”ҹжҲҗдёҖеј е…·жңүж—¶й—ҙеқҗж Үзҡ„еӣҫзәёпјҢз”ЁжҲ·еҸҜд»ҘжҹҘзңӢеҗ„з§ҚдәӢ件иҖ—з”өж—¶й—ҙгҖӮ
е®үиЈ…
дёҖгҖҒйҰ–е…Ҳе®үиЈ…Goзј–зЁӢиҜӯиЁҖ
зӮ№еҮ»дёӢиҪҪгҖҗдёӢиҪҪгҖ‘пјӣ
е®үиЈ…Goпјӣ
й…ҚзҪ®GOROOTе’ҢGOPATH
гҖҖгҖҖгҖҖгҖҖa. GOROOTзҡ„дҪңз”ЁжҳҜе‘ҠиҜүGo е‘Ҫд»Өе’Ңе…¶д»–зӣёе…іе·Ҙе…·пјҢеңЁе“ӘйҮҢеҺ»жүҫеҲ°е®үиЈ…еңЁдҪ зі»з»ҹдёҠзҡ„GoеҢ…,жүҖд»ҘиҝҷйҮҢй…ҚзҪ®зҡ„жҳҜGOзҡ„е®үиЈ…зӣ®еҪ•
гҖҖгҖҖгҖҖгҖҖ 
гҖҖгҖҖгҖҖгҖҖb.GOPATHеҸҜд»Ҙз®ҖеҚ•зҗҶи§ЈдёәжҳҜе·ҘзЁӢзҡ„зӣ®еҪ•пјҢжүҖд»ҘеҲӣе»әдёҖдёӘGOзҡ„е·ҘзЁӢи·Ҝеҫ„
гҖҖгҖҖгҖҖгҖҖ 
C.жңҖеҗҺй…ҚзҪ®дёҖдёӢзҺҜеўғеҸҳйҮҸпјҢжҠҠGoзҡ„binзӣ®еҪ•ж”ҫеҲ°pathзҺҜеўғеҸҳйҮҸдёӯ
гҖҖгҖҖгҖҖгҖҖ 
гҖҖгҖҖ4. жЈҖжҹҘGoжҳҜеҗҰе®үиЈ…жҲҗеҠҹпјҢжү“ејҖе‘Ҫд»ӨиЎҢиҫ“е…ҘGo version
гҖҖгҖҖ
дәҢгҖҒе®үиЈ…Git
зӮ№еҮ»дёӢиҪҪгҖҗдёӢиҪҪгҖ‘пјӣ
жҢүз…§жӯҘйӘӨе®үиЈ…пјӣ
е®үиЈ…е®ҢжҲҗжЈҖжҹҘпјҡе‘Ҫд»ӨиЎҢиҫ“е…Ҙgit version
гҖҖгҖҖ 
гҖҖгҖҖд№ҹеҸҜд»ҘзӣҙжҺҘжү“ејҖgit bashжЈҖжҹҘ
гҖҖгҖҖ
дёүгҖҒе®үиЈ…Python
зӮ№еҮ»дёӢиҪҪгҖҗдёӢиҪҪгҖ‘пјҢжіЁж„Ҹд»…ж”ҜжҢҒpython2.7
е®үиЈ…е®ҢжҲҗпјӣ
зҺҜеўғеҸҳйҮҸй…ҚзҪ®пјҢж·»еҠ Pathзҡ„и·Ҝеҫ„пјҢжҳҜPythonзҡ„е®үиЈ…и·Ҝеҫ„
иҫ“е…Ҙе‘Ҫд»ӨиЎҢ python вҖ“VпјҲжіЁж„ҸжҳҜеӨ§еҶҷVпјүжЈҖжҹҘжҳҜеҗҰе®үиЈ…жҲҗеҠҹ
гҖҖгҖҖгҖҖгҖҖ 
еӣӣгҖҒе®үиЈ…JavaзҺҜеўғ
зӮ№еҮ»дёӢиҪҪгҖҗдёӢиҪҪгҖ‘пјӣ
е®ҢжҲҗе®үиЈ…гҖӮ
дә”гҖҒдёӢиҪҪBattery Historianжәҗз Ғ并且иҝҗиЎҢ
gitзӣ®еҪ•дёӢзӮ№еҮ»git-bash.exe,иҫ“е…Ҙе‘Ҫд»ӨиЎҢgo get -d -u github.com/google/battery-historian/...

**дёӢиҪҪеҲ°GOPATHй…ҚзҪ®зӣ®еҪ•дёӢ
иҝӣе…ҘеҲ°$GOPATH/src/github.com/google/battery-historianзӣ®еҪ•дёӢж–№
иҝҗиЎҢBattery Historian
иҫ“е…Ҙ $ go run setup.go
# Compile Javascript files using the Closure compiler

зӯүеҫ…ж•°еҲҶй’ҹпјҢеҰӮжһңд»Қ然没жңүдёӢиҪҪжҲҗеҠҹпјҢеҸҜд»ҘжүӢеҠЁдёӢиҪҪпјҢеҰӮдёӢж“ҚдҪң
**дёӢиҪҪгҖҗclosure-libraryгҖ‘е’ҢгҖҗclosure-compilerгҖ‘е’ҢгҖҗflot-axislabelsгҖ‘пјҢи§ЈеҺӢж”ҫеҲ°GOROOTзӣ®еҪ•дёӢthird_partyж–Ү件еӨ№дёӢж–№зҡ„зҡ„closure-compilerе’Ңclosure-libraryе’Ңflot-axislabelsж–Ү件еӨ№ ../battery-historian\third_partyпјӣеҰӮжһңжІЎжңүеқҮжүӢеҠЁеҲӣе»ә

b. go run cmd/battery-historian/battery-historian.go
# Run Historian on your machine (make sure $PATH contains $GOBIN)
$ go run cmd/battery-historian/battery-historian.go [--port <default:9999>]
жЈҖжҹҘ/battery-historianжҳҜеҗҰиҝҗиЎҢпјҢзҷ»еҪ•зҪ‘еқҖ http://localhost:9999жҹҘзңӢ
з”ҹжҲҗbugreport
дёҖгҖҒж•°жҚ®еҮҶеӨҮ
1.windows cmdдёӢжү§иЎҢд»ҘдёӢе‘Ҫд»ӨпјҢејҖеҗҜз”өжұ ж•°жҚ®иҺ·еҸ–
adb shell dumpsys batterystats --enable full-wake-history
2.windows cmdдёӢжү§иЎҢд»ҘдёӢе‘Ҫд»ӨпјҢйҮҚзҪ®з”өжұ ж•°жҚ®
adb shell dumpsys batterystats --reset
дәҢгҖҒж“ҚдҪңеә”з”ЁпјҢз”ҹжҲҗbugreport
жӢ”жҺүUSBпјҢ然еҗҺеҜ№еҫ…жөӢappиҝӣиЎҢзӣёе…іж“ҚдҪңпјҢдёҖж®өж—¶й—ҙеҗҺпјҢжҸ’дёҠUSBпјҢиҝҗиЎҢдёҖдёӢдёӨжқЎе‘Ҫд»ӨгҖӮ
1.windows cmdдёӢжү§иЎҢд»ҘдёӢе‘Ҫд»ӨпјҢе°ҶbugreportдҝЎжҒҜдҝқеӯҳеҲ°зӣёеә”и·Ҝеҫ„дёӢпјҢзӯүеҫ…жү§иЎҢе®ҢжҜ•
adb bugreport > bugreport.txt
2.windows cmd дёӢжү§иЎҢд»ҘдёӢе‘Ҫд»ӨпјҢе°Ҷд»ҘдёҠtxtж–ҮжЎЈиҪ¬еҢ–дёәhtmlж–Ү件
python historian.py -a bugreport.txt >battery.html
жіЁпјҡзҺ°еңЁдёҚзҹҘйҒ“дёәд»Җд№ҲдјҡжҸҗзӨәй”ҷиҜҜпјҢжүҫдёҚеҲ°historian.pyиҝҷдёӘж–Ү件
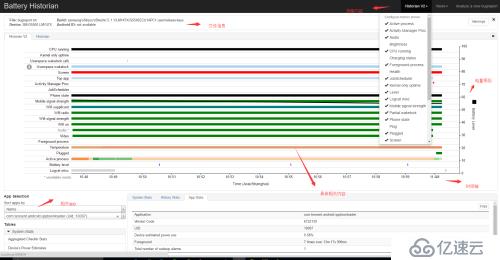
дёҠйқўзҡ„historian.py е°ұжҳҜз”ЁpythonеҶҷзҡ„и„ҡжң¬пјҢжүҖд»ҘйңҖиҰҒpythonзҺҜеўғпјҢеҸҜд»Ҙд»ҺgithubдёҠдёӢиҪҪпјҢд»ҘдёҠе‘Ҫд»Өжү§иЎҢе®ҢеҗҺпјҢдјҡеҸ‘зҺ°дёӨдёӘж–Ү件пјҢbugreport.txtе’Ңbattery.htmlпјҢиҝҷдёӘж—¶еҖҷз”Ёи°·жӯҢжөҸи§ҲеҷЁиҫ“е…Ҙhttp://localhost:9999,дёҠдј bugreport.txtжҲ–иҖ…жҳҜзӣҙжҺҘжү“ејҖbattery.htmlе°ұеҸҜд»ҘдәҶпјҢи§ҶеӣҫеҰӮдёӢпјҡ

д»ҘдёҠжҳҜV2.0зүҲзҡ„пјҢдҪ еҸҜд»ҘиҮӘе·ұеҲҮжҚўеҲ°1зүҲпјҢзҺ°еңЁжқҘеҲҶжһҗдёӢеҗ„дёӘеҸӮж•°зҡ„ж„Ҹд№үпјҡ
Battery usage categories
Filtering batterystats output
Batterystats & Battery Historian Walkthrough
Systrace Walkthrough
гҖҖгҖҖThe Battery Historian chart graphs power-relevant events over time.
гҖҖгҖҖEach row shows a colored bar segment when a system component is active and thus drawing current from the battery. The chart does not show how much battery was used by the component, only that the app was active. Charts are organized by category.

гҖҖгҖҖгҖҖгҖҖгҖҖгҖҖгҖҖгҖҖгҖҖгҖҖгҖҖгҖҖгҖҖгҖҖгҖҖгҖҖFigure 1. Example of Battery Historian output.
battery_level:
з”өйҮҸж¶ҲиҖ—йҖҹеәҰзӯүзә§пјҢеҖјжҳҜзҷҫеҲҶжҜ”пјҢ093е°ұжҳҜ93%
top:
收йӣҶз”өйҮҸж•°жҚ®ж—¶пјҢзі»з»ҹдёӯеӨ„дәҺtopзҡ„еә”з”ЁпјҢеҰӮжһңдҪ зҡ„еә”з”ЁжҳҜеүҚеҸ°зҡ„пјҢиҜ·зЎ®дҝқе®ғжҳҜtopзҡ„гҖӮйҷӨйқһдҪ жғізҹҘйҒ“дҪ зҡ„еә”з”ЁеңЁеҗҺеҸ°ж—¶зҡ„з”өйҮҸж¶ҲиҖ—гҖӮ
wifi_running:
wifiиҝһжҺҘжҙ»и·ғж—¶й—ҙгҖӮ
screen:
еұҸ幕зӮ№дә®ж—¶й—ҙгҖӮ
phone_in_call:
йҖҡиҜқж—¶й—ҙгҖӮ
wake_lock:
жіЁж„ҸпјҢеңЁиЎЁж јдёӯпјҢе®ғжҳҜд»ЈпјҠзҡ„пјҢе®ғжҳҜжңҖйҮҚиҰҒзҡ„еҸӮиҖғгҖӮ
йҖҡеёёеә”з”Ёзҡ„иҝҗиЎҢе‘ЁжңҹжҳҜеҗҜеҠЁпјҢиҝҗиЎҢдёҖдәӣдҪңдёҡпјҢ然еҗҺзқЎи§үгҖӮеҗҜеҠЁжҳҜжңҖиҙ№иө„жәҗзҡ„пјҢеҰӮжһңеңЁиҝҷиЎҢйҮҢеҮәзҺ°еӨҡдёӘе°ҸеқҡжқЎпјҢиҜҙжҳҺжңүй—®йўҳгҖӮrunning:
cpuиҝҗиЎҢж—¶й—ҙгҖӮ
wake_reason:
еҶ…ж ёжңҖеҗҺдёҖж¬Ўе”ӨйҶ’зҡ„еҺҹеӣ гҖӮеҰӮжһңжҳҜз”ұдҪ зҡ„еә”з”Ёе”ӨйҶ’пјҢиҜ·зЎ®е®ҡжҳҜеҗҰеҝ…иҰҒиҝҷд№ҲеҒҡгҖӮ
mobile_radio:
ж— зәҝз”өејҖеҗҜзҡ„ж—¶й—ҙпјҢејҖж— зәҝз”өйқһеёёиҖ–з”өгҖӮиҝҷйҮҢеҮәзҺ°еҜҶйӣҶзҡ„е°ҸеқҡжқЎпјҢиҜҙжҳҺжңүдјҳеҢ–з©әй—ҙгҖӮ
gps:
gpsејҖеҗҜзҡ„ж—¶й—ҙгҖӮ
sync:
жӯЈеңЁеҗҺеҸ°еҗҢжӯҘзҡ„еә”з”ЁгҖӮ
гҖҖжіЁж„ҸпјҢдёҠйқўзҡ„жҜҸиЎҢеҲҶзұ»еҸӘжҳҜж №жҚ®еҪ“еүҚејҖеҗҜзҡ„еҠҹиғҪжҲ–жңҚеҠЎпјҢеә”用收йӣҶзҡ„ж•°жҚ®гҖӮ并дёҚжҳҜжҜҸж¬ЎйғҪдёҖж ·пјҢеҰӮwifiжІЎејҖпјҢе°ұдёҚдјҡжңүwifiзӣёе…ізҡ„ж•°жҚ®пјҢgpsжІЎејҖе°ұжІЎжңүgpsзӣёе…іж•°жҚ®гҖӮ гҖҖ
гҖҖbatterystats.txt жҳҫзӨәзҡ„жҳҜе…ЁйғЁж•°жҚ®гҖӮbatterystats.htmlжҳҫзӨәзҡ„еҸӘжҳҜе®ғеҲҶжһҗж—¶жүҖйңҖзҡ„ж•°жҚ®гҖӮ
гҖҖгҖҖгҖҖгҖҖгҖҖгҖҖ
гҖҖгҖҖгҖҖгҖҖгҖҖгҖҖгҖҖгҖҖгҖҖгҖҖFigure 2.Example of filtered batterystats output.
Battery History:
дёҺз”өйҮҸзӣёе…іиЎҢдёәзҡ„зҡ„еҺҶеҸІи®°еҪ•гҖӮ
Per-PID Stats:
жҜҸдёӘеә”з”ЁиҝӣзЁӢиҝҗиЎҢзҡ„ж—¶й—ҙгҖӮ
Statistics since last charge:
жңҖиҝ‘дёҖж¬Ўе……з”өж—¶зі»з»ҹеҸӮж•°зҡ„з»ҹи®ЎпјҢеҰӮз”өжұ дҝЎеҸ·зӯүзә§пјҢеұҸ幕дә®еәҰгҖӮ
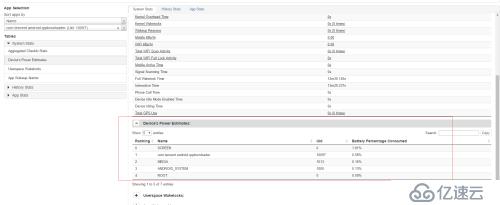
Estimated power use (mAh) by UID and peripheral:
зІ—з•Ҙз»ҹи®Ўз”өжұ зҡ„mAhгҖӮ
Per-app mobile ms per packet:
дҪҝз”Ёж— зәҝз”өи®ҫеӨҮдј иҫ“ж•°жҚ®зҡ„ж—¶й—ҙй—ҙйҡ”гҖӮеҘҪзҡ„еә”з”Ёдјҡд»ҘеҜҶйӣҶжү№йҮҸж–№ејҸдј иҫ“гҖӮ
All partial wake locks:
wakelocksзҡ„з»ҹи®ЎгҖӮ
еҲҶжһҗV1.0пјҢеҸҜд»ҘеҸӮиҖғhttp://blog.csdn.net/itfootball/article/details/44084159
жңҖеҗҺжҲ‘们иҝҳеҸҜд»ҘзңӢеҲ°зӣёе…іиҝӣзЁӢиҖ—иҙ№зҡ„з”өйҮҸпјҲдј°з®—еҖјпјүпјҡ

е…ҚиҙЈеЈ°жҳҺпјҡжң¬з«ҷеҸ‘еёғзҡ„еҶ…е®№пјҲеӣҫзүҮгҖҒи§Ҷйў‘е’Ңж–Үеӯ—пјүд»ҘеҺҹеҲӣгҖҒиҪ¬иҪҪе’ҢеҲҶдә«дёәдё»пјҢж–Үз« и§ӮзӮ№дёҚд»ЈиЎЁжң¬зҪ‘з«ҷз«ӢеңәпјҢеҰӮжһңж¶үеҸҠдҫөжқғиҜ·иҒ”зі»з«ҷй•ҝйӮ®з®ұпјҡis@yisu.comиҝӣиЎҢдёҫжҠҘпјҢ并жҸҗдҫӣзӣёе…іиҜҒжҚ®пјҢдёҖз»ҸжҹҘе®һпјҢе°Ҷз«ӢеҲ»еҲ йҷӨж¶үе«ҢдҫөжқғеҶ…е®№гҖӮ
жӮЁеҘҪпјҢзҷ»еҪ•еҗҺжүҚиғҪдёӢи®ўеҚ•е“ҰпјҒ