您好,登录后才能下订单哦!
密码登录
登录注册
点击 登录注册 即表示同意《亿速云用户服务条款》
我的程序里面是用到了安卓的listview来显示数据,主要用SimpleAdapter适配器,然而怎么获取listview的item中的控件呢?就如说我这里做了一个显示地址管理。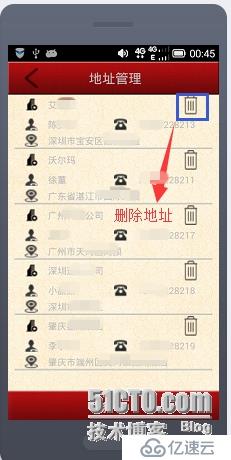
而让我苦恼的是要怎么获取里面的删除控件呢?
一开始我想直接取出来然后给它设置监听器,运行奔溃了,后来想了想,也是,你的listview每个item的布局都是一样的,我怎么知道你是点击哪个的。
所这个还是要在listview被点击时调用addressListView.setOnItemClickListener(),应该在这方法中去给控件添加监听器。
这里非常有用,不就如说当你叫外卖或者网购的时候,里面有一个+、-控件。获得控件的原理跟这个是一样的。
接下来我跟大家分享一下:
item样式文件:address_item.xml:
<?xml version="1.0" encoding="UTF-8"?>
<LinearLayout xmlns:android="http://schemas.android.com/apk/res/android"
android:layout_width="fill_parent"
android:layout_height="fill_parent"
android:orientation="vertical"
>
<RelativeLayout
android:layout_width="match_parent"
android:layout_height="wrap_content"
>
<TextView
android:id="@+id/textView0"
android:layout_width="20dp"
android:layout_height="wrap_content"
android:layout_marginLeft="15dp"
android:layout_centerVertical="true"
android:background="@drawable/company" />
<TextView
android:id="@+id/CompanyName"
android:layout_width="wrap_content"
android:layout_height="wrap_content"
android:layout_toRightOf="@+id/textView0"
android:layout_marginLeft="15dp"
android:layout_centerVertical="true"
android:text="沃尔玛" />
<TextView
android:id="@+id/delAddress"
android:layout_width="25dp"
android:layout_height="30dp"
android:layout_alignParentRight="true"
android:layout_alignParentTop="true"
android:layout_marginRight="20dp"
android:background="@drawable/address_delete" />
</RelativeLayout>
<RelativeLayout
android:layout_width="match_parent"
android:layout_height="wrap_content"
android:layout_marginTop="5dp">
<TextView
android:id="@+id/textView1"
android:layout_width="20dp"
android:layout_height="wrap_content"
android:layout_marginLeft="15dp"
android:layout_centerVertical="true"
android:background="@drawable/contact_person"
/>
<TextView
android:id="@+id/ContactPersonName"
android:layout_width="80dp"
android:layout_height="wrap_content"
android:layout_toRightOf="@+id/textView1"
android:layout_marginLeft="15dp"
android:layout_centerVertical="true"
android:text="徐董" />
<TextView
android:id="@+id/textView2"
android:layout_width="20dp"
android:layout_height="wrap_content"
android:layout_toRightOf="@+id/ContactPersonName"
android:layout_marginLeft="20dp"
android:layout_centerVertical="true"
android:background="@drawable/phone"/>
<TextView
android:id="@+id/PhoneNumer"
android:layout_width="100dp"
android:layout_height="wrap_content"
android:layout_toRightOf="@+id/textView2"
android:layout_marginLeft="15dp"
android:layout_centerVertical="true"
android:text="15766228209" />
</RelativeLayout>
<RelativeLayout
android:layout_width="match_parent"
android:layout_height="wrap_content"
android:layout_marginTop="5dp" >
<TextView
android:id="@+id/textView3"
android:layout_width="20dp"
android:layout_height="wrap_content"
android:layout_marginLeft="15dp"
android:layout_centerVertical="true"
android:background="@drawable/address"
/>
<TextView
android:id="@+id/AddressDetail"
android:layout_width="wrap_content"
android:layout_height="wrap_content"
android:layout_toRightOf="@+id/textView3"
android:layout_marginLeft="15dp"
android:layout_centerVertical="true"
android:text="广东省湛江市国际大厦" />
</RelativeLayout>
<LinearLayout
android:layout_width="match_parent"
android:layout_height="wrap_content"
android:orientation="vertical" >
<ImageView
android:id="@+id/p_w_picpathView1"
android:layout_width="wrap_content"
android:layout_height="wrap_content"
android:src="@drawable/dv" />
</LinearLayout>
</LinearLayout>
listview布局文件:addressmanage.xml
<?xml version="1.0" encoding="utf-8"?>
<LinearLayout xmlns:android="http://schemas.android.com/apk/res/android"
android:layout_width="fill_parent"
android:layout_height="fill_parent"
android:orientation="vertical"
android:background="@drawable/bg">
<RelativeLayout
android:id="@+id/title"
android:layout_width="fill_parent"
android:layout_height="50dp"
android:background="@drawable/bg_navigation" >
<TextView
android:id="@+id/textView1"
android:layout_width="fill_parent"
android:layout_height="fill_parent"
android:layout_centerVertical="true"
android:layout_marginLeft="5dip"
android:gravity="center"
android:text="地址管理"
android:textSize="20dip" />
<LinearLayout
android:id="@+id/AddressBack"
android:layout_width="80dp"
android:layout_height="50dp"
android:layout_alignLeft="@+id/textView1"
android:layout_alignParentBottom="true"
android:layout_alignParentTop="true" >
<TextView
android:layout_width="20dp"
android:layout_height="30dp"
android:layout_alignParentLeft="true"
android:layout_centerVertical="true"
android:layout_marginLeft="20dp"
android:layout_marginTop="10dp"
android:background="@drawable/back"
/>
</LinearLayout>
</RelativeLayout>
<LinearLayout
android:id="@+id/linearlayoutAddress"
android:layout_width="match_parent"
android:layout_height="wrap_content"
android:orientation="vertical"
>
<ListView
android:id="@+id/addressListView"
android:layout_width="match_parent"
android:layout_height="wrap_content"
android:layout_marginLeft="10dp"
android:layout_marginRight="10dp"
android:listSelector="#00000000"
>
</ListView>
</LinearLayout>
<Button
android:id="@+id/AddNewAddress"
android:layout_width="fill_parent"
android:layout_height="50dip"
android:layout_marginBottom="10dp"
android:text="新增"
android:background="@drawable/addressbuttonbg"/>
</LinearLayout>
上面两个就是xml布局文件
接下来就是.java文件的部分主要代码:
addressListView = (ListView)findViewById(R.id.addressListView);
List<Map<String, Object>> listitems = new ArrayList<Map<String,Object>>();
for (int i = 0; i < companys.length; i++) {
Map<String, Object> listitem = new HashMap<String, Object>();
listitem.put("company", companys[i]);
listitem.put("person",persons[i]);
listitem.put("phone", phones[i]);
listitem.put("address", address[i]);
listitems.add(listitem);
}
SimpleAdapter simpleAdapter = new SimpleAdapter(AdrressManageActivity.this, listitems, R.layout.address_item, new String[]{"company","person","phone","address"},new int[]{R.id.CompanyName,R.id.ContactPersonName,R.id.PhoneNumer,R.id.AddressDetail});
addressListView.setAdapter(simpleAdapter);
//设置焦点响应问题 同时要将 item 中的焦点 focusable 设置为 false
addressListView.setDescendantFocusability(ViewGroup.FOCUS_BLOCK_DESCENDANTS);
//设置listview中的哪个item被点击,然后获得删除按钮
addressListView.setOnItemClickListener(new OnItemClickListener() {
@Override
public void onItemClick(AdapterView<?> arg0, View view,
int arg2, long arg3) {
// TODO Auto-generated method stub
TextView delButton = (TextView)view.findViewById(R.id.delAddress);
delButton.setOnClickListener(myListener);
}
});
上面加背景色的为最主要代码。
1、item的布局文件最好不要出现button和check这样的控件
2、要是用到点击事件,可以用TextView来代替。原因如下:
你的item中的布局文件最好不要用button或者check控件,因为你用了button或者check控件的话,item的focus就会失焦,因为button或者check控件优先了。所以你会点击listview的item没有反应。
3、清除item按下的背景颜色。
在listview的xml中加入: android:listSelector="#00000000"
4、获得item的点击事件
addressListView.setOnItemClickListener(new OnItemClickListener() {
@Override
public void onItemClick(AdapterView<?> arg0, View view,
int arg2, long arg3) {
// TODO Auto-generated method stub
delButton = (TextView)view.findViewById(R.id.delAddress);
delButton.setOnClickListener(myListener);
}
});
其中view代表这个item的布局。所以通过方法view.findViewById(xxx);来获得你要的控件。
5、为你的控件设置监听器
如上:delButton.setOnClickListener(myListener);
6、你要做出什么响应就自己写啦。今天忧郁了很久,终于解决了。
免责声明:本站发布的内容(图片、视频和文字)以原创、转载和分享为主,文章观点不代表本网站立场,如果涉及侵权请联系站长邮箱:is@yisu.com进行举报,并提供相关证据,一经查实,将立刻删除涉嫌侵权内容。