您好,登录后才能下订单哦!
这篇“LyScript如何实现内存交换与差异对比”文章的知识点大部分人都不太理解,所以小编给大家总结了以下内容,内容详细,步骤清晰,具有一定的借鉴价值,希望大家阅读完这篇文章能有所收获,下面我们一起来看看这篇“LyScript如何实现内存交换与差异对比”文章吧。
实现被加载程序内特定一块内存区域的交换,该方法实现原理就是两个变量之间的交换,只是在交换时需要逐个字节进行,调用read_memory_byte()函数实现起了很容易。
from LyScript32 import MyDebug

# 交换两个内存区域
def memory_xchage(dbg,memory_ptr_x,memory_ptr_y,bytes):
    ref = False
    for index in range(0,bytes):
        # 读取两个内存区域
        read_byte_x = dbg.read_memory_byte(memory_ptr_x + index)
        read_byte_y = dbg.read_memory_byte(memory_ptr_y + index)

        # 交换内存
        ref = dbg.write_memory_byte(memory_ptr_x + index,read_byte_y)
        ref = dbg.write_memory_byte(memory_ptr_y + index, read_byte_x)
    return ref

if __name__ == "__main__":
    dbg = MyDebug()
    dbg.connect()

    eip = dbg.get_register("eip")

    # 内存交换
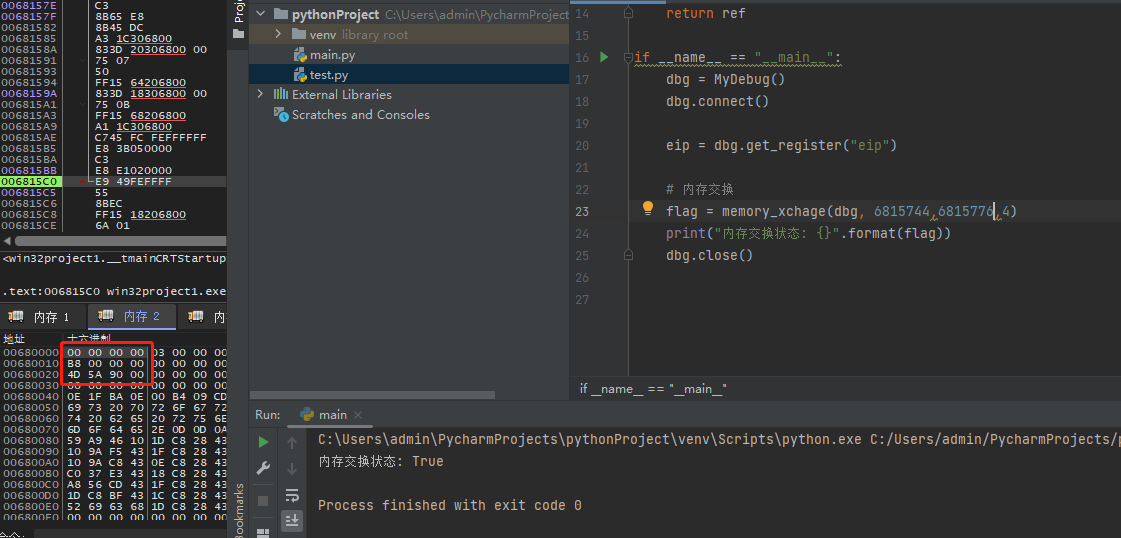
    flag = memory_xchage(dbg, 6815744,6815776,4)
    print("内存交换状态: {}".format(flag))
    dbg.close()
PE文件头节点交换后如下:

可用于对比该进程内存中的特定一块区域的差异,返回是列表中的字典形式,分别传入对比内存x,y以及需要对比的内存长度,此处建议不要超过1024字节。
from LyScript32 import MyDebug

# 对比两个内存区域
def memory_cmp(dbg,memory_ptr_x,memory_ptr_y,bytes):
    cmp_memory = []
    for index in range(0,bytes):

        item = {"addr":0, "x": 0, "y": 0}

        # 读取两个内存区域
        read_byte_x = dbg.read_memory_byte(memory_ptr_x + index)
        read_byte_y = dbg.read_memory_byte(memory_ptr_y + index)

        if read_byte_x != read_byte_y:
            item["addr"] = memory_ptr_x + index
            item["x"] = read_byte_x
            item["y"] = read_byte_y
            cmp_memory.append(item)
    return cmp_memory

if __name__ == "__main__":
    dbg = MyDebug()
    dbg.connect()

    eip = dbg.get_register("eip")

    # 内存对比
    cmp_ref = memory_cmp(dbg, 6815744,6815776,4)
    for index in range(0,len(cmp_ref)):
        print("地址: 0x{:08X} -> X: 0x{:02x} -> y: 0x{:02x}".format(cmp_ref[index].get("addr"),cmp_ref[index].get("x"),cmp_ref[index].get("y")))

    dbg.close()
对比特定内存区域,返回差异字节地址:

通过调用read_memory_byte()函数,或者open()打开文件,等就可以得到程序磁盘与内存中特定位置的机器码参数,然后通过对每一个列表中的字节进行比较,就可得到特定位置下磁盘与内存中的数据是否一致的判断。
#coding: utf-8
import binascii,os,sys
from LyScript32 import MyDebug

# 得到程序的内存镜像中的机器码
def get_memory_hex_ascii(address,offset,len):
    count = 0
    ref_memory_list = []
    for index in range(offset,len):
        # 读出数据
        char = dbg.read_memory_byte(address + index)
        count = count + 1

        if count % 16 == 0:
            if (char) < 16:
                print("0" + hex((char))[2:])
                ref_memory_list.append("0" + hex((char))[2:])
            else:
                print(hex((char))[2:])
                ref_memory_list.append(hex((char))[2:])
        else:
            if (char) < 16:
                print("0" + hex((char))[2:] + " ",end="")
                ref_memory_list.append("0" + hex((char))[2:])
            else:
                print(hex((char))[2:] + " ",end="")
                ref_memory_list.append(hex((char))[2:])
    return ref_memory_list

# 读取程序中的磁盘镜像中的机器码
def get_file_hex_ascii(path,offset,len):
    count = 0
    ref_file_list = []

    with open(path, "rb") as fp:
        # file_size = os.path.getsize(path)
        fp.seek(offset)

        for item in range(offset,offset + len):
            char = fp.read(1)
            count = count + 1
            if count % 16 == 0:
                if ord(char) < 16:
                    print("0" + hex(ord(char))[2:])
                    ref_file_list.append("0" + hex(ord(char))[2:])
                else:
                    print(hex(ord(char))[2:])
                    ref_file_list.append(hex(ord(char))[2:])
            else:
                if ord(char) < 16:
                    print("0" + hex(ord(char))[2:] + " ", end="")
                    ref_file_list.append("0" + hex(ord(char))[2:])
                else:
                    print(hex(ord(char))[2:] + " ", end="")
                    ref_file_list.append(hex(ord(char))[2:])
    return ref_file_list

if __name__ == "__main__":
    dbg = MyDebug()

    connect_flag = dbg.connect()
    print("连接状态: {}".format(connect_flag))

    module_base = dbg.get_base_from_address(dbg.get_local_base())
    print("模块基地址: {}".format(hex(module_base)))

    # 得到内存机器码
    memory_hex_byte = get_memory_hex_ascii(module_base,0,100)

    # 得到磁盘机器码
    file_hex_byte = get_file_hex_ascii("d://Win32Project1.exe",0,100)

    # 输出机器码
    print("\n内存机器码: ",memory_hex_byte)
    print("\n磁盘机器码: ",file_hex_byte)

    dbg.close()
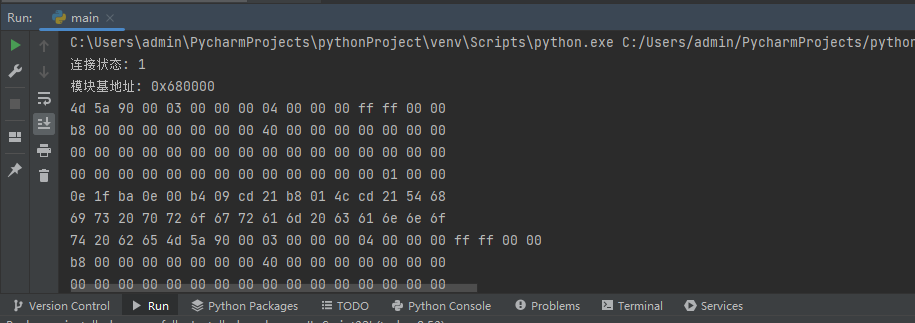
读取后输出时会默认十六个字符一次换行,输出效果如下。

我们继续增加磁盘与内存对比过程,然后就能实现对特定内存区域与磁盘区域字节码一致性的判断。
#coding: utf-8
import binascii,os,sys
from LyScript32 import MyDebug

# 得到程序的内存镜像中的机器码
def get_memory_hex_ascii(address,offset,len):
    count = 0
    ref_memory_list = []
    for index in range(offset,len):
        # 读出数据
        char = dbg.read_memory_byte(address + index)
        count = count + 1

        if count % 16 == 0:
            if (char) < 16:
                print("0" + hex((char))[2:])
                ref_memory_list.append("0" + hex((char))[2:])
            else:
                print(hex((char))[2:])
                ref_memory_list.append(hex((char))[2:])
        else:
            if (char) < 16:
                print("0" + hex((char))[2:] + " ",end="")
                ref_memory_list.append("0" + hex((char))[2:])
            else:
                print(hex((char))[2:] + " ",end="")
                ref_memory_list.append(hex((char))[2:])
    return ref_memory_list

# 读取程序中的磁盘镜像中的机器码
def get_file_hex_ascii(path,offset,len):
    count = 0
    ref_file_list = []

    with open(path, "rb") as fp:
        # file_size = os.path.getsize(path)
        fp.seek(offset)

        for item in range(offset,offset + len):
            char = fp.read(1)
            count = count + 1
            if count % 16 == 0:
                if ord(char) < 16:
                    print("0" + hex(ord(char))[2:])
                    ref_file_list.append("0" + hex(ord(char))[2:])
                else:
                    print(hex(ord(char))[2:])
                    ref_file_list.append(hex(ord(char))[2:])
            else:
                if ord(char) < 16:
                    print("0" + hex(ord(char))[2:] + " ", end="")
                    ref_file_list.append("0" + hex(ord(char))[2:])
                else:
                    print(hex(ord(char))[2:] + " ", end="")
                    ref_file_list.append(hex(ord(char))[2:])
    return ref_file_list

if __name__ == "__main__":
    dbg = MyDebug()

    connect_flag = dbg.connect()
    print("连接状态: {}".format(connect_flag))

    module_base = dbg.get_base_from_address(dbg.get_local_base())
    print("模块基地址: {}".format(hex(module_base)))

    # 得到内存机器码
    memory_hex_byte = get_memory_hex_ascii(module_base,0,1024)

    # 得到磁盘机器码
    file_hex_byte = get_file_hex_ascii("d://Win32Project1.exe",0,1024)

    # 输出机器码
    for index in range(0,len(memory_hex_byte)):
        # 比较磁盘与内存是否存在差异
        if memory_hex_byte[index] != file_hex_byte[index]:
            # 存在差异则输出
            print("\n相对位置: [{}] --> 磁盘字节: 0x{} --> 内存字节: 0x{}".
                  format(index,memory_hex_byte[index],file_hex_byte[index]))
    dbg.close()
代码运行后即可输出,存在差异的相对位置:

通过封装的get_memory_hex_ascii得到内存机器码,然后再使用如下过程实现输出该内存中的机器码所对应的ASCII码。
from LyScript32 import MyDebug
import os,sys

# 转为ascii
def to_ascii(h):
    list_s = []
    for i in range(0, len(h), 2):
        list_s.append(chr(int(h[i:i+2], 16)))
    return ''.join(list_s)

# 转为16进制
def to_hex(s):
    list_h = []
    for c in s:
        list_h.append(hex(ord(c))[2:])
    return ''.join(list_h)

# 得到程序的内存镜像中的机器码
def get_memory_hex_ascii(address,offset,len):
    count = 0
    ref_memory_list = []
    for index in range(offset,len):
        # 读出数据
        char = dbg.read_memory_byte(address + index)
        count = count + 1

        if count % 16 == 0:
            if (char) < 16:
                ref_memory_list.append("0" + hex((char))[2:])
            else:
                ref_memory_list.append(hex((char))[2:])
        else:
            if (char) < 16:
                ref_memory_list.append("0" + hex((char))[2:])
            else:
                ref_memory_list.append(hex((char))[2:])
    return ref_memory_list


if __name__ == "__main__":
    dbg = MyDebug()
    dbg.connect()

    eip = dbg.get_register("eip")

    # 得到模块基地址
    module_base = dbg.get_base_from_address(dbg.get_local_base())

    # 得到指定区域内存机器码
    ref_memory_list = get_memory_hex_ascii(module_base,0,1024)

    # 解析ascii码
    break_count = 1
    for index in ref_memory_list:
        if break_count %32 == 0:
            print(to_ascii(hex(int(index, 16))[2:]))
        else:
            print(to_ascii(hex(int(index, 16))[2:]),end="")
        break_count = break_count + 1

    dbg.close()
输出效果如下,如果换成中文,那就是一个中文搜索引擎了。

通过二次封装get_memory_hex_ascii()实现扫描内存特征码功能,如果存在则返回True否则返回False。
from LyScript32 import MyDebug
import os,sys

# 得到程序的内存镜像中的机器码
def get_memory_hex_ascii(address,offset,len):
    count = 0
    ref_memory_list = []
    for index in range(offset,len):
        # 读出数据
        char = dbg.read_memory_byte(address + index)
        count = count + 1

        if count % 16 == 0:
            if (char) < 16:
                ref_memory_list.append("0" + hex((char))[2:])
            else:
                ref_memory_list.append(hex((char))[2:])
        else:
            if (char) < 16:
                ref_memory_list.append("0" + hex((char))[2:])
            else:
                ref_memory_list.append(hex((char))[2:])
    return ref_memory_list


# 在指定区域内搜索特定的机器码,如果完全匹配则返回
def search_hex_ascii(address,offset,len,hex_array):
    # 得到指定区域内存机器码
    ref_memory_list = get_memory_hex_ascii(address,offset,len)

    array = []

    # 循环输出字节
    for index in range(0,len + len(hex_array)):

        # 如果有则继续装
        if len(hex_array) != len(array):
            array.append(ref_memory_list[offset + index])

        else:
            for y in range(0,len(array)):
                if array[y] != ref_memory_list[offset + index + y]:
                    return False

        array.clear()
    return False

if __name__ == "__main__":
    dbg = MyDebug()
    dbg.connect()

    eip = dbg.get_register("eip")

    # 得到模块基地址
    module_base = dbg.get_base_from_address(dbg.get_local_base())

    re = search_hex_ascii(module_base,0,100,hex_array=["0x4d","0x5a"])

dbg.close()特征码扫描一般不需要自己写,自己写的麻烦,而且不支持通配符,可以直接调用我们API中封装好的scan_memory_one()它可以支持??通配符模糊匹配,且效率要高许多。
以上就是关于“LyScript如何实现内存交换与差异对比”这篇文章的内容,相信大家都有了一定的了解,希望小编分享的内容对大家有帮助,若想了解更多相关的知识内容,请关注亿速云行业资讯频道。
免责声明:本站发布的内容(图片、视频和文字)以原创、转载和分享为主,文章观点不代表本网站立场,如果涉及侵权请联系站长邮箱:is@yisu.com进行举报,并提供相关证据,一经查实,将立刻删除涉嫌侵权内容。