您好,登录后才能下订单哦!
主要参考了这篇文章,感谢作者的贡献
http://forum.xda-developers.com/showthread.php?t=2566234
1.Monkeyrunner
Monkeyrunner是一个自动化的测试工具,我们用它做产品的黑盒测试。它提供了Python API使我们不用修改Android代码,而是用python程序来控制我们的设备模拟器。我们可以用python来安装应用,测试包,运行,发起按键事件,获取并保存用户界面的截图。
Monkeyrunner工具设计的主要目的,是在框架的层面上测试应用和设备并为运行单元测试套件。当然,你也可以用它来做其他的事。
Monkeyrunner官方网站
http://developer.android.com/tools/help/monkeyrunner_concepts.html
2.基本条件:
1. Windows 7/8 OS
2. Java 6
3. Eclipse
4. Anroid设备最好要能运行 2.3.4及以上版本(非强制性)
5. Python
6. Jython
7. 一个待测试的应用
3.安装
下载安装Python:http://www.python.org/getit/
接下来通过eclipse的market place下载eclipse的PyDev插件
help->Install New Soft
地址是:http://pydev.org/updates

配置 Jython interpreters:参考这篇博客(其中也包含了Pydev的安装过程),我就不重复造车了
http://blog.csdn.net/zhubaitian/article/details/39803205
配置 Python interpreters:
Window->Preferences->PyDev->Interpreters->-Python interpreters

4.建工程
这样最基本的配置就完成了,接下来新建一个文件
New -> PyDev Project -> 为工程命名并选择 Jython
如下:

右键你的工程,new-->PyDev-->new module

选择empty
写入代码
关于monkeyrunner的语法,官网讲的很清楚:
http://developer.android.com/tools/help/monkeyrunner_concepts.html
例如我自己的代码如下
# Imports the monkeyrunner modules used by this program
from com.android.monkeyrunner import MonkeyRunner, MonkeyDevice
from symbol import if_stmt
from sys import exit

# Connects to the current device, returning a MonkeyDevice object
device = MonkeyRunner.waitForConnection()

if not device:
    print("no device")
    exit

# Installs the Android package. Notice that this method returns a boolean, so you can test
# to see if the installation worked.
device.installPackage('F:/android-space/OrangeLife_2.0/bin/OrangeLife_2.0.apk')

# sets a variable with the package's internal name
package = 'com.curry.ams'

# sets a variable with the name of an Activity in the package
activity = 'com.curry.ams.user.LoginActivity'

# sets the name of the component to start
runComponent = package + '/' + activity

# Runs the component
device.startActivity(component=runComponent)

# Presses the Menu button
device.touch(285,488, MonkeyDevice.DOWN_AND_UP)
device.type('13313933088')
device.touch(432,648, MonkeyDevice.DOWN_AND_UP)
device.type('ysclyy2413567')
device.touch(573,1133, MonkeyDevice.DOWN_AND_UP)

# Takes a screenshot
result = device.takeSnapshot()

# Writes the screenshot to a file
result.writeToFile('F:/android-space/shot1.png','png')
5.运行
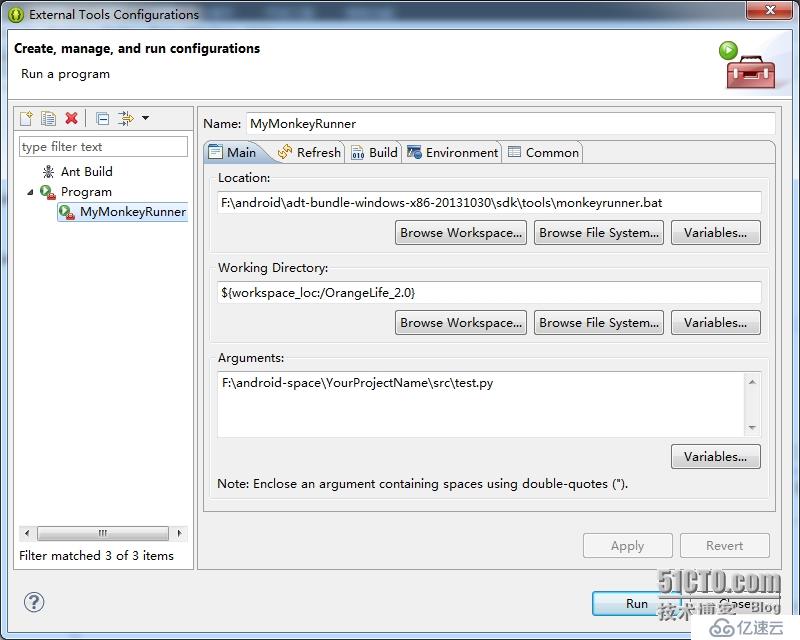
运行前要先进行配置:
Run-->Extenal Tools-->Extenal Tools configration

Locations:这里填的是你android sdk文件夹下,tool中的monkeyrunner.bat
Working Directory:你的工作目录,你的.apk文件要在该工作目录中
Arguments:要执行的.py文件的路径
点击run 就开始运行了
免责声明:本站发布的内容(图片、视频和文字)以原创、转载和分享为主,文章观点不代表本网站立场,如果涉及侵权请联系站长邮箱:is@yisu.com进行举报,并提供相关证据,一经查实,将立刻删除涉嫌侵权内容。