您好,登录后才能下订单哦!
密码登录
登录注册
点击 登录注册 即表示同意《亿速云用户服务条款》
本篇内容主要讲解“Vue怎么自定义日历小控件”,感兴趣的朋友不妨来看看。本文介绍的方法操作简单快捷,实用性强。下面就让小编来带大家学习“Vue怎么自定义日历小控件”吧!
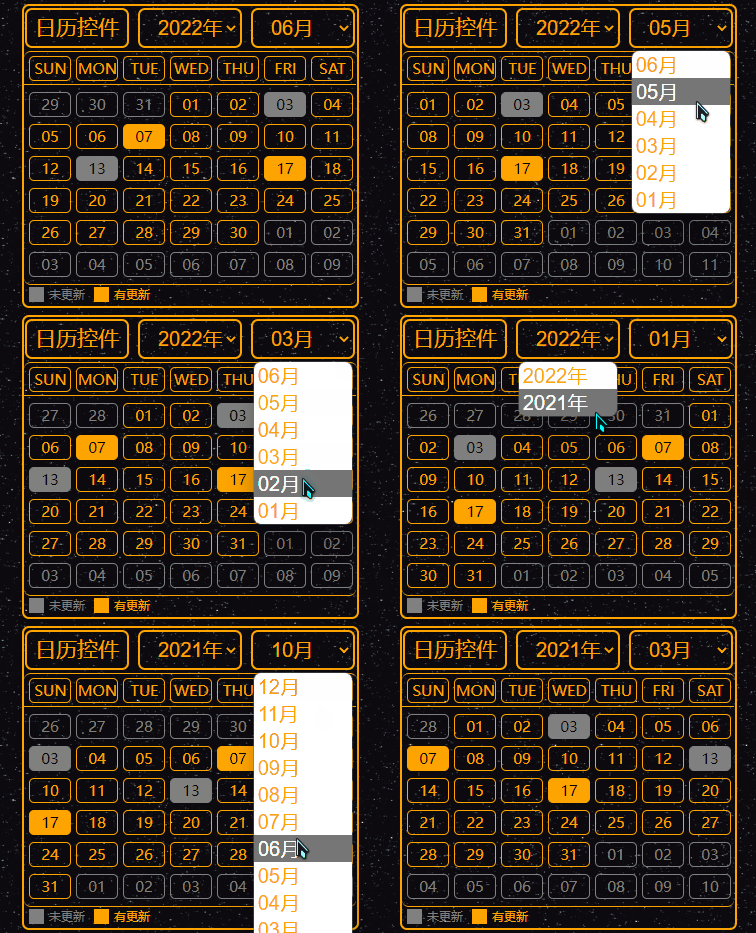
先上效果图:

可以在效果图中看到,选择不同的月份的时候当月天数与星期几都是一一对应,非当月天数则是灰色显示,一目了然。
并且此日历控件支持自动确定当前时间,每次打开默认显示的就是最新的月份,用来做签到打卡的功能比较合适。
由于使用的是原生div进行制作,自定义功能非常强,可以自由的更换样式、背景、颜色、大小等等。
在与数据库的时候可以从数据库获得时间信息并填充到控件中,图中的色块就可以看出。
该控件使用了Vue、CSS、以及最原生的div实现了自定义的样式,不得不说,div在自定义这一块是真的太给力了。
代码如下:
<!DOCTYPE html>
<html lang="en">
<head>
    <meta charset="UTF-8">
    <title>日历控件</title>
    <script src="./vue.js"></script>
</head>
<style>
    .writer-upper-right {
    float: left;
    width: 333px;
    height: 300px;
    border: 2px orange solid;
    border-radius: 7px;
}
.calendar-head {
    width: 100%;
    height: 15%;
    border-radius: 7px;
}
.calendar-body {
    width: 99.9%;
    height: 84.9%;
    border-radius: 7px;
    border-top: 1px orange solid;
}
.calendar-head-title {
    float: left;
    width: 100px;
    height: 79%;
    line-height: 33px;
    border-radius: 7px;
    border: 2px orange solid;
    margin-top: 2px;
    margin-left: 1px;
    text-align: center;
    color: orange;
    font-size: 21px;
}
.calendar-head-year {
    float: left;
    margin-left: 9px;
    width: 100px;
    height: 79%;
    border-radius: 7px;
    border: 2px orange solid;
    margin-top: 2px;
    color: orange;
    text-align: center;
}
.select-calendar-year {
    float: left;
    width: 100%;
    height: 100%;
    border: none;
    background: none;
    color: orange;
    text-indent: 0.7em;
    font-size: 20px;
}
.select-calendar-year:focus {
    outline: none;
}
.select-calendar-year:hover {
    cursor: pointer;
}
.calendar-body-week {
    width: 99.8%;
    height: 32px;
    margin: 0 auto;
    border-bottom: 1px orange solid;
}
.calendar-body-days {
    width: 99.8%;
    height: 199px;
    border-bottom: 1px orange solid;
    border-top: none;
    border-radius: 7px;
}
.calendar-body-info {
    width: 99.8%;
    height: 18px;
    border-radius: 7px;
}
.weekEveryDay {
    float: left;
    width: 40px;
    height: 23px;
    margin-left: 5px;
    margin-top: 4px;
    border: 1px orange solid;
    border-radius: 5px;
    line-height: 23px;
    text-align: center;
    font-size: 15px;
    color: orange;
}
.monthEveryDay {
    margin-top: 7px;
}
.not-now-month {
    border-color: gray;
    color: gray;
}
.now-day-writer {
    background-color: orange;
    color: black;
}
.now-day-not-writer {
    border-color: gray;
    background-color: gray;
    color: black;
}
.info-if-writer {
    float: left;
    width: 60px;
    height: 16px;
    margin-left: 5px;
    margin-top: 1px;
}
.color-span {
    float: left;
    width: 15px;
    height: 15px;
    margin-top: 1px;
    background-color: gray;
}
.color-info {
    float: left;
    width: 40px;
    height: 15px;
    margin-top: 1px;
    margin-left: 5px;
    line-height: 15px;
    text-align: left;
    font-size: 12px;
    color: gray;
}
.color-span2 {
    background-color: orange;
}
.color-info2 {
    color: orange;
}
</style>
<body >
    <div id="app">
        <div class="writer-upper-right">
            <div class="calendar-head">
                <div class="calendar-head-title">日历控件</div>
                <div class="calendar-head-year">
                    <label>
                        <select class="select-calendar-year" v-model="calendarYear" @change="SelectCalendarYear">
                            <option v-for="year in calendarAllYear" :value="year" :key="year">{{year}}年</option>
                        </select>
                    </label>
                </div>
                <div class="calendar-head-year">
                    <label>
                        <select class="select-calendar-year" v-model="calendarMonth" @change="SelectCalendarMonth">
                            <option v-for="month in calendarAllMonth" :value="month" :key="month">{{month}}月</option>
                        </select>
                    </label>
                </div>
            </div>
            <div class="calendar-body">
                <div class="calendar-body-week">
                    <div class="weekEveryDay">SUN</div>
                    <div class="weekEveryDay">MON</div>
                    <div class="weekEveryDay">TUE</div>
                    <div class="weekEveryDay">WED</div>
                    <div class="weekEveryDay">THU</div>
                    <div class="weekEveryDay">FRI</div>
                    <div class="weekEveryDay">SAT</div>
                </div>
                <div class="calendar-body-days">
                    <div class="weekEveryDay monthEveryDay not-now-month" v-for="day in calendarPrevDays" disabled>{{day}}</div>
                    <div class="weekEveryDay monthEveryDay"
                         v-for="day in calendarNowDays"
                         :class="['weekEveryDay monthEveryDay', {'now-day-writer' : calendarHadWrite.includes(day)}, {'now-day-not-writer' : calendarNotWrite.includes(day)}]"
                    >{{day}}</div>
                    <div class="weekEveryDay monthEveryDay not-now-month" v-for="day in calendarNextDays" disabled>{{day}}</div>
                </div>
                <div class="calendar-body-info">
                    <div class="info-if-writer">
                        <div class="color-span"></div>
                        <div class="color-info">未更新</div>
                    </div>
                    <div class="info-if-writer">
                        <div class="color-span color-span2"></div>
                        <div class="color-info color-info2">有更新</div>
                    </div>
                </div>
            </div>
        </div>
    </div>
</body>
</html>
到此,相信大家对“Vue怎么自定义日历小控件”有了更深的了解,不妨来实际操作一番吧!这里是亿速云网站,更多相关内容可以进入相关频道进行查询,关注我们,继续学习!
免责声明:本站发布的内容(图片、视频和文字)以原创、转载和分享为主,文章观点不代表本网站立场,如果涉及侵权请联系站长邮箱:is@yisu.com进行举报,并提供相关证据,一经查实,将立刻删除涉嫌侵权内容。