您好,登录后才能下订单哦!
这篇“Angular中的NgModule怎么使用”文章的知识点大部分人都不太理解,所以小编给大家总结了以下内容,内容详细,步骤清晰,具有一定的借鉴价值,希望大家阅读完这篇文章能有所收获,下面我们一起来看看这篇“Angular中的NgModule怎么使用”文章吧。
NgModule 会把相关的代码收集到一些功能集中,形成功能单元。在使用Angular CL 命令新建一个项目的时候,会给我们生成一个根模块,命名为 AppModule,根模块有一个根组件AppComponent,引导这个根模块就可以启动应用。Angular 应用是模块化的,我们在开发中会根据其功能 作用 以及其特性,建立大大小小各种模块,从而构建其成为一个应用程序,任何模块都能包含任意数量的其它组件。
1.@NgModule()
import { BrowserModule } from '@angular/platform-browser';
import { NgModule } from '@angular/core';

import { AppRoutingModule } from './app-routing.module';
import { AppComponent } from './app.component';

@NgModule({
  declarations: [
    AppComponent
  ],
  imports: [
    BrowserModule,
    AppRoutingModule
  ],
  providers: [],
  bootstrap: [AppComponent]
})
export class AppModule { }
由⬆️代码我们可以看到,NgModule 是一个带有 @NgModule() 装饰器的类,它接受一个元数据对象,该对象的属性用来描述这个模块。
点进去@NgModule() 装饰器的类我们可以看到他有如下属性以及官方的对其属性的解释。
export declare interface NgModule {
    providers?: Provider[];// 本模块向全局服务中贡献的那些服务的创建器。 这些服务能被本应用中的任何部分使用。(你也可以在组件级别指定服务提供商,这通常是首选方式。)
    declarations?: Array<Type<any> | any[]>;// 那些属于本 NgModule 的组件、指令、管道
    imports?: Array<Type<any> | ModuleWithProviders<{}> | any[]>;// 那些导出了本模块中的组件模板所需的类的其它模块
    exports?: Array<Type<any> | any[]>;//那些能在其它模块的组件模板中使用的可声明对象的子集
    entryComponents?: Array<Type<any> | any[]>;
    bootstrap?: Array<Type<any> | any[]>;
    schemas?: Array<SchemaMetadata | any[]>;
}
以下是本人使用Angular后对此元数据属性个人口语化的理解
providers:将本模块所有在组件中注入的服务,在这里提前定义好,否则在此模块中使用这个服务会有错误提示。
declaration:declaration 英文意思为声明。在这里声明一些模块中要使用到的一些组件,指令,管道等。
imports:导入一些模块,比如说我把所有的指令构成一个模块 我使用其中某些指令的时候,我可以选择导入整个指令模块。也可以导入一些通过npm install 安装的一些模块导入其中,才可以使用。
exports:导出组件or指令管道等,以供引用此模块的模块可以使用此模块的组件or 指令管道等。
exporyComponents:entry component 表示 angular 的入口组件,可以引导组件是一个入口组件,Angular 会在引导过程中把它加载到 DOM 中。 其它入口组件是在其它时机动态加载的。字面上的意义,但是啥时候用呢,比如,我要弹出一个组件,那么这个组件是要动态加载到DOM中了吧,这个时候就需要将这个组件xxxComponent写上了。
bootstrap:这个模块启动的时候应该启动的组件,上面代码可以看到AppModule是作为根模块的启动组件。
schemas:不属于Angular的组件或者指令的元素或者属性都需要在这里进行声明。
2.JavaScript 模块 与 NgModule
JavaScript 和 Angular 都使用模块来组织代码,虽然它们的组织形式不同,但 Angular 的应用会同时依赖两者。
JavaScript 模块:
模块是内含 JavaScript 代码的独立文件。要让其中的东西可用,要写一个导出语句
例:
export class AppComponent { ... }在其他文件中需要使用
import { AppComponent } from './app.component';而NgModulem模块我们在随笔的开头以及介绍他的元数据,对其有一定的了解了。
NgModule 类 与 JavaScript 模块有下列关键性的不同:
1.NgModule 只绑定了可声明的类,这些可声明的类只是供 Angular 编译器用的。
2.NgModule 与 JavaScript 类把它所有的成员类都放在一个巨型文件中不同,只要把该模块的类列在它的 @NgModule.declarations 列表中。
3.NgModule 只能导出可声明的类。这可能是它自己拥有的也可能是从其它模块中导入的。它不会声明或导出任何其它类型的类。
4.与 JavaScript 模块不同,NgModule 可以通过把服务提供商加到 @NgModule.providers 列表中,来用服务扩展整个应用。
相比之下我们可以看出,NgModulem模块更灵活,扩展性强,更具优势。
3.常用模块
首先要知道跑起来一个项目需要引用什么基本的模块,以下是Angular 提供的一些官方的模块。
NgModule | 导入自 | 为何使用 |
|---|---|---|
|
| 当你想要在浏览器中运行应用时 |
|
| 当你想要使用 |
|
| 当要构建模板驱动表单时(它包含 |
|
| 当要构建响应式表单时 |
RouterModule | @angular/router | 要使用路由功能,并且你要用到 |
|
| 当你要和服务器对话时 |
4.特性模块的分类
官方文档将模块分为五大类。
领域特性模块
带路由的特性模块
路由模块
服务特性模块
可视部件特性模块
虽然我特么当年根本不知道,但是在开发中慢慢摸索其实发现也是根据模块的特性将模块的分类,结果不经相同。
以下为个人在开发中对功能模块的划分
1).业务型模块:整一个应用程序,根据其业务功能我们可以将程序拆分为一个个模块,有很明确的业务特性,围绕其业务功能的模块。例如:用户模块,订单模块等。它有自己独立的路由,有提供与此模块的服务,有一个or多个组件,它惰性懒加载,不会导出or提供任何组件or指令管道,引用官方、本应用程序or第三方的功能模块。它有明确的业务特性,不与别的模块有耦合性。
2).组件模块:应用程序中通常都有规范化的标准设计 ,比如说统一的table,card date 等。将这些都抽出来,做成一个个组件,在模块中导出此组件以供其他模块使用,这样减少了应用程序中重复的样式代码等。曾经我是将所有这种可能多处要使用的封装为组件后,统一在一个模块中导出,后来演变为每一个组件都拆分为一个模块。这样也是发现如果这种通用性的组件多起来的话,假设有二三十个组件在这个UIComponent模块中,而我因为要使用其中一两个组件而导入这个模块,性能是很差的,所以后来都将组件拆分为一个个模块以供业务模块使用,例:DateModule,InputModule..等。
3).服务模块:提供一些通用型的服务。比如说http服务对httpClient二次包装适用于项目,文件服务,配置服务等。
4).其他模块:应用程序中我们会根据需要会做一些指令管道等,其就形成一个指令模块包含应用程序中所有等指令,管道模块包含应用程序中的所有管道。后来觉得,其实这些指令管道不需要集中起来统一导出引用。因为一个模块并不会引用到指令模块中超过百分之八十的指令,so 只需要把它们集中到一个pipe文件夹下,哪个模块需要用到具体个指令or管道,直接声明在其模块中使用便可。
5.创建,导入特性模块
我们将系统根据其功能 业务划分好模块,有利于合作开发,代码的维护和使用。
创建特性模块
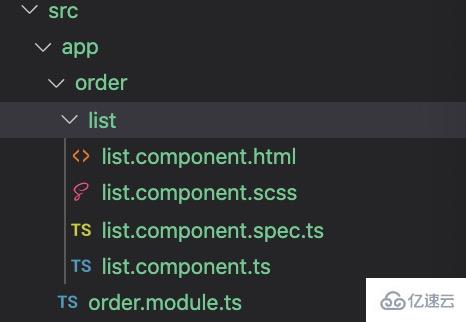
ng g m order
ng g c order/list // 订单模块下新建一个list 组件
我们看最后cli给我们生成的目录结构

order.module.ts
import { NgModule } from '@angular/core';
import { CommonModule } from '@angular/common';
import { ListComponent } from './list/list.component';

@NgModule({
  declarations: [ListComponent],//定义list组件
  exports: [ListComponent],//导出list组件
  imports: [
    CommonModule
  ]
})
export class OrderModule { }
list.component.ts
import { Component, OnInit } from '@angular/core';

@Component({
  selector: 'app-list',
  templateUrl: './list.component.html',
  styleUrls: ['./list.component.scss']
})
export class ListComponent implements OnInit {

  constructor() { }

  ngOnInit() {
  }

}
导入使用特性模块
现在我们导入根模块
app.module.ts
import { BrowserModule } from '@angular/platform-browser';
import { NgModule } from '@angular/core';

import { AppRoutingModule } from './app-routing.module';
import { AppComponent } from './app.component';
import { OrderModule } from './order/order.module';

@NgModule({
  declarations: [
    AppComponent
  ],
  imports: [
    BrowserModule,
    AppRoutingModule,
    OrderModule //将order模块导入
  ],
  providers: [],
  bootstrap: [AppComponent]
})
export class AppModule { }
app.component.html 在跟模块使用
<!--The content below is only a placeholder and can be replaced.-->
<div style="text-align:center">
  <h2>
    Welcome to {{ title }}!
  </h2>
</div>

<app-list></app-list>
<router-outlet></router-outlet>
我们可以看到渲染了order模块的list组件

6.惰性加载模块
如果我们将所有的模块都导入根模块,那么应用在初始化加载的时候就会非常慢。这时候我们应该考虑使用惰性加载。根据需求加载相应都模块,减少应用初始化包的大小以及减少加载的时间,提高用户体验性。
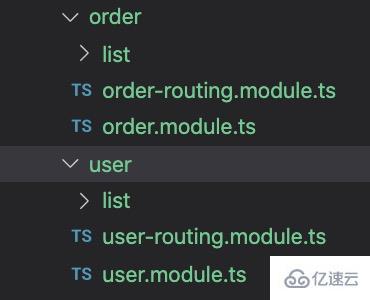
惰性加载的模块特点是该模块拥有路由模块。so 接着上面我们创建了一个订单模块 我们给订单模块加上路由。并再创建一个user.module以及user.module模块下的list组件。

order.module
import { NgModule } from '@angular/core';
import { CommonModule } from '@angular/common';

import { OrderRoutingModule } from './order-routing.module';
import { ListComponent } from './list/list.component';


@NgModule({
  declarations: [ListComponent],
  imports: [
    CommonModule,
    OrderRoutingModule
  ]
})
export class OrderModule { }
order-routing.module
import { NgModule } from '@angular/core';
import { Routes, RouterModule } from '@angular/router';
import { ListComponent } from './list/list.component';


const routes: Routes = [
  {
    path: 'list',
    component: ListComponent
  },
];

@NgModule({
  imports: [RouterModule.forChild(routes)],
  exports: [RouterModule]
})
export class OrderRoutingModule { }
user模块如此类推
接下来配置路由
AppRoutingModule在顶级路由中配置
import { NgModule } from '@angular/core';
import { Routes, RouterModule } from '@angular/router';

const routes: Routes = [
  {
    path: 'orders',
    loadChildren: './order/order.module#OrderModule'
  },
  {
    path: 'orders',
    loadChildren: './user/user.module#UserModule'
  }
];

@NgModule({
  imports: [RouterModule.forRoot(routes)],
  exports: [RouterModule]
})
export class AppRoutingModule { }
我们给app.component.html新增两个button
<!--The content below is only a placeholder and can be replaced.-->
<div style="text-align:center">
  <h3>
    Welcome to {{ title }}!
  </h3>
</div>


<button routerLink="/user/list">user</button>
<button routerLink="/order/list">order</button>

<router-outlet></router-outlet>
效果图

惰性加载模块有什么好处呢,在大型项目中往往有许多个模块,而且大很大。如果一个模块1m,如果我们在浏览器输入地址打开这个应用,瞬间要加载100m 是非常慢的,而且我们并非要是用到着这100个模块。将系统业务拆分为各个模块,划分好界限。按需加载,我点击了user 我加载user 模块我出现user 列表,对user进行操作。当我需要使用时才加载极大的减少了页面初始加载的时间以及减少了资源的消耗。

7.共享模块
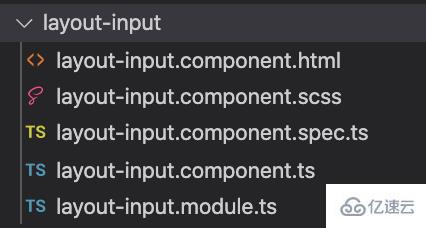
共享模块顾名思义,就是共享于所有的模块中。首先得定义好这个模块的具体功能特性,比如指令、管道和组件等分别封装成一个个模块,哪些业务模块需要使用到其里面的功能变导入其模块中便可。简单的比如,本系统的input 都是统一样式的,我们可以制作一个input 模块 然后在其他模块直接导入使用。这极大的规范了系统的统一性和降低了以后的维护成本。

以上就是关于“Angular中的NgModule怎么使用”这篇文章的内容,相信大家都有了一定的了解,希望小编分享的内容对大家有帮助,若想了解更多相关的知识内容,请关注亿速云行业资讯频道。
免责声明:本站发布的内容(图片、视频和文字)以原创、转载和分享为主,文章观点不代表本网站立场,如果涉及侵权请联系站长邮箱:is@yisu.com进行举报,并提供相关证据,一经查实,将立刻删除涉嫌侵权内容。