您好,登录后才能下订单哦!
密码登录
登录注册
点击 登录注册 即表示同意《亿速云用户服务条款》
上一篇,我们看了用户注册,本片我们来看一下系统参数管理,C#版本的界面如下,我记得我在java实战篇也写过这个界面
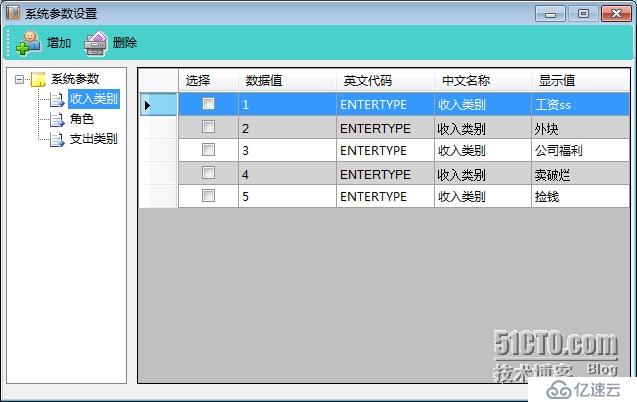
那么今天我们来看一下Android中是如何实现这个东西。首先先来看一下Service端。
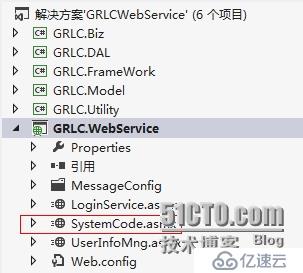
首先是新增加一个asmx。
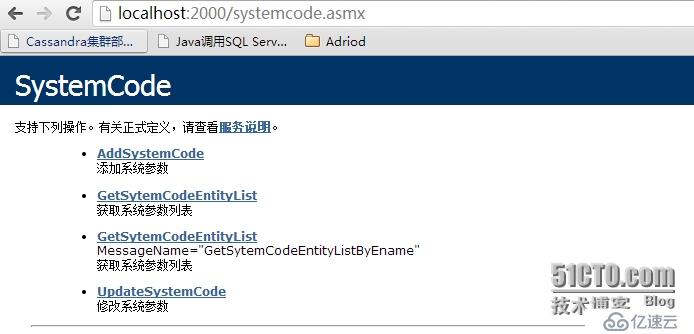
我们来看一下它内部提供的方法
[WebService(Namespace = "http://tempuri.org/")]
   [WebServiceBinding(ConformsTo = WsiProfiles.None)]
   [System.ComponentModel.ToolboxItem(false)]
   // 若要允许使用 ASP.NET AJAX 从脚本中调用此 Web 服务,请取消注释以下行。
   // [System.Web.Script.Services.ScriptService]
   public class SystemCode : System.Web.Services.WebService
   {
       [WebMethod(Description = "添加系统参数")]
       public CommonResponse AddSystemCode(SystemCodeEntity systemCodeEntity,string userID)
       {
           return SystemCodeBiz.GetInstance().AddSystemCode(systemCodeEntity,userID);
       }
       [WebMethod(Description = "修改系统参数")]
       public CommonResponse UpdateSystemCode(SystemCodeEntity systemCodeEntity, string userID)
       {
           return SystemCodeBiz.GetInstance().UpdateSystemCode(systemCodeEntity, userID);
       }
       [WebMethod(Description = "获取系统参数列表", MessageName = "GetSytemCodeEntityList")]
       public List<SystemCodeEntity> GetSytemCodeEntityList()
       {
           return SystemCodeBiz.GetInstance().GetSytemCodeEntityList();
       }
       [WebMethod(Description = "获取系统参数列表", MessageName = "GetSytemCodeEntityListByEname")]
       public List<SystemCodeEntity> GetSytemCodeEntityList(string ename)
       {
           return SystemCodeBiz.GetInstance().GetSytemCodeEntityList(ename);
       }
   }
第一个方法是添加系统参数,第二个方法是修改系统参数,第三个方法是获取系统参数列表,第四个方法是根据ename获取系统参数列表。如果不知道什么是ename,请看第一篇。
OK,这四个方法对应的Biz层的代码如下
namespace GRLC.Biz
{
    public class SystemCodeBiz
    {
        static SystemCodeBiz systemCodeBiz = new SystemCodeBiz();
        private SystemCodeBiz()
        { }
        public static SystemCodeBiz GetInstance()
        {
            return systemCodeBiz;
        }
        const string moduleName = "SystemCodeModule";
        private string GetMessageByName(string msgName)
        {
            return CommonFunction.GetMessageByModuleAndName(moduleName, msgName);
        }
        private string EnameExists
        {
            get
            {
                return this.GetMessageByName("EnameHasExists");
            }
        }
        private string DataHasExists
        {
            get
            {
                return this.GetMessageByName("DataHasExists");
            }
        }
        private string AddFailed
        {
            get
            {
                return this.GetMessageByName("AddFailed");
            }
        }
        private string UpdateFailed
        {
            get
            {
                return this.GetMessageByName("UpdateFailed");
            }
        }
        private string DisplayContentExists
        {
            get
            {
                return this.GetMessageByName("DisplayContentExists");
            }
        }
        public CommonResponse AddSystemCode(SystemCodeEntity systemCodeEntity, string userID)
        {
            bool isEnameExists = SystemCodeDAL.GetInstance().CheckIfEnameExists(systemCodeEntity.Ename);
            if (isEnameExists)
            {
                return new CommonResponse() { IsSuccess = false, ErrorMessage = EnameExists };
            }
            bool isDataExists = SystemCodeDAL.GetInstance().CheckIfDataExists(systemCodeEntity.Ename, systemCodeEntity.Cname);
            if (isDataExists)
            {
                return new CommonResponse() { IsSuccess = false, ErrorMessage = DataHasExists };
            }
            bool isDisplayContentExists = SystemCodeDAL.GetInstance().CheckIfDisplayContentExists(systemCodeEntity.Ename, systemCodeEntity.DisplayContent);
            int suc = SystemCodeDAL.GetInstance().AddSystemCode(systemCodeEntity, userID);
            if (suc > 0)
            {
                return new CommonResponse() { IsSuccess = true };
            }
            else
            {
                return new CommonResponse() { IsSuccess = false, ErrorMessage = AddFailed };
            }
        }
        public CommonResponse UpdateSystemCode(SystemCodeEntity systemCodeEntity, string userID)
        {
            bool isDisplayContentExists = SystemCodeDAL.GetInstance().CheckIfDisplayContentExists(systemCodeEntity.Ename, systemCodeEntity.DisplayContent);
            if (isDisplayContentExists)
            {
                return new CommonResponse() { IsSuccess = false, ErrorMessage = DisplayContentExists };
            }
            int suc = SystemCodeDAL.GetInstance().UpdateSystemCode(systemCodeEntity, userID);
            if (suc > 0)
            {
                return new CommonResponse() { IsSuccess = true };
            }
            else
            {
                return new CommonResponse() { IsSuccess = false, ErrorMessage = UpdateFailed };
            }
        }
        public List<SystemCodeEntity> GetSytemCodeEntityList()
        {
            return SystemCodeDAL.GetInstance().GetSytemCodeEntityList();
        }
        public List<SystemCodeEntity> GetSytemCodeEntityList(string ename)
        {
            List<SystemCodeEntity> systemCodeEntityList = this.GetSytemCodeEntityList();
            if (systemCodeEntityList != null)
            {
                return systemCodeEntityList.Where(s => s.Ename == ename).OrderBy(s => s.Data).ToList();
            }
            return systemCodeEntityList;
        }
    }
}
对应的DAL层的方法如下
namespace GRLC.DAL
{
    public class SystemCodeDAL
    {
        static SystemCodeDAL systemCodeDAL = new SystemCodeDAL();
        private SystemCodeDAL()
        { }
        public static SystemCodeDAL GetInstance()
        {
            return systemCodeDAL;
        }
        public int AddSystemCode(SystemCodeEntity systemCodeEntity, string userID)
        {
            using (BonusEntities bonusEntities = new BonusEntities())
            {
                Codes code = new Codes();
                code.ename = systemCodeEntity.Ename;
                code.cname = systemCodeEntity.Cname;
                code.data = systemCodeEntity.Data;
                code.display_content = systemCodeEntity.DisplayContent;
                code.create_time = DateTime.Now;
                code.lastmodify_date = DateTime.Now;
                code.lastmodifier = userID;
                code.create_person = userID;
                bonusEntities.Codes.Add(code);
                return bonusEntities.SaveChanges();
            }
        }
        public int UpdateSystemCode(SystemCodeEntity systemCodeEntity, string userID)
        {
            using (BonusEntities bonusEntities = new BonusEntities())
            {
                Codes code = new Codes();
                code.ename = systemCodeEntity.Ename;
                code.cname = systemCodeEntity.Cname;
                code.data = systemCodeEntity.Data;
                code.display_content = systemCodeEntity.DisplayContent;
                code.lastmodify_date = DateTime.Now;
                code.lastmodifier = userID;
                bonusEntities.Entry(code).State = EntityState.Modified;
                return bonusEntities.SaveChanges();
            }
        }
        public bool CheckIfEnameExists(string ename)
        {
            using (BonusEntities bonusEntities = new BonusEntities())
            {
                return bonusEntities.Codes.Any(c => c.ename == ename);
            }
        }
        public bool CheckIfDataExists(string ename, string data)
        {
            using (BonusEntities bonusEntities = new BonusEntities())
            {
                return bonusEntities.Codes.Any(c => c.ename == ename && c.data == data);
            }
        }
        public bool CheckIfDisplayContentExists(string ename, string displayContent)
        {
            using (BonusEntities bonusEntities = new BonusEntities())
            {
                return bonusEntities.Codes.Any(c => c.ename == ename && c.display_content == displayContent);
            }
        }
        public List<SystemCodeEntity> GetSytemCodeEntityList()
        {
            List<SystemCodeEntity> systemCodeEntityList = new List<SystemCodeEntity>();
            using (BonusEntities bonusEntities = new BonusEntities())
            {
                SystemCodeEntity systemCodeEntity = null;
                List<Codes> codeList = bonusEntities.Codes.ToList();
                foreach (var code in codeList)
                {
                    systemCodeEntity = new SystemCodeEntity();
                    systemCodeEntity.Cname = code.cname;
                    systemCodeEntity.Ename = code.ename;
                    systemCodeEntity.Data = code.data;
                    systemCodeEntity.DisplayContent = code.display_content;
                    systemCodeEntityList.Add(systemCodeEntity);
                }
            }
            return systemCodeEntityList;
        }
    }
}
OK,完了我们部署Service进行访问
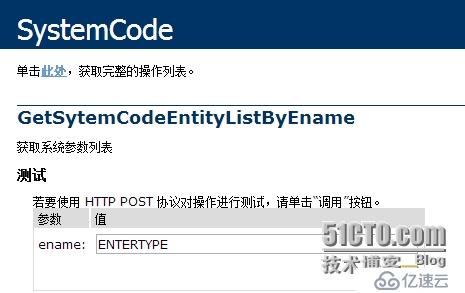
点击第三个方法,如下,输入ename,点击调用
点击调用返回的xml数据如下
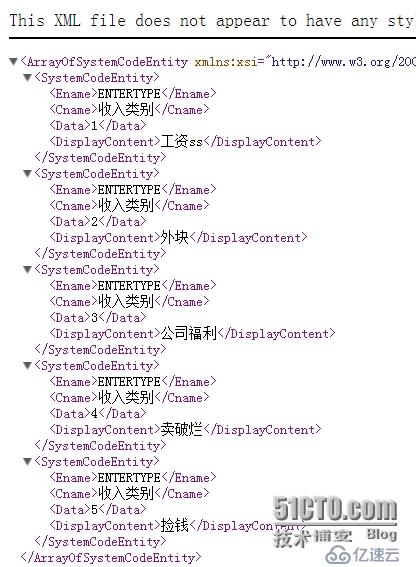
OK,这证明我们的service没问题。接下来看android部分,首先从index界面跳到系统参数界面
p_w_picpathBtnSystemCode=(ImageButton)this.findViewById(R.id.p_w_picpathBtnSystemCode);
        p_w_picpathBtnSystemCode.setOnClickListener(new OnClickListener() {
            public void onClick(View v) {
                Intent intent = new Intent();
                intent.setClass(index.this,systemcode.class);
                startActivityForResult(intent, 0);
            }
        });
SystemCode界面的代码如下
<?xml version="1.0" encoding="utf-8"?>
<LinearLayout xmlns:android="http://schemas.android.com/apk/res/android"
    android:layout_width="fill_parent" android:layout_height="fill_parent">
    <ExpandableListView android:id="@+id/expandableListView"
        android:dividerHeight="1dp"
        android:divider="@color/yellow"
        android:layout_width="fill_parent" android:layout_height="wrap_content">
    </ExpandableListView>
</LinearLayout>
只有一个ExpandedListView。在后台代码中,我们首先会初始化数据
public void onCreate(Bundle savedInstanceState) {
        super.onCreate(savedInstanceState);
        setContentView(R.layout.systemcode);
        InitCodesInfo();
    }
我们看一下这个InitCodesInfo方法
private void InitCodesInfo() {
        expandableListView = (ExpandableListView) findViewById(R.id.expandableListView);
        List<Map<String, String>> groups = new ArrayList<Map<String, String>>();
        Map<String, String> root = new HashMap<String, String>();
        root.put("root", "系统参数");
        groups.add(root);
        SoapObject soapChild = null;
        List<String> enameList = new ArrayList<String>();
        Map<String, String> leaf = null;
        List<Map<String, String>> leafList = new ArrayList<Map<String, String>>();
        leaves = new ArrayList<List<Map<String, String>>>();
        SoapObject soapObject = this.GetSystemCodeList();
        for (int i = 0; i < soapObject.getPropertyCount(); i++) {
            soapChild = (SoapObject) soapObject.getProperty(i);
            String ename = soapChild.getProperty("Ename").toString();
            String cname = soapChild.getProperty("Cname").toString();
            if (!enameList.contains(ename)) {
                leaf = new HashMap<String, String>();
                leaf.put("Key", ename);
                leaf.put("Name", cname);
                leafList.add(leaf);
                enameList.add(ename);
            }
        }
        leaves.add(leafList);
        SimpleExpandableListAdapter adapter = new SimpleExpandableListAdapter(
                this, groups, R.layout.expandlist_group,
                new String[] { "root" }, new int[] { R.id.textGroup }, leaves,
                R.layout.expandlist_child, new String[] { "Key", "Name" },
                new int[] { R.id.textChildID, R.id.textChildName });
        expandableListView.setAdapter(adapter);
        expandableListView.setOnChildClickListener(listener);
        expandableListView.expandGroup(0);
    }
在这个方法中首先要看的是GetSystemCodeList方法,这个方法就是调用webservice提供的GetSytemCodeEntityList方法。我们看下代码
private SoapObject GetSystemCodeList() {
        SoapObject request = new SoapObject(NAMESPACE, METHOD_NAME);
        SoapSerializationEnvelope soapEnvelope = new SoapSerializationEnvelope(
                SoapEnvelope.VER11);
        soapEnvelope.dotNet = true;
        soapEnvelope.setOutputSoapObject(request);
        HttpTransportSE httpTS = new HttpTransportSE(URL);
        soapEnvelope.bodyOut = httpTS;
        soapEnvelope.setOutputSoapObject(request);// 设置请求参数
        try {
            httpTS.call(SOAP_ACTION, soapEnvelope);
        } catch (IOException e) {
            // TODO Auto-generated catch block
            e.printStackTrace();
        } catch (XmlPullParserException e) {
            // TODO Auto-generated catch block
            e.printStackTrace();
        }
        SoapObject result = null;
        try {
            result = (SoapObject) soapEnvelope.getResponse();
        } catch (SoapFault e) {
            // TODO Auto-generated catch block
            e.printStackTrace();
        }
        return result;
    }
NameSpace,MethodName等参数如下
final static String NAMESPACE = "http://tempuri.org/";
    final static String METHOD_NAME = "GetSytemCodeEntityList";
    final static String SOAP_ACTION = "http://tempuri.org/GetSytemCodeEntityList";
    final static String URL = "http://10.0.2.2:2000/SystemCode.asmx?wsdl";
OK,这个掉用完之后,就是构造数据了,我们先看一下图
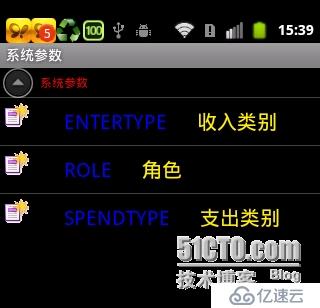
那么这个listView的数据正是由那个for循环实现的。因为我们只有一个根节点,所以我们只加了一个
root.put("root", "系统参数");
然后接下来我们要构造出下面的子节点,我们把ename当做key,把cname当做value加进HashMap<String, String>中。每一次循环,我们会得到一条数据加进Map<String,String>中,再把它加进List<Map<String,String>>中。最后将List<Map<String,String>>加进List<List<Map<String, String>>>中。数据构造好以后,就是展示了
SimpleExpandableListAdapter adapter = new SimpleExpandableListAdapter(
                this, groups, R.layout.expandlist_group,
                new String[] { "root" }, new int[] { R.id.textGroup }, leaves,
                R.layout.expandlist_child, new String[] { "Key", "Name" },
                new int[] { R.id.textChildID, R.id.textChildName });
        expandableListView.setAdapter(adapter);
        expandableListView.setOnChildClickListener(listener);
        expandableListView.expandGroup(0);
第一个参数是页面本身对象,第二个参数是根节点的数据,第三个参数是展示根节点的布局文件
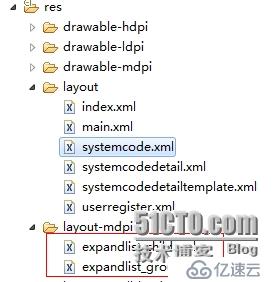
一个是根节点的布局文件expandlist_group.xml,内容如下
<?xml version="1.0" encoding="utf-8"?>
<LinearLayout xmlns:android="http://schemas.android.com/apk/res/android"
    android:layout_width="fill_parent" android:layout_height="fill_parent"
    android:orientation="vertical">
    <TextView android:id="@+id/textGroup" android:layout_width="fill_parent"
        android:layout_height="fill_parent" android:paddingLeft="40px"
        android:paddingTop="6px" android:paddingBottom="6px" android:textSize="12sp"
        android:textColor="@color/red"
        android:text="No data">
    </TextView>
</LinearLayout>
另一个是子节点的布局文件expandlist_child.xml,内容如下
<?xml version="1.0" encoding="utf-8"?>
<LinearLayout xmlns:android="http://schemas.android.com/apk/res/android"
    android:layout_width="fill_parent" android:layout_height="fill_parent"
    android:orientation="horizontal">
    <ImageView android:id="@+id/civ" android:layout_height="wrap_content"
        android:layout_width="wrap_content" android:src="@drawable/main_system_code"
        android:maxWidth="20dp" android:maxHeight="20dp" android:padding="5dp" />
    <TextView android:id="@+id/textChildID" android:layout_width="wrap_content"
        android:layout_height="wrap_content" android:paddingLeft="30px"
        android:textColor="@color/blue"
        android:paddingTop="10px"
        android:paddingBottom="10px"
        android:textSize="20sp" />
    <TextView android:id="@+id/textChildName" android:layout_width="wrap_content"
        android:textColor="@color/yellow"
        android:textSize="20sp"
        android:layout_height="wrap_content" android:paddingLeft="30px"
        android:text="No data" />
</LinearLayout>
第四个参数是根节点的key值root,如果你有很多的根节点,那么这里可以有多个。第五个参数是设置用expandlist_group.xml布局模版中哪个控件来显示根节点的内容。第六个参数是子节点的数据,第七个参数是要展示子节点内容的布局模版。第八个参数是设置要显示的字段,第九个参数每个参数对应的展示控件。OK,最终运行出来的效果如上图所示。
OK,接下来我们看看点击某个子节点,展示其详细内容的界面的部分。先看一下跳转
private OnChildClickListener listener = new OnChildClickListener() {
public boolean onChildClick(ExpandableListView parent, View v,
int groupPosition, int childPosition, long id) {
Object ename = leaves.get(0).get(childPosition).values().toArray()[1];
Intent intent = new Intent();
Bundle bundle = new Bundle();
bundle.putString("ename", ename.toString());
intent.putExtras(bundle);
intent.setClass(systemcode.this, systemcodedetail.class);
startActivityForResult(intent, 0);
finish();
return false;
}
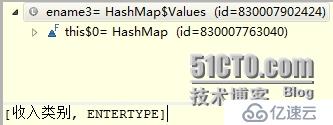
};我们首先会拿到ename,这个ename在这里的话,因为leaves集合中只有一项。所以在这里是get(0)。
然后我们根据position,即第一行就是0,第二行就是1。根据position我们拿到点击的行的数据values。那么values[1]就是ename,values[0]就是cname。
拿到ename直接传到systemcodedetail界面。systemcodedetailUI代码如下
<?xml version="1.0" encoding="utf-8"?>
<LinearLayout android:id="@+id/ls"
  xmlns:android="http://schemas.android.com/apk/res/android"
  android:layout_width="match_parent"
  android:layout_height="match_parent"
  android:orientation="horizontal">
    <ListView android:id="@+id/codelistView"
    android:layout_width="fill_parent"
    android:layout_height="fill_parent">
    </ListView>
</LinearLayout>
其后台接收到ename之后会初始化数据
private void InitData() {
        Bundle bundle = getIntent().getExtras();
        String enameValue = bundle.getString("ename");
        List<Map<String, Object>> dataList = new ArrayList<Map<String, Object>>();
        Map<String, Object> dataMap = null;
        SoapObject soapObject = this.GetSystemCodeListByEname(enameValue);
        for (int i = 0; i < soapObject.getPropertyCount(); i++) {
            SoapObject soapObj = (SoapObject) soapObject.getProperty(i);
            dataMap = new HashMap<String, Object>();
            String displayContent = soapObj.getProperty("DisplayContent")
                    .toString();
            String cname = soapObj.getProperty("Cname").toString();
            String data = soapObj.getProperty("Data").toString();
            dataMap.put("displaycontent", displayContent);
            dataMap.put("cname", cname);
            dataMap.put("data", data);
            dataList.add(dataMap);
        }
        SimpleAdapter simpleAdapter = new SimpleAdapter(this, dataList,
                R.layout.systemcodedetailtemplate, new String[] { "cname",
                        "data", "displaycontent" }, new int[] { R.id.labCname,
                        R.id.labData,R.id.labDisplay });
        this.codeListView.setAdapter(simpleAdapter);
    }
他获取数据的方法是GetSystemCodeListByEname
private SoapObject GetSystemCodeListByEname(String ename) {
        SoapObject request = new SoapObject(NAMESPACE, METHOD_NAME);
        PropertyInfo pi = new PropertyInfo();
        pi.setName("ename");
        pi.setType(String.class);
        pi.setValue(ename);
        request.addProperty(pi);
        SoapSerializationEnvelope soapEnvelope = new SoapSerializationEnvelope(
                SoapEnvelope.VER11);
        soapEnvelope.dotNet = true;
        soapEnvelope.setOutputSoapObject(request);
        HttpTransportSE httpTS = new HttpTransportSE(URL);
        soapEnvelope.bodyOut = httpTS;
        soapEnvelope.setOutputSoapObject(request);// 设置请求参数
        try {
            httpTS.call(SOAP_ACTION, soapEnvelope);
        } catch (IOException e) {
            // TODO Auto-generated catch block
            e.printStackTrace();
        } catch (XmlPullParserException e) {
            // TODO Auto-generated catch block
            e.printStackTrace();
        }
        SoapObject result = null;
        try {
            result = (SoapObject) soapEnvelope.getResponse();
        } catch (SoapFault e) {
            // TODO Auto-generated catch block
            e.printStackTrace();
        }
        return result;
    }
其对应的NameSpace,Method_Name参数如下
    final static String NAMESPACE = "http://tempuri.org/";
    final static String METHOD_NAME = "GetSytemCodeEntityListByEname";
    final static String SOAP_ACTION = "http://tempuri.org/GetSytemCodeEntityListByEname";
/*  final static String URL = "http://10.0.2.2:2000/SystemCode.asmx?wsdl";*/
final static String URL = "http://172.19.73.18:2000/SystemCode.asmx?wsdl";OK,在初始化方法中,我们构造出了List<Map<String, Object>>集合。
然后通过下面的方法呈现数据到界面
SimpleAdapter simpleAdapter = new SimpleAdapter(this, dataList,
                R.layout.systemcodedetailtemplate, new String[] { "cname",
                        "data", "displaycontent" }, new int[] { R.id.labCname,
                        R.id.labData,R.id.labDisplay });
        this.codeListView.setAdapter(simpleAdapter);
第一个参数当前Activity对象,第二个参数是数据源。第三个参数是展示数据的布局模版。如下
<?xml version="1.0" encoding="utf-8"?>
<RelativeLayout xmlns:android="http://schemas.android.com/apk/res/android"
    android:layout_width="fill_parent" android:layout_height="75dp"
    android:paddingLeft="10dp" android:paddingRight="10dp">
    <ImageView android:id="@+id/img" android:layout_height="fill_parent"
        android:layout_width="60dp" android:src="@drawable/userregister"
        android:layout_alignParentLeft="true" />
    <LinearLayout android:orientation="vertical"
        android:layout_height="fill_parent" android:layout_width="fill_parent"
        android:gravity="center_vertical" android:layout_toRightOf="@id/img"
        android:paddingLeft="8dp">
        <TextView android:id="@+id/labCname" android:layout_width="wrap_content"
            android:layout_height="wrap_content" android:textColor="#cbcaca"
            android:textSize="12dp" />
        <TextView android:id="@+id/labData" android:layout_width="wrap_content"
            android:layout_height="wrap_content" android:textColor="#cbcaca"
            android:textSize="12dp" />
        <TextView android:id="@+id/labDisplay" android:layout_width="wrap_content"
            android:layout_height="wrap_content" android:textColor="#cbcaca"
            android:textSize="12dp" />
    </LinearLayout>
    <LinearLayout android:orientation="horizontal"
        android:layout_alignParentRight="true"
        android:layout_height="wrap_content"
        android:layout_centerVertical="true"
        android:layout_width="wrap_content">
        <Button android:id="@+id/btnUpdate" android:text="@string/btnUpdate"
            android:layout_width="wrap_content" android:layout_height="fill_parent" />
        <Button android:id="@+id/btnDelete" android:text="@string/btnDelete"
            android:layout_width="wrap_content" android:layout_height="fill_parent" />
    </LinearLayout>
</RelativeLayout>
OK,这个布局使用了相对布局和线性布局的嵌套。第四个参数是指要显示的字段。第五个参数是指分别显示这些字段的控件。OK,跑起来看看效果
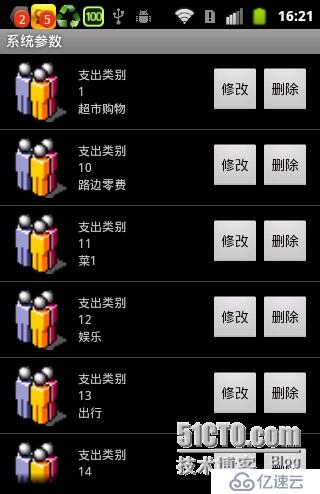
效果还凑合,至于修改和删除嘛,请留意下节。
免责声明:本站发布的内容(图片、视频和文字)以原创、转载和分享为主,文章观点不代表本网站立场,如果涉及侵权请联系站长邮箱:is@yisu.com进行举报,并提供相关证据,一经查实,将立刻删除涉嫌侵权内容。