您好,登录后才能下订单哦!
密码登录
登录注册
点击 登录注册 即表示同意《亿速云用户服务条款》
这篇文章主要介绍“怎么用WPF代码实现Windows屏保制作”的相关知识,小编通过实际案例向大家展示操作过程,操作方法简单快捷,实用性强,希望这篇“怎么用WPF代码实现Windows屏保制作”文章能帮助大家解决问题。
屏保程序的本质上就是一个Win32 窗口应用程序;
把编译好一个窗口应用程序之后,把扩展名更改为 scr,于是你的屏幕保护程序就做好了;

选中修改好的 scr 程序上点击右键,可以看到一个 安装 选项,点击之后就安装了;
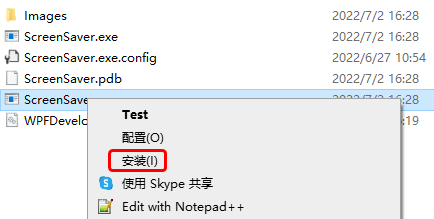
安装之后会立即看到我们的屏幕保护程序已经运行起来了;
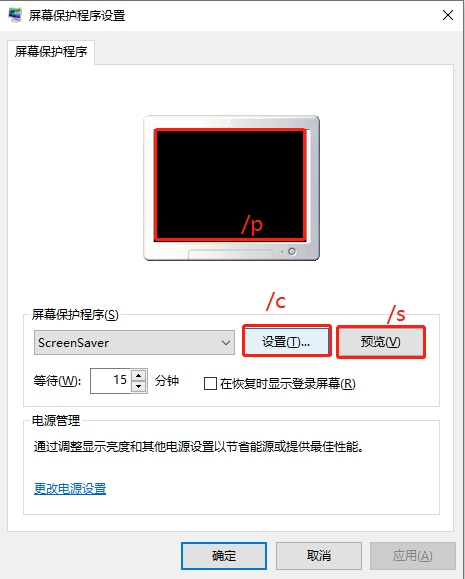
处理屏幕保护程序参数如下
/s 屏幕保护程序开始,或者用户点击了 预览 按钮;
/c 用户点击了 设置按钮;
/p 用户选中屏保程序之后,在预览窗格中显示;
1)MainWindow.xaml 代码如下;
<Window x:Class="ScreenSaver.MainWindow"
        xmlns="http://schemas.microsoft.com/winfx/2006/xaml/presentation"
        xmlns:x="http://schemas.microsoft.com/winfx/2006/xaml"
        xmlns:d="http://schemas.microsoft.com/expression/blend/2008"
        xmlns:mc="http://schemas.openxmlformats.org/markup-compatibility/2006"
        xmlns:system="clr-namespace:System;assembly=mscorlib"
        xmlns:drawing="http://www.microsoft.net/drawing"
        xmlns:local="clr-namespace:ScreenSaver"
        mc:Ignorable="d" WindowStyle="None"
        Title="MainWindow" Height="450" Width="800">
    <Grid x:Name="MainGrid">
        <drawing:PanningItems ItemsSource="{Binding stringCollection,RelativeSource={RelativeSource AncestorType=local:MainWindow}}"
                              x:Name="MyPanningItems">
            <drawing:PanningItems.ItemTemplate>
                <DataTemplate>
                    <Rectangle>
                        <Rectangle.Fill>
                            <ImageBrush ImageSource="{Binding .}"/>
                        </Rectangle.Fill>
                    </Rectangle>
                </DataTemplate>
            </drawing:PanningItems.ItemTemplate>
        </drawing:PanningItems>
        <Grid  HorizontalAlignment="Center"
               VerticalAlignment="Top"
                Margin="0,50,0,0">
            <Grid.RowDefinitions>
                <RowDefinition/>
                <RowDefinition/>
            </Grid.RowDefinitions>
            <Grid.Resources>
                <Style TargetType="TextBlock">
                    <Setter Property="FontSize" Value="90"/>
                    <Setter Property="FontWeight" Value="Black"/>
                    <Setter Property="Foreground" Value="White"/>
                </Style>
            </Grid.Resources>
            <WrapPanel>
                <TextBlock Text="{Binding Hour,RelativeSource={RelativeSource AncestorType=local:MainWindow}}"/>
                <TextBlock Text=":" x:Name="PART_TextBlock">
                    <TextBlock.Triggers>
                        <EventTrigger RoutedEvent="FrameworkElement.Loaded">
                            <BeginStoryboard>
                                <Storyboard>
                                    <DoubleAnimation Duration="00:00:01"
                                                 From="1"
                                                 To="0"
                                                 Storyboard.TargetName="PART_TextBlock"
                                                 Storyboard.TargetProperty="Opacity"
                                                 RepeatBehavior="Forever"
                                                 FillBehavior="Stop"/>
                                </Storyboard>
                            </BeginStoryboard>
                        </EventTrigger>
                    </TextBlock.Triggers>
                </TextBlock>
                <TextBlock Text="{Binding Minute,RelativeSource={RelativeSource AncestorType=local:MainWindow}}"/>
            </WrapPanel>
            <TextBlock Grid.Row="1" FontSize="45" HorizontalAlignment="Center" Text="{Binding Date,RelativeSource={RelativeSource AncestorType=local:MainWindow}}"/>
        </Grid>
    </Grid>
</Window>
2) MainWindow.xaml.cs 代码如下;
当屏保启动后需要注意如下
将鼠标设置为不可见Cursors.None;
将窗体设置为最大化WindowState.Maximized;
WindowStyle设置为"None";
注意监听鼠标按下和键盘按键则退出屏保;
using System;
using System.Collections.ObjectModel;
using System.Globalization;
using System.IO;
using System.Windows;
using System.Windows.Input;
using System.Windows.Threading;

namespace ScreenSaver
{
    /// <summary>
    ///     MainWindow.xaml 的交互逻辑
    /// </summary>
    public partial class MainWindow : Window
    {
        public static readonly DependencyProperty stringCollectionProperty =
            DependencyProperty.Register("stringCollection", typeof(ObservableCollection<string>), typeof(MainWindow),
                new PropertyMetadata(null));

        public static readonly DependencyProperty HourProperty =
            DependencyProperty.Register("Hour", typeof(string), typeof(MainWindow), new PropertyMetadata(null));

        public static readonly DependencyProperty MinuteProperty =
            DependencyProperty.Register("Minute", typeof(string), typeof(MainWindow), new PropertyMetadata(null));

        public static readonly DependencyProperty SecondProperty =
            DependencyProperty.Register("Second", typeof(string), typeof(MainWindow), new PropertyMetadata(null));

        public static readonly DependencyProperty DateProperty =
            DependencyProperty.Register("Date", typeof(string), typeof(MainWindow), new PropertyMetadata());

        private readonly DispatcherTimer timer = new DispatcherTimer();

        public MainWindow()
        {
            InitializeComponent();
            Loaded += delegate
            {
                WindowState = WindowState.Maximized;
                Mouse.OverrideCursor = Cursors.None;
                var date = DateTime.Now;
                Hour = date.ToString("HH");
                Minute = date.ToString("mm");
                Date =
                    $"{date.Month} / {date.Day}   {CultureInfo.CurrentCulture.DateTimeFormat.GetDayName(date.DayOfWeek)}";
                stringCollection = new ObservableCollection<string>();
                var path = Path.Combine(AppDomain.CurrentDomain.BaseDirectory, "Images");
                var directoryInfo = new DirectoryInfo(path);
                foreach (var item in directoryInfo.GetFiles())
                {
                    if (Path.GetExtension(item.Name) != ".jpg") continue;
                    stringCollection.Add(item.FullName);
                }

                timer.Interval = TimeSpan.FromSeconds(1);
                timer.Tick += delegate
                {
                    date = DateTime.Now;
                    Hour = date.ToString("HH");
                    Minute = date.ToString("mm");
                    Date =
                        $"{date.Month} / {date.Day}   {CultureInfo.CurrentCulture.DateTimeFormat.GetDayName(date.DayOfWeek)}";
                };
                timer.Start();
            };
            MouseDown += delegate { Application.Current.Shutdown(); };
            KeyDown += delegate { Application.Current.Shutdown(); };
        }

        public ObservableCollection<string> stringCollection
        {
            get => (ObservableCollection<string>)GetValue(stringCollectionProperty);
            set => SetValue(stringCollectionProperty, value);
        }


        public string Hour
        {
            get => (string)GetValue(HourProperty);
            set => SetValue(HourProperty, value);
        }

        public string Minute
        {
            get => (string)GetValue(MinuteProperty);
            set => SetValue(MinuteProperty, value);
        }

        public string Second
        {
            get => (string)GetValue(SecondProperty);
            set => SetValue(SecondProperty, value);
        }


        public string Date
        {
            get => (string)GetValue(DateProperty);
            set => SetValue(DateProperty, value);
        }
    }
}
关于“怎么用WPF代码实现Windows屏保制作”的内容就介绍到这里了,感谢大家的阅读。如果想了解更多行业相关的知识,可以关注亿速云行业资讯频道,小编每天都会为大家更新不同的知识点。
免责声明:本站发布的内容(图片、视频和文字)以原创、转载和分享为主,文章观点不代表本网站立场,如果涉及侵权请联系站长邮箱:is@yisu.com进行举报,并提供相关证据,一经查实,将立刻删除涉嫌侵权内容。