您好,登录后才能下订单哦!
密码登录
登录注册
点击 登录注册 即表示同意《亿速云用户服务条款》
项目基本配置参考文章SpringBoot入门一,使用myEclipse新建一个SpringBoot项目,使用myEclipse新建一个SpringBoot项目即可。现在来给项目添加一个log4j2支持,添加方式非常简单,仅需两步即可,具体内容如下:
<!-- 3.开启thymeleaf模板引擎支持 -->
<dependency>
    <groupId>org.springframework.boot</groupId>
    <artifactId>spring-boot-starter-thymeleaf</artifactId>
</dependency>#----------------视图层thymeleaf配置---------------
## 是否开启缓存
spring.thymeleaf.cache=false
## 设置不严格的html
spring.thymeleaf.mode=LEGACYHTML5
## 编码格式
spring.thymeleaf.encoding=utf-8
## 前缀,也就是模板存放的路径,默认是templates,可以不用配置
spring.thymeleaf.prefix=/view/
## 后缀
spring.thymeleaf.suffix=.htmlimport java.util.ArrayList;
import java.util.List;
import org.springframework.stereotype.Controller;
import org.springframework.web.bind.annotation.RequestMapping;
import com.qfx.common.controller.BaseController;
import com.qfx.demo.bean.User;
@Controller
@RequestMapping("thyemleaf")
public class ThymeleafController extends BaseController {
@RequestMapping("view/first")
public String firstView(){
User user = new User();
user.setUserId("001");
user.setUserName("张三");
user.setUserAge(18);
user.setUserSex(true);
User user2 = new User();
user2.setUserId("002");
user2.setUserName("李四");
user2.setUserAge(20);
user2.setUserSex(true);
User user3 = new User();
user3.setUserId("003");
user3.setUserName("柳林");
user3.setUserAge(16);
user3.setUserSex(false);
List<User> userList = new ArrayList<User>();
userList.add(user);
userList.add(user2);
userList.add(user3);
List<String> list = new ArrayList<String>();
list.add("123");
list.add("abc");
list.add("哈哈哈");
list.add("((&($*");
request.setAttribute("msg", "欢迎来到thyemleaf的世界!");
request.setAttribute("userList", userList);
request.setAttribute("list", list);
return "firstPage";
}
}<!DOCTYPE html>
<html>
<head>
<meta charset="utf-8">
<title>firstPage.html</title>
<meta name="keywords" content="keyword1,keyword2,keyword3">
<meta name="description" content="this is my page">
<meta name="content-type" content="text/html; charset=UTF-8">
<!--<link rel="stylesheet" type="text/css" href="./styles.css">-->
</head>
<body>
<br/>
<table align="center" width="50%" border="1" cellpadding="5" cellspacing="0" bordercolor="lime">
<caption>
<span th:text="${msg}"></span>
<select >
<option th:each="user:${userList}" th:value="${user.userId}" th:text="${user.userId}+'_'+${user.userName}"></option>
</select>
</caption>
</table>
<br/>
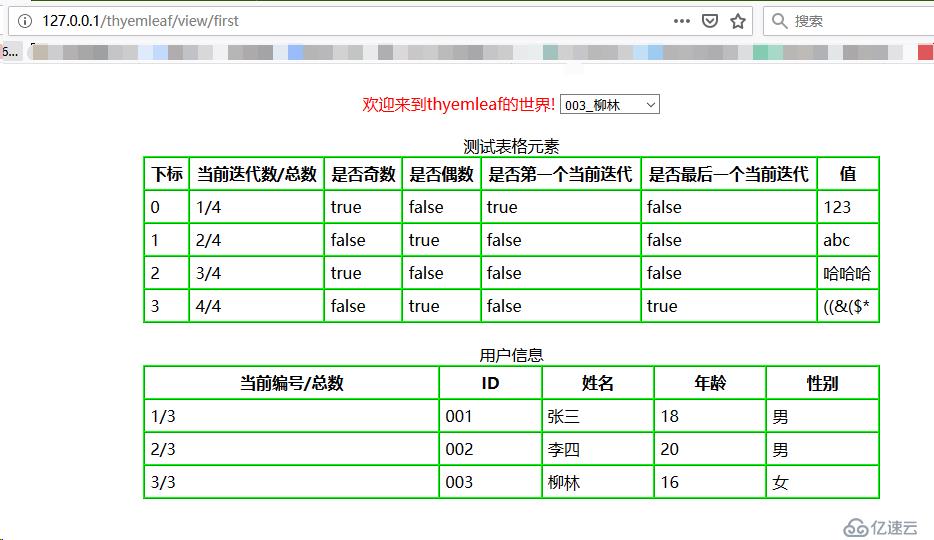
<table align="center" width="50%" border="1" cellpadding="5" cellspacing="0" bordercolor="lime">
<caption>测试表格元素 </caption>
<tr>
<th>下标</th>
<th>当前迭代数/总数</th>
<th>是否奇数</th>
<th>是否偶数</th>
<th>是否第一个当前迭代</th>
<th>是否最后一个当前迭代</th>
<th>值</th>
</tr>
<tr th:each="value,state:${list}">
<td th:text="${state.index}"></td>
<td th:text="${state.count +'/'+ state.size}"></td>
<td th:text="${state.odd}"></td>
<td th:text="${state.even}"></td>
<td th:text="${state.first}"></td>
<td th:text="${state.last}"></td>
<td th:text="${value}"></td>
</tr>
</table>
<br/>
<table align="center" width="50%" border="1" cellpadding="5" cellspacing="0" bordercolor="lime">
<caption>用户信息</caption>
<tr>
<th>当前编号/总数</th>
<th>ID</th>
<th>姓名</th>
<th>年龄</th>
<th>性别</th>
</tr>
<tr th:each="user,state:${userList}">
<td th:text="${state.count +'/'+ state.size}"></td>
<td th:text="${user.userId}"></td>
<td th:text="${user.userName}"></td>
<td th:text="${user.userAge}"></td>
<td th:text="${user.userSex ? '男':'女'}"></td>
</tr>
</table>
</body>
</html>
6.1 thymeleaf参考手册
6.1 thymeleaf使用详解
6.2 Thymeleaf 模板引擎中文文档
6.3 Thymeleaf的 th:* 属性之—— th: ->设值& 遍历迭代& 条件判断
免责声明:本站发布的内容(图片、视频和文字)以原创、转载和分享为主,文章观点不代表本网站立场,如果涉及侵权请联系站长邮箱:is@yisu.com进行举报,并提供相关证据,一经查实,将立刻删除涉嫌侵权内容。