您好,登录后才能下订单哦!
| 导语 最全Flutter教程,涉及Dart语言,Flutter Widget,Flutter状态管理等。
最爱折腾的就是前端工程师了,从 jQuery 折腾到 AngularJs,再折腾到 Vue、React。 最爱跨屏的也是前端工程师,从 phonegap,折腾到 React Native,这不又折腾到了 Flutter。
图啥?
低成本地为用户带来更优秀的用户体验。
目前来说Flutter可能是其中最优秀的一种方案了。
Flutter 是什么?
Flutter is Google’s UI toolkit for building beautiful, natively compiled applications for mobile, web, and desktopfrom a single codebase.
Flutter是由原 Google Chrome 团队成员,利用 Chrome 2D 渲染引擎,然后精简 CSS 布局演变而来。
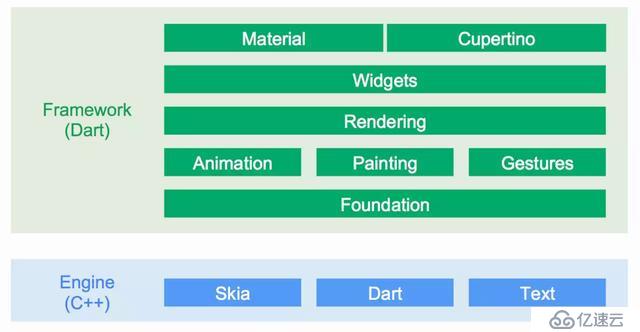
[ Flutter 架构 ]
或者更详细的版本:
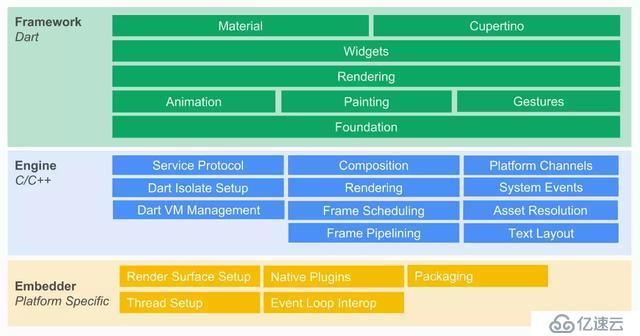
Flutter 在各个原生的平台中,使用自己的 C++的引擎渲染界面,没有使用 webview,也不像 RN、NativeScript 一样使用系统的组件。简单来说平台只是给 Flutter 提供一个画布。
界面使用 Dart 语言开发,貌似唯一支持 JIT,和 AOT 模式的强类型语言。
写法非常的现代,声明式,组件化,Composition > inheritance,响应式……就是现在前端流行的这一套 :smile:
一套代码搞定所有平台。
Flutter 为什么快?Flutter 相比 RN 的优势在哪里?
从架构中实际上已经能看出 Flutter 为什么快,至少相比之前的当红炸子鸡 React Native 快的原因了。
Skia 引擎,Chrome, Chrome OS,Android,Firefox,Firefox OS 都以此作为渲染引擎。
Dart 语言可以 AOT 编译成 ARM Code,让布局以及业务代码运行的最快,而且 Dart 的 GC 针对 Flutter 频繁销毁创建 Widget 做了专门的优化。
CSS 的子集 Flex like 的布局方式,保留强大表现能力的同时,也保留了性能。
Flutter 业务书写的 Widget 在渲染之前 diff 转化成 Render Object,对,就像 React 中的 Virtual DOM,以此来确保开发体验和性能。
而相比 React Native:
RN 使用 JavaScript 来运行业务代码,然后 JS Bridge 的方式调用平台相关组件,性能比有损失,甚至平台不同 js 引擎都不一样。
RN 使用平台组件,行为一致性会有打折,或者说,开发者需要处理更多平台相关的问题。
而具体两者的性能测试,可以看这里,结论是 Flutter,在 CPU,FPS,内存稳定上均优于 ReactNative。
Dart 语言
在开始 Flutter 之前,我们需要先了解下 Dart 语言……
Dart 是由 Google 开发,最初是想作为 JavaScript 替代语言,但是失败沉寂之后,作为 Flutter 独有开发语言又焕发了第二春 :joy:。
实际上即使到了 2.0,Dart 语法和 JavaScriptFlutter非常的相像。单线程,Event Loop……
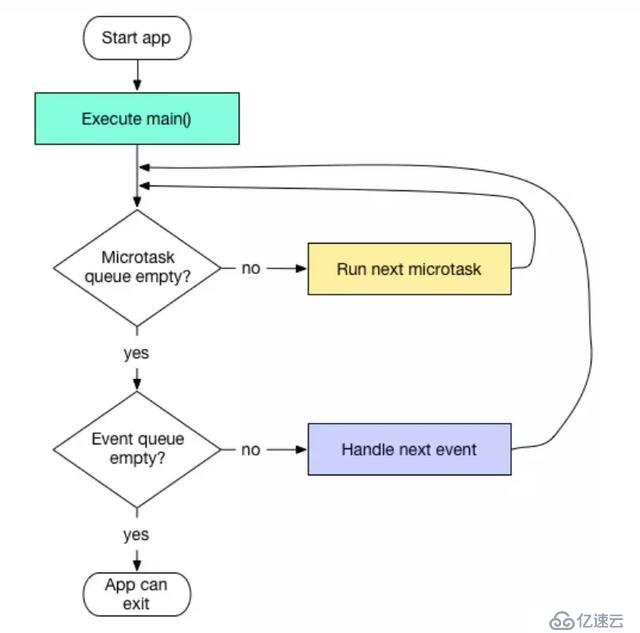
[ Dart Event Loop模型 ]
当然作为一篇写给前端工程师的教程,我在这里只想写写 JavaScript 中暂时没有的,Dart 中更为省心,也更“甜”的东西。
不会飘的 this
强类型,当然前端现在有了 TypeScript :grimacing:
强大方便的操作符号:
?. 方便安全的 foo?.bar取值,如果 foo 为 null,那么取值为 null
?? condition?expr1:expr2 可以简写为 expr1??expr2
=和其他符号的组合: *=、 ~/=、 &=、 |= ……
级联操作符(Cascade notation ..)
// 想想这样省了多少变量声明
querySelect('#button')
 ..text ="Confirm"
 ..classes.add('important')
 ..onClick.listen((e) => window.alert('Confirmed'))
复制代码
甚至可以重写操作符
class Vector {
 final int x, y;
 Vector(this.x, this.y);
 Vector operator +(Vector v) => Vector(x + v.x, y + v.y);
 Vector operator -(Vector v) => Vector(x - v.x, y - v.y);
 // Operator == and hashCode not shown. For details, see note below.
 // ···
}
void main() {
 final v = Vector(2, 3);
 final w = Vector(2, 2);
 assert(v + w == Vector(4, 5));
 assert(v - w == Vector(0, 1));
}
复制代码注:重写 ==,也需要重写 Object hashCodegetter
class Person {
 final String firstName, lastName;
 Person(this.firstName, this.lastName);
 // Override hashCode using strategy from Effective Java,
 // Chapter 11.
 @override
 int get hashCode {
 int result = 17;
 result = 37 * result + firstName.hashCode;
 result = 37 * result + lastName.hashCode;
 return result;
 }
 // You should generally implement operator == if you
 // override hashCode.
 @override
 bool operator ==(dynamic other) {
 if (other is! Person) return false;
 Person person = other;
 return (person.firstName == firstName &&
 person.lastName == lastName);
 }
}
void main() {
 var p1 = Person('Bob', 'Smith');
 var p2 = Person('Bob', 'Smith');
 var p3 = 'not a person';
 assert(p1.hashCode == p2.hashCode);
 assert(p1 == p2);
 assert(p1 != p3);
}
复制代码
这点在 diff 对象的时候尤其有用。
lsolate
Dart 运行在独立隔离的 iSolate 中就类似 JavaScript 一样,单线程事件驱动,但是 Dart 也开放了创建其他 isolate,充分利用 CPU 的多和能力。
loadData() async {
 // 通过spawn新建一个isolate,并绑定静态方法
 ReceivePort receivePort =ReceivePort();
 await Isolate.spawn(dataLoader, receivePort.sendPort);
 // 获取新isolate的监听port
 SendPort sendPort = await receivePort.first;
 // 调用sendReceive自定义方法
 List dataList = await sendReceive(sendPort, 'https://hicc.me/posts');
 print('dataList $dataList');
}
// isolate的绑定方法
static dataLoader(SendPort sendPort) async{
 // 创建监听port,并将sendPort传给外界用来调用
 ReceivePort receivePort =ReceivePort();
 sendPort.send(receivePort.sendPort);
 // 监听外界调用
 await for (var msg in receivePort) {
 String requestURL =msg[0];
 SendPort callbackPort =msg[1];
 Client client = Client();
 Response response = await client.get(requestURL);
 List dataList = json.decode(response.body);
 // 回调返回值给调用者
 callbackPort.send(dataList);
 }
}
// 创建自己的监听port,并且向新isolate发送消息
Future sendReceive(SendPort sendPort, String url) {
 ReceivePort receivePort =ReceivePort();
 sendPort.send([url, receivePort.sendPort]);
 // 接收到返回值,返回给调用者
 return receivePort.first;
}
复制代码
当然 Flutter 中封装了compute,可以方便的使用,譬如在其它 isolate 中解析大的 json。
Dart UI as Code
在这里单独提出来的意义在于,从 React 开始,到 Flutter,到最近的 Apple SwiftUI,Android Jetpack Compose 声明式组件写法越发流行,Web 前端使用 JSX 来让开发者更方便的书写,而 Flutter,SwiftUI 则直接从优化语言本身着手。
函数类的命名参数
void test({@required int age,String name}) {
 print(name);
 print(age);
}
// 解决函数调用时候,参数不明确的问题
test(name:"hicc",age: 30)
// 这样对于组件的使用尤为方便
class MyApp extends StatelessWidget {
 @override
 Widget build(BuildContext context) {
 return Scaffold(
 appBar: AppBar(),
 body: Container(),
 floatingActionButton:FloatingActionButton()
 );
 }
}
复制代码
大杀器:Collection If 和 Collection For
// collection If
Widget build(BuildContext context) {
 return Row(
 children: [
 IconButton(icon: Icon(Icons.menu)),
 Expanded(child: title),
 if (!isAndroid)
 IconButton(icon: Icon(Icons.search)),
 ],
 );
}
复制代码
// Collect For
var command = [
 engineDartPath,
 frontendServer,
 for (var root in fileSystemRoots) "--filesystem-root=$root",
 for (var entryPoint in entryPoints)
 if (fileExists("lib/$entryPoint.json")) "lib/$entryPoint",
 mainPath
];
复制代码
更多 Dart 2.3 对此的优化看这里。
Flutter 怎么写
到这里终于到正题了,如果熟悉 web 前端,熟悉 React 的话,你会对下面要讲的异常的熟悉。
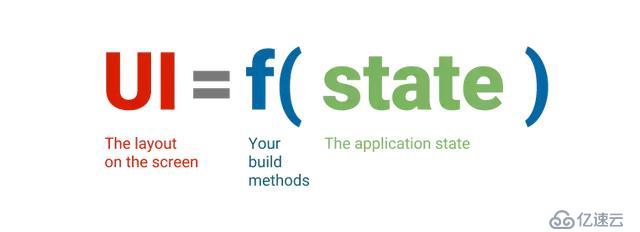
[ UI=F(state) ]
Flutter App 的一切从 lib/main.dart文件的 main 函数开始:
import 'package:flutter/material.dart';
void main() => runApp(MyApp());
class MyApp extends StatelessWidget {
 @override
 Widget build(BuildContext context) {
 return MaterialApp(
 title: 'Welcome to Flutter',
 home: Scaffold(
 appBar: AppBar(
 title: Text('Welcome to Flutter'),
 ),
 body: Center(
 child: Text('Hello World'),
 ),
 ),
 );
 }
}
复制代码
Dart 类 build 方法返回的便是 Widget,在 Flutter 中一切都是 Widget,包括但不限于
结构性元素,menu,button 等
样式类元素,font,color 等
布局类元素,padding,margin 等
导航
手势
Widget 是 Dart 中特殊的类,通过实例化(Dart 中new 是可选的)相互嵌套,你的这个 App 就是形如下图的一颗组件树(Dart 入口函数的概念, main.dart->main())。
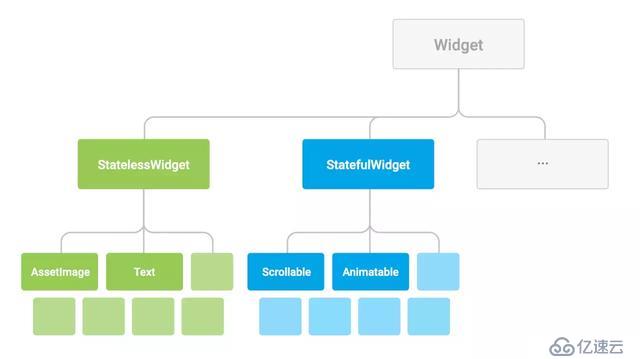
[ Flutter Widget Tree ]
Widget 布局
上说过 Flutter 布局思路来自 CSS,而 Flutter 中一切皆 Widget,因此整体布局也很简单:
容器组件 Container
decoration 装饰属性,设置背景色,背景图,边框,圆角,阴影和渐变等
margin
padding
alignment
width
height
Padding,Center
Row,Column,Flex
Wrap, Flow 流式布局
stack, z 轴布局
……
更多可以看这里
Flutter 中 Widget 可以分为三类,形如 React 中“展示组件”、“容器组件”,“context”。
StatelessWidget
这个就是 Flutter 中的“展示组件”,自身不保存状态,外部参数变化就销毁重新创建。Flutter 建议尽量使用无状态的组件。
StatefulWidget
状态组件就是类似于 React 中的“容器组件”了,Flutter 中状态组件写法会稍微不一样。
class Counter extends StatefulWidget {
 // This class is the configuration for the state. It holds the
 // values (in this case nothing) provided by the parent and used by the build
 // method of the State. Fields in a Widget subclass are always marked "final".
 @override
 _CounterState createState() => _CounterState();
}
class _CounterState extends State<Counter> {
 int _counter = 0;
 void _increment() {
 setState(() {
 // This call to setState tells the Flutter framework that
 // something has changed in this State, which causes it to rerun
 // the build method below so that the display can reflect the
 // updated values. If you change _counter without calling
 // setState(), then the build method won't be called again,
 // and so nothing would appear to happen.
 _counter++;
 });
 }
 @override
 Widget build(BuildContext context) {
 // This method is rerun every time setState is called, for instance
 // as done by the _increment method above.
 // The Flutter framework has been optimized to make rerunning
 // build methods fast, so that you can just rebuild anything that
 // needs updating rather than having to individually change
 // instances of widgets.
 return Row(
 children: <Widget>[
 RaisedButton(
 onPressed: _increment,
 child: Text('Increment'),
 ),
 Text('Count: $_counter'),
 ],
 );
 }
}
复制代码
可以看到 Flutter 中直接使用了和 React 中同名的 setState方法,不过不会有变量合并的东西,当然也有生命周期。
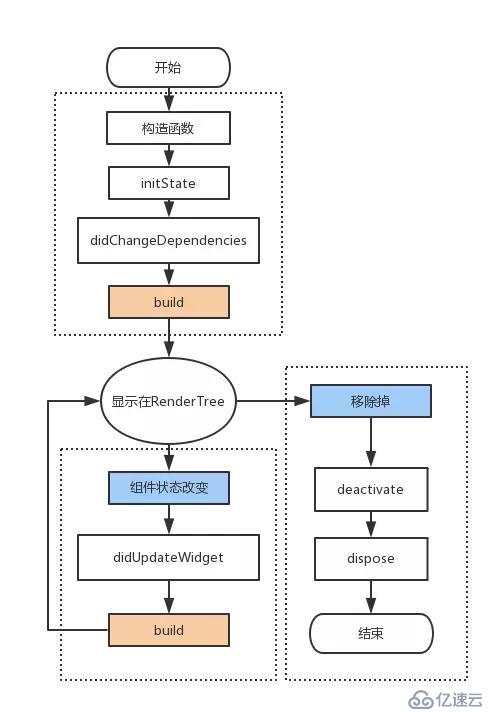
[ Flutter StatefulWidget 声明周期 ]
可以看到一个有状态的组件需要两个 Class,这样写的原因在于,Flutter 中 Widget 都是 immmutable 的,状态组件的状态保存在 State 中,组件仍然每次重新创建,Widget 在这里只是一种对组件的描述,Flutter 会 diff 转换成 Element,然后转换成 RenderObject 才渲染。
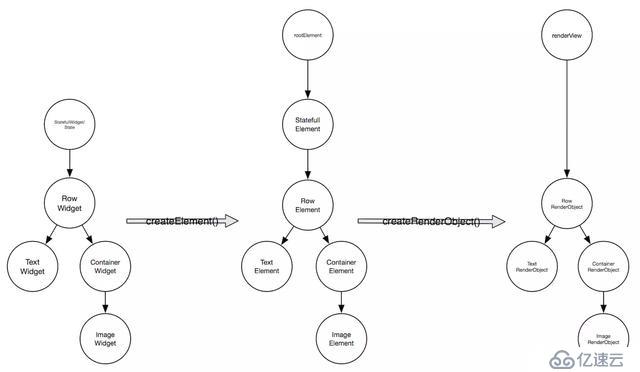
[ Flutter render object ]
Flutter Widget 更多的渲染流程可以看这里。
实际上 Widget 只是作为组件结构一种描述,还可以带来的好处是,你可以更方便的做一些主题性的组件, Flutter 官方提供的Material Components widgets和Cupertino (iOS-style) widgets质量就相当高,再配合 Flutter 亚秒级的Hot Reload,开发体验可以说挺不错的。
State Management
setState()可以很方便的管理组件内的数据,但是 Flutter 中状态同样是从上往下流转的,因此也会遇到和 React 中同样的问题,如果组件树太深,逐层状态创建就显得很麻烦了,更不要说代码的易读和易维护性了。
InheritedWidget
同样 Flutter 也有个 context一样的东西,那就是 InheritedWidget,使用起来也很简单。
class GlobalData extends InheritedWidget {
 final int count;
 GlobalData({Key key, this.count,Widget child}):super(key:key,child:child);
 @override
 bool updateShouldNotify(GlobalData oldWidget) {
 return oldWidget.count != count;
 }
 static GlobalData of(BuildContext context) => context.inheritFromWidgetOfExactType(GlobalData);
}
class MyApp extends StatelessWidget {
 // This widget is the root of your application.
 @override
 Widget build(BuildContext context) {
 return MaterialApp(
 title: 'Flutter Demo',
 theme: ThemeData(
 primarySwatch: Colors.blue,
 ),
 home: MyHomePage(title: 'Flutter Demo Home Page'),
 );
 }
}
class MyHomePage extends StatefulWidget {
 MyHomePage({Key key, this.title}) : super(key: key);
 final String title;
 @override
 _MyHomePageState createState() => _MyHomePageState();
}
class _MyHomePageState extends State<MyHomePage> {
 int _counter = 0;
 void _incrementCounter() {
 _counter++;
 });
 }
 @override
 Widget build(BuildContext context) {
 return Scaffold(
 appBar: AppBar(
 title: Text(widget.title),
 ),
 body: GlobalData(
 count: _counter,
 child: Center(
 child: Column(
 mainAxisAlignment: MainAxisAlignment.center,
 children: <Widget>[
 Text(
 'You have pushed the button this many times:',
 ),
 Text(
 '$_counter',
 style: Theme.of(context).textTheme.display1,
 ),
 Body(),
 Body2()
 ],
 ),
 ),
 ),
 floatingActionButton: FloatingActionButton(
 onPressed: _incrementCounter,
 tooltip: 'Increment',
 child: Icon(Icons.add),
 ),
 );
 }
}
class Body extends StatelessWidget {
 @override
 Widget build(BuildContext context) {
 GlobalData globalData = GlobalData.of(context);
 return Text(globalData.count.toString());
 }
}
class Body2 extends StatelessWidget {
 @override
 Widget build(BuildContext context) {
 // TODO: implement build
 GlobalData globalData = GlobalData.of(context);
 return Text(globalData.count.toString());
 }
复制代码
具体实现原理可以参考这里,不过 Google 封装了一个更为上层的库provider,具体使用可以看这里。
BlOC
BlOC是 Flutter team 提出建议的另一种更高级的数据组织方式,也是我最中意的方式。简单来说:
Bloc = InheritedWidget + RxDart(Stream)
Dart 语言中内置了 Steam,Stream ~= Observable,配合RxDart, 然后加上 StreamBuilder会是一种异常强大和自由的模式。
class GlobalData extends InheritedWidget {
 final int count;
 final Stream<String> timeInterval$ = new Stream.periodic(Duration(seconds: 10)).map((time) => new DateTime.now().toString());
 GlobalData({Key key, this.count,Widget child}):super(key:key,child:child);
 @override
 bool updateShouldNotify(GlobalData oldWidget) {
 return oldWidget.count != count;
 }
 static GlobalData of(BuildContext context) => context.inheritFromWidgetOfExactType(GlobalData);
}
class TimerView extends StatelessWidget {
 @override
 Widget build(BuildContext context) {
 GlobalData globalData = GlobalData.of(context);
 return StreamBuilder(
 stream: globalData.timeInterval$,
 builder: (context, snapshot) {
 return Text(snapshot?.data ?? '');
 }
 );
 }
}
复制代码
当然 Bloc 的问题在于
学习成本略高,Rx 的概念要吃透,不然你会抓狂
自由带来的问题是,可能代码不如 Redux 类的规整。
顺便,今年 Apple 也拥抱了响应式,Combine(Rx like) + SwiftUI 也基本等于 Bloc 了。
所以,Rx 还是要赶紧学起来 :grimacing:
除去 Bloc,Flutter 中还是可以使用其他的方案,譬如:
Flutter Redux
阿里闲鱼的Fish Redux,据说性能很好。
Mobx
……
展开来说现在的前端开发使用强大的框架页面组装已经不是难点了。开发的难点在于如何组合富交互所需的数据,也就是上面图中的 state部分。
更具体来说,是怎么优雅,高效,易维护地处理短暂数据(ephemeral state) setState()和需要共享的 App State 的问题,这是个工程性的问题,但往往也是日常开发最难的事情了,引用 Redux 作者 Dan 的一句:
“The rule of thumb is:Do whatever is less awkward.”
到这里,主要的部分已经讲完了,有这些已经可以开发出一个不错的 App 了。剩下的就当成一个 bonus 吧。
测试
Flutter debugger,测试都是出场自带,用起来也不难。
// 测试在/test/目录下面
void main() {
 testWidgets('Counter increments smoke test', (WidgetTester tester) async {
 // Build our app and trigger a frame.
 await tester.pumpWidget(MyApp());
 // Verify that our counter starts at 0.
 expect(find.text('0'), findsOneWidget);
 expect(find.text('1'), findsNothing);
 // Tap the '+' icon and trigger a frame.
 await tester.tap(find.byIcon(Icons.add));
 await tester.pump();
 // Verify that our counter has incremented.
 expect(find.text('0'), findsNothing);
 expect(find.text('1'), findsOneWidget);
 });
}
复制代码
包管理,资源管理
类似与 JavaScript 的 npm,Flutter,也就是 Dart 也有自己的包仓库。不过项目包的依赖使用 yaml 文件来描述:
name: app
description: A new Flutter project.
version: 1.0.0+1
environment:
 sdk: ">=2.1.0 <3.0.0"
dependencies:
 flutter:
 sdk: flutter
 cupertino_icons: ^0.1.2
复制代码
生命周期
移动应用总归需要应用级别的生命周期,flutter 中使用生命周期钩子,也非常的简单:
class MyApp extends StatefulWidget {
 @override
 _MyAppState createState() => new _MyAppState();
}
class _MyAppState extends State<MyApp> with WidgetsBindingObserver {
 @override
 void initState() {
 super.initState();
 WidgetsBinding.instance.addObserver(this);
 }
 @override
 void dispose() {
 WidgetsBinding.instance.removeObserver(this);
 super.dispose();
 }
 @override
 void didChangeAppLifecycleState(AppLifecycleState state) {
 switch (state) {
 case AppLifecycleState.inactive:
 print('AppLifecycleState.inactive');
 break;
 case AppLifecycleState.paused:
 print('AppLifecycleState.paused');
 break;
 case AppLifecycleState.resumed:
 print('AppLifecycleState.resumed');
 break;
 case AppLifecycleState.suspending:
 print('AppLifecycleState.suspending');
 break;
 }
 super.didChangeAppLifecycleState(state);
 }
 @override
 Widget build(BuildContext context) {
 return Container();
 }
}
复制代码
使用原生能力
和 ReactNative 类似,Flutter 也是使用类似事件的机制来使用平台相关能力。
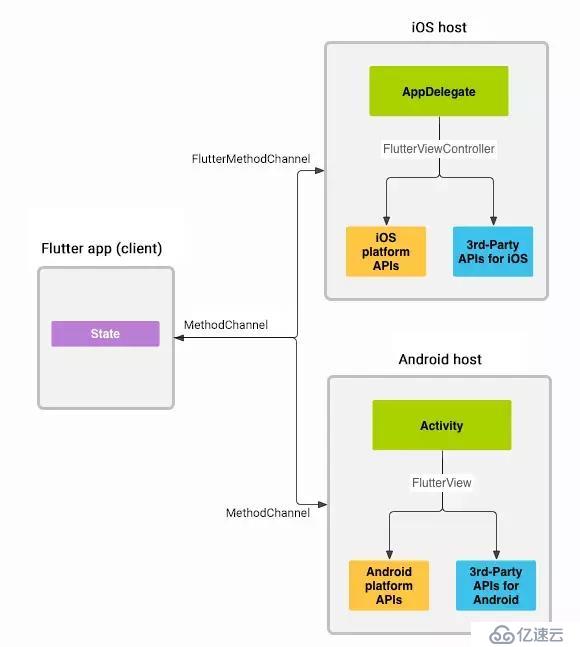
[ Flutter platform channels ]
Flutter Web, Flutter Desktop
这些还在开发当中,鉴于对 Dart 喜欢,以及对 Flutter 性能的乐观,这些倒是很值得期待。

[ Flutter web 架构 ]
还记得平台只是给 Flutter 提供一个画布么,Flutter Desktop 未来更是可以大有可为 :smile:,相关可以看这里。
最后每种方案,每种技术都有优缺点,甚至技术的架构决定了,有些缺陷可能永远都没法改进,所以 [emoji]。
免责声明:本站发布的内容(图片、视频和文字)以原创、转载和分享为主,文章观点不代表本网站立场,如果涉及侵权请联系站长邮箱:is@yisu.com进行举报,并提供相关证据,一经查实,将立刻删除涉嫌侵权内容。