您好,登录后才能下订单哦!
密码登录
登录注册
点击 登录注册 即表示同意《亿速云用户服务条款》
本篇内容主要讲解“C++中怎么使用FFmpeg适配自定义编码器”,感兴趣的朋友不妨来看看。本文介绍的方法操作简单快捷,实用性强。下面就让小编来带大家学习“C++中怎么使用FFmpeg适配自定义编码器”吧!
FFmpeg是一个开源的多媒体框架,底层可对接实现多种编解码器,下面参考文件doc/examples/encode_video.c分析编码一帧的流程
统一的编码流程如下图所示
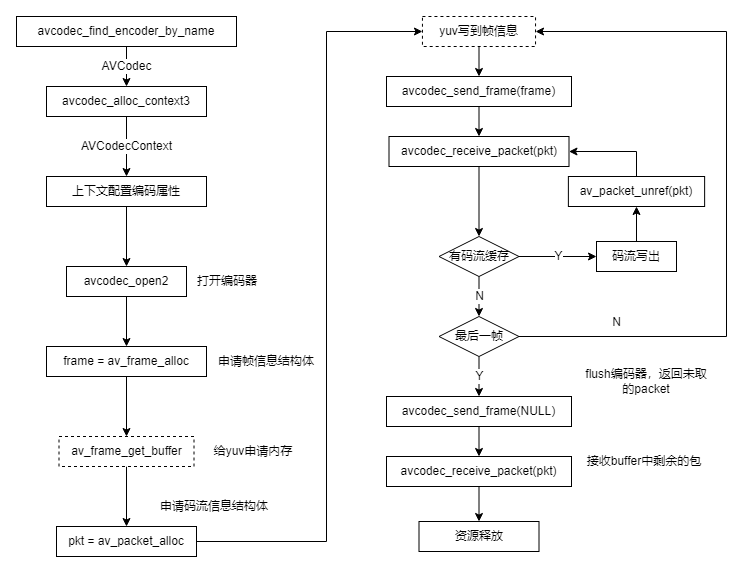
FFmpeg使用的是引用计数的思想,对于一块buffer,刚申请时引用计数为1,每有一个模块进行使用,引用计数加1,使用完毕后引用计数减1,当减为0时释放buffer。
此流程中需要关注buffer的分配,对于编码器来说,输入buffer是yuv,也就是上图中的frame,输出buffer是码流包,也就是上图中的pkt,下面对这两个buffer进行分析
frame:这个结构体是由av_frame_alloc分配的,但这里并没有分配yuv的内存,yuv内存是av_frame_get_buffer分配的,可见这里输入buffer完全是来自外部的,不需要编码器来管理,编码器只需要根据所给的yuv地址来进行编码就行了
pkt:这个结构体是由av_packet_alloc分配的,也没有分配码流包的内存,可见这里pkt仅仅是一个引用,pkt直接传到了avcodec_receive_packet接口进行编码,完成之后将pkt中码流的内容写到文件,最后调用av_packet_unref接口减引用计数,因此这里pkt是编码器内部分配的,分配完成之后会减pkt的引用计数加1,然后输出到外部,外部使用完毕之后再减引用计数来释放buffer
编码一帧的相关代码如下:
static void encode(AVCodecContext *enc_ctx, AVFrame *frame, AVPacket *pkt,
                   FILE *outfile)
{
    int ret;
    /* send the frame to the encoder */
    if (frame)
        printf("Send frame %3"PRId64"\n", frame->pts);
    ret = avcodec_send_frame(enc_ctx, frame);
    if (ret < 0) {
        fprintf(stderr, "Error sending a frame for encoding\n");
        exit(1);
    }
    while (ret >= 0) {
        ret = avcodec_receive_packet(enc_ctx, pkt);
        if (ret == AVERROR(EAGAIN) || ret == AVERROR_EOF)
            return;
        else if (ret < 0) {
            fprintf(stderr, "Error during encoding\n");
            exit(1);
        }
        printf("Write packet %3"PRId64" (size=%5d)\n", pkt->pts, pkt->size);
        fwrite(pkt->data, 1, pkt->size, outfile);
        av_packet_unref(pkt);
    }
}其中avcodec_receive_packet返回EAGAIN表示送下一帧,返回EOF表示编码器内部已经没有码流。
此处分析编码一帧的内部流程,首先看FFmpeg内部编码器的上下文,其中有三个重要结构体
typedef struct AVCodecInternal {
	...
    /**
     * The input frame is stored here for encoders implementing the simple
     * encode API.
     *
     * Not allocated in other cases.
     */
    AVFrame *in_frame;
    /**
     * Temporary buffers for newly received or not yet output packets/frames.
     */
    AVPacket *buffer_pkt;
    AVFrame *buffer_frame;
    ...
} AVCodecInternal;
下面结合送帧和收流的接口进行介绍
avcodec_send_frame: 送帧接口,将yuv的帧信息赋值到buffer_frame,然后触发一帧编码,将编码出的码流赋值到buffer_pkt
avcodec_receive_packet: 收流接口,检查上下文中是否有已经编码好的码流buffer_pkt,如果有则将其返回,如果没有再触发一帧编码,将编码好的码流返回
可见send和receive接口均可触发一帧编码,此处触发一帧编码分为两个流程,receive流程和simple流程,代码片段如下:
static int encode_receive_packet_internal(AVCodecContext *avctx, AVPacket *avpkt)
{
	...
	if (ffcodec(avctx->codec)->cb_type == FF_CODEC_CB_TYPE_RECEIVE_PACKET) {
        ret = ffcodec(avctx->codec)->cb.receive_packet(avctx, avpkt);
        if (ret < 0)
            av_packet_unref(avpkt);
        else
            // Encoders must always return ref-counted buffers.
            // Side-data only packets have no data and can be not ref-counted.
            av_assert0(!avpkt->data || avpkt->buf);
    } else
        ret = encode_simple_receive_packet(avctx, avpkt);
    ...
}如果是receive流程,则直接调用receive_packet接口的回调,该接口中注册定制编码器的接口,完成一帧编码。如果是simple流程,则调用的是encode_simple_receive_packet,这是FFmpeg封装的一个简易流程,其中调用的是encode接口,代码片段如下,详细分析可参考文章:
static int encode_simple_internal(AVCodecContext *avctx, AVPacket *avpkt)
{
    AVFrame          *frame = avci->in_frame;
    const FFCodec *const codec = ffcodec(avctx->codec);
    int got_packet;
	...
	/* 拷贝buffer_frame到in_frame */
	...
    if (CONFIG_FRAME_THREAD_ENCODER && avci->frame_thread_encoder) {
        /* This will unref frame. */
        ret = ff_thread_video_encode_frame(avctx, avpkt, frame, &got_packet);
    } else {
        ret = ff_encode_encode_cb(avctx, avpkt, frame, &got_packet);
#if FF_API_THREAD_SAFE_CALLBACKS
        if (frame) {
            av_frame_unref(frame);
        }
#endif
    }
    ...
    return ret;
}simple流程中会把buffer_frame的引用拷贝到in_frame,然后将in_frame送帧编码,意味着其内部只能缓存一帧,不支持多帧缓存。并且simple流程中,调用send之后,如果调用receive成功获取到一包码流,下一次调用receive将会返回EAGAIN,且不会调用encode接口,因此对于不支持多帧缓存的编码器而言,如果send一帧后,需要receive两包码流,那么获取到一包码流之后receive接口会返回EAGAIN,循环退出进行下一次send,此时上一帧未编码的yuv会被覆盖
receive流程中没有该限制,直接调用了receive_packet接口,因此如果需要在ffmpeg适配层做多帧缓存,可以使用receive的流程。另外receive流程没有上述限制,在成功收到一帧码流之后,仍然会调用receive,比较灵活,可以做一些定制化的操作
适配接口参考ffmpeg/libavcodec/nvenc_h364.c,这是英伟达的硬件编码器接口,自定义一个编码器只需实现以下结构体
const FFCodec ff_h364_nvenc_encoder = {
    .p.name         = "h364_nvenc",
    .p.long_name    = NULL_IF_CONFIG_SMALL("NVIDIA NVENC H.264 encoder"),
    .p.type         = AVMEDIA_TYPE_VIDEO,
    .p.id           = AV_CODEC_ID_H264,
    .init           = ff_nvenc_encode_init,
    FF_CODEC_RECEIVE_PACKET_CB(ff_nvenc_receive_packet),
    .close          = ff_nvenc_encode_close,
    .flush          = ff_nvenc_encode_flush,
    .priv_data_size = sizeof(NvencContext),
    .p.priv_class   = &h364_nvenc_class,
    .defaults       = defaults,
    .p.capabilities = AV_CODEC_CAP_DELAY | AV_CODEC_CAP_HARDWARE |
                      AV_CODEC_CAP_ENCODER_FLUSH | AV_CODEC_CAP_DR1,
    .caps_internal  = FF_CODEC_CAP_INIT_CLEANUP,
    .p.pix_fmts     = ff_nvenc_pix_fmts,
    .p.wrapper_name = "nvenc",
    .hw_configs     = ff_nvenc_hw_configs,
};
这里面最重要三个接口是init、close和receive,还有一个比较重要的数据结构是option,此处写明了编码器支持的具体配置
static const AVOption options[] = {
#ifdef NVENC_HAVE_NEW_PRESETS
    { "preset",       "Set the encoding preset",            OFFSET(preset),       AV_OPT_TYPE_INT,   { .i64 = PRESET_P4 },     PRESET_DEFAULT, PRESET_P7,          VE, "preset" },
#else
    { "preset",       "Set the encoding preset",            OFFSET(preset),       AV_OPT_TYPE_INT,   { .i64 = PRESET_MEDIUM }, PRESET_DEFAULT, PRESET_LOSSLESS_HP, VE, "preset" },
#endif
    { "default",      "",                                   0,                    AV_OPT_TYPE_CONST, { .i64 = PRESET_DEFAULT },             0, 0, VE, "preset" },
    { "slow",         "hq 2 passes",                        0,                    AV_OPT_TYPE_CONST, { .i64 = PRESET_SLOW },                0, 0, VE, "preset" },
    { "medium",       "hq 1 pass",                          0,                    AV_OPT_TYPE_CONST, { .i64 = PRESET_MEDIUM },              0, 0, VE, "preset" },
...
};
static const AVClass h364_nvenc_class = {
    .class_name = "h364_nvenc",
    .item_name = av_default_item_name,
    .option = options,
    .version = LIBAVUTIL_VERSION_INT,
};init是初始化编码器的接口,在avcodec_open2中调用,定义接口如下,此接口一般是根据用户的option配置,来对编码器进行相应的初始化
int (*init)(struct AVCodecContext *)
close是关闭编码器的接口,在avcodec_free_context中调用,定义接口如下,该接口完成编码器内部的一些资源释放操作
int (*close)(struct AVCodecContext *)
每个编码器有一个自定义的上下文,其作用是在编码器初始化之前对上下文进行配置,编码器初始化的时候就可以按照用户的配置来初始化,以nvenc为例该上下文的定义为
ypedef struct NvencContext
{
    ...
    // 队列相关的定义
    ...
    // 编码相关的配置信息
    int preset;
    int profile;
    int level;
    int tier;
    int rc;
    int cbr;
	...
} NvencContext;该上下文在avcodec内部使用,对外不可见,因此需要option的方式开放对外配置的接口,使用一个AVOption来描述一个编码器的配置
typedef struct AVOption {
    const char *name;
    /**
     * short English help text
     * @todo What about other languages?
     */
    const char *help;
    /**
     * The offset relative to the context structure where the option
     * value is stored. It should be 0 for named constants.
     */
    int offset;
    enum AVOptionType type;
    /**
     * the default value for scalar options
     */
    union {
        int64_t i64;
        double dbl;
        const char *str;
        /* TODO those are unused now */
        AVRational q;
    } default_val;
    double min;                 ///< minimum valid value for the option
    double max;                 ///< maximum valid value for the option
    int flags;
    const char *unit;
} AVOption;其中关键的是offset和type成员,offset描述了这个option在上下文中的偏移量,type描述了成员占据的长度,有这两个信息就可以在不对外暴露内部上下文的情况下,修改其中的值,用户配置option的示例如下
av_opt_set(c->priv_data, "preset", "slow", 0);
nvenc在avcodec层实现了多帧缓存,因此他实现的是receive接口,代码片段如下,需要注意这里输入输出都存在拷贝
int ff_nvenc_receive_packet(AVCodecContext *avctx, AVPacket *pkt)
{
    NvencSurface *tmp_out_surf;
    int res, res2;
    NvencContext *ctx = avctx->priv_data;
    AVFrame *frame = ctx->frame;		// 这个是init中申请的
    if (!frame->buf[0]) {
    	// 将buffer_frame引用拷贝到frame中
        res = ff_encode_get_frame(avctx, frame);
        if (res < 0 && res != AVERROR_EOF)
            return res;
    }
	// 编码一帧,推测是阻塞的,nv相关的函数没有找到介绍,其中存在拷贝
    res = nvenc_send_frame(avctx, frame);
    if (res < 0) {
        if (res != AVERROR(EAGAIN))
            return res;
    } else
        av_frame_unref(frame);
    if (output_ready(avctx, avctx->internal->draining)) {
    	// 从ready队列中取编码好的surface
        av_fifo_read(ctx->output_surface_ready_queue, &tmp_out_surf, 1);
        res = nvenc_push_context(avctx);
        if (res < 0)
            return res;
		// 拷贝到pkt中
        res = process_output_surface(avctx, pkt, tmp_out_surf);
        res2 = nvenc_pop_context(avctx);
        if (res2 < 0)
            return res2;
        if (res)
            return res;
		// surface再放回unused队列
        av_fifo_write(ctx->unused_surface_queue, &tmp_out_surf, 1);
    } else if (avctx->internal->draining) {
        return AVERROR_EOF;
    } else {
        return AVERROR(EAGAIN);
    }
    return 0;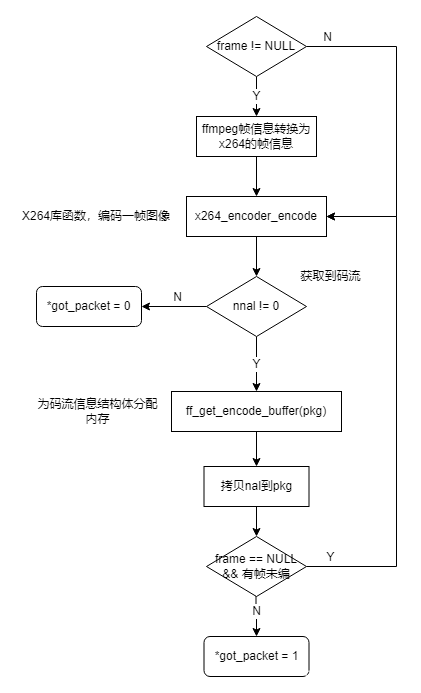
}nvenc没有实现encode接口,这里参考libavcodec/libx264.c的实现,libx264的流程比较繁琐,总结为流程图如下,x264_encoder_encode为非阻塞接口,内部存在yuv的拷贝,调用后不一定会获取到一帧编码好的码流,但获取到之后,同样需要拷贝到输出pkt中
通过以上分析,发现两种编码器的实现都存在拷贝,下面分析零拷贝实现的可能性
首先是输入零拷贝,输入yuv是外部申请的,编码器只是使用,对于一个阻塞的编码器(即送帧后需要阻塞等待该帧编码完成),这个设计是相对简单的,只需要将frame的地址告诉编码器即可,从编码开始到结束只有一个yuv buffer,编码完成后意味这一帧也消耗完了;如果是非阻塞的编码器涉及多个buffer缓存在编码器中,该设计过于复杂此处不讨论
然后是输出零拷贝,输出的码流buffer是编码器自己申请的,要实现零拷贝,上层使用完毕之后就需要将该buffer还给编码器,参考FFmpeg的example是有这个动作的,即调用unref减引用计数
void av_packet_unref(AVPacket *pkt)
AVPacket中实际的码流buffer在buf成员中
typedef struct AVPacket {
    /**
     * A reference to the reference-counted buffer where the packet data is
     * stored.
     * May be NULL, then the packet data is not reference-counted.
     */
    AVBufferRef *buf;
    ...
} AVPacket;该接口将buf的引用计数减到零之后,会进行释放操作,对于AVBufferRef而言,释放操作是可以定制的,只需要将free赋值即可
struct AVBuffer {
    ...
    void (*free)(void *opaque, uint8_t *data);
	...
};FFmpeg有相关接口可以生成一个定制的AVBufferRef
AVBufferRef *av_buffer_create(uint8_t *data, size_t size,
                              void (*free)(void *opaque, uint8_t *data),
                              void *opaque, int flags)
这里data是已经分配好的buffer的地址,size是已经分配的buffer的大小,free是对应的释放函数
因此,输出buffer零拷贝可以这样实现,通过相关编码器接口获取到一包码流之后,通过av_buffer_create来生成AVBufferRef,传入的是这包码流的地址和大小,注册free函数为还码流buffer给编码器的函数,将生成的AVBufferRef赋值到AVPacket中返回给上层,上层使用完毕后,调用av_packet_unref即可向编码器还码流。
到此,相信大家对“C++中怎么使用FFmpeg适配自定义编码器”有了更深的了解,不妨来实际操作一番吧!这里是亿速云网站,更多相关内容可以进入相关频道进行查询,关注我们,继续学习!
免责声明:本站发布的内容(图片、视频和文字)以原创、转载和分享为主,文章观点不代表本网站立场,如果涉及侵权请联系站长邮箱:is@yisu.com进行举报,并提供相关证据,一经查实,将立刻删除涉嫌侵权内容。