жӮЁеҘҪпјҢзҷ»еҪ•еҗҺжүҚиғҪдёӢи®ўеҚ•е“ҰпјҒ
иҝҷзҜҮж–Үз« дё»иҰҒд»Ӣз»ҚвҖңжҖҺд№Ҳе®үиЈ…е’ҢдҪҝз”ЁPythonиҪ»йҮҸзә§жҖ§иғҪе·Ҙе…·LocustвҖқзҡ„зӣёе…ізҹҘиҜҶпјҢе°Ҹзј–йҖҡиҝҮе®һйҷ…жЎҲдҫӢеҗ‘еӨ§е®¶еұ•зӨәж“ҚдҪңиҝҮзЁӢпјҢж“ҚдҪңж–№жі•з®ҖеҚ•еҝ«жҚ·пјҢе®һз”ЁжҖ§ејәпјҢеёҢжңӣиҝҷзҜҮвҖңжҖҺд№Ҳе®үиЈ…е’ҢдҪҝз”ЁPythonиҪ»йҮҸзә§жҖ§иғҪе·Ҙе…·LocustвҖқж–Үз« иғҪеё®еҠ©еӨ§е®¶и§ЈеҶій—®йўҳгҖӮ
LocustеҹәдәҺpythonзҡ„еҚҸзЁӢжңәеҲ¶пјҢжү“з ҙдәҶзәҝзЁӢиҝӣзЁӢзҡ„йҷҗеҲ¶пјҢеҸҜд»ҘиғҪеӨҹеңЁдёҖеҸ°жөӢиҜ•жңәдёҠи·‘й«ҳ并еҸ‘
гҖҖгҖҖ1.еҝ«ж…ўпјҡиЎЎйҮҸзі»з»ҹзҡ„еӨ„зҗҶж•ҲзҺҮпјҡе“Қеә”ж—¶й—ҙ
гҖҖгҖҖ2.еӨҡе°‘пјҡиЎЎйҮҸзі»з»ҹзҡ„еӨ„зҗҶиғҪеҠӣпјҡеҚ•дҪҚж—¶й—ҙеҶ…иғҪеӨ„зҗҶеӨҡе°‘дёӘдәӢеҠЎпјҲtpsпјү
жҖ§иғҪжөӢиҜ•ж №жҚ®жөӢиҜ•йңҖжұӮжңҖеёёи§Ғзҡ„еҲҶдёәдёӢйқўдёүзұ»
гҖҖгҖҖ1 иҙҹиҪҪжөӢиҜ•load testing
гҖҖгҖҖгҖҖгҖҖдёҚж–ӯеҗ‘жңҚеҠЎеҷЁеҠ еҺӢпјҢеҖјеҫ—йў„е®ҡзҡ„жҢҮж ҮжҲ–иҖ…йғЁеҲҶзі»з»ҹиө„жәҗиҫҫеҲ°з“¶йўҲпјҢзӣ®зҡ„жҳҜжүҫеҲ°зі»з»ҹжңҖеӨ§иҙҹиҪҪзҡ„иғҪеҠӣ
гҖҖгҖҖ2 еҺӢеҠӣжөӢиҜ•
гҖҖгҖҖгҖҖгҖҖйҖҡиҝҮй«ҳиҙҹиҪҪжҢҒз»ӯй•ҝж—¶й—ҙпјҢжқҘйӘҢиҜҒзі»з»ҹжҳҜеҗҰзЁіе®ҡ
гҖҖгҖҖ3 并еҸ‘жөӢиҜ•пјҡ
гҖҖгҖҖгҖҖгҖҖеҗҢж—¶еғҸжңҚеҠЎеҷЁжҸҗдәӨиҜ·жұӮпјҢзӣ®зҡ„еҸ‘зҺ°зі»з»ҹжҳҜеҗҰеӯҳеңЁдәӢеҠЎеҶІзӘҒжҲ–иҖ…й”ҒеҚҮзә§зҡ„зҺ°иұЎ
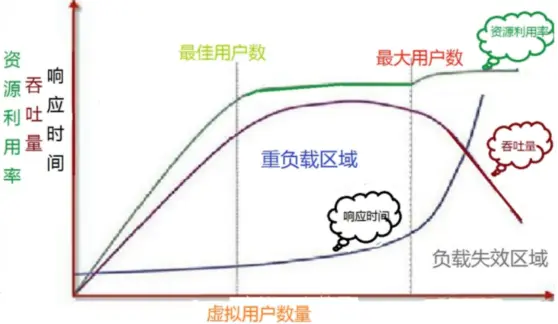
жҖ§иғҪиҙҹиҪҪжЁЎеһӢ

е®үиЈ…еӯҳеңЁй—®йўҳпјҢеҸҜд»ҘйҖҡиҝҮиұҶз“ЈжәҗдёӢиҪҪ
pip install locust
еҹәжң¬дёҠеӨҡж•°зҡ„еңәжҷҜжҲ‘们йғҪеҸҜд»ҘеҹәдәҺиҝҷдёӘжЁЎжқҝread.pyеҺ»еҒҡдҝ®ж”№
from locust import HttpUser, TaskSet, task, tag, events
# еҗҜеҠЁlocustж—¶иҝҗиЎҢ
@events.test_start.add_listener
def setup(environment, **kwargs):
# print("task setup")
# еҒңжӯўlocustж—¶иҝҗиЎҢ
@events.test_stop.add_listener
def teardown(environment, **kwargs):
print("task teardown")
class UserBehavor(TaskSet):
#иҷҡжӢҹз”ЁжҲ·еҗҜз”ЁtaskиҝҗиЎҢ
def on_start(self):
print("start")
locusts_spawned.wait()
#иҷҡжӢҹз”ЁжҲ·з»“жқҹtaskиҝҗиЎҢ
def on_stop(self):
print("stop")
@tag('test1')
@task(2)
def index(self):
    self.client.get('/yetangjian/p/17320268.html')
@task(1)
def info(self):
self.client.get("/yetangjian/p/17253215.html")
class WebsiteUser(HttpUser):
def setup(self):
print("locust setup")
def teardown(self):
print("locust teardown")
host = "https://www.cnblogs.com"
task_set = task(UserBehavor)
min_wait = 3000
max_wait = 5000жіЁпјҡиҝҷйҮҢжҲ‘们з»ҷдәҶдёҖдёӘwebhostпјҢиҝҷж ·жҲ‘们еҸҜд»ҘзӣҙжҺҘеңЁжөҸи§ҲеҷЁдёӯжү“ејҖlocust
еҪ“然жҲ‘们еҸҜд»ҘжҠҠйӣҶеҗҲзӮ№ж“ҚдҪңж”ҫе…ҘдёҠиҝ°жЁЎжқҝзҡ„setupдёӯеҺ»иҝҗиЎҢиө·жқҘ
locusts_spawned = Semaphore()
locusts_spawned.acquire()
def on_hatch_complete(**kwargs):
"""
select_taskзұ»зҡ„й’©еӯҗеҮҪж•°
:param kwargs:
:return:
"""
locusts_spawned.release()
events.spawning_complete.add_listener(on_hatch_complete)
n = 0
class UserBehavor(TaskSet):
def login(self):
global n
n += 1
print(f"第{n}дёӘз”ЁжҲ·зҷ»йҷҶ")
def on_start(self):
self.login()
locusts_spawned.wait()
@task
def test1(self):
#catch_responseиҺ·еҸ–иҝ”еӣһ
with self.client.get("/yetangjian/p/17253215.html",catch_response=True):
print("жҹҘиҜўз»“жқҹ")
class WebsiteUser(HttpUser):
host = "https://www.cnblogs.com"
task_set = task(UserBehavor)
wait_time = between(1,3)
if __name__ == '__main__':
os.system('locust -f read.py --web-host="127.0.0.1"')еңЁдёҠйқўдёӨдёӘдҫӢеӯҗдёӯжҲ‘们已з»ҸзңӢеҲ°дәҶдёҖдәӣпјҢдҫӢеҰӮиЈ…йҘ°еҷЁevents.test_start.add_listenerпјӣevents.test_stop.add_listenerз”ЁжқҘеңЁиҙҹиҪҪжөӢиҜ•еүҚеҗҺиҝӣиЎҢдёҖдәӣж“ҚдҪңпјҢеҸҲдҫӢеҰӮon_startгҖҒon_stopпјҢеңЁtaskжү§иЎҢеүҚеҗҺиҝҗиЎҢпјҢеҸҲдҫӢеҰӮtaskпјҢеҸҜд»Ҙз”ЁжқҘеҲҶй…Қд»»еҠЎзҡ„жқғйҮҚ
зӯүеҫ…ж—¶й—ҙ
# wait between 3.0 and 10.5 seconds after each task #wait_time = between(3.0, 10.5) #еӣәе®ҡж—¶й—ҙзӯүеҫ… # wait_time = constant(3) #зЎ®дҝқжҜҸз§’иҝҗиЎҢеӨҡе°‘ж¬Ў constant_throughputпјҲtask_runs_per_secondпјү #зЎ®дҝқжҜҸеӨҡе°‘з§’иҝҗиЎҢдёҖж¬Ў constant_pacing(wait_time)
еҗҢж ·д№ҹеҸҜд»ҘеңЁUserзұ»дёӢеҸ‘йҮҚеҶҷwait_timeжқҘиҫҫеҲ°иҮӘе®ҡд№ү
tagж Үи®°
@tag('test1')
@task(2)
def index(self):
self.client.get('/yetangjian/p/17320268.html')йҖҡиҝҮеҜ№д»»еҠЎжү“ж Үи®°пјҢе°ұеҸҜд»ҘеңЁиҝҗиЎҢж—¶еҖҷжү§иЎҢиҝҗиЎҢжҹҗдёҖдәӣд»»еҠЎпјҡ
#еҸӘжү§иЎҢж Үи®°test1
os.system('locust -f read.py --tags test1 --web-host="127.0.0.1"')
#дёҚжү§иЎҢж Үи®°иҝҮзҡ„
os.system('locust -f read.py --exclude-tags --web-host="127.0.0.1"')
#йҷӨеҺ»test1жү§иЎҢжүҖжңү
os.system('locust -f read.py --exclude-tags test1 --web-host="127.0.0.1"')иҮӘе®ҡд№үеӨұиҙҘ
#е®ҡд№үе“Қеә”ж—¶й—ҙи¶…иҝҮ0.1е°ұдёәеӨұиҙҘ
with self.client.get("/yetangjian/p/17253215.html", catch_response=True) as response:
if response.elapsed.total_seconds() > 0.1:
response.failure("Request took too long")
#е®ҡд№үе“Қеә”з ҒжҳҜ200е°ұдёәеӨұиҙҘ
with self.client.get("/yetangjian/p/17320268.html", catch_response=True) as response:
if response.status_code == 200:
response.failure("е“Қеә”з Ғ200пјҢдҪҶжҲ‘е®ҡд№үдёәеӨұиҙҘ")
иҮӘе®ҡд№үиҙҹиҪҪеҪўзҠ¶
иҮӘе®ҡд№үдёҖдёӘshape.pyйҖҡиҝҮ继жүҝLoadTestShape并йҮҚеҶҷtick
иҝҷдёӘеҪўзҠ¶зұ»е°Ҷд»Ҙ100еқ—дёәеҚ•дҪҚ,20йҖҹзҺҮзҡ„еўһеҠ з”ЁжҲ·ж•°пјҢ然еҗҺеңЁ10еҲҶй’ҹеҗҺеҒңжӯўиҙҹиҪҪжөӢиҜ•пјҲд»ҺиҝҗиЎҢејҖе§Ӣзҡ„第51з§’ејҖе§Ӣuser_countдјҡroundеҲ°100пјү
from locust import LoadTestShape
class MyCustomShape(LoadTestShape):
    time_limit = 600
    spawn_rate = 20
    def tick(self):
        run_time = self.get_run_time()
        if run_time < self.time_limit:
            # User count rounded to nearest hundred.
            user_count = round(run_time, -2)
            return (user_count, self.spawn_rate)
        return None
иҝҗиЎҢеӣҫеҰӮдёӢжүҖзӨә

йҖҡиҝҮе‘Ҫд»ӨиЎҢеҺ»и§ҰеҸ‘
os.system('locust -f read.py,shape.py --web-host="127.0.0.1"')дёҚеҗҢж—¶й—ҙйҳ¶ж®өзҡ„дҫӢеӯҗ
from locust import LoadTestShape
class StagesShapeWithCustomUsers(LoadTestShape):
    stages = [
        {"duration": 10, "users": 10, "spawn_rate": 10},
        {"duration": 30, "users": 50, "spawn_rate": 10},
        {"duration": 60, "users": 100, "spawn_rate": 10},
        {"duration": 120, "users": 100, "spawn_rate": 10}]
    def tick(self):
        run_time = self.get_run_time()
        for stage in self.stages:
            if run_time < stage["duration"]:
                tick_data = (stage["users"], stage["spawn_rate"])
                return tick_data
return Noneе…ідәҺвҖңжҖҺд№Ҳе®үиЈ…е’ҢдҪҝз”ЁPythonиҪ»йҮҸзә§жҖ§иғҪе·Ҙе…·LocustвҖқзҡ„еҶ…е®№е°ұд»Ӣз»ҚеҲ°иҝҷйҮҢдәҶпјҢж„ҹи°ўеӨ§е®¶зҡ„йҳ…иҜ»гҖӮеҰӮжһңжғідәҶи§ЈжӣҙеӨҡиЎҢдёҡзӣёе…ізҡ„зҹҘиҜҶпјҢеҸҜд»Ҙе…іжіЁдәҝйҖҹдә‘иЎҢдёҡиө„и®Ҝйў‘йҒ“пјҢе°Ҹзј–жҜҸеӨ©йғҪдјҡдёәеӨ§е®¶жӣҙж–°дёҚеҗҢзҡ„зҹҘиҜҶзӮ№гҖӮ
е…ҚиҙЈеЈ°жҳҺпјҡжң¬з«ҷеҸ‘еёғзҡ„еҶ…е®№пјҲеӣҫзүҮгҖҒи§Ҷйў‘е’Ңж–Үеӯ—пјүд»ҘеҺҹеҲӣгҖҒиҪ¬иҪҪе’ҢеҲҶдә«дёәдё»пјҢж–Үз« и§ӮзӮ№дёҚд»ЈиЎЁжң¬зҪ‘з«ҷз«ӢеңәпјҢеҰӮжһңж¶үеҸҠдҫөжқғиҜ·иҒ”зі»з«ҷй•ҝйӮ®з®ұпјҡis@yisu.comиҝӣиЎҢдёҫжҠҘпјҢ并жҸҗдҫӣзӣёе…іиҜҒжҚ®пјҢдёҖз»ҸжҹҘе®һпјҢе°Ҷз«ӢеҲ»еҲ йҷӨж¶үе«ҢдҫөжқғеҶ…е®№гҖӮ
жӮЁеҘҪпјҢзҷ»еҪ•еҗҺжүҚиғҪдёӢи®ўеҚ•е“ҰпјҒ