您好,登录后才能下订单哦!
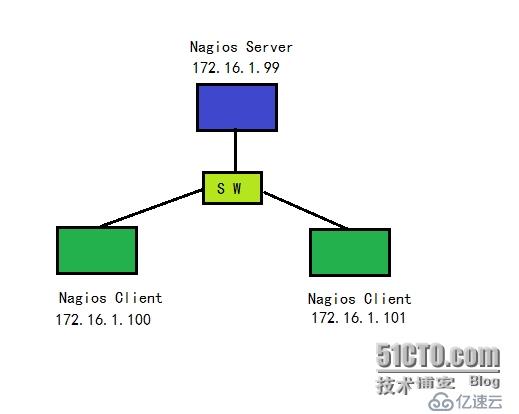
拓扑图:

一安装Nagios
1、安装前准备
a、创建Nagios用户和用户组,创建nagios主目录
[root@Server /]# useradd -s /sbin/nologin nagios
[root@Server /]# passwd nagios
[root@Server /]# mkdir /usr/local/nagios
[root@Server /]# chown nagios.nagios /usr/local/nagios/
b、开启sendmail或者Postfix服务
chkconfig sendmail on
service sendmail start
或者
chkconfig postfix on
service postfix start
2、编译安装Nagios
[root@Server Nagios主程序]# tar -zxvf nagios-3.2.3.tar.gz
[root@Server Nagios主程序]# cd nagios-3.2.3
[root@Server nagios-3.2.3]# ./configure --prefix=/usr/local/nagios/ 指定Nagios的安装目录
[root@Server nagios-3.2.3]#make all
[root@Server nagios-3.2.3]#make install 安装Nagios主程序CGI和HTML文件
[root@Server nagios-3.2.3]#make install-init 在/etc/rc.d/init.d目录下创建Nagios启动脚本
[root@Server nagios-3.2.3]#make install-commandmode 命令来配置目录权限
[root@Server nagios-3.2.3]#make install-config 安装Nagios示例配置文件,这里的安装路径是/usr/local/nagios/etc
a、设置开机启动
[root@Server nagios-3.2.3]# chkconfig --add nagios
[root@Server nagios-3.2.3]# chkconfig --level 35 nagios on
[root@Server nagios-3.2.3]# chkconfig | grep nagios
nagios 0:关闭 1:关闭 2:关闭 3:启用 4:启用 5:启用 6:关闭
[root@Server nagios-3.2.3]#
b、Nagios各个目录名称及用途说明
[root@Server nagios-3.2.3]# ls /usr/local/nagios/
bin etc libexec sbin share var
[root@Server nagios]# ls var
archives rw spool
[root@Server nagios]#
目录名称 用途
bin Nagios可执行程序所在目录
etc Nagios配置文件所在目录
sbin NagiosCGI文件所在目录,也就是执行外部命令所需文件所在目录
share Nagios网页文件所在的目录
libexec Nagios外部插件所在目录
var Nagios日志文件、lock等文件所在的目录
var/archives Nagios日志自动归档目录
var/rw 用来存放外部命令文件的目录
3、安装Nagios插件
[root@Server Nagios插件]# tar -zxvf nagios-plugins-1.4.14.tar.gz
[root@Server Nagios插件]# cd nagios-plugins-1.4.14
[root@Server nagios-plugins-1.4.14]# ./configure
[root@Server nagios-plugins-1.4.14]# make all
[root@Server nagios-plugins-1.4.14]# make install
4、安装Nagios汉化插件
[root@Server Nagios汉化插件]# tar -jxvf nagios-cn-3.2.3.tar.bz2
[root@Server Nagios汉化插件]# cd nagios-cn-3.2.3
[root@Server nagios-cn-3.2.3]# ./configure
[root@Server nagios-cn-3.2.3]# make all
[root@Server nagios-cn-3.2.3]# make install
5、安装Apache和PHP
[root@Server Apache]# tar -jxvf httpd-2.2.13.tar.bz2
[root@Server Apache]# cd httpd-2.2.13
[root@Server httpd-2.2.13]# ./configure --prefix=/usr/local/apache2
[root@Server httpd-2.2.13]# make
[root@Server httpd-2.2.13]# make install
[root@Server PHP]# tar -jxvf php-5.5.15.tar.bz2
[root@Server php-5.5.15]# cd php-5.5.15
[root@Server php-5.5.15]# ./configure --prefix=/usr/local/php --with-apxs2=/usr/local/apache2/bin/apxs
[root@Server php-5.5.15]# make
[root@Server php-5.5.15]# make test
[root@Server php-5.5.15]# make install
a、配置Apache文件
vim /usr/local/apache2/conf/httpd.conf
242 User apache
243 Group apache
改成
66 User nagios
67 Group nagios
167 DirectoryIndex index.html
改成
167 DirectoryIndex index.html index.php
167 AddType application/x-httpd-php .php
添加
412 #setting for nagios
413 ScriptAlias /nagios/cgi-bin "/usr/local/nagios/sbin"
414 <Directory "/usr/local/nagios/sbin">
415 Authtype Basic
416 Options ExecCGI
417 AllowOverride None
418 Order allow,deny
419 Allow from all
420 AuthName "Nagios Access"
421 AuthUserFile /usr/local/nagios/etc/htpasswd
422 Require valid-user
423 </Directory>
424
425 Alias /nagios "/usr/local/nagios/share"
426 <Directory "/usr/local/nagios/share">
427 AuthType Basic
428 Options None
429 AllowOverride None
430 Order allow,deny
431 Allow from all
432 AuthName "nagios Access"
433 AuthUserFile /usr/local/nagios/etc/htpasswd
434 Require valid-user
435 </Directory>
b、创建Apache目录验证文件
[root@Server /]# /usr/local/apache2/bin/htpasswd -cm /usr/local/nagios/etc/htpasswd xiaodong
New password:
Re-type new password:
Adding password for user xiaodong
[root@Server /]#
c、启动Apache服务
[root@Server conf]# /usr/local/apache2/bin/apachectl start
httpd: apr_sockaddr_info_get() failed for Server.shbztech.com
httpd: Could not reliably determine the server's fully qualified domain name, using 127.0.0.1 for ServerName
[root@Server conf]#
(FQDN的问题,修改文件“/etc/httpd/conf/httpd.conf”即可解决)
98 ServerName server.shbztech.com:80
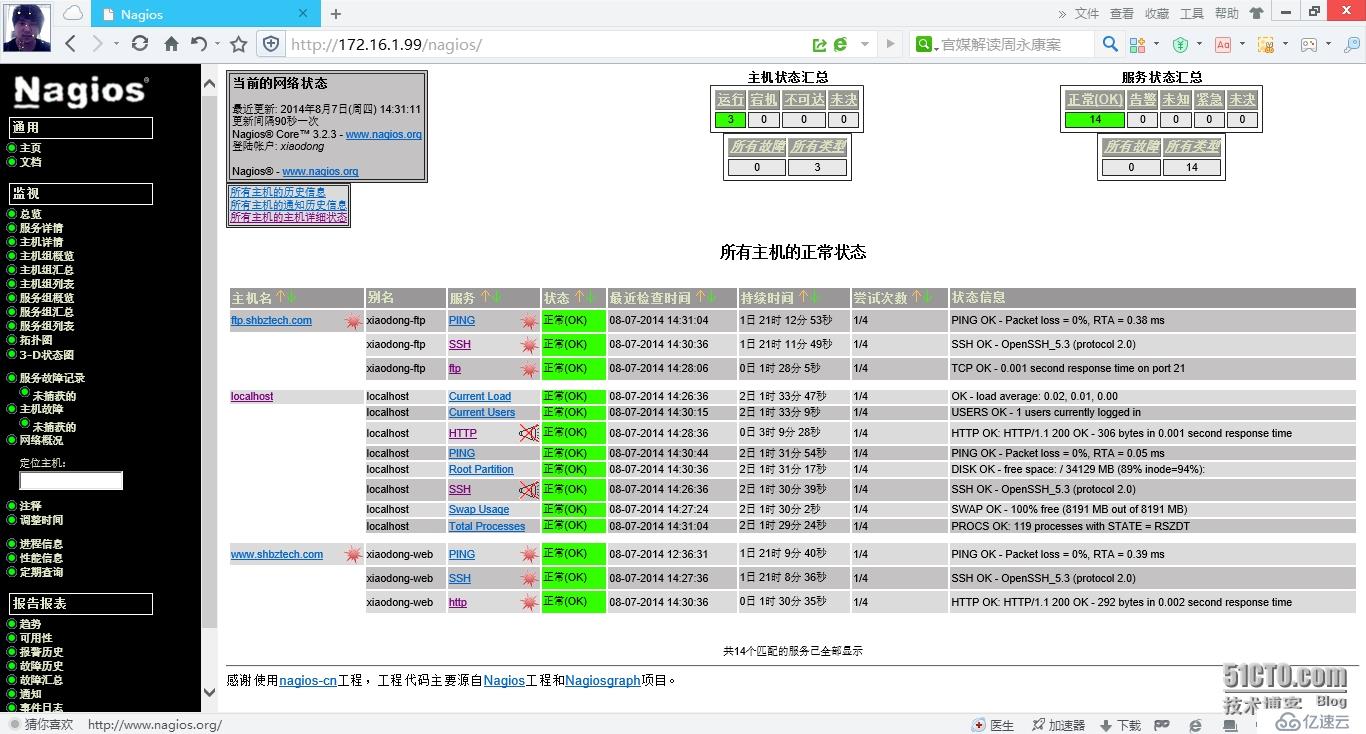
http:172.16.1.99/nagios 通过身份验证“xiaodong/xiaodong”可以看到Nagios的主页
6、配置Nagios
默认的配置文件在“/usr/local/nagios/etc”目录下,
文件名或目录名 用途
cgi.cfg 控制CGI访问的配置文件
nagios.cfg Nagios主配置文件
resource.cfg 变量定义文件,又称为资源文件,在此文件中定义变量,以便由其它配置文件引用。
objects objects是一个目录,在此目录下有很多配置文件模板,用于定义Nagios对象
objects/commands.cfg 命令定义配置文件,其中定义的命令可以被其它配置文件引用
objects/contacts.cfg 定义联系人和联系人组的配置文件
objects/localhost.cfg 定义监控本地主机的配置文件
objects/printer.cfg 定义监控打印机的一个配置文件模板,默认没有启用此文件
objects/switch.cfg 监控路由器的一个配置文件模板,默认没有启用此文件
objects/templates.cfg 定义主机和服务的一个模板配置文件,可以在其它配置文件中引用
objects/timeperiods.cfg 定义Nagios监控时间段的配置文件
objects/windows.cfg 监控windows主机的一个配置文件模板,默认没有启用此文件
a、配置文件之间的关系
Nagios的配置过程设计的几个定义有:主机、主机组、服务、服务组、联系人、联系人组、监控时间和监控命令等。
第一:定义监控那些主机、主机组、服务和服务组。
第二:定义这个监控通过什么命令实现。
第三:定义监控的时间段。
第四:定义主机和服务出现问题时要通知的联系人和联系人组。
b、templates.cfg文件
define contact{ ;联系人
name generic-contact ;联系人名称
service_notification_period 24x7 ;当服务出现异常,发送通知的时间段(timeperiods.cfg文件中定义)
host_notification_period 24x7 ;当主机出现异常时,发送通知的时间段
service_notification_options w,u,c,r,f,s ;定义服务“通知可以被发送的情况”,w即warn,表示警告状态;u即unknown,表示不明状态;c即criticle,表示紧急状态;r即recover,表示恢复状态。
host_notification_options d,u,r,f,s ;定义主机在什么状态下需要发送通知给使用者,d即down,表示宕机状态;u即unreachable,表示不可到达状态;r即recovery,表示重新恢复状态
service_notification_commands notify-service-by-email ;服务故障发送通知的方式,“commands.cfg文件中定义”
host_notification_commands notify-host-by-email ;主机故障发送通知的方式,“commands.cfg文件中定义”
register 0 ; DONT REGISTER THIS DEFINITION - ITS NOT A REAL CONTACT, JUST A TEMPLATE!
}
define host{
name generic-host ;主机名称(自定义)
notifications_enabled 1 ;
event_handler_enabled 1 ;
flap_detection_enabled 1 ;
failure_prediction_enabled 1 ;其值可以为0或1,起作用为是启用Nagios的数据输出功能。
process_perf_data 1 ;Nagios收集数据写入某个文件中,以备提取
retain_status_information 1 ;
retain_nonstatus_information 1 ;
notification_period 24x7 ;
register 0 ;
}
define host{
name linux-server ;主机名称(自定义)
use generic-host ;use表示引用,将generic-host的属性应用到linux-server中
check_period 24x7 ;Nagios检查主机的时间段
check_interval 5 ;Nagios对主机检查时间间隔
retry_interval 1 ;重试检查时间间隔,单位是分钟
max_check_attempts 10 ;Nagios对主机的最大检查次数,当Nagios检查到主机宕机时,会重复检查该主机的次数
check_command check-host-alive ;指定检查主机状态的命令
notification_period workhours ;主机故障时,发送通知的时间范围,其中“workhours”在timeperiods.cfg中进行定义
notification_interval 120 ;当主机出现异常后,故障一直没有解决,Nagios再次对使用者发送通知的时间。单位是分钟。如果觉得所有的事件发送一次通知就够了,可以吧这个选项设为0
notification_options d,u,r ;定义主机在什么状态下发送通知给使用者
contact_groups admins ;指定联系人组。“admins”在contacts.cfg文件中定义
register 0 ;
}
define service{
name generic-service ;定义一个服务名称
active_checks_enabled 1 ;
passive_checks_enabled 1 ;
parallelize_check 1 ;
obsess_over_service 1 ;
check_freshness 0 ;
notifications_enabled 1 ;
event_handler_enabled 1 ;
flap_detection_enabled 1 ;
failure_prediction_enabled 1 ;
process_perf_data 1 ;
retain_status_information 1 ;
retain_nonstatus_information 1 ;
is_volatile 0 ;
check_period 24x7 ;
max_check_attempts 3 ;Nagios对服务的最大检查次数
normal_check_interval 10 ;服务检查时间间隔,单位:分钟
retry_check_interval 2 ;重试检查事件间隔,单位:分钟
contact_groups admins ;指定联系人组
notification_options w,u,c,r ;
notification_interval 60 ;服务出现故障后,故障一直没解决,Nagios在此向使用者发送通知的时间,单位:分钟
notification_period 24x7 ;
register 0 ;
}
define service{
name local-service ; The name of this service template
use generic-service ; Inherit default values from the generic-service definition
max_check_attempts 4 ; Re-check the service up to 4 times in order to determine its final (hard) state
normal_check_interval 5 ; Check the service every 5 minutes under normal conditions
retry_check_interval 1 ; Re-check the service every minute until a hard state can be determined
register 0 ; DONT REGISTER THIS DEFINITION - ITS NOT A REAL SERVICE, JUST A TEMPLATE!
}
c、resource.cfg文件(只有一行)
$USER1$=/usr/local/nagios/libexec 指定安装Nagios插件的路径
d、commangs.cfg文件
此文件默认情况下是存在的,无需任何修改即可使用。
e、hosts.cfg
此文件默认情况下不存在,需要手动创建。主要用来指定被监控的主机地址
define host {
use linux-server ;引用主机linux-server的属性
host_name www.shbztech.com ;主机名
alias xiaodong-web ;主机别名
address 172.16.1.100 ;主机IP
}
define host {
use linux-server
host_name ftp.shbztech.com
alias xiaodong-ftp
address 172.16.1.101
}
define hostgroup { ;定义一个主机组
hostgroup_name linux-server ;主机组名称,可以随意指定
alias Linux Server ;主机组别名
members www.shbztech.com,ftp.shbztech.com ;主机组成员
}
f、services.cfg文件
此文件默认情况下不存在,需要手动创建。主要用来定义监控的服务和主机资源。
例如:监控HTTP服务、FTP服务、主机磁盘空间、主机系统负载等。
################################## xiaodong Web #####################################
define service{
use local-service
host_name www.shbztech.com
service_description PING
check_command check_ping!100.0,20%!500.0,60%
}
define service{
use local-service
host_name www.shbztech.com
service_description SSH
check_command check_ssh
}
define service{
use local-service
host_name www.shbztech.com
service_description http
check_command check_http
}
################################## xiaodong FTP #####################################
define service{
use local-service
host_name ftp.shbztech.com
service_description PING
check_command check_ping!100.0,20%!500.0,60%
}
define service{
use local-service
host_name ftp.shbztech.com
service_description SSH
check_command check_ssh
}
define service{
use local-service
host_name ftp.shbztech.com
service_description ftp
check_command check_tcp!21
}
在Nagios中,插件命令和参数组合格式为:命令!参数!参数。如果有更多参数,以此通过叹号分割即可
例如:
check_ping!100.0,20%!500.0,60%
此命令组合从左到右依次为:命令!告警时延,丢包率!严重告警时延,丢包率。
check_http!0.0020!0.0050!10
此命令组合从左到右依次为:命令!告警时延!严重告警时延!连接超时时间
check_tcp!23!0.0020!0.0050!10
此命令组合从左到右依次为:命令!端口!告警时延!严重告警时延!连接超时时间
check_ssh!22!10
此命令组合从左到右依次为:命令!端口!连接超时时间
check_smtp!0.0020!0.0050!10
此命令组合从左到右依次为:命令!告警时延!严重告警时延!连接超时时间
另外,在监控服务器端口时,很多命令都可以使用check_tcp来代替,
例如:
check_ssh=check_tcp!22
check_imap=check_tcp!143
check_ftp=check_tcp!21
g、contacts.cfg文件
contacts.cfg是一个定义联系人和联系人组的配置文件。
define contact{
contact_name xiaodong ;联系人名称
use generic-contact ;引用generic-contact的属性信息
alias Nagios Admin ;联系人别名
email lixiaodong620@163.com ;联系人常用邮箱地址
}
define contactgroup{
contactgroup_name admins ;联系人组
alias Nagios Administrators ;联系人组描述
members xiaodong ;联系人组成员
}
h、timeperiods.cfg文件
此文件只用于定义监控的时间段
define timeperiod{
timeperiod_name 24x7
alias 24 Hours A Day, 7 Days A Week
sunday 00:00-24:00
monday 00:00-24:00
tuesday 00:00-24:00
wednesday 00:00-24:00
thursday 00:00-24:00
friday 00:00-24:00
saturday 00:00-24:00
}
define timeperiod{
timeperiod_name workhours
alias Normal Work Hours
monday 09:00-17:00
tuesday 09:00-17:00
wednesday 09:00-17:00
thursday 09:00-17:00
friday 09:00-17:00
}
i、cgi.cfg文件
此文件用来控制相关CGI脚本,如果想在Nagios的Web监控界面执行CGI脚本,例如重启Nagios进程、关闭Nagios通知
停止Nagios主机检测等,这时就需要配置cgi.cfg文件了
由于Nagios的Web监控界面验证用户为xiaodong,因此只需在cgi.cfg文件中添加此用户的执行权限。
107 default_user_name=xiaodong
119 authorized_for_system_information=nagiosadmin,xiaodong
131 authorized_for_configuration_information=nagiosadmin,xiaodong
144 authorized_for_system_commands=nagiosadmin,xiaodong
157 authorized_for_all_services=nagiosadmin,xiaodong
158 authorized_for_all_hosts=nagiosadmin,xiaodong
j、nagios.cfg文件
Nagios的核心配置文件,所有对象配置文件必须在这个文件中进行定义才能发挥其作用
“log_file”变量用来定义Nagios日志文件的路径
19 log_file=/usr/local/nagios/var/nagios.log
“cfg_file”变量用来引用对象配置文件
30 cfg_file=/usr/local/nagios/etc/objects/hosts.cfg
31 cfg_file=/usr/local/nagios/etc/objects/services.cfg
32 cfg_file=/usr/local/nagios/etc/objects/commands.cfg
33 cfg_file=/usr/local/nagios/etc/objects/contacts.cfg
34 cfg_file=/usr/local/nagios/etc/objects/timeperiods.cfg
35 cfg_file=/usr/local/nagios/etc/objects/templates.cfg
“object_cache_file”变量用于指定一个“所有对象配置文件”的副本文件,又称为对象缓冲文件,这个设定可以加快CGI的配置缓冲,并且在编辑对象配置文件时,可以让正在进行的Nagios不影响CGI的显示输出
69 object_cache_file=/usr/local/nagios/var/objects.cache
“resource_file”变量用于指定Nagios资源文件的路径
98 resource_file=/usr/local/nagios/etc/resource.cfg
“status_file”变量用于定义一个状态文件
108 status_file=/usr/local/nagios/var/status.dat
“status_update_interval”变量用于定义状态文件的更新时间间隔,单位是秒,最先更新间隔是1秒
117 status_update_interval=10
“nagios”进程由那个用户和组运行
125 nagios_user=nagios
133 nagios_group=nagios
“check_external_commands”变量用于设置是否允许Nagios在Web监控界面上运行CGI命令,也就是是否允许Nagios在Web界面下执行重启Nagios、停止主机/服务检查等操作,“1”为运行,“0”为不允许运行
145 check_external_commands=1
“command_check_interval”变量用于设置Nagios对外部命令检测的时间间隔,如果指定了一个数字加一个“s”(如10s),那么外部检测命令的间隔是这个数值以秒为单位的时间间隔。如果没有“s”,那么外部检测的命令的间隔是以这个数值为“时间单位”的时间间隔
163 command_check_interval=2
“interval_length”变量指定了Nagios的时间单位,默认是60秒,也就是1分钟,即在Nagios配置中所有的“时间单位”都是分钟
720 interval_length=60
7、Nagios的运行和维护
a、验证nagios配置文件的正确性
[root@Server etc]# /usr/local/nagios/bin/nagios -v /usr/local/nagios/etc/nagios.cfg
Nagios Core 3.2.3
Copyright (c) 2009-2010 Nagios Core Development Team and Community Contributors
Copyright (c) 1999-2009 Ethan Galstad
Last Modified: 10-03-2010
License: GPL
Website: http://www.nagios.org
Reading configuration data...
Read main config file okay...
Processing object config file '/usr/local/nagios/etc/objects/hosts.cfg'...
Processing object config file '/usr/local/nagios/etc/objects/services.cfg'...
Processing object config file '/usr/local/nagios/etc/objects/commands.cfg'...
Processing object config file '/usr/local/nagios/etc/objects/contacts.cfg'...
Processing object config file '/usr/local/nagios/etc/objects/timeperiods.cfg'...
Processing object config file '/usr/local/nagios/etc/objects/templates.cfg'...
Processing object config file '/usr/local/nagios/etc/objects/localhost.cfg'...
Read object config files okay...
Running pre-flight check on configuration data...
Checking services...
Checked 14 services.
Checking hosts...
Checked 3 hosts.
Checking host groups...
Checked 2 host groups.
Checking service groups...
Checked 0 service groups.
Checking contacts...
Checked 1 contacts.
Checking contact groups...
Checked 1 contact groups.
Checking service escalations...
Checked 0 service escalations.
Checking service dependencies...
Checked 0 service dependencies.
Checking host escalations...
Checked 0 host escalations.
Checking host dependencies...
Checked 0 host dependencies.
Checking commands...
Checked 24 commands.
Checking time periods...
Checked 5 time periods.
Checking for circular paths between hosts...
Checking for circular host and service dependencies...
Checking global event handlers...
Checking obsessive compulsive processor commands...
Checking misc settings...
Total Warnings: 0
Total Errors: 0
Things look okay - No serious problems were detected during the pre-flight check
[root@Server etc]#
b、启动与停止Nagios
启动Nagios
1>通过初始化脚本启动Nagios
/etc/init.d/nagios start
或者
service nagios start
2>手工方式启动Nagios
通过Nagios命令的“-d”参数来启动Nagios守护进程
/usr/local/nagios/bin/nagios -d /usr/local/nagios/etc/nagios.cfg
关闭Nagios
1>通过初始化脚本关闭Nagios服务
/etc/init.c/nagios stop
或者
service nagios stop
2>通过kill方式关闭Nagios
kill <nagios_pid>
重启Nagios
1>通过初始化脚本来重启Nagios
/etc/init.d/nagios reload
/etc/init.d/nagios restart
或者
service nagios restart
2>通过Web监控页重启Nagios
3>手工方式平滑重启
kill -HUP <nagios_pid>
8、Nagios性能分析图表的实现
a、安装rrdtool
[root@Server RRDtool]# tar -zxvf rrdtool-1.4.5.tar.gz
[root@Server RRDtool]# cd rrdtool-1.4.5
[root@Server rrdtool-1.4.5]# ./configure --prefix=/usr/local/rrdtool
[root@Server rrdtool-1.4.5]# make
[root@Server rrdtool-1.4.5]# make install
[root@Server rrdtool-1.4.5]#
configure: error: Please fix the library issues listed above and try again.
解决方案:
第一:
tar -zxvf cgilib-0.5.tar.gz
cd cgilib-0.5
make
cp libcgi.a /usr/local/lib
cp cgi.h /usr/include/
不能解决看下面
第二:
yum -y install libart_lgpl-devel
不能解决看下面
第三:
yum -y install pango-devel* cairo-devel* libxml2-devel
解决!!
b、安装pnp
[root@Server PNP]# tar -zxvf pnp-0.4.13.tar.gz
[root@Server PNP]# cd pnp-0.4.13
[root@Server pnp-0.4.13]# ./configure --with-nagios-user=nagios --with-nagios-group-nagios --with-rrdtool=/usr/local/rrdtool/bin/rrdtool --with-perfdata-dir=/usr/local/nagios/share/perfdata
[root@Server pnp-0.4.13]# make all
[root@Server pnp-0.4.13]# make install
[root@Server pnp-0.4.13]# make install-config
[root@Server pnp-0.4.13]# make install-init
c、配置pnp
创建默认配置文件
[root@Server /]# cd /usr/local/nagios/etc/pnp/
[root@Server pnp]# cp process_perfdata.cfg-sample process_perfdata.cfg
[root@Server pnp]# cp npcd.cfg-sample npcd.cfg
[root@Server pnp]# cp rra.cfg-sample rra.cfg
[root@Server pnp]# chown -R nagios.nagios /usr/local/nagios/etc/pnp/
修改process_perfdata.cfg文件
[root@Server pnp]# vim process_perfdata.cfg
44 LOG_LEVEL = 0
改成
44 LOG_LEVEL = 2
d、修改Nagios配置文件
1>增加小太阳图标
修改templates.cfg文件
define host {
name hosts-pnp
register 0
action_url /nagios/pnp/index.php?host=$HOSTNAME$
process_perf_data 1
}
define service {
name services-pnp
register 0
action_url /nagios/pnp/index.php?host=$HOSTNAME$&srv=$SERVICEDESC$
process_perf_data 1
}
2>修改nagios.cfg文件
833 process_performance_data=0
改成
833 process_performance_data=1 ###开启数据输出功能
去掉注释
845 host_perfdata_command=process-host-perfdata
846 service_perfdata_command=process-service-perfdata
3>修改commands.cfg文件
228 define command{
229 command_name process-host-perfdata
230 command_line /usr/local/nagios/libexec/process_perfdata.pl
231 }
235 define command{
236 command_name process-service-perfdata
237 command_line /usr/local/nagios/libexec/process_perfdata.pl
238 }
4>修改hosts.cfg文件和services.cfg文件
hosts.cfg
define host {
use linux-server,hosts-pnp ;“添加hosts-pnp”
host_name www.shbztech.com
alias xiaodong-web
address 172.16.1.100
}
services.cfg
define service{
use local-service,services-pnp
host_name www.shbztech.com
service_description PING
check_command check_ping!100.0,20%!500.0,60%
}
检测Nagios配置正确性
/usr/local/nagios/bin/nagios -v /usr/local/nagios/etc/nagios.cfg
service nagios restart
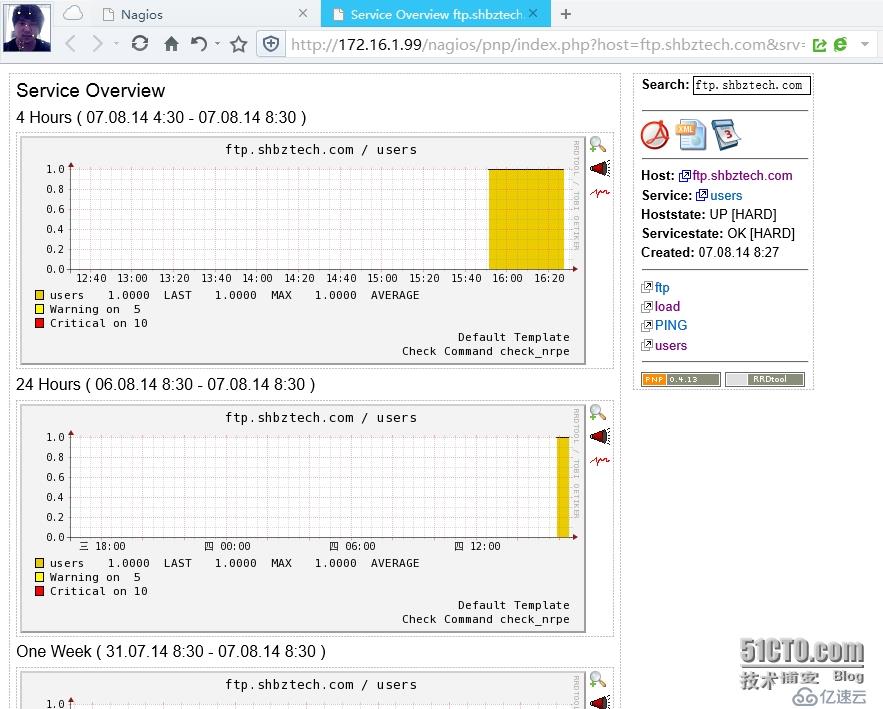
打开小太阳出现故障
故障一:PHP zlib Support not found
解决方案:需要重新编译安装PHP。
[root@Server php-5.5.15]# cd php-5.5.15
[root@Server php-5.5.15]# ./configure --prefix=/usr/local/php5 --with-gd --with-zlib --with-apxs2=/usr/local/apache2/bin/apxs
[root@Server php-5.5.15]# make
[root@Server php-5.5.15]# make test
[root@Server php-5.5.15]# make install
故障二: /usr/local/nagios/share/pnp/include/function.inc.php on line 557
解决方案:vim /usr/local/nagios/share/pnp/include/function.inc.php
556 date_default_timezone_set('UTC'); 添加一行
故障三: /usr/local/nagios/share/pnp/include/function.inc.php on line 1027
1027 $pdf =& new PDF('P', 'mm', 'A4');
改成
1027 $pdf = new PDF('P', 'mm', 'A4');
1503 if($level == 2 && $type == "complete" && eregi("^NAGIOS_",$tag)){
改成
1503 if($level == 2 && $type == "complete" && preg_match("/^NAGIOS_/",$tag)){
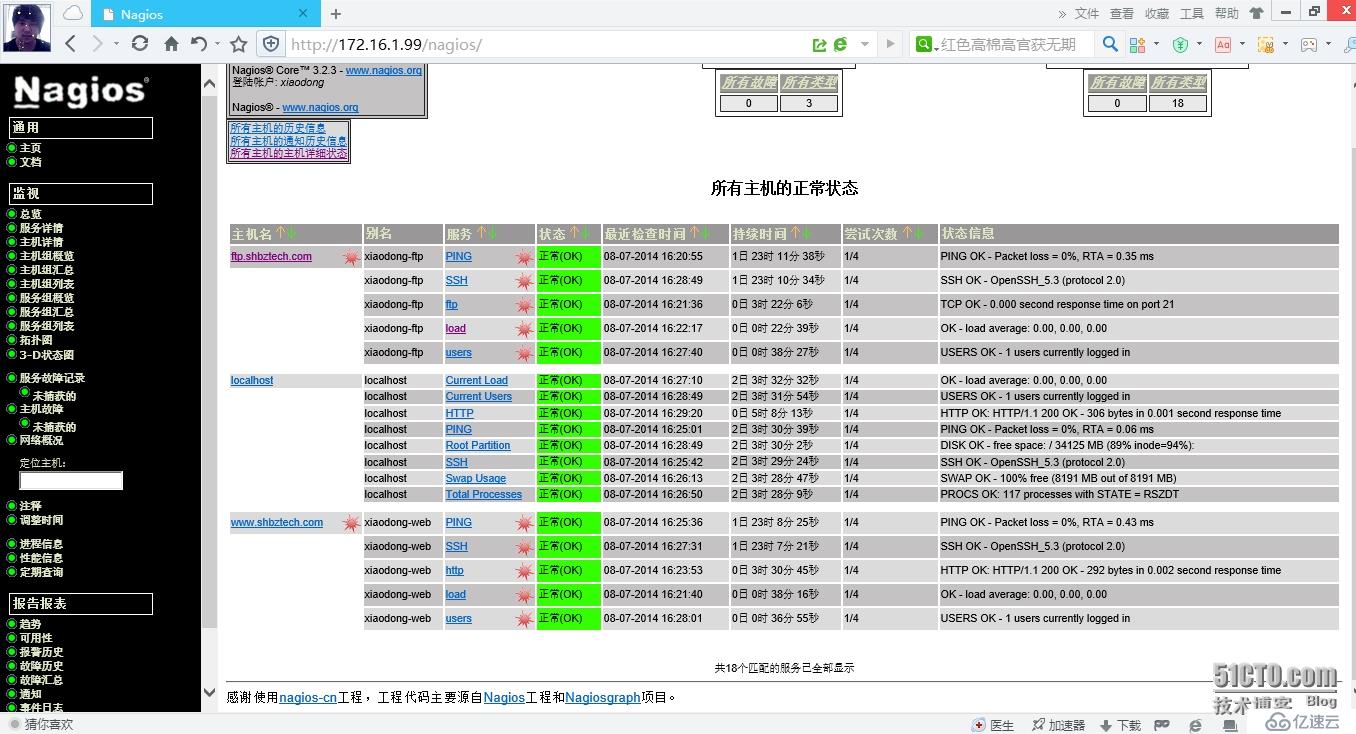
再重新重启nagios,应该就能看到图表了


9、利用插件扩展Nagios的监控功能 - 利用NRPE外部构件监控远程主机
配置Nagios客户端(远程主机)
a、安装Nagios插件
[root@www nagios]# useradd -s /sbin/nologin nagios
[root@www nagios]# passwd nagios
[root@www nagios]# tar -zxvf nagios-plugins-1.4.14.tar.gz
[root@www nagios]# cd nagios-plugins-1.4.14
[root@www nagios-plugins-1.4.14]# ./configure
[root@www nagios-plugins-1.4.14]# make install
[root@www nagios-plugins-1.4.14]# chown nagios.nagios /usr/local/nagios/
[root@www nagios-plugins-1.4.14]# chown nagios.nagios /usr/local/nagios/libexec/
b、安装NRPE插件
[root@www nagios]# tar -zxvf nrpe-2.14.tar.gz
[root@www nagios]# cd nrpe-2.14
故障:checking for SSL headers... configure: error: Cannot find ssl headers
解决方案:
yum -y install openssl-devel
[root@www nrpe-2.14]# make all
[root@www nrpe-2.14]# make install-plugin
[root@www nrpe-2.14]# make install-daemon
[root@www nrpe-2.14]# make install-daemon-config
c、配置NRPE
/usr/local/nagios/etc/nrpe.cfg
81 allowed_hosts=127.0.0.1
改成
81 allowed_hosts=127.0.0.1,172.16.1.99 ;nagios监控服务器IP
d、启动NRPE守护进程
/usr/local/nagios/bin/nrpe -c /usr/local/nagios/etc/nrpe.cfg -d
vim /etc/rc.local 加入开机启动脚本
/usr/local/nagios/bin/nrpe -c /usr/local/nagios/etc/nrpe.cfg -d
[root@www /]# netstat -antl | grep 5666
tcp 0 0 0.0.0.0:5666 0.0.0.0:* LISTEN
关闭NRPE进程
ps -aux | grep nagios
kill pid
e、测试NRPE功能
在客户端本机上测试
[root@www /]# /usr/local/nagios/libexec/check_nrpe -H 127.0.0.1
NRPE v2.14 --看到“NRPE v2.14”就说明成功了
在服务器上安装NRPE和配置Nagios服务
a、安装NRPE插件
[root@NagiosServer NRPE]# tar -zxvf nrpe-2.14.tar.gz
[root@NagiosServer NRPE]# cd nrpe-2.14
[root@NagiosServer NRPE]# ./configure
故障:checking for SSL headers... configure: error: Cannot find ssl headers
解决方案:
yum -y install openssl-devel
[root@NagiosServer NRPE]# make all
[root@NagiosServer nrpe-2.14]# make install-plugin ;通过make install-plugin 命令默认将check_nrpe插件安装到/usr/local/nagios/libexec目录下
b、测试插件与客户端是否能正常通信
[root@NagiosServer /]# /usr/local/nagios/libexec/check_nrpe -H 172.16.1.100
NRPE v2.14 --看到“NRPE v2.14”就说明成功了
[root@NagiosServer /]# /usr/local/nagios/libexec/check_nrpe -H 172.16.1.101
NRPE v2.14
c、定义一个check_nrpe监控命令
vim /usr/local/nagios/etc/objects/commands.cfg
添加如下命令
define command{
command_name check_nrpe
command_line $USER1$/check_nrpe -H $HOSTADDRESS$ -c $ARG1$
}
d、添加远程主机监控
vim /usr/local/nagios/etc/objects/services.cfg
################################# xiaodong www #####################################
define service{
use local-service,services-pnp
host_name www.shbztech.com
service_description PING
check_command check_ping!100.0,20%!500.0,60%
}
define service{
use local-service,services-pnp
host_name www.shbztech.com
service_description SSH
check_command check_ssh
}
define service{
use local-service,services-pnp
host_name www.shbztech.com
service_description http
check_command check_http
}
define service{
use local-service,services-pnp
host_name www.shbztech.com
service_description users
check_command check_nrpe!check_users
}
define service{
use local-service,services-pnp
host_name www.shbztech.com
service_description load
check_command check_nrpe!check_load
}
################################# xiaodong ftp #####################################
define service{
use local-service,services-pnp
host_name ftp.shbztech.com
service_description PING
check_command check_ping!100.0,20%!500.0,60%
}
define service{
use local-service,services-pnp
host_name ftp.shbztech.com
service_description SSH
check_command check_ssh
}
define service{
use local-service,services-pnp
host_name ftp.shbztech.com
service_description ftp
check_command check_tcp!21
}
define service{
use local-service,services-pnp
host_name ftp.shbztech.com
service_description users
check_command check_nrpe!check_users
}
define service{
use local-service,services-pnp
host_name ftp.shbztech.com
service_description load
check_command check_nrpe!check_load
}
增加的配置是对www.shbztech.com和ftp.shbztech.com主机的当前用户数、系统负载、磁盘空间利用率、swap内存使用4个方面进行监控
监控远程主机的命令方式:check_nrpe!远程主机下定义的监控变量 而check_users、check_load等变量已经在Nagios客户端nrpe.cfg文件中进行了定义。
e、测试和启动Nagios服务
[root@NagiosServer /]# /usr/local/nagios/bin/nagios -v /usr/local/nagios/etc/nagios.cfg
[root@NagiosServer /]# service nagios restart


免责声明:本站发布的内容(图片、视频和文字)以原创、转载和分享为主,文章观点不代表本网站立场,如果涉及侵权请联系站长邮箱:is@yisu.com进行举报,并提供相关证据,一经查实,将立刻删除涉嫌侵权内容。