жӮЁеҘҪпјҢзҷ»еҪ•еҗҺжүҚиғҪдёӢи®ўеҚ•е“ҰпјҒ
иҝҷзҜҮж–Үз« з»ҷеӨ§е®¶еҲҶдә«зҡ„жҳҜжңүе…іSpring Data Redisзҡ„дҪҝз”Ёж–№жі•гҖӮе°Ҹзј–и§үеҫ—жҢәе®һз”Ёзҡ„пјҢеӣ жӯӨеҲҶдә«з»ҷеӨ§е®¶еӯҰд№ гҖӮеҰӮдёӢиө„ж–ҷжҳҜе…ідәҺSpring Data Redisзҡ„е®һзҺ°жӯҘйӘӨгҖӮ
еҜ№дәҺз”өе•Ҷзі»з»ҹзҡ„е№ҝе‘ҠеҗҺеҸ°з®ЎзҗҶе’Ңе№ҝе‘ҠеүҚеҸ°еұ•зӨәпјҢйҰ–йЎөжҜҸеӨ©жңүеӨ§йҮҸзҡ„дәәи®ҝй—®пјҢеҜ№ж•°жҚ®еә“йҖ жҲҗеҫҲеӨ§зҡ„и®ҝй—®еҺӢеҠӣпјҢз”ҡиҮіжҳҜзҳ«з—ӘгҖӮйӮЈеҰӮдҪ•и§ЈеҶіе‘ўпјҹжҲ‘们йҖҡеёёзҡ„еҒҡжі•жңүдёӨз§ҚпјҡдёҖз§ҚжҳҜж•°жҚ®зј“еӯҳгҖҒдёҖз§ҚжҳҜзҪ‘йЎөйқҷжҖҒеҢ–гҖӮ
redisжҳҜдёҖж¬ҫејҖжәҗзҡ„Key-Valueж•°жҚ®еә“пјҢиҝҗиЎҢеңЁеҶ…еӯҳдёӯпјҢз”ұANSI Cзј–еҶҷгҖӮдјҒдёҡејҖеҸ‘йҖҡеёёйҮҮз”ЁRedisжқҘе®һзҺ°зј“еӯҳгҖӮеҗҢзұ»зҡ„дә§е“Ғиҝҳжңүmemcache гҖҒmemcached гҖҒMongoDBзӯүгҖӮ
JedisжҳҜRedisе®ҳж–№жҺЁеҮәзҡ„дёҖж¬ҫйқўеҗ‘Javaзҡ„е®ўжҲ·з«ҜпјҢжҸҗдҫӣдәҶеҫҲеӨҡжҺҘеҸЈдҫӣJavaиҜӯиЁҖи°ғз”ЁгҖӮеҸҜд»ҘеңЁRedisе®ҳзҪ‘дёӢиҪҪпјҢеҪ“然иҝҳжңүдёҖдәӣејҖжәҗзҲұеҘҪиҖ…жҸҗдҫӣзҡ„е®ўжҲ·з«ҜпјҢеҰӮJredisгҖҒSRPзӯүзӯүпјҢжҺЁиҚҗдҪҝз”ЁJedis
Spring-data-redisжҳҜspringеӨ§е®¶ж—Ҹзҡ„дёҖйғЁеҲҶпјҢжҸҗдҫӣдәҶеңЁsrpingеә”з”ЁдёӯйҖҡиҝҮз®ҖеҚ•зҡ„й…ҚзҪ®и®ҝй—®redisжңҚеҠЎпјҢеҜ№reidsеә•еұӮејҖеҸ‘еҢ…(Jedis, JRedis, and RJC)иҝӣиЎҢдәҶй«ҳеәҰе°ҒиЈ…пјҢRedisTemplateжҸҗдҫӣдәҶredisеҗ„з§Қж“ҚдҪңгҖҒејӮеёёеӨ„зҗҶеҸҠеәҸеҲ—еҢ–пјҢж”ҜжҢҒеҸ‘еёғи®ўйҳ…пјҢ并еҜ№spring 3.1 cacheиҝӣиЎҢдәҶе®һзҺ°гҖӮ
spring-data-redisй’ҲеҜ№jedisжҸҗдҫӣдәҶеҰӮдёӢеҠҹиғҪпјҡ
1.иҝһжҺҘжұ иҮӘеҠЁз®ЎзҗҶпјҢжҸҗдҫӣдәҶдёҖдёӘй«ҳеәҰе°ҒиЈ…зҡ„вҖңRedisTemplateвҖқзұ»
2.й’ҲеҜ№jedisе®ўжҲ·з«ҜдёӯеӨ§йҮҸapiиҝӣиЎҢдәҶеҪ’зұ»е°ҒиЈ…,е°ҶеҗҢдёҖзұ»еһӢж“ҚдҪңе°ҒиЈ…дёәoperationжҺҘеҸЈ
ValueOperationsпјҡз®ҖеҚ•K-Vж“ҚдҪң
SetOperationsпјҡsetзұ»еһӢж•°жҚ®ж“ҚдҪң
ZSetOperationsпјҡzsetзұ»еһӢж•°жҚ®ж“ҚдҪң
HashOperationsпјҡй’ҲеҜ№mapзұ»еһӢзҡ„ж•°жҚ®ж“ҚдҪң
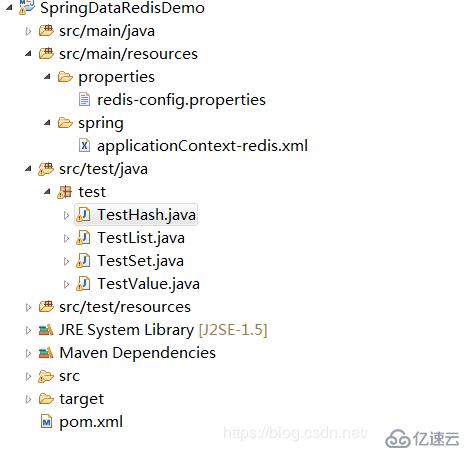
пјҲ1пјүжһ„е»әMavenе·ҘзЁӢ SpringDataRedisDemo
пјҲ2пјүеј•е…ҘSpringзӣёе…ідҫқиө–гҖҒеј•е…ҘJUnitдҫқиө– пјҲеҶ…е®№еҸӮеҠ е…¶е®ғе·ҘзЁӢпјү
пјҲ3пјүеј•е…ҘJedisе’ҢSpringDataRedisдҫқиө–
pom.xml
<project xmlns="http://maven.apache.org/POM/4.0.0" xmlns:xsi="http://www.w3.org/2001/XMLSchema-instance"
xsi:schemaLocation="http://maven.apache.org/POM/4.0.0 http://maven.apache.org/xsd/maven-4.0.0.xsd">
<modelVersion>4.0.0</modelVersion>
<groupId>com.ldc.org</groupId>
<artifactId>SpringDataRedisDemo</artifactId>
<version>0.0.1-SNAPSHOT</version>
<!-- йӣҶдёӯе®ҡд№үдҫқиө–зүҲжң¬еҸ· -->
<properties>
<junit.version>4.12</junit.version>
<spring.version>4.2.4.RELEASE</spring.version>
</properties>
<dependencies>
<!-- Spring -->
<dependency>
<groupId>org.springframework</groupId>
<artifactId>spring-context</artifactId>
<version>${spring.version}</version>
</dependency>
<dependency>
<groupId>org.springframework</groupId>
<artifactId>spring-beans</artifactId>
<version>${spring.version}</version>
</dependency>
<dependency>
<groupId>org.springframework</groupId>
<artifactId>spring-webmvc</artifactId>
<version>${spring.version}</version>
</dependency>
<dependency>
<groupId>org.springframework</groupId>
<artifactId>spring-jdbc</artifactId>
<version>${spring.version}</version>
</dependency>
<dependency>
<groupId>org.springframework</groupId>
<artifactId>spring-aspects</artifactId>
<version>${spring.version}</version>
</dependency>
<dependency>
<groupId>org.springframework</groupId>
<artifactId>spring-jms</artifactId>
<version>${spring.version}</version>
</dependency>
<dependency>
<groupId>org.springframework</groupId>
<artifactId>spring-context-support</artifactId>
<version>${spring.version}</version>
</dependency>
<dependency>
<groupId>org.springframework</groupId>
<artifactId>spring-test</artifactId>
<version>${spring.version}</version>
</dependency>
<dependency>
<groupId>junit</groupId>
<artifactId>junit</artifactId>
<version>4.9</version>
</dependency>
<!-- зј“еӯҳ -->
<dependency>
<groupId>redis.clients</groupId>
<artifactId>jedis</artifactId>
<version>2.8.1</version>
</dependency>
<dependency>
<groupId>org.springframework.data</groupId>
<artifactId>spring-data-redis</artifactId>
<version>1.7.2.RELEASE</version>
</dependency>
</dependencies>
</project>пјҲ4пјүеңЁsrc/main/resourcesдёӢеҲӣе»әpropertiesж–Ү件еӨ№пјҢе»әз«Ӣredis-config.properties
redis.host=127.0.0.1
redis.port=6379
redis.pass=
redis.database=0
redis.maxIdle=300
redis.maxWait=3000
redis.testOnBorrow=true пјҲ5пјүеңЁsrc/main/resourcesдёӢеҲӣе»әspringж–Ү件еӨ№ пјҢеҲӣе»әapplicationContext-redis.xml
<?xml version="1.0" encoding="UTF-8"?>
<beans xmlns="http://www.springframework.org/schema/beans"
xmlns:xsi="http://www.w3.org/2001/XMLSchema-instance" xmlns:p="http://www.springframework.org/schema/p"
xmlns:context="http://www.springframework.org/schema/context"
xmlns:mvc="http://www.springframework.org/schema/mvc"
xmlns:cache="http://www.springframework.org/schema/cache"
xsi:schemaLocation="http://www.springframework.org/schema/beans
http://www.springframework.org/schema/beans/spring-beans.xsd
http://www.springframework.org/schema/context
http://www.springframework.org/schema/context/spring-context.xsd
http://www.springframework.org/schema/mvc
http://www.springframework.org/schema/mvc/spring-mvc.xsd
http://www.springframework.org/schema/cache
http://www.springframework.org/schema/cache/spring-cache.xsd">
<!-- еј•е…Ҙredisзҡ„propertiesж–Ү件 -->
<context:property-placeholder location="classpath*:properties/*.properties" />
<!-- redis зӣёе…ій…ҚзҪ® -->
<bean id="poolConfig" class="redis.clients.jedis.JedisPoolConfig">
<property name="maxIdle" value="${redis.maxIdle}" />
<property name="maxWaitMillis" value="${redis.maxWait}" />
<property name="testOnBorrow" value="${redis.testOnBorrow}" />
</bean>
<bean id="JedisConnectionFactory" class="org.springframework.data.redis.connection.jedis.JedisConnectionFactory"
p:host-name="${redis.host}" p:port="${redis.port}" p:password="${redis.pass}" p:pool-config-ref="poolConfig"/>
<bean id="redisTemplate" class="org.springframework.data.redis.core.RedisTemplate">
<property name="connectionFactory" ref="JedisConnectionFactory" />
</bean>
</beans> package test;
import org.junit.Test;
import org.junit.runner.RunWith;
import org.springframework.beans.factory.annotation.Autowired;
import org.springframework.data.redis.core.RedisTemplate;
import org.springframework.test.context.ContextConfiguration;
import org.springframework.test.context.junit4.SpringJUnit4Cla***unner;
@RunWith(SpringJUnit4Cla***unner.class)
@ContextConfiguration(locations="classpath:spring/applicationContext-redis.xml")
public class TestValue {
@Autowired
private RedisTemplate redisTemplate;
@Test
public void setValue() {
redisTemplate.boundValueOps("name").set("ldc");
}
@Test
public void getValue() {
String string=(String) redisTemplate.boundValueOps("name").get();
System.out.println(string);
}
@Test
public void deleteValue() {
redisTemplate.delete("name");
}
}package test;
import java.util.Set;
import org.junit.Test;
import org.junit.runner.RunWith;
import org.springframework.beans.factory.annotation.Autowired;
import org.springframework.data.redis.core.RedisTemplate;
import org.springframework.test.context.ContextConfiguration;
import org.springframework.test.context.junit4.SpringJUnit4Cla***unner;
@RunWith(SpringJUnit4Cla***unner.class)
@ContextConfiguration(locations="classpath:spring/applicationContext-redis.xml")
public class TestSet {
@Autowired
private RedisTemplate redisTemplate;
@Test
public void setValue() {
//еӯҳиҝӣеҺ»е’ҢйЎәеәҸж— е…і
redisTemplate.boundSetOps("nameSet").add("жӣ№ж“Қ");
redisTemplate.boundSetOps("nameSet").add("еҲҳеӨҮ");
redisTemplate.boundSetOps("nameSet").add("еӯҷжқғ");
}
@Test
public void getValue() {
Set set=redisTemplate.boundSetOps("nameSet").members();
System.out.println(set);
}
@Test
public void removeValue() {
//еҚ•зӢ¬зҡ„移йҷӨе…¶дёӯдёҖдёӘе…ғзҙ
redisTemplate.boundSetOps("nameSet").remove("еӯҷжқғ");
}
@Test
public void delete() {
//移йҷӨе…ЁйғЁ
redisTemplate.delete("nameSet");
}
}package test;
import java.util.List;
import java.util.Set;
import org.junit.Test;
import org.junit.runner.RunWith;
import org.springframework.beans.factory.annotation.Autowired;
import org.springframework.data.redis.core.RedisTemplate;
import org.springframework.test.context.ContextConfiguration;
import org.springframework.test.context.junit4.SpringJUnit4Cla***unner;
@RunWith(SpringJUnit4Cla***unner.class)
@ContextConfiguration(locations="classpath:spring/applicationContext-redis.xml")
public class TestList {
@Autowired
private RedisTemplate redisTemplate;
/**
* еҸіеҺӢж Ҳ
*/
@Test
public void setValue1() {
redisTemplate.boundListOps("nameList1").rightPush("еҲҳеӨҮ");
redisTemplate.boundListOps("nameList1").rightPush("е…ізҫҪ");
redisTemplate.boundListOps("nameList1").rightPush("еј йЈһ");
}
/**
* жҳҫзӨәеҸіеҺӢж Ҳзҡ„еҖј
*/
@Test
public void getValue1() {
List list=redisTemplate.boundListOps("nameList1").range(0, 10);
System.out.println(list);
}
/**
* е·ҰеҺӢж Ҳ
*/
@Test
public void setValue2() {
redisTemplate.boundListOps("nameList2").leftPush("еҲҳеӨҮ");
redisTemplate.boundListOps("nameList2").leftPush("е…ізҫҪ");
redisTemplate.boundListOps("nameList2").leftPush("еј йЈһ");
}
/**
* жҳҫзӨәе·ҰеҺӢж Ҳзҡ„еҖј
*/
@Test
public void getValue2() {
List list=redisTemplate.boundListOps("nameList2").range(0, 10);
System.out.println(list);
}
/**
* жҢүз…§зҙўеј•жҹҘиҜў
*/
@Test
public void searchByIndex() {
String string=(String) redisTemplate.boundListOps("nameList2").index(1);
System.out.println(string);
}
/**
* еҲ йҷӨе…¶дёӯдёҖдёӘе…ғзҙ
*/
@Test
public void removeValue() {
//еҚ•зӢ¬зҡ„移йҷӨе…¶дёӯдёҖдёӘе…ғзҙ пјҢ第дёҖдёӘеҸӮж•°жҳҜ移йҷӨзҡ„дёӘж•°пјҢдёҚжҳҜдҪҚзҪ®зҡ„дёӢиЎЁ
redisTemplate.boundSetOps("nameList1").remove(1,"е…ізҫҪ");
}
/**
* еҲ йҷӨж•ҙдёӘListйӣҶеҗҲ
*/
@Test
public void delete() {
//еҚ•зӢ¬зҡ„移йҷӨе…¶дёӯдёҖдёӘе…ғзҙ пјҢ第дёҖдёӘеҸӮж•°жҳҜ移йҷӨзҡ„дёӘж•°пјҢдёҚжҳҜдҪҚзҪ®зҡ„дёӢиЎЁ
redisTemplate.delete("nameList1");
}
}package test;
import java.util.List;
import java.util.Set;
import org.junit.Test;
import org.junit.runner.RunWith;
import org.springframework.beans.factory.annotation.Autowired;
import org.springframework.data.redis.core.RedisTemplate;
import org.springframework.test.context.ContextConfiguration;
import org.springframework.test.context.junit4.SpringJUnit4Cla***unner;
@RunWith(SpringJUnit4Cla***unner.class)
@ContextConfiguration(locations="classpath:spring/applicationContext-redis.xml")
public class TestHash {
@Autowired
private RedisTemplate redisTemplate;
/**
* еӯҳеҖј
*/
@Test
public void setValue() {
redisTemplate.boundHashOps("nameHash").put("a", "е”җеғ§");
redisTemplate.boundHashOps("nameHash").put("b", "жӮҹз©ә");
redisTemplate.boundHashOps("nameHash").put("c", "е…«жҲ’");
redisTemplate.boundHashOps("nameHash").put("d", "жІҷеғ§");
}
/**
* еҸ–жүҖжңүkey
*/
@Test
public void getKey() {
Set keys=redisTemplate.boundHashOps("nameHash").keys();
System.out.println(keys);
}
/**
* еҸ–жүҖжңүvalue
*/
@Test
public void getValue() {
List list=redisTemplate.boundHashOps("nameHash").values();
System.out.println(list);
}
/**
* ж №жҚ®keyеҸ–еҖј
*/
@Test
public void searchValueByKey() {
String string=(String) redisTemplate.boundHashOps("nameHash").get("b");
System.out.println(string);
}
/**
* 移йҷӨжҹҗдёӘе°Ҹkeyзҡ„еҖј
*/
@Test
public void removeValueByKey() {
redisTemplate.boundHashOps("nameHash").delete("c");
}
/**
* еҲ йҷӨе…¶дёӯдёҖдёӘе…ғзҙ
*/
@Test
public void removeValue() {
//еҚ•зӢ¬зҡ„移йҷӨе…¶дёӯдёҖдёӘе…ғзҙ пјҢ第дёҖдёӘеҸӮж•°жҳҜ移йҷӨзҡ„дёӘж•°пјҢдёҚжҳҜдҪҚзҪ®зҡ„дёӢиЎЁ
redisTemplate.boundSetOps("nameList1").remove(1,"е…ізҫҪ");
}
/**
* еҲ йҷӨж•ҙдёӘListйӣҶеҗҲ
*/
@Test
public void delete() {
//еҚ•зӢ¬зҡ„移йҷӨе…¶дёӯдёҖдёӘе…ғзҙ пјҢ第дёҖдёӘеҸӮж•°жҳҜ移йҷӨзҡ„дёӘж•°пјҢдёҚжҳҜдҪҚзҪ®зҡ„дёӢиЎЁ
redisTemplate.delete("nameList1");
}
}
д»ҘдёҠе°ұжҳҜSpring Data Redisзҡ„дҪҝз”Ёж–№жі•пјҢиҜҰз»ҶдҪҝз”Ёжғ…еҶөиҝҳеҫ—иҰҒеӨ§е®¶иҮӘе·ұдҪҝз”ЁиҝҮжүҚиғҪзҹҘйҒ“е…·дҪ“иҰҒйўҶгҖӮеҰӮжһңжғійҳ…иҜ»жӣҙеӨҡзӣёе…іеҶ…е®№зҡ„ж–Үз« пјҢж¬ўиҝҺе…іжіЁдәҝйҖҹдә‘иЎҢдёҡиө„и®Ҝйў‘йҒ“пјҒ
е…ҚиҙЈеЈ°жҳҺпјҡжң¬з«ҷеҸ‘еёғзҡ„еҶ…е®№пјҲеӣҫзүҮгҖҒи§Ҷйў‘е’Ңж–Үеӯ—пјүд»ҘеҺҹеҲӣгҖҒиҪ¬иҪҪе’ҢеҲҶдә«дёәдё»пјҢж–Үз« и§ӮзӮ№дёҚд»ЈиЎЁжң¬зҪ‘з«ҷз«ӢеңәпјҢеҰӮжһңж¶үеҸҠдҫөжқғиҜ·иҒ”зі»з«ҷй•ҝйӮ®з®ұпјҡis@yisu.comиҝӣиЎҢдёҫжҠҘпјҢ并жҸҗдҫӣзӣёе…іиҜҒжҚ®пјҢдёҖз»ҸжҹҘе®һпјҢе°Ҷз«ӢеҲ»еҲ йҷӨж¶үе«ҢдҫөжқғеҶ…е®№гҖӮ
жӮЁеҘҪпјҢзҷ»еҪ•еҗҺжүҚиғҪдёӢи®ўеҚ•е“ҰпјҒ