您好,登录后才能下订单哦!
密码登录
登录注册
点击 登录注册 即表示同意《亿速云用户服务条款》
前言
本文采用Spring cloud本文为2.1.8RELEASE,version=Greenwich.SR3
概术
在高并发应用中,缓存、限流、降级,是我们保护系统应用的三大利器。在开发一些api接口的时候,通常也会在网关层做限流控制,一方面是为了防止大量的请求是服务器过载,导致服务器不可用,另一方面也是防止其他人的恶习网络***。
常见的限流方式,如Hystrix的使用线程池隔离,超过线程池的负载走熔断的逻辑;也有通过滑动的时间窗口来控制流量。
常用的限流算法有,计数器算法、漏桶算法、令牌桶算法,这里就不对相关算法进行描述。
熔断
Spring Cloud Gateway的熔断可以基于Hystrix实现。
1.1 增加pom相关依赖**
<dependency>
 <groupId>org.springframework.cloud</groupId>
 <artifactId>spring-cloud-starter-netflix-hystrix</artifactId>
</dependency>
1.2 修改application.yml**
server:
 port: 8100
spring:
 redis:
 host: localhost
 port: 6379
 application:
 name: spring-gateway
 cloud:
 gateway:
 discovery:
 locator:
 enabled: true # 开启通过服务中心的自动根据 serviceId 创建路由的功能
 default-filters:
 - My=true
 routes:
 - id: ribbon-route
 uri: lb://EUREKA-RIBBON
 order: 0
 predicates:
 - Path=/ribbon/**
 filters:
 - name: Hystrix
 args:
 name: fallback
 fallbackUri: forward:/fallback
 - StripPrefix=1 #去掉前缀,具体实现参考StripPrefixGatewayFilterFactory
 - AddResponseHeader=X-Response-Default-Foo, Default-Bar
 - id: feign-route
 uri: lb://EUREKA-FEIGN
 order: 0
 predicates:
 - Path=/feign/**
 filters:
 - StripPrefix=1
 - AddResponseHeader=X-Response-Default-Foo, Default-Bar
eureka:
 instance:
 hostname: eureka1.server.com
 lease-renewal-interval-in-seconds: 5
 lease-expiration-duration-in-seconds: 10
 client:
 service-url:
 defaultZone: http://eureka1.server.com:8701/eureka/,http://eureka2.server.com:8702/eureka/,http://eureka3.server.com:8703/eureka/
只设置ribbon的路由熔断,feign设置和ribbon相同。
Hystrix支持两个参数:
name:即HystrixCommand的名字
fallbackUri:fallback对应的uri,这里的uri仅支持forward:schemed
1.3 创建FallBackController
package spring.cloud.demo.spring.gateway.controller;
import org.springframework.web.bind.annotation.GetMapping;
import org.springframework.web.bind.annotation.RestController;
@RestController
public class FallBackController {
 @GetMapping("/fallback")
 public String fallback() {
 return "Error:fallback";
 }

}
1.4 启动相关服务
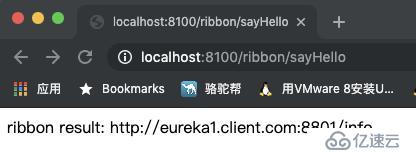
启动eureka-server、eureka-client、eureka-ribbon、spring-gateway相关服务,访问 http://localhost :8100/ribbon/sayHello地址,页面显示结果如下:
然后我们将eureka-ribbon服务停掉,刷新页面,返回结果如下: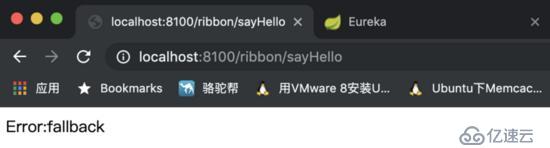
至此:熔断的简单配置实现就完成了,如需自定义熔断策略可以参考HystrixGatewayFilter的内容。
限流
Spring Cloud Gateway官方提供了RequestRateLimiterGatewayFilterFactory类,使用redis和lua脚本来实现令牌桶的方式。我们也可以基于Google Guava中的RateLimiter、Bucket4j、RateLimitJ来实现。本文将采用官方提供的方式来实现。
1.1 增加pom相关依赖
<dependency>
 <groupId>org.springframework.boot</groupId>
 <artifactId>spring-boot-starter-data-redis-reactive</artifactId>
</dependency>
1.2 修改application.yml配置
server:
 port: 8100
spring:
 redis:
 host: localhost
 port: 6379
 application:
 name: spring-gateway
 cloud:
 gateway:
 discovery:
 locator:
 enabled: true # 开启通过服务中心的自动根据 serviceId 创建路由的功能
 default-filters:
 - My=true
 routes:
 - id: ribbon-route
 uri: lb://EUREKA-RIBBON
 order: 0
 predicates:
 - Path=/ribbon/**
 filters:
 - name: RequestRateLimiter
 args:
 key-resolver: '#{@ipKeyResolver}'
 redis-rate-limiter.replenishRate: 200
 redis-rate-limiter.burstCapacity: 400
 - name: Hystrix
 args:
 name: fallback
 fallbackUri: forward:/fallback
 - StripPrefix=1 #去掉前缀,具体实现参考StripPrefixGatewayFilterFactory
 - AddResponseHeader=X-Response-Default-Foo, Default-Bar
 - id: feign-route
 uri: lb://EUREKA-FEIGN
 order: 0
 predicates:
 - Path=/feign/**
 filters:
 - StripPrefix=1
 - AddResponseHeader=X-Response-Default-Foo, Default-Bar
eureka:
 instance:
 hostname: eureka1.server.com
 lease-renewal-interval-in-seconds: 5
 lease-expiration-duration-in-seconds: 10
 client:
 service-url:
 defaultZone: http://eureka1.server.com:8701/eureka/,http://eureka2.server.com:8702/eureka/,http://eureka3.server.com:8703/eureka/
说明:
1 增加redis相关配置
2.1 -name: RequestRateLimiter, filter的名称,必须是RequestRateLimiter
2.2 redis-rate-limiter.replenishRate: 允许用户每秒处理的请求个数
2.3 redis-rate-limiter.burstCapacity: 令牌桶的容量,允许在一秒内完成的最大请求数
2.4 key-resolver: 使用的Bean名称,规则为按名称引用Bean
1.3 增加限流Bean
package spring.cloud.demo.spring.gateway.config;
import org.springframework.cloud.gateway.filter.ratelimit.KeyResolver;
import org.springframework.context.annotation.Bean;
import org.springframework.context.annotation.Configuration;
import reactor.core.publisher.Mono;
@Configuration
public class BeanConfig {
 @Bean
 public KeyResolver ipKeyResolver() {
 return exchange -> Mono.just(exchange.getRequest().getRemoteAddress().getHostName());
 }
}
这里设置的是ip的限流。
1.4 启动相关服务
首先启动redis服务,然后顺序启动eureka-server、eureka-client、eureka-ribbon、spring-gateway相关服务,访问 http://localhost:8100/ribbon/sayHello。为了演示方便可以将redis-rate-limiter.replenishRate和redis-rate-limiter.burstCapacity参数设置成1和3,然后疯狂刷新页面可以看到有请求失败的情况(最好使用压测工具来演示)。同时我们还要打开redis的监控(monitor命令),可以看到redis的监控,如下: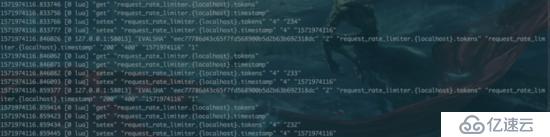
说明:redis中会有2个key,request_rate_limiter.{xxx}.timestamp和request_rate_limiter.{xxx}.tokens
总结
本文简单的实现了Gateway的熔断和限流。总体来说Spring Cloud Gateway提供的路由网关、过滤器、熔断、限流还是都比较简单,也非常灵活,可以根据自己的需求来自定义。
免责声明:本站发布的内容(图片、视频和文字)以原创、转载和分享为主,文章观点不代表本网站立场,如果涉及侵权请联系站长邮箱:is@yisu.com进行举报,并提供相关证据,一经查实,将立刻删除涉嫌侵权内容。