жӮЁеҘҪпјҢзҷ»еҪ•еҗҺжүҚиғҪдёӢи®ўеҚ•е“ҰпјҒ
зӣ®еүҚеңЁзі»з»ҹдёӯж¶үеҸҠеҲ°жҗңзҙўзҡ„и§ЈеҶіж–№жЎҲйғҪжҳҜйҖҡиҝҮж•°жҚ®еә“иҮӘеёҰзү№жҖ§и§ЈеҶіпјҢеҰӮйҖҡиҝҮmysql5.7иҮӘеёҰзҡ„е…Ёж–ҮжЈҖзҙўеҠҹиғҪе®һзҺ°иө„жәҗзҡ„жҗңзҙўгҖӮ
иҝҷж ·е®һзҺ°зҡ„еҘҪеӨ„жҳҜж–№дҫҝпјҢж— йңҖйўқеӨ–ејҖеҸ‘е’Ңз»ҙжҠӨжҲҗжң¬гҖӮдҪҶжҳҜйҡҸзқҖдёҡеҠЎзҡ„еҸ‘еұ•е’Ңж•°жҚ®зҡ„еўһеҠ пјҢжҖ§иғҪе’ҢеҸҜжү©еұ•ж–№йқўеҫҲе®№жҳ“еҮәзҺ°з“¶йўҲгҖӮ
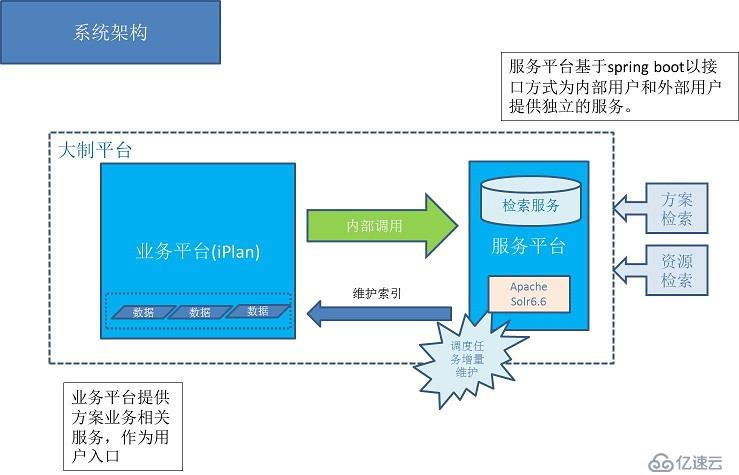
з»“еҗҲжң¬ж¬Ўж–№жЎҲеә“йңҖжұӮзҡ„еҘ‘жңәпјҢеҶіе®ҡеј•е…Ҙspring boot + solr дёәдё»иҰҒжһ¶жһ„еҹәзЎҖзҡ„еүҚзҪ®е№іеҸ°з”ЁдәҺеә”еҜ№ж—Ҙжёҗж—әзӣӣзҡ„жҗңзҙўжңҚеҠЎйңҖжұӮгҖӮ

еүҚзҪ®е№іеҸ°еҹәдәҺspring bootејҖеҸ‘пјҢдё»иҰҒзңӢдёӯspring bootзҡ„еҫ®жңҚеҠЎжҖқжғіпјҢж–№дҫҝејҖеҸ‘е’ҢйғЁзҪІгҖӮеҗҢж—¶еҸҜд»Ҙдёәд»ҘеҗҺзҡ„еҫ®жңҚеҠЎжһ¶жһ„еҒҡжҠҖжңҜзғӯиә«гҖӮ
йҖҡиҝҮspring bootжҗӯе»әзҡ„еүҚзҪ®е№іеҸ°дјҡеӨ„зҗҶиҜ·жұӮжҺҘе…ҘпјҢйҷҗжөҒпјҢзӣ‘жҺ§пјҢе®үе…ЁзӯүйқһеҠҹиғҪжҖ§йңҖжұӮгҖӮ
жҗңзҙўз«Ҝз»“еҗҲдәҶжңҖж–°зҡ„apache solrжңҚеҠЎеҷЁз«ҜпјҲ6.6зүҲжң¬пјүпјҢдҪҝз”ЁиҮӘеёҰзҡ„smart-cnдёӯж–ҮеҲҶиҜҚ组件пјҢжҸҗдҫӣжҗңзҙўжңҚеҠЎзҡ„еҹәзЎҖж”ҜжҢҒгҖӮ
жһ¶жһ„е®һзҺ°йғЁеҲҶдё»иҰҒйҖҡиҝҮе…·дҪ“е®һи·өжқҘйӘҢиҜҒжһ¶жһ„зҡ„еҸҜиЎҢжҖ§пјҢдёҚж¶үеҸҠе…·дҪ“дёҡеҠЎз»ҶиҠӮе’Ңе®һйҷ…ж•°жҚ®пјҢ
жһ¶жһ„е®һзҺ°зҡ„ж“ҚдҪңжҸҸиҝ°еҠӣжұӮеҒҡеҲ°еҸҜеӨҚеҲ¶гҖӮ
йҰ–е…ҲзЎ®дҝқжң¬жңәе®үиЈ…дәҶjdk8+пјҢ然еҗҺе°ұиҝӣе…ҘeclipseпјҢеҲӣе»әдёҖдёӘmaven projectгҖӮ
POMж–Ү件еҢ…еҗ«д»ҘдёӢеҶ…е®№пјҡ
<parent>
        <groupId>org.springframework.boot</groupId>
        <artifactId>spring-boot-starter-parent</artifactId>
        <version>2.0.0.BUILD-SNAPSHOT</version>
</parent>
<properties>
        <spring.data.solr.version>2.1.1.RELEASE</spring.data.solr.version>
    </properties>
    <dependencyManagement>
        <dependencies>
            <dependency>
                <groupId>org.springframework.data</groupId>
                <artifactId>spring-data-solr</artifactId>
                <version>${spring.data.solr.version}</version>
            </dependency>
        </dependencies>
    </dependencyManagement>
    <dependencies>
    <dependency>
       <groupId>org.springframework.boot</groupId>
        <artifactId>spring-boot-starter-web</artifactId>
    </dependency>
    <dependency>
            <groupId>org.springframework.data</groupId>
            <artifactId>spring-data-solr</artifactId>
        </dependency>
</dependencies>Mavenз»“жһ„жҗӯеҘҪеҗҺе°ұжҳҜжҗӯе»әдҪ зҡ„йЎ№зӣ®жһ¶жһ„пјҢеҰӮеӣҫпјҡ
Application.java еҜ№еә”дәҶйЎ№зӣ®зҡ„е…ҘеҸЈпјҢйҖҡиҝҮдёҖж®өеҫҲз®ҖеҚ•зҡ„д»Јз Ғе°ұеҸҜд»ҘеҗҜеҠЁдёҖдёӘjettyжңҚеҠЎдәҶгҖӮ
package app;
import org.springframework.boot.SpringApplication;
import org.springframework.boot.autoconfigure.SpringBootApplication;
import sample.Example;
@SpringBootApplication
public class Application {
public static void main(String[] args) throws Exception {
        SpringApplication.run(Example.class, args);
    }
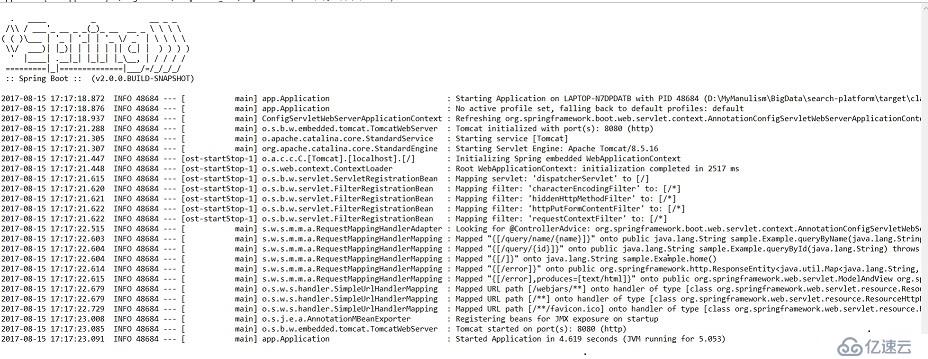
}иҝҗиЎҢзӨәж„Ҹеӣҫпјҡ

йҰ–е…ҲеҲ°е®ҳж–№зҪ‘з«ҷдёӢиҪҪжңҖж–°зҡ„е®үиЈ…еҢ…пјҢеҪ“еүҚзүҲжң¬жҳҜ6.6пјҢдёӢиҪҪzipеҢ…е°ұеҸҜд»ҘдәҶгҖӮ
и§ЈеҺӢеҗҺзҡ„ж–Ү件еӨ№жңүд»ҘдёӢеҮ дёӘзӣ®еҪ•жҳҜйҰ–е…ҲйңҖиҰҒе…іжіЁзҡ„пјҡ
binпјҡ еҗҜеҠЁи„ҡжң¬зӣ®еҪ•пјҢйҖҡиҝҮиҝҷйҮҢйқўзҡ„е‘Ҫд»ӨжқҘеҗҜеҠЁе…ій—ӯжңҚеҠЎеҷЁ
serverпјҡsolrжңҚеҠЎеҷЁзӣ®еҪ•пјҢй…ҚзҪ®ж–Ү件е’ҢjarеҢ…д»ҘеҸҠзҙўеј•ж•°жҚ®йғҪжҳҜеңЁиҝҷдёӘзӣ®еҪ•йҮҢйқўзҡ„
contribпјҡиҝҷдёӘйҮҢйқўж”ҫзҡ„жҳҜйҡҸзүҲжң¬еҸ‘еёғзҡ„дёҖдәӣеҸҜйҖүеҢ…пјҢжҲ‘们еҗҺйқўз”ЁеҲ°зҡ„дёӯж–ҮеҲҶиҜҚеҢ…е°ұеңЁйҮҢйқў
з”ұдәҺжҲ‘们жҳҜйӘҢиҜҒжһ¶жһ„жүҖд»ҘжүҖжңүзҡ„й…ҚзҪ®йғҪжҳҜеҹәдәҺеҚ•жңәзҡ„гҖӮ
дёӢдёҖжӯҘиҰҒеҒҡзҡ„жҳҜеҲӣе»әдёҖдёӘcoreпјҢеңЁsolr-6.6.0\server\solrзӣ®еҪ•дёӢж–°е»әдёҖдёӘж–Ү件еӨ№sample_solrпјҢеҢ…еҗ«еҰӮдёӢж–Ү件еӨ№
conf й…ҚзҪ®ж–Ү件зӣ®еҪ•пјҢеҲқе§ӢзүҲжң¬д»Һsolr-6.6.0\example\example-DIH\solr\db\conf еӨҚеҲ¶
data ж•°жҚ®ж–Ү件зӣ®еҪ•пјҢжүӢе·ҘеҲӣе»ә
core.properties жүӢе·ҘеҲӣе»әзӣ®еҪ•пјҢеҶ…е®№еҰӮдёӢпјҡ
name=sample_solr |
еҲӣе»әе®ҢжҲҗcoreеҗҺйңҖиҰҒдҝ®ж”№дёҖдёӢcoreйҮҢйқўзҡ„й…ҚзҪ®ж–Ү件пјҢ
еңЁsolr-6.6.0\server\solr\sample_solr\confзӣ®еҪ•дёӢйқўпјҢжңүдёүдёӘж–Ү件пјҢжҢүз…§йЎәеәҸдҝ®ж”№
solrconfig.xml
жүҫеҲ°data importзҡ„request handlerдҝ®ж”№дёә
<requestHandler name="/dataimport" class="solr.DataImportHandler">
    <lst name="defaults">
      <str name="config">solr-data-config.xml</str>
    </lst>
  </requestHandler>
solr-data-config.xml
йҖҡиҝҮиҝҷдёӘж–Ү件жқҘй…ҚзҪ®дҪ зҡ„data sourceе’Ңж–ҮжЎЈеӯ—ж®өпјҢдёӢйқўжҳҜжҲ‘зҡ„й…ҚзҪ®
жңүеҮ дёӘең°ж–№йңҖиҰҒжіЁж„Ҹзҡ„пјҢ
batchSize
е®ҳж–№ж–ҮжЎЈе»әи®®й’ҲеҜ№mysqlж•°жҚ®еә“дҪҝз”Ё-1жқҘиҝ«дҪҝmysqlдҪҝз”ЁInteger.MIN_VALUEдҪңдёәfetch sizeпјҢе®һйҷ…ж“ҚдҪңдёӯи®ҫзҪ®жҲҗ-1ж—¶жҲ‘дҪҝз”Ёmysql-connector-java-5.1.24пјҲиҝҷдёӘй©ұеҠЁеҰӮжһңжІЎжңүйңҖиҰҒиҮӘиЎҢдёӢиҪҪ并еҸ‘еҲ°solr-6.6.0\server\libзӣ®еҪ•пјүдҪңдёәй©ұеҠЁдјҡеҮәзҺ°result set closeзҡ„й”ҷиҜҜпјҢжүҖд»Ҙиҝҷиҫ№и®ҫзҪ®жҲҗ10пјҢе…·дҪ“жңүжІЎжңүз”Ёиҝҳеҫ…йӘҢиҜҒ
еҗҺжқҘеңЁmysqlзҡ„bug listжүҫеҲ°дәҶдёҖдёӘзӣёдјјзҡ„й—®йўҳпјҢдҫӣеҸӮиҖғ
https://bugs.mysql.com/bug.php?id=83027
entityзҡ„PK
еңЁdeltaQueryзҡ„ж—¶еҖҷдјҡз”ЁеҲ°пјҢиҷҪ然deltaQueryзҡ„иҜӯеҸҘжҳҜйҖҡиҝҮupdate_time> xxxжқҘиҺ·еҸ–еўһйҮҸж•°жҚ®пјҢе®һйҷ…жңҖеҗҺжҹҘиҜўзҡ„ж—¶еҖҷиҝҳжҳҜйҖҡиҝҮpk in (ids) иҝҷж ·зҡ„ж–№ејҸпјҢжүҖд»ҘеҰӮжһңйңҖиҰҒз”ЁеҲ°deltaQueryпјҢPKйңҖиҰҒи®ҫзҪ®жҲҗж•°жҚ®еә“иЎЁзҡ„дё»й”®
fieldзҡ„е®ҡд№ү
иҝҷиҫ№еҸҜд»ҘзңӢеҲ°жҲ‘е®ҡд№үдәҶдёҖдёӘtagеӯ—ж®өпјҢеҸҜжҳҜеҪ“дҪ еҺ»жҗңзҙўзҡ„ж—¶еҖҷпјҢз»“жһңйҮҢйқўжӯ»жҙ»еҸӘеҮәзҺ°idе’ҢnameгҖӮ
жңҖеҗҺеҸ‘зҺ°ж–ҮжЎЈдёӯзҡ„еӯ—ж®өйғҪжҳҜиҰҒйҖҡиҝҮе®ҡд№үзҡ„пјҢеҸӘдёҚиҝҮsolrдёәиҮӘе·ұзҡ„sampleйў„з•ҷдәҶдёҖдәӣеӯ—ж®өе®ҡд№үеҲҡеҘҪеҢ…еҗ«idе’ҢnameпјҢиҝҷд№ҹз®—жҳҜдёӘзӣёеҪ“еқ‘зҡ„ең°ж–№гҖӮ
managed-schema
дёҠйқўиҜҙеҖ’fieldйңҖиҰҒйҖҡиҝҮе®ҡд№үпјҢйӮЈд№ҲиҝҷдёӘж–Ү件е°ұжҳҜз”ЁжқҘе®ҡд№үж–ҮжЎЈдёӯдҪҝз”ЁеҲ°зҡ„еӯ—ж®өе’Ңеӯ—ж®өзұ»еһӢдәҶгҖӮSolrжӯЈжҳҜйҖҡиҝҮschemeе®ҡд№үжқҘжһ„е»әзҙўеј•гҖӮ
иҝҷдёӘschemeж–Ү件еҢ…еҗ«еӣӣз§Қе…ғзҙ пјҡ
field type
еӯ—ж®өзҡ„зұ»еһӢеҰӮж–Үжң¬пјҢж•°еӯ—жө®зӮ№зӯүпјҢе®ҡд№үиҙҙеҲҮзҡ„зұ»еһӢжңүеҲ©дәҺsolrжӣҙеҮҶзЎ®зҡ„иҜҶеҲ«еӯ—ж®ө并иҫ“еҮәз»“жһң
field
еӯ—ж®өпјҢз”ЁдәҺз»„жҲҗsolrж–ҮжЎЈзҡ„зҡ„еҹәжң¬еҚ•дҪҚгҖӮеҰӮжһңд»Һйқўеҗ‘еҜ№иұЎи§’еәҰжқҘзңӢпјҢдёҖдёӘж–ҮжЎЈжҳҜдёҖдёӘеҜ№иұЎпјҢзӣёеә”зҡ„еӯ—ж®өе°ұжҳҜиҝҷдёӘеҜ№иұЎзҡ„еұһжҖ§
dynamicField
еҠЁжҖҒеӯ—ж®өпјҢsolrйҷӨдәҶжҸҗдҫӣдёҖдәӣй»ҳи®Өеӯ—ж®өд№ӢеӨ–иҝҳйў„з•ҷдәҶдёҖдәӣйҖҡй…Қз¬Ұеӯ—ж®өе®ҡд№үпјҢеҰӮдёӢпјҡ
<dynamicField name="*_txt" type="text_general" multiValued="true" indexed="true" stored="true"/> |
з»“еҗҲжҲ‘们дёҠйқўзҡ„tagеӯ—ж®өпјҢеҰӮжһңжҲ‘们и§үеҫ—жҜҸдёӘеӯ—ж®өйғҪиҰҒе®ҡд№үеӨӘйә»зғҰпјҢйӮЈд№ҲеҸҜд»ҘеңЁentityйҮҢйқўзӣҙжҺҘдҪҝз”Ёdynamic fieldпјҢ
<field column="tag" name="tag_txt" type="string"/> |
йҮҚж–°е»әз«Ӣзҙўеј•еҗҺпјҢжҲ‘们зҡ„жҗңзҙўз»“жһңеҰӮеӣҫпјҡ
copyField
д»ҺеҗҚеӯ—е°ұеҸҜд»ҘзңӢеҮәжқҘиҝҷжҳҜдёҖдёӘеӨҚеҲ¶еӯ—ж®өеҠҹиғҪпјҢд»Һе®ҡд№үжқҘзңӢд№ҹеҫҲжҳҺжҳҫзҡ„еҸ‘зҺ°жңүsourceжңүdestгҖӮдёҖдёӘдё»иҰҒзҡ„з”ЁйҖ”е°ұжҳҜе…Ёж–ҮжЈҖзҙўпјҢе°ҶйңҖиҰҒжЈҖзҙўзҡ„еӯ—ж®өйғҪcopyеҲ°дёҖдёӘеӯ—ж®өпјҢд№ӢеҗҺеҜ№иҝҷдёӘеӯ—ж®өзҡ„жҗңзҙўдёҚе°ұжҳҜе…Ёж–ҮжЈҖзҙўдәҶеҗ—пјҹиҝҷдёӘе’Ңж—©жңҹж•°жҚ®еә“йҮҢйқўе°ҶеҮ дёӘеӯ—ж®өз»„еҗҲиө·жқҘеҗҺжқҘдёӘжЁЎзіҠжҹҘиҜўе°ұжҳҜе…Ёж–ҮжҗңзҙўжҳҜдёҖдёӘйҒ“зҗҶгҖӮ
иҝҷдёӘиҰҒжіЁж„Ҹзҡ„жҳҜеҰӮжһңsourceжңүеҮ дёӘеӯ—ж®өпјҢйӮЈд№Ҳзӣ®ж Үеӯ—ж®өзҡ„multiValuedйңҖиҰҒи®ҫзҪ®дёәtrue
жӣҙиҜҰз»Ҷзҡ„еҗ«д№үе»әи®®еҸӮиҖғе®ҳж–№ж–ҮжЎЈпјҢжҲ‘们主иҰҒж¶үеҸҠfield typeпјҢfieldе’ҢcopyFieldзҡ„е®ҡд№үпјҢиҝҷйҮҢе°ұеҹәдәҺжҲ‘们зҡ„дҫӢеӯҗжқҘзңӢзңӢгҖӮ
field typeеңЁдёҖиҲ¬жғ…еҶөдёӢдёҚйңҖиҰҒжү©еұ•пјҢеӣ дёәsolrе·Із»ҸиҮӘеёҰдәҶеҫҲеӨҡзҡ„зұ»еһӢдәҶпјҢиҝҷйҮҢжҲ‘们дёәдәҶж”ҜжҢҒдёӯж–ҮеҲҶиҜҚпјҢж–°еўһдёҖдёӘеӯ—ж®өзұ»еһӢеҰӮдёӢ
<fieldType name="text_smart" class="solr.TextField" positionIncrementGap="100">
      <analyzer type="index">
        <tokenizer class="solr.HMMChineseTokenizerFactory"/>
        <filter class="solr.CJKWidthFilterFactory"/>
<filter class="solr.StopFilterFactory" words="org/apache/lucene/analysis/cn/smart/stopwords.txt"/>
<filter class="solr.PorterStemFilterFactory"/>
<filter class="solr.LowerCaseFilterFactory"/>
      </analyzer>
      <analyzer type="query">
        <tokenizer class="solr.HMMChineseTokenizerFactory"/>
        <filter class="solr.CJKWidthFilterFactory"/>
<filter class="solr.StopFilterFactory" words="org/apache/lucene/analysis/cn/smart/stopwords.txt"/>
<filter class="solr.PorterStemFilterFactory"/>
<filter class="solr.LowerCaseFilterFactory"/>
      </analyzer>
    </fieldType>
еҸҜд»ҘзңӢеҮәдёҖдёӘfield typeз”ұдёӨйғЁеҲҶжһ„жҲҗпјҢindexе’ҢqueryгҖӮIndexиҙҹиҙЈе»әз«Ӣзҙўеј•зҡ„ж—¶еҖҷеҜ№дәҺеӯ—ж®өзҡ„и§ЈжһҗиҖҢqueryиҙҹиҙЈжҹҘиҜўзҡ„ж—¶еҖҷгҖӮеҗҢж—¶дёәдәҶдёӯж–ҮеҲҶиҜҚжҲ‘们йңҖиҰҒд»Һsolr-6.6.0\contrib\analysis-extras\lucene-libsдёӯжӢ·иҙқlucene-analyzers-smartcn-6.6.0.jarиҝҷдёӘjarеҢ…еҲ°webapp\WEB-INF\lib
fieldзҡ„й…ҚзҪ®еҰӮдёӢпјҡ
1 | <field name="tag" type="text_smart" indexed="true" stored="true"/><field name="text" type="text_smart" multiValued="true" indexed="true" stored="false"/> |
дё»иҰҒжҳҜеҜ№йңҖиҰҒж”ҜжҢҒдёӯж–Үзҡ„еӯ—ж®өtypeй…ҚзҪ®жҲҗжҲ‘们д№ӢеүҚе®ҡд№үзҡ„text_smart
copyField
<copyField source="name" dest="text"/><copyField source="tag" dest="text"/> |
йҖҡиҝҮдёҠйқўзҡ„й…ҚзҪ®жҲ‘们дёҖдёӘsolrжңҚеҠЎеҷЁз«Ҝе°ұеҸҜд»ҘжӯЈеёёиҝҗдҪңдәҶпјҢжҲ‘们еӣһйЎҫдёҖдёӢжҲ‘们зҡ„иҝҮзЁӢ
жңҖеҗҺжҲ‘们иҝӣе…Ҙе‘Ҫд»ӨиЎҢпјҢйҖҡиҝҮsolr.cmd startжқҘеҗҜеҠЁ
еҹәдәҺжҲ‘们еүҚйқўдёӨдёӘз« иҠӮзҡ„еҶ…е®№пјҢиҝҷж—¶еҖҷиҰҒеҒҡзҡ„е°ұжҳҜеңЁspring bootйЎ№зӣ®йҮҢйқўжҸҗдҫӣsolrжңҚеҠЎеҷЁзҡ„жҗңзҙўжҺҘеҸЈе°ҒиЈ…д»ҘеҸҠзҙўеј•зҡ„з»ҙжҠӨгҖӮ
йҰ–е…ҲжҲ‘们йңҖиҰҒеҲӣе»әsolrзҡ„й…ҚзҪ®пјҢйҖҡиҝҮдёӨдёӘж–Ү件
1пјҢ application.properties
еңЁsrc/main/resourceзӣ®еҪ•дёӢйқўж–°е»әдёҖдёӘpropertiesж–Ү件пјҢеҶ…е®№еҰӮдёӢ
spring.data.solr.host=http://127.0.0.1:8983/solr/sample_solr |
2пјҢ SolrConfig.java
йҖҡиҝҮжіЁи§Је°Ҷpropertiesдёӯе®ҡд№үзҡ„еұһжҖ§жіЁе…ҘеҲ°beanдёӯ
package sample;
import org.springframework.boot.context.properties.ConfigurationProperties;
@ConfigurationProperties(prefix = "spring.data.solr")
public class SolrConfig {
private String host;
private String zkHost;
private String defaultCollection;
//getter setter
}жҺҘдёӢжқҘе°ұжҳҜйҖҡиҝҮдёҖдёӘcontrollerжқҘйҖҡиҝҮrestfulзҡ„ж–№ејҸе°Ҷз”ЁжҲ·жҺҘеҸЈе’Ңsolr scriptиҝһжҺҘиө·жқҘгҖӮ
дёӢйқўжҳҜжҲ‘们зҡ„дёҖдёӘжҹҘиҜўcontroller
package sample;
//import section
@RestController
@EnableAutoConfiguration
public class Example {
 @Autowired
    private SolrClient client;

    @RequestMapping("/query/name/{name}")
    public String queryByName(@PathVariable  String name) throws IOException, SolrServerException {
ModifiableSolrParams params =new ModifiableSolrParams();
    params.add("q",name);
    params.add("hl","on");
    params.add("hl.fl","name,tag");

    params.add("ws","json");
    params.add("start","0");
    params.add("rows","10");
    QueryResponse response=null;

    try{
        response=client.query(params);
        SolrDocumentList results = response.getResults();
        for (SolrDocument document:results) {
        System.out.println( document);
        }
    }catch(Exception e){
        e.getStackTrace();
    }
    return response.toString();
    }

}еҗҜеҠЁspring bootжңҚеҠЎпјҢеңЁжөҸи§ҲеҷЁиҫ“е…ҘжҲ‘们зҡ„жҹҘиҜўжҢҮд»ӨеҗҺе°ұеҸҜд»Ҙеҫ—еҲ°з»“жһңдәҶ
http://localhost:8080/query/name/жөӢиҜ•
йҖҡиҝҮжһ¶жһ„е®һзҺ°йғЁеҲҶзҡ„йӘҢиҜҒпјҢеҹәдәҺspring boot + solrзҡ„еүҚзҪ®жңҚеҠЎжһ¶жһ„жҳҜеҸҜиЎҢзҡ„гҖӮдҪҶжҳҜдҪңдёәдёҖдёӘеүҚзҪ®е№іеҸ°жқҘиҜҙпјҢжҲ‘们иҝҳйңҖиҰҒе…іжіЁе“ӘдәӣзӮ№е‘ўпјҹ
е®үе…ЁжҖ§
еүҚзҪ®е№іеҸ°еҫҲеӨҡж—¶еҖҷжҳҜжҡҙйңІеңЁйҖҡз”ЁйҳІзҒ«еўҷд№ӢеӨ–зҡ„пјҢжүҖд»ҘеҚұйҷ©зі»ж•°еҫҖеҫҖд№ҹжҳҜеҫҲй«ҳзҡ„гҖӮжҲ‘们主иҰҒд»ҺдёӨдёӘж–№йқўжқҘеҠ ејәйҳІиҢғ
йҷҗжөҒ
йҖҡиҝҮйҷҗжөҒе’ҢйҖӮеҪ“зҡ„жңҚеҠЎйҷҚзә§пјҢдҝқиҜҒжңҚеҠЎеҸҜз”ЁжҖ§д»ҘеҸҠйҒҝе…ҚеҸҜиғҪзҡ„жөҒйҮҸ***гҖӮе…·дҪ“е®һж–ҪеҸҜд»ҘеҸӮз…§зәҝзЁӢжұ зҡ„жҖқжғіпјҢдёҚе…·дҪ“еұ•ејҖгҖӮ
и®ӨиҜҒ
йҖҡиҝҮи®ӨиҜҒдҪ“зі»з»“еҗҲеҠ еҜҶз®—жі•дҝқиҜҒдҝЎжҒҜдј иҫ“зҡ„дҝқеҜҶжҖ§е’Ңе®Ңж•ҙжҖ§
еҸҜйқ жҖ§
еҸҜйқ жҖ§жҳҜжҢҮзі»з»ҹзҡ„еҸҜз”ЁзЁӢеәҰпјҢж¶өзӣ–зі»з»ҹжҢҒз»ӯиҝҗиЎҢж—¶й—ҙпјҢе®•жңәж—¶й—ҙпјҢжңҚеҠЎеӣһеӨҚж—¶й—ҙзӯүеӣ зҙ гҖӮжҲ‘们йҖҡиҝҮйў„йҳІе’Ңзӣ‘жҺ§дёӨдёӘйҖ”еҫ„жқҘдҝқиҜҒгҖӮ
йў„йҳІ
йҖҡиҝҮйғЁзҪІйӣҶзҫӨжңҚеҠЎд»ҺеүҚзҪ®пјҢжҗңзҙўжңҚеҠЎи§’еәҰеҺ»йҷӨеҚ•зӮ№
зӣ‘жҺ§
йҖҡиҝҮзӢ¬з«Ӣзҡ„зӣ‘жҺ§зі»з»ҹеҜ№еүҚзҪ®зі»з»ҹе’ҢжҗңзҙўжңҚеҠЎеҷЁиҝӣиЎҢзӣ‘жҺ§пјҢи®ҫе®ҡеҗҲзҗҶзҡ„йҳҲеҖје’ҢжҠҘиӯҰзӮ№
е…ҚиҙЈеЈ°жҳҺпјҡжң¬з«ҷеҸ‘еёғзҡ„еҶ…е®№пјҲеӣҫзүҮгҖҒи§Ҷйў‘е’Ңж–Үеӯ—пјүд»ҘеҺҹеҲӣгҖҒиҪ¬иҪҪе’ҢеҲҶдә«дёәдё»пјҢж–Үз« и§ӮзӮ№дёҚд»ЈиЎЁжң¬зҪ‘з«ҷз«ӢеңәпјҢеҰӮжһңж¶үеҸҠдҫөжқғиҜ·иҒ”зі»з«ҷй•ҝйӮ®з®ұпјҡis@yisu.comиҝӣиЎҢдёҫжҠҘпјҢ并жҸҗдҫӣзӣёе…іиҜҒжҚ®пјҢдёҖз»ҸжҹҘе®һпјҢе°Ҷз«ӢеҲ»еҲ йҷӨж¶үе«ҢдҫөжқғеҶ…е®№гҖӮ
жӮЁеҘҪпјҢзҷ»еҪ•еҗҺжүҚиғҪдёӢи®ўеҚ•е“ҰпјҒ