жӮЁеҘҪпјҢзҷ»еҪ•еҗҺжүҚиғҪдёӢи®ўеҚ•е“ҰпјҒ
еҜҶз Ғзҷ»еҪ•
зҷ»еҪ•жіЁеҶҢ
зӮ№еҮ» зҷ»еҪ•жіЁеҶҢ еҚіиЎЁзӨәеҗҢж„ҸгҖҠдәҝйҖҹдә‘з”ЁжҲ·жңҚеҠЎжқЎж¬ҫгҖӢ
иҝҷзҜҮж–Үз« дё»иҰҒд»Ӣз»ҚjsжҖҺд№Ҳе®һзҺ°еӨҡдёӘж ҮйўҳеҗёйЎ¶ж•ҲжһңпјҢж–Үдёӯд»Ӣз»Қзҡ„йқһеёёиҜҰз»ҶпјҢе…·жңүдёҖе®ҡзҡ„еҸӮиҖғд»·еҖјпјҢж„ҹе…ҙи¶Јзҡ„е°Ҹдјҷдјҙ们дёҖе®ҡиҰҒзңӢе®ҢпјҒ
еҜ№дәҺеҜјиҲӘзҡ„еҗёйЎ¶ж•ҲжһңпјҢpcз«Ҝе’Ң移еҠЁз«Ҝзҡ„йңҖжұӮеҸҜиғҪжңүдәӣе·®ејӮгҖӮеңЁpcз«ҜпјҢжҲ‘们йҖҡеёёеҸӘйңҖиҰҒдёҖдёӘйЎ¶йғЁеҜјиҲӘпјӣеңЁз§»еҠЁз«ҜпјҢеңЁж»‘еҠЁйЎөйқўзҡ„ж—¶еҖҷпјҢжӣҙйңҖиҰҒеӨҡдёӘж Үйўҳзҡ„еҗёйЎ¶пјҲдҫӢеҰӮең°еҢәзҡ„йҖүжӢ©пјҢйңҖиҰҒе°ҶзңҒд»ҪеҗёйЎ¶пјүгҖӮ
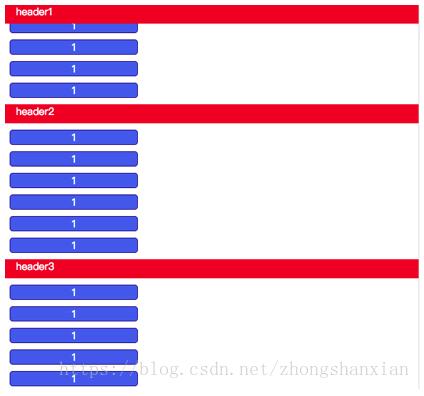
еҚ•дёӘж ҮйўҳеҗёйЎ¶е’ҢеӨҡдёӘж ҮйўҳеҗёйЎ¶зҡ„еҢәеҲ«еңЁдәҺпјҡеӨҡдёӘж ҮйўҳеҗёйЎ¶йңҖиҰҒзЎ®е®ҡдёҖдёӘй«ҳеәҰиҢғеӣҙпјҢеңЁиҝҷдёӘиҢғеӣҙдёӯеҸӘиғҪжңүдёҖдёӘж ҮйўҳеҗёйЎ¶пјҢе…¶д»–йғҪжҳҜеӣәе®ҡж•ҲжһңгҖӮ
дёҖгҖҒйЎөйқўеёғеұҖеҸҠж ·ејҸ
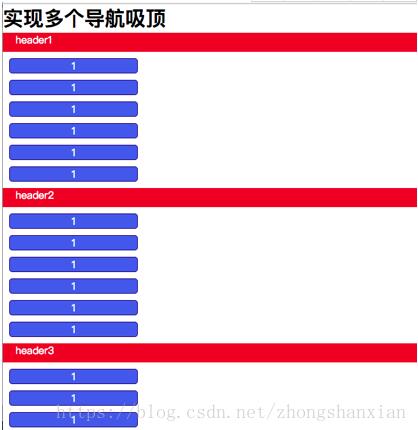
жӯӨеӨ„дёәдәҶжөӢиҜ•ж•ҲжһңпјҢз”ЁдәҶеҮ дёӘйҮҚеӨҚзҡ„sectionж ҮзӯҫпјҢеӨ§е®¶ж №жҚ®е®һйҷ…йңҖжұӮзј–еҶҷеёғеұҖе’Ңж ·ејҸгҖӮ
<body> <ul id="container"> <h2>е®һзҺ°еӨҡдёӘж Үйўҳзҡ„еҗёйЎ¶</h2> <section> <div class="box">header1</div> <li>1</li> <li>1</li> <li>1</li> <li>1</li> <li>1</li> <li>1</li> </section> <!--и®ҫзҪ®еӨҡдёӘеҰӮheader1зҡ„еӯҗеҲ—иЎЁпјҢзӘ—еҸЈеҸҜд»ҘиҝӣиЎҢж»ҡеҠЁпјҢжӯӨеӨ„зңҒз•Ҙ--> <section> <div class="box">header5</div> <li>1</li> <li>1</li> <li>1</li> <li>1</li> <li>1</li> <li>1</li> </section> </ul> </body>
<style type="text/css">
 * {
 padding: 0;
 margin: 0;
 }
 ul {
 width: 100%;
 }
 li {
 width: 200px;
 color: white;
 margin: 10px;
 list-style: none;
 border-radius: 5px;
 border: 1px solid #191970;
 background: #4169E1;
 text-align: center;
 }
 div {
 width: 100%;
 height: 30px;
 color: white;
 padding-left: 20px;
 background: #DC143C;
 }
 .box1 {
 position: fixed;
 top: 0;
 }
</style>дәҢгҖҒjsзҡ„зј–еҶҷ
1гҖҒиҺ·еҸ–жүҖжңүйңҖиҰҒеҗёйЎ¶ж•Ҳжһңзҡ„ж ҮйўҳгҖӮиҝҷйҮҢзҡ„ж ҮйўҳжңҖеҘҪз”ЁзӣёеҗҢзҡ„еёғеұҖе’Ңж ·ејҸпјҢиҺ·еҸ–ж—¶иғҪеӨҹжӣҙеҝ«жҚ·е’Ңз»ҹдёҖгҖӮ
var box = document.getElementsByClassName('box'), //иҺ·еҸ–жүҖжңүйңҖиҰҒеҗёйЎ¶ж•Ҳжһңзҡ„ж Үйўҳ
section = document.getElementsByTagName('section'); //иҺ·еҸ–жүҖжңүеӯҗеҲ—иЎЁпјҢеҗҺйқўжңүз”Ё2гҖҒиҺ·еҸ–ж ҮйўҳдёӘж•°е’Ңе®ҡд№үдёҖдёӘж•°з»„пјҢз”ЁжқҘеӯҳж”ҫжҜҸдёӘж ҮйўҳеҲ°зҲ¶е…ғзҙ зҡ„и·қзҰ»пјҲoffsetTopпјүгҖӮ
var ot = [], //еӯҳеӮЁжҜҸдёӘж Үйўҳзҡ„offsetTop len = box.length; //ж Үйўҳзҡ„дёӘж•°
3гҖҒйҒҚеҺҶжүҖжңүж ҮйўҳпјҢиҺ·еҸ–offsetTopпјҢ并еӯҳе…Ҙotж•°з»„дёӯгҖӮ
for(let i=0; i<len; i++) {
ot.push(box[i].offsetTop); //иҺ·еҸ–жҜҸдёӘж Үйўҳзҡ„offsetTop
}4гҖҒзӣ‘еҗ¬windowзҡ„ж»ҡеҠЁдәӢ件пјҢиҺ·еҸ–scrollTopпјӣеҰӮжһңж»ҡеҠЁй«ҳеәҰдҪҚдәҺ第iдёӘж Үйўҳзҡ„offsetTopе’Ң第i+1дёӘж Үйўҳзҡ„offsetTopд№Ӣй—ҙпјҲдҫӢеҰӮж»ҡеҠЁзҡ„й«ҳеәҰдҪҚдәҺheader1е’Ңheader2зҡ„offsetTopд№Ӣй—ҙпјҢheade1еҗёйЎ¶пјүпјҢеҲҷ第iдёӘж Үйўҳж·»еҠ box1ж ·ејҸпјҢе®һзҺ°еҗёйЎ¶гҖӮ
window.onscroll = function () {
//иҺ·еҸ–ж»ҡеҠЁзҡ„й«ҳеәҰ
var st = document.documentElement.scrollTop || document.body.scrollTop;
for(let i=0; i<len; i++) {
if(st>ot[i] && st<ot[i+1]) { //ж»ҡеҠЁж—¶зӣ‘еҗ¬дҪҚзҪ®пјҢдёәж Үйўҳзҡ„еҗёйЎ¶и®ҫзҪ®дёҖдёӘзҺ°е®һиҢғеӣҙ
box[i].className = 'box box1';
} else {
box[i].className = 'box';
}
}
}5гҖҒ第еӣӣжӯҘдёӯпјҢжңүдёӘй—®йўҳпјҡеҪ“ж»ҡеҠЁйҒ“жңҖеҗҺдёҖдёӘж ҮйўҳпјҲiпјүж—¶пјҢж— жі•иҺ·еҸ–пјҲi+1пјүгҖӮ
и§ЈеҶіж–№жі•пјҡд»Һ第дёҖжӯҘдёӯиҺ·еҫ—зҡ„sectionж ҮзӯҫйӣҶеҗҲдёӯжӢҝеҮәжңҖеҗҺдёҖдёӘеӯҗеҲ—иЎЁпјҲsection[0]пјүпјҢ然еҗҺиҺ·еҸ–жңҖеҗҺдёҖдёӘеӯҗеҲ—иЎЁзҡ„й«ҳеәҰпјҢи®Ўз®—еҮәжңҖеҗҺдёҖдёӘж Үйўҳзҡ„жҳҫзӨәй«ҳеәҰиҢғеӣҙпјҢ并еӯҳе…Ҙotж•°з»„дёӯгҖӮ
//иҺ·еҸ–жңҖеҗҺдёҖдёӘеӯҗеҲ—иЎЁзҡ„й«ҳеәҰпјҢдёәдәҶи®ҫзҪ®жңҖеҗҺдёҖдёӘеҗёйЎ¶ж Үйўҳзҡ„дҪҚзҪ® //section[len-1].getBoundingClientRect().height //жӯӨж–№жі•иҝ”еӣһдёҖдёӘnumber ot.push(box[len-1].offsetTop + section[len-1].getBoundingClientRect().height);
дёүгҖҒжңҖеҗҺж•Ҳжһң
е®Ңж•ҙjsд»Јз Ғ
var box = document.getElementsByClassName('box'), //иҺ·еҸ–жүҖжңүйңҖиҰҒеҗёйЎ¶ж•Ҳжһңзҡ„ж Үйўҳ
section = document.getElementsByTagName('section'); //иҺ·еҸ–жүҖжңүеӯҗеҲ—иЎЁ
var ot = [], //еӯҳеӮЁжҜҸдёӘж Үйўҳзҡ„offsetTop
len = box.length; //ж Үйўҳзҡ„дёӘж•°
for(let i=0; i<len; i++) {
ot.push(box[i].offsetTop); //иҺ·еҸ–жҜҸдёӘж Үйўҳзҡ„offsetTop
}
//иҺ·еҸ–жңҖеҗҺдёҖдёӘеӯҗеҲ—иЎЁзҡ„й«ҳеәҰпјҢдёәдәҶи®ҫзҪ®жңҖеҗҺдёҖдёӘеҗёйЎ¶ж Үйўҳзҡ„дҪҚзҪ®
//section[len-1].getBoundingClientRect().height
//жӯӨж–№жі•иҝ”еӣһдёҖдёӘnumber
ot.push(box[len-1].offsetTop + section[len-1].getBoundingClientRect().height);
window.onscroll = function () {
//иҺ·еҸ–ж»ҡеҠЁзҡ„й«ҳеәҰ
var st = document.documentElement.scrollTop || document.body.scrollTop;
for(let i=0; i<len; i++) {
if(st>ot[i] && st<ot[i+1]) { //ж»ҡеҠЁж—¶зӣ‘еҗ¬дҪҚзҪ®пјҢдёәж Үйўҳзҡ„еҗёйЎ¶и®ҫзҪ®дёҖдёӘзҺ°е®һиҢғеӣҙ
box[i].className = 'box box1';
} else {
box[i].className = 'box';
}
}
}д»ҘдёҠжҳҜвҖңjsжҖҺд№Ҳе®һзҺ°еӨҡдёӘж ҮйўҳеҗёйЎ¶ж•ҲжһңвҖқиҝҷзҜҮж–Үз« зҡ„жүҖжңүеҶ…е®№пјҢж„ҹи°ўеҗ„дҪҚзҡ„йҳ…иҜ»пјҒеёҢжңӣеҲҶдә«зҡ„еҶ…е®№еҜ№еӨ§е®¶жңүеё®еҠ©пјҢжӣҙеӨҡзӣёе…ізҹҘиҜҶпјҢж¬ўиҝҺе…іжіЁдәҝйҖҹдә‘иЎҢдёҡиө„и®Ҝйў‘йҒ“пјҒ
е…ҚиҙЈеЈ°жҳҺпјҡжң¬з«ҷеҸ‘еёғзҡ„еҶ…е®№пјҲеӣҫзүҮгҖҒи§Ҷйў‘е’Ңж–Үеӯ—пјүд»ҘеҺҹеҲӣгҖҒиҪ¬иҪҪе’ҢеҲҶдә«дёәдё»пјҢж–Үз« и§ӮзӮ№дёҚд»ЈиЎЁжң¬зҪ‘з«ҷз«ӢеңәпјҢеҰӮжһңж¶үеҸҠдҫөжқғиҜ·иҒ”зі»з«ҷй•ҝйӮ®з®ұпјҡis@yisu.comиҝӣиЎҢдёҫжҠҘпјҢ并жҸҗдҫӣзӣёе…іиҜҒжҚ®пјҢдёҖз»ҸжҹҘе®һпјҢе°Ҷз«ӢеҲ»еҲ йҷӨж¶үе«ҢдҫөжқғеҶ…е®№гҖӮ
жӮЁеҘҪпјҢзҷ»еҪ•еҗҺжүҚиғҪдёӢи®ўеҚ•е“ҰпјҒ