жӮЁеҘҪпјҢзҷ»еҪ•еҗҺжүҚиғҪдёӢи®ўеҚ•е“ҰпјҒ
еҜҶз Ғзҷ»еҪ•
зҷ»еҪ•жіЁеҶҢ
зӮ№еҮ» зҷ»еҪ•жіЁеҶҢ еҚіиЎЁзӨәеҗҢж„ҸгҖҠдәҝйҖҹдә‘з”ЁжҲ·жңҚеҠЎжқЎж¬ҫгҖӢ
иҝҷзҜҮж–Үз« е°ҶдёәеӨ§е®¶иҜҰз»Ҷи®Іи§Јжңүе…іе°ҸзЁӢеәҸеҰӮдҪ•е®һзҺ°жӮ¬жө®жҗңзҙўжЎҶпјҢе°Ҹзј–и§үеҫ—жҢәе®һз”Ёзҡ„пјҢеӣ жӯӨеҲҶдә«з»ҷеӨ§е®¶еҒҡдёӘеҸӮиҖғпјҢеёҢжңӣеӨ§е®¶йҳ…иҜ»е®ҢиҝҷзҜҮж–Үз« еҗҺеҸҜд»ҘжңүжүҖ收иҺ·гҖӮ
е°ҸзЁӢеәҸе®һзҺ°жӮ¬жө®жҗңзҙўжЎҶзҡ„е…·дҪ“д»Јз ҒпјҢе…·дҪ“еҶ…е®№еҰӮдёӢ
жӮ¬жө®жҗңзҙўжЎҶжҳҜеҪ“ж•°жҚ®з•ҢйқўдёҚж–ӯж»ҡеҠЁж—¶пјҢжҗңзҙўжЎҶе§Ӣз»ҲжӮ¬жө®еңЁжңҖдёҠж–№гҖӮжқҘзңӢдёҖдёӢж•Ҳжһңеӣҫ
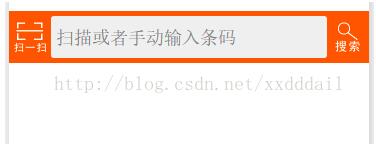
UIд»Јз Ғ
<view class="search-wrapper">
<view class="search-panel">
<view class="search-section">
<view class="search-button-wrapper">
<image class="search-button" src="/images/scan.png" bindtap="scan"></image>
</view>
<view class="search-input-wrapper ">
<input bindinput="bindBarcodeInput" bindconfirm="query" bindfocus="bindBarcodeFocus" bindblur="bindBarcodeBlur" class="search-input" placeholder="жү«жҸҸжҲ–иҖ…жүӢеҠЁиҫ“е…ҘжқЎз Ғ" value="{{barcode}}" confirm-type="search" />
</view>
<view class="search-button-wrapper">
<image class="search-button" src="/images/search.png" bindtap="query"></image>
</view>
</view>
</view>
<view class="search-demo" hidden="{{hiddenDropdown}}">
<button size="mini" bindtap="setDemoData">зӨәдҫӢ</button>
<button size="mini" bindtap="clear" >жё…з©ә</button>
</view>
</view>ж ·ејҸ
.search-wrapper {
position: fixed;/*жӮ¬еҒңжҗңзҙўжЎҶзҡ„е…ій”®ж ·ејҸ*/
top: 0px;
left: 0;
width: 100%;
z-index: 999;
}
.search-panel {
background-color: #f50;
}
.search-section {
padding: 5px 0px;
display: flex;
flex-direction: row;
}
.search-demo {
padding: 5px;
flex-direction: row;
background-color: #eee;
padding-left:42px;
align-items: flex-start;
}
.search-input-wrapper {
flex: 8;
padding: 5px;
background-color: #eee;
border-radius: 3px;
}
.search-input {
padding-top: 5px;
}
.search-clear {
float: right;
width: 32px;
height: 32px;
z-index: 998;
}
.search-button-wrapper {
padding-left: 5px;
padding-right: 5px;
padding-top:5px;
}
.search-button {
flex: 1;
border: none !important;
color: white !important;
width: 32px;
height: 32px;
}JSд»Јз Ғ
//иҺ·еҸ–еә”з”Ёе®һдҫӢ
var app = getApp()
Page({
data: {
barcode: "",
hiddenLoading: true,
hiddenData: true,
hiddenDropdown: true,
hiddenClear:true,
demoData: 'XXXX',
Product: {},
},
bindBarcodeInput: function (e) {
this.setData({
barcode: e.detail.value
})
},
bindBarcodeFocus: function (e) {
this.setData({
hiddenDropdown: false,
hiddenClear:false
})
},
bindBarcodeBlur: function (e) {
this.setData({
hiddenDropdown: true,
hiddenClear:true
})
},
scan: function (e) {
var that = this;
wx.scanCode({
success: function (res) {
that.setData({
barcode: res.result
});
that.query(e);
},
fail: function () {
that.setData({
barcode: "",
hiddenData: true
});
},
complete: function () {
// complete
}
})
},
setDemoData: function (e) {
this.setData({
barcode: this.data.demoData
});
},
clear: function (e) {
this.setData({
barcode: "",
hiddenData: true
});
},
query: function (e) {
var url = "https://www.xxx.com/query";//жҹҘиҜўж•°жҚ®зҡ„URL
var that = this;
if (that.data.barcode == undefined
|| that.data.barcode == null
|| that.data.barcode.length <= 0) {
that.setData({ hiddenData: true });
wx.showToast({
title: 'иҜ·иҫ“е…ҘжқЎз Ғ',
image: '/images/fail.png',
duration: 2000
});
return;
}
wx.request({
url: url,
data: { barcode: that.data.barcode },
method: 'GET',
success: function (res) {
var result = res.data;
if (result.Status != 0) {
that.setData({ hiddenData: true });
wx.showToast({
title: result.Message,
image: '/images/fail.png',
duration: 2000
})
return;
}
that.setData({ Product: result.Data, hiddenData: false });
wx.showToast({
title: "иҺ·еҸ–ж•°жҚ®жҲҗеҠҹ",
image: '/images/ok.png',
duration: 2000
})
},
fail: function (e) {
var toastText = 'иҺ·еҸ–ж•°жҚ®еӨұиҙҘ' + JSON.stringify(e);
that.setData({
hiddenLoading: !that.data.hiddenLoading,
hiddenData: true
});
wx.showToast({
title: toastText,
icon: '',
duration: 2000
})
},
complete: function () {
// complete
}
})
}
})з”ЁеҲ°зҡ„еҮ дёӘеӣҫзүҮ


е…ідәҺвҖңе°ҸзЁӢеәҸеҰӮдҪ•е®һзҺ°жӮ¬жө®жҗңзҙўжЎҶвҖқиҝҷзҜҮж–Үз« е°ұеҲҶдә«еҲ°иҝҷйҮҢдәҶпјҢеёҢжңӣд»ҘдёҠеҶ…е®№еҸҜд»ҘеҜ№еӨ§е®¶жңүдёҖе®ҡзҡ„её®еҠ©пјҢдҪҝеҗ„дҪҚеҸҜд»ҘеӯҰеҲ°жӣҙеӨҡзҹҘиҜҶпјҢеҰӮжһңи§үеҫ—ж–Үз« дёҚй”ҷпјҢиҜ·жҠҠе®ғеҲҶдә«еҮәеҺ»и®©жӣҙеӨҡзҡ„дәәзңӢеҲ°гҖӮ
е…ҚиҙЈеЈ°жҳҺпјҡжң¬з«ҷеҸ‘еёғзҡ„еҶ…е®№пјҲеӣҫзүҮгҖҒи§Ҷйў‘е’Ңж–Үеӯ—пјүд»ҘеҺҹеҲӣгҖҒиҪ¬иҪҪе’ҢеҲҶдә«дёәдё»пјҢж–Үз« и§ӮзӮ№дёҚд»ЈиЎЁжң¬зҪ‘з«ҷз«ӢеңәпјҢеҰӮжһңж¶үеҸҠдҫөжқғиҜ·иҒ”зі»з«ҷй•ҝйӮ®з®ұпјҡis@yisu.comиҝӣиЎҢдёҫжҠҘпјҢ并жҸҗдҫӣзӣёе…іиҜҒжҚ®пјҢдёҖз»ҸжҹҘе®һпјҢе°Ҷз«ӢеҲ»еҲ йҷӨж¶үе«ҢдҫөжқғеҶ…е®№гҖӮ
жӮЁеҘҪпјҢзҷ»еҪ•еҗҺжүҚиғҪдёӢи®ўеҚ•е“ҰпјҒ