您好,登录后才能下订单哦!
密码登录
登录注册
点击 登录注册 即表示同意《亿速云用户服务条款》
这篇“VSCode下如何配置python调试运行环境”文章,文中示例代码介绍的非常详细,具有一定的参考价值,感兴趣的小伙伴们一定要参考一下,对于“VSCode下如何配置python调试运行环境”,小编整理了以下知识点,请大家跟着小编的步伐一步一步的慢慢理解,接下来就让我们进入主题吧。
Visual Studio Code 是一个运行于 OS X,Windows和 Linux 之上的,针对于编写现代 web 和云应用的跨平台编辑器,它为开发者们提供了对多种编程语言的内置支持,并且正如 Microsoft 在Build 大会的 keynote 中所指出的,这款编辑器也会为这些语言都提供了丰富的代码补全和导航功能。
VSCode配置python调试环境
很久之前的一个东东,翻出来看看
VSCode配置python调试环境
* 1.下载python解释器
* 2.在VSCode市场中安装Python插件
* 4.在用户设置里加两条
* 5.接下来是正式的调试了
Input
Output
Input示例
Output示例
1080 两个数的平方和
1.下载python解释器
python 3.6.3 for windows
安装到系统某个路径例如C:\Python36
最好添加到Path,也可以不加
2.在VSCode市场中安装Python插件
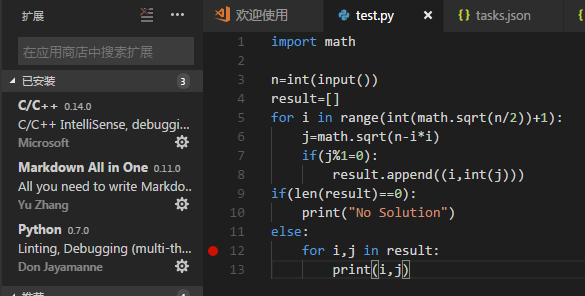
3.同样是打开一个文件夹,新建一个.py文件(这样容易识别项目,vscode就需要新建一个文件夹)
4.同样是launch.json文件和tasks.json文件
launch.josn
{
 // 使用 IntelliSense 了解相关属性。
 // 悬停以查看现有属性的描述。
 // 欲了解更多信息,请访问: https://go.microsoft.com/fwlink/?linkid=830387
 "version": "0.2.0",
 "configurations": [
  {
   "name": "Python",
   "type": "python",
   "request": "launch",
   "stopOnEntry": false,//是否在第一条语句时程序停止,下面的这个选项都一样
   "pythonPath": "C:/Python34/python",//可执行文件路径
   "program": "${file}",
   "cwd": "${workspaceRoot}",
   "env": {},
   "envFile": "${workspaceRoot}/.env",
   "debugOptions": [
    "WaitOnAbnormalExit",
    "WaitOnNormalExit",
    "RedirectOutput"
   ]
  },
  {
   "name": "PySpark",
   "type": "python",
   "request": "launch",
   "stopOnEntry": true,
   "osx": {
    "pythonPath": "${env:SPARK_HOME}/bin/spark-submit"
   },
   "windows": {
    "pythonPath": "${env:SPARK_HOME}/bin/spark-submit.cmd"
   },
   "linux": {
    "pythonPath": "${env:SPARK_HOME}/bin/spark-submit"
   },
   "program": "${file}",
   "cwd": "${workspaceRoot}",
   "env": {},
   "envFile": "${workspaceRoot}/.env",
   "debugOptions": [
    "WaitOnAbnormalExit",
    "WaitOnNormalExit",
    "RedirectOutput"
   ]
  },
  {
   "name": "Python Module",
   "type": "python",
   "request": "launch",
   "stopOnEntry": false,
   "pythonPath": "${config:python.pythonPath}",
   "module": "module.name",
   "cwd": "${workspaceRoot}",
   "env": {},
   "envFile": "${workspaceRoot}/.env",
   "debugOptions": [
    "WaitOnAbnormalExit",
    "WaitOnNormalExit",
    "RedirectOutput"
   ]
  },
  {
   "name": "Integrated Terminal/Console",
   "type": "python",
   "request": "launch",
   "stopOnEntry": false,
   "pythonPath": "${config:python.pythonPath}",
   "program": "${file}",
   "cwd": "",
   "console": "integratedTerminal",
   "env": {},
   "envFile": "${workspaceRoot}/.env",
   "debugOptions": [
    "WaitOnAbnormalExit",
    "WaitOnNormalExit"
   ]
  },
  {
   "name": "External Terminal/Console",
   "type": "python",
   "request": "launch",
   "stopOnEntry": false,
   "pythonPath": "${config:python.pythonPath}",
   "program": "${file}",
   "cwd": "",
   "console": "externalTerminal",
   "env": {},
   "envFile": "${workspaceRoot}/.env",
   "debugOptions": [
    "WaitOnAbnormalExit",
    "WaitOnNormalExit"
   ]
  },
  {
   "name": "Django",
   "type": "python",
   "request": "launch",
   "stopOnEntry": false,
   "pythonPath": "${config:python.pythonPath}",
   "program": "${workspaceRoot}/manage.py",
   "cwd": "${workspaceRoot}",
   "args": [
    "runserver",
    "--noreload",
    "--nothreading"
   ],
   "env": {},
   "envFile": "${workspaceRoot}/.env",
   "debugOptions": [
    "WaitOnAbnormalExit",
    "WaitOnNormalExit",
    "RedirectOutput",
    "DjangoDebugging"
   ]
  },
  {
   "name": "Flask",
   "type": "python",
   "request": "launch",
   "stopOnEntry": false,
   "pythonPath": "${config:python.pythonPath}",
   "program": "fully qualified path fo 'flask' executable. Generally located along with python interpreter",
   "cwd": "${workspaceRoot}",
   "env": {
    "FLASK_APP": "${workspaceRoot}/quickstart/app.py"
   },
   "args": [
    "run",
    "--no-debugger",
    "--no-reload"
   ],
   "envFile": "${workspaceRoot}/.env",
   "debugOptions": [
    "WaitOnAbnormalExit",
    "WaitOnNormalExit",
    "RedirectOutput"
   ]
  },
  {
   "name": "Flask (old)",
   "type": "python",
   "request": "launch",
   "stopOnEntry": false,
   "pythonPath": "${config:python.pythonPath}",
   "program": "${workspaceRoot}/run.py",
   "cwd": "${workspaceRoot}",
   "args": [],
   "env": {},
   "envFile": "${workspaceRoot}/.env",
   "debugOptions": [
    "WaitOnAbnormalExit",
    "WaitOnNormalExit",
    "RedirectOutput"
   ]
  },
  {
   "name": "Pyramid",
   "type": "python",
   "request": "launch",
   "stopOnEntry": true,
   "pythonPath": "${config:python.pythonPath}",
   "cwd": "${workspaceRoot}",
   "env": {},
   "envFile": "${workspaceRoot}/.env",
   "args": [
    "${workspaceRoot}/development.ini"
   ],
   "debugOptions": [
    "WaitOnAbnormalExit",
    "WaitOnNormalExit",
    "RedirectOutput",
    "Pyramid"
   ]
  },
  {
   "name": "Watson",
   "type": "python",
   "request": "launch",
   "stopOnEntry": true,
   "pythonPath": "${config:python.pythonPath}",
   "program": "${workspaceRoot}/console.py",
   "cwd": "${workspaceRoot}",
   "args": [
    "dev",
    "runserver",
    "--noreload=True"
   ],
   "env": {},
   "envFile": "${workspaceRoot}/.env",
   "debugOptions": [
    "WaitOnAbnormalExit",
    "WaitOnNormalExit",
    "RedirectOutput"
   ]
  },
  {
   "name": "Attach (Remote Debug)",
   "type": "python",
   "request": "attach",
   "localRoot": "${workspaceRoot}",
   "remoteRoot": "${workspaceRoot}",
   "port": 3000,
   "secret": "my_secret",
   "host": "localhost"
  }
 ]
}
tasks.json
 {
  // See https://go.microsoft.com/fwlink/?LinkId=733558
  // for the documentation about the tasks.json format
  "version": "2.0.0",
  "tasks": [
   {
    "taskName": "echo",
    "type": "shell",
    "command": "C:\\Python34\\python",//Python可执行文件路径
    "args": ["${file}"]
   }
  ]
 }
4.在用户设置里加两条
settings.json
 "python.pythonPath": "C:\\Python34\\python" ,//路径
 "python.linting.enabled": false,//忘了是什么东西了,反正有用
Linting (Prospector, Pylint, pycodestyle, Flake8, pylama, pydocstyle, mypy with config files and plugin
静态代码扫描(可以理解为代码语法和格式错误提示,支持多种linter)
5.接下来是正式的调试了

默认是Python选项
按\(<F5>\)启动调试
然后在
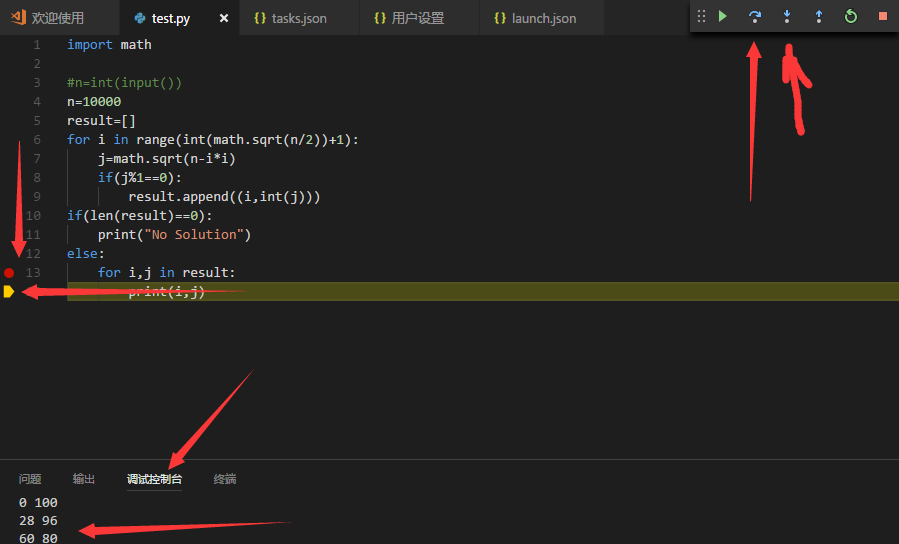
中有一些东西就是这样
但是这个默认的\(python\)选项并不能由用户输入
所以有
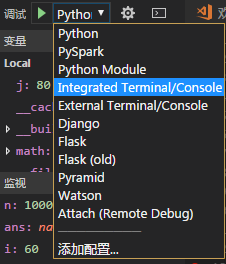
这个和下面的那个都可以
这个Intergrated……的选项是下图的东东

其实这个可以直接
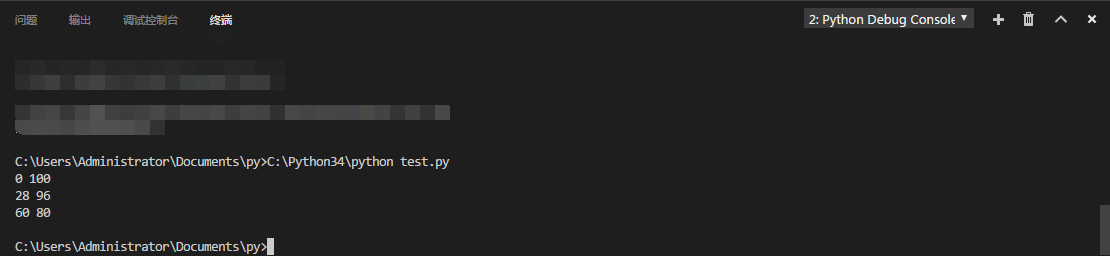
直接当成cmd来用同样可以由用户输入
然后那个External……的选项只不过是开了一个控制台窗口
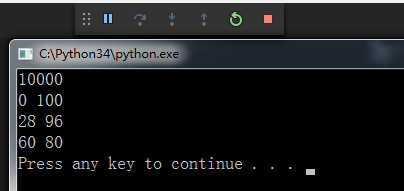
2333……
剩下的可以自己试试
说不定有惊喜
翻出很久之前做的一道题目
用py3写的
刚刚一直在用的test.py就是用的这道题的代码
1080 两个数的平方和
基准时间限制:1 秒 空间限制:131072 KB 分值: 5
给出一个整数N,将N表示为2个整数i j的平方和(i <= j),如果有多种表示,按照i的递增序输出。
例如:
(注:3 11同11 3算1种)
Input
一个数N()
Output
共K行:每行2个数,i j,表示。
如果无法分解为2个数的平方和,则输出
Input示例
130
Output示例
3 11
7 9
以上是“VSCode下如何配置python调试运行环境”这篇文章的所有内容,感谢各位的阅读!相信大家都有了一定的了解,希望分享的内容对大家有所帮助,如果还想学习更多知识,欢迎关注亿速云行业资讯频道!
免责声明:本站发布的内容(图片、视频和文字)以原创、转载和分享为主,文章观点不代表本网站立场,如果涉及侵权请联系站长邮箱:is@yisu.com进行举报,并提供相关证据,一经查实,将立刻删除涉嫌侵权内容。